background image

6

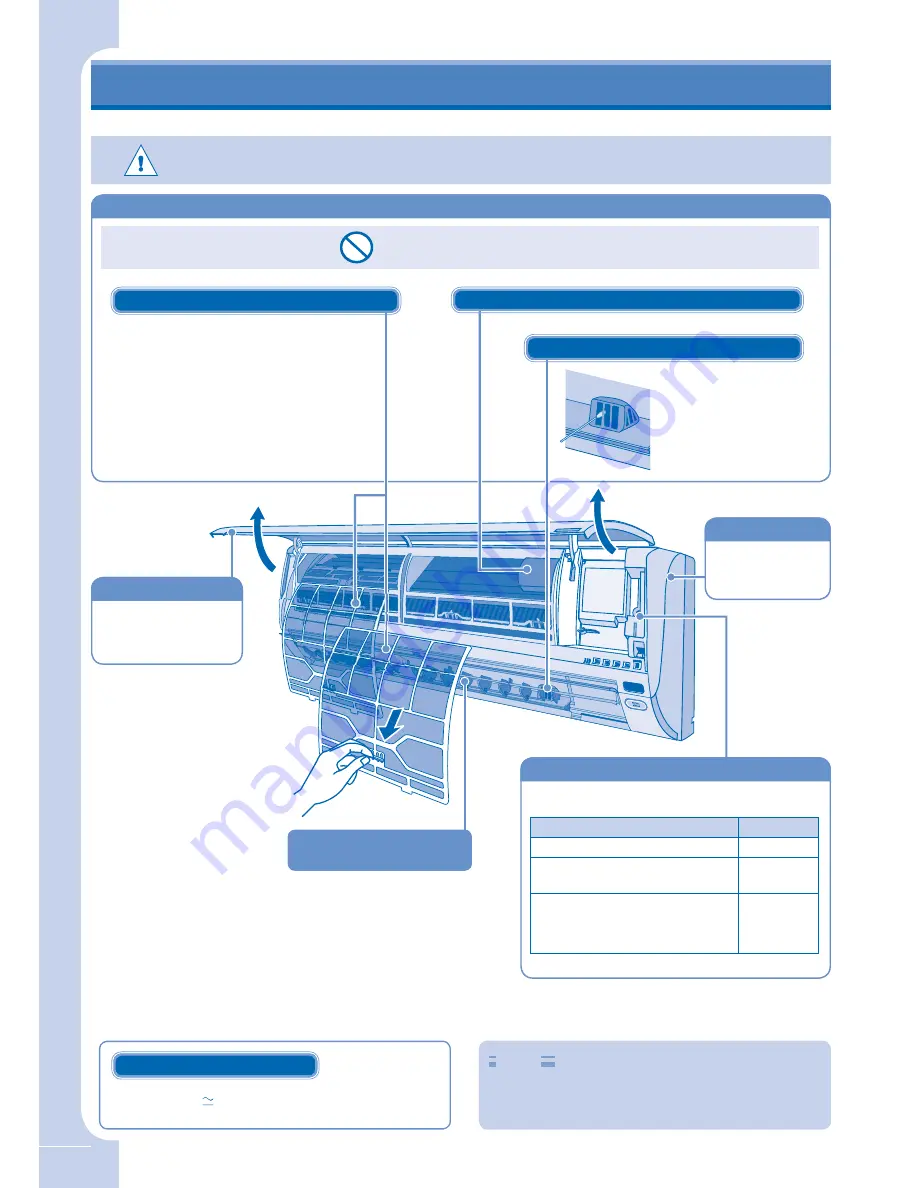
Raise and pull to 

remove. Wash gently 

and dry.

FRONT PANEL

FRONT PANEL

FRONT PANEL

FRONT PANEL

Remove

Remove

Wipe the unit 

gently with a 

soft, dry cloth.

INDOOR UNIT

INDOOR UNIT

INDOOR UNIT

INDOOR UNIT

e-ion AIR PURIFYING SYSTEM

e-ion AIR PURIFYING SYSTEM

e-ion AIR PURIFYING SYSTEM

e-ion AIR PURIFYING SYSTEM


Do not touch during operation

•   Do not use benzene, thinner or scouring powder.
•   Use only soap (  pH7) or neutral household detergent.
•   Do not use water hotter than 40°C.

WASHING INSTRUCTIONS

Hints

  Clean the 

fi

 lter regularly for best performance and to reduce 

power consumption.

  Please consult your nearest dealer for seasonal inspection.

To operate the air-conditioner when the remote 
control is misplaced or malfunctioned.

Action

Mode

Press once.

Automatic

Press and hold until you hear one beep, 
then release.

Cooling

Press and hold until you hear one beep 
then release.
Press and hold until you hear two beeps 
then release.

Heating

•  To turn off, press the AUTO OFF/ON button again.

CARE & CLEANING

AUTO OFF/ON BUTTON

AUTO OFF/ON BUTTON

AUTO OFF/ON BUTTON

AUTO OFF/ON BUTTON

AIRFLOW DIRECTION 

AIRFLOW DIRECTION 

LOUVER

LOUVER

AIRFLOW DIRECTION 

AIRFLOW DIRECTION 

LOUVER

LOUVER

Switch off the power supply before cleaning

ACTIVE e-ion POWER MODULE

• Clean the 

fi

 lters regularly.

• Wash/rinse the 

fi

 lters gently with water to avoid 

damage to the 

fi

 lter surface.

• Dry the 

fi

 lters thoroughly under the shade, away 

from 

fi

 re or direct sunlight.

•  Replace any damage 

fi

 lter.

Part no.: CWD00K1001 (Left and Right)

e-ion FILTERS

Clean with dry cotton 

bud.

•   Active e-ion 

generator cleaning is 
recommended every 6 
months.

ACTIVE e-ion GENERATOR

Summary of Contents for CS-E12GKEW

Page 1: ...to e D esl igu e a un ida de εκι νή στε στ αμ ατή στε τη λει του ργ ία ura επ ιθυ μη τή σία Se lec t fan sp eed Se lec cio ne la vel oc ida d de l ven tila do r Se lec cio ne a vel oc ida de da ven tila do r Επ ιλο γή ταχ ύτη τας ανε μισ τήρ α Ad jus t the air flo w dir ect ion lou ver Aju ste la pe rsi an a de dir ecc ión de l flu jo de air e Aju ste a pla ca de dir ecç ão do flu xo de ar Ρυ θμί ...

Page 2: ...allation will cause leakage electric shock or fire Please consult an authorized dealer or specialist for the installation work During Operation Do not insert your fingers or other objects into the indoor or outdoor unit Do not attempt to repair the unit by yourself Indoor Unit During Installation Do not install the unit in a potentially explosive atmosphere Ensure that the drainage pipe is connect...

Page 3: ...t facility for re use recycling and recovery and should not be disposed of in the municipal waste stream Please contact your installer dealer or local authority for more information Penalties may also be applicable for incorrect disposal of waste products in accordance with national legislation subject to the national law of each member state Information on Disposal in other countries outside the ...

Page 4: ...ODE OPERATION MODE OPERATION MODE OPERATION AUTO HEAT DRY COOL INDICATOR INDICATOR INDICATOR INDICATOR Unit selects the operation mode according to temperature setting outdoor and room temperature Operation mode is reselected every 30 minutes During operation mode selection the power indicator blinks Notes Press RESET button to restore the remote control s default setting For normal operation the ...

Page 5: ...ion will stop automatically Select ON or OFF timer Set the desired time Confirm the setting Hints Temperature setting of 1 C higher in cool mode or 2 C lower in heat mode than the desired temperature performs a 10 power saving To reduce power consumption during cool mode close the curtains to prevent the sunlight and heat from coming in To disable the PATROL operation during unit start with press ...

Page 6: ...d or malfunctioned Action Mode Press once Automatic Press and hold until you hear one beep then release Cooling Press and hold until you hear one beep then release Press and hold until you hear two beeps then release Heating To turn off press the AUTO OFF ON button again CARE CLEANING AUTO OFF ON BUTTON AUTO OFF ON BUTTON AUTO OFF ON BUTTON AUTO OFF ON BUTTON AIRFLOW DIRECTION AIRFLOW DIRECTION LO...

Page 7: ...ITERIAS TROUBLESHOOTING Activate heat mode for 2 3 hours to thoroughly dry the unit Turn off the power supply Remove the remote control batteries FOR EXTENDED NON USE Checking of remote control batteries No obstruction at air inlet and air outlet vents After 15 minutes of operation it is normal to have the following temperature difference between air inlet and air outlet vents Cooling 8 C Heating ...

Page 8: ...nstalación Durante el funcionamiento No introduzca los dedos ni ningún otro objeto en la unidad interior o exterior No intente reparar la unidad usted mismo Unidad Interior Durante la instalación No instale la unidad en una atmósfera potencialmente explosiva Verifique que los tubos de drenaje estén conectados adecuadamente De lo contrario podrían producirse pérdidas de agua Durante el funcionamien...

Page 9: ...e la Comunidad Europea cuentan con un sistema dedicado a la recolección de este tipo de productos No intente desmontar el sistema por sus propios medios ya que podría tener efectos nocivos sobre su salud y dañar el entorno por la manipulación incorrecta de desechos La extracción y desechado del refrigerante el aceite y otras piezas debe ser llevado a cabo por un instalador cualificado y siempre si...

Page 10: ...tro de la temperatura recomendada podría resultar en el ahorro de energía MODO CALOR 20 C 24 C MODO FRÍO 26 C 28 C MODO DESHUMIDIFICACIÓN 1 C 2 C menos que la temperatura ambiente MODO DESHUMIDIFICACIÓN PARA DESHUMIDIFICAR EL AMBIENTE Seleccionar Conectar Ajuste de temperatura Ajuste la hora Confirmar Pulse PREPARACIÓN DEL MANDO A PREPARACIÓN DEL MANDO A DISTANCIA DISTANCIA PREPARACIÓN DEL MANDO A...

Page 11: ...e 5 segundos y luego suéltelo Para ajustar el formato de hora en 12 am pm o 24 horas pulse y mantenga presionado el botón durante aproximadamente 5 segundos Para reducir la intensidad de la pantalla en el acondicionador de aire Pulse y mantenga presionado el botón durante 5 segundos Para reiniciar vuelva a pulsar el botón durante 5 segundos Para cambiar el ajuste de temperatura a C o F pulsar y ma...

Page 12: ...ulsar y mantener presionado hasta que suene un pitido después soltar Enfriamiento Pulsar y mantener presionado hasta que suene un pitido después soltar Pulsar y mantener presionado hasta que suenen dos pitidos después soltar Calentamiento Para apagar OFF volver a pulsar el botón de encendido apagado automático AUTO OFF ON CUIDADO Y LIMPIEZA BOTÓN DE ENCENDIDO APAGADO BOTÓN DE ENCENDIDO APAGADO AUT...

Page 13: ... no funcionan correctamente NO UTILICE LA UNIDAD SI LOCALIZACIÓN DE AVERÍAS Active el modo de calentamiento durante 2 a 3 horas para secar bien la unidad Apague la unidad Extraiga las pilas del mando a distancia SI NO SE VA A UTILIZAR LA UNIDAD DURANTE UN PERIODO PROLONGADO DE TIEMPO Verifique las pilas del mando a distancia Compruebe que las tomas de entrada y salida de las rejillas de ventilació...

Page 14: ...sired temperature Sélectionnez la température souhaitée Seleccione la temperature deseada Select fan speed Permet de sélectionner la vitesse du ventilateur Seleccione la velocidad del ventilador Adjust the airflow direction louver Permet d ajuster la claire voie d orientation du flux d air Ajuste la persiana de dirección del flujo de aire 4 4 4 5 5 5 QUICK GUIDE GUIDE RAPIDE GUÍA RÁPIDA For detail...

Reviews: