23
Insulated tubes
Drain hose
Clamp
Hi
Lo
Indoor unit
Outdoor unit
Manifold valve
(Exclusively for R410A)
Pressure
gauge
Vacuum pump
Charging hose
(Exclusively for R410A)
Vacuum pump adapter
(Exclusively for R410A)
(with reverse flow prevention)
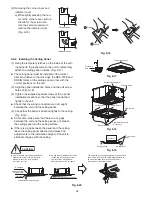
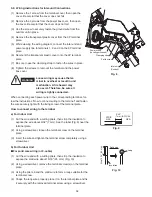
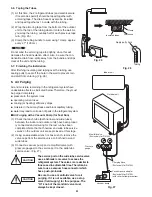
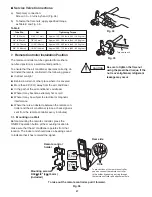
(1) At this time, the 2 refrigerant tubes (and electrical wire
if local codes permit) should be taped together with
armoring tape. The drain hose may also be included
and taped together as 1 bundle with the tubing.
(2) Wrap the armoring tape from the bottom of the outdoor
unit to the top of the tubing where it enters the wall. As
you wrap the tubing, overlap half of each previous tape
turn. (Fig. 25)
(3) Clamp the tubing bundle to wall, using 1 clamp approx.
every 47" (120 cm).
Do not wind the armoring tape too tightly, since this will
decrease the heat insulation effect. Also, be sure the con-
densation drain hose splits away from the bundle and drips
clear of the unit and the tubing.
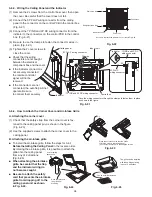
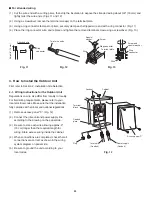
5-7. Finishing the Installation
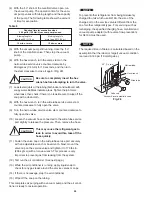
After finishing insulating and taping over the tubing, use
sealing putty to seal off the hole in the wall to prevent rain
and draft from entering. (Fig. 26)
NOTE
5-6. Taping the Tubes
Fig. 25
6. Air Purging
Air and moisture remaining in the refrigerant system have
undesirable effects as indicated below. Therefore, they must
be purged completely.
pressure in the system rises
operating current rises
cooling (or heating) efficiency drops
moisture in the air may freeze and block capillary tubing
water may lead to corrosion of parts in the refrigerant system
Air Purging with a Vacuum Pump (for Test Run)
(1) Check that each tube (both narrow and wide tubes)
between the indoor and outdoor units have been proper-
ly connected and all wiring for the test run has been
completed. Note that both narrow and wide tube service
valves on the outdoor unit are kept closed at this stage.
(2) Using an adjustable wrench or box wrench, remove the
valve caps from the service valve on both narrow and
wide tubes.
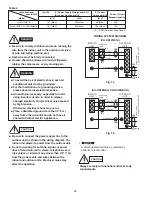
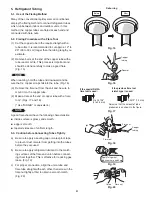
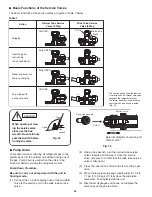
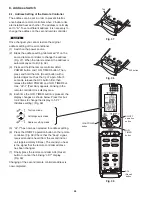
(3) Connect a vacuum pump and a manifold valve (with
pressure gauges) to the service port on the wide tube
service valve. (Fig. 27)
CAUTION
CAUTION
Be sure to use a manifold valve for air
purging. If it is not available, use a stop
valve (field supply) for this purpose. The
“Hi” knob of the manifold valve must
always be kept closed.
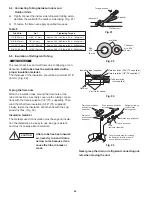
The service port on the wide tube service valve
uses a Schrader core valve to access the
refrigerant system. The valve core is similar to
those used in automobile tires. Therefore, be
sure to use a vacuum hose connector which
has a push-pin inside.
Fig. 27
Fig. 26
Apply putty here
Tubing
Summary of Contents for CS-KS12NB41
Page 37: ...Outdoor Unit CU KS12NK1A 8FA2 5251 12300 2 37 ...
Page 69: ......
Page 117: ......
Page 118: ...Operating Instructions CZ RD515U 852 6 4181 230 00 1 APPENDIX C A 3 ...
Page 129: ......
Page 130: ...A 4 INSTALLATION INSTRUCTIONS CZ RD515U 852 6 4190 592 00 0 APPENDIX D ...
Page 135: ......
Page 136: ...DC1111 0 ...


