background image

14

Air filter

The air filter collects dust and other particles from the air and should 
be cleaned once every 6 months.
If the filter gets blocked, the efficiency of the air conditioner drops 
greatly.

The frequency with which the filter should be cleaned depends on 
the environment in which the unit is used.

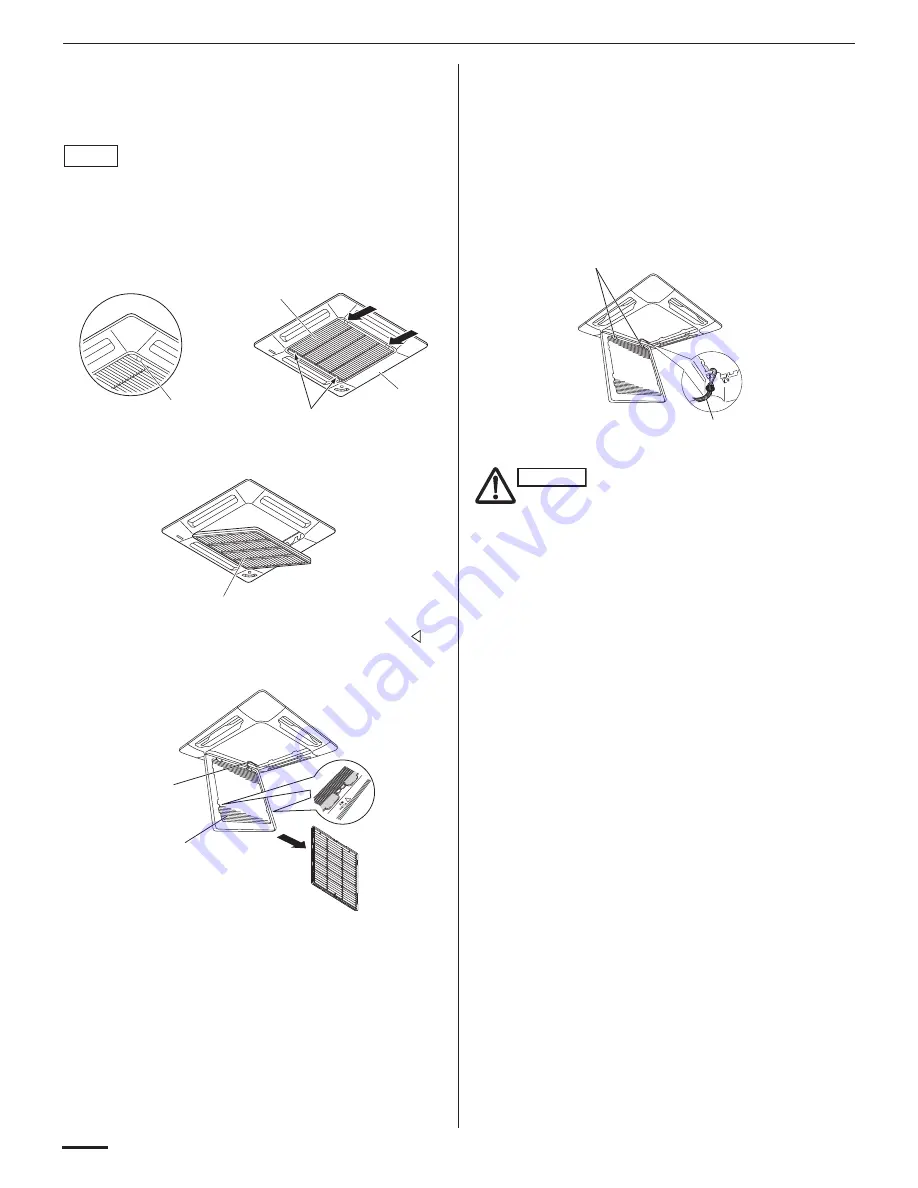
How to remove the filter
1.

Slide the two latches of the air intake grille with your thumbs in the 
direction of the arrow to open the grille.

2.

Open the air intake grille downward.

3.

Press the tabs on both sides of the air filter (indicated with   
marks on the grill) to release the filter, and then, lift and pull the 
filter up and out using the tabs to remove it.

4.

Use a vacuum cleaner to remove light dust. If there is sticky dust 
on the filter, wash the filter in lukewarm, soapy water, rinse it in 
clean water, and dry it.

5.

Insert the filter correctly again inside the grille, close the grille 
letting the latches slide towards the outside and fix again the 
latch.

How to remove the air intake grille
1.

Open the air intake grille.

2.

Detach the safety cord from the frame (remember to attach it 
again after cleaning or maintenance).

3.

Hold on the air intake grille and pull it towards you to detach the 
two air intake grille hinges.

4.

Clean the grille gently using a soft sponge, or the like. Then dry it 
with care.
Neutral detergent may be used to remove stubborn dirt. Then 
rinse thoroughly with water and dry it.

Care: After a prolonged idle period

Check the indoor and outdoor unit air intakes and outlets for 
blockage; if there is a blockage, remove it.

Care: Before a prolonged idle period

• Operate the fan for half a day to dry out the inside.
• Disconnect the power supply and also turn off the circuit breaker.
• Clean the air filter and replace it in its original position.
• Outdoor unit internal components must be checked and cleaned 

periodically.
Contact your local dealer for this service.

NOTE

Latch

Air intake grille hinge

Ceiling 
panel

Air intake 
grille

Air intake grille

Safety cord

Air filter

• When cleaning the air filter, never 

remove the safety cord. If it is 
necessary to remove it for servicing 
and maintenance inside, be sure to 
reinstall the safety cord securely (hook 
on the grille side) after the work.

• When the air intake grille has been 

opened, rotating parts (such as the 
fan), electrically charged areas, etc. will 
be exposed in the unit’s opening. Bear 
in mind the dangers that these parts 
and areas pose, and proceed with the 
work carefully.

• Periodically check the outdoor unit to 

see if the air outlet or air intake is 
clogged with dirt or soot.

Air intake grille hinge

Safety cord

CAUTION

Summary of Contents for CS-KS12NB41

Page 1: ...Operating Instructions APPENDIX A 852 6 4181 211 00 1 CS KS12NB41 CZ 18BT1U CU KS12NK1A CS KS18NB4UW CZ 18BT1U CU KS18NKU CS KS18NB4UW CZ 18BT1U CU KS18NKUA A 1 ...

Page 2: ...ing the unit read these operating instructions thoroughly and keep them for future reference CV6233187622 This air conditioner uses the refrigerant R410A Ceiling Panel CZ 18BT1U Multiple use is applied for the model CS KS18NB4UW only Single use means that only one indoor unit is connected with one outdoor unit in a one unit to one unit configuration Multiple use i e Flexi Multi system means that t...

Page 3: ...rates at maximum output for 30 minutes regardless of the desired temperature The fan speed is 1 step above High CONTENTS Page FEATURES 2 PRODUCT INFORMATION 2 SAFETY PRECAUTIONS 2 INSTALLATION LOCATION 3 ELECTRICAL REQUIREMENTS 3 SAFETY INSTRUCTIONS 3 NAMES OF PARTS 4 USING THE REMOTE CONTROLLER 8 OPERATION WITH THE REMOTE CONTROLLER 9 1 Operation 9 2 Adjusting the Fan Speed 9 3 Fan Only 9 4 Night...

Page 4: ... outdoor units by users Engage authorized dealer or specialist for cleaning In case of malfunction of this appliance do not repair by yourself Contact to the sales dealer or service dealer for a repair Refrigerant gas leakage may cause fire For safety be sure to turn the air conditioner off and also to disconnect the power before cleaning Pull off the power plug from a receptacle or switch off the...

Page 5: ...ure fan speed timer setting and air sweeping Refrigerant Tubes The indoor and outdoor units are connected by copper tubes through which refrigerant gas flows Drain Hose Moisture in the room condenses and drains off through this hose Outdoor Condensing Unit The outdoor unit contains the compressor fan motor heat exchanger coil and other electrical components INDOOR UNIT Air Intakes Remote Controlle...

Page 6: ...ogram Timer ON Timer OFF Timer 1 hour OFF Timer 5 NIGHT SETBACK 6 Confirmation of transmission 7 Auto flap indication Flap angle indication Sweep indication 8 High power operation Displayed when setting timer Displayed when transmitting data Displayed when indoor unit sensor is in use Displayed when setting temperature Displayed when temperature is shown Displayed when the time display is set to 1...

Page 7: ...small tipped object such as a ballpoint pen the mark will appear at the display And the room temperature is detected by the sensor which is built into the indoor unit and the air conditioner is controlled accordingly If the remote controller is located near a heat source such as a space heater or in direct sunlight press the SENSOR button to switch to the sensor on the indoor unit NOTE ADDRESS swi...

Page 8: ...n For details see 4 Night Setback Mode When you press this button in the DRY or COOL mode the mark appears in the display and the remote controller will automatically adjust the set temperature to save energy Time display selector button This switches the time display between 24 hour time and 12 hour time The illustration above pictures the remote controller after the cover has been opened The rem...

Page 9: ...and during air conditioner operation the transmitter on the remote controller should be pointed towards the receiver on the indoor unit Make sure that there are no objects between the remote controller and receiver which could block the signal The batteries last about six months depending on how much you use the remote controller Replace the batteries when the remote controller s display fails to ...

Page 10: ...AN SPEED selector button to the setting you want STEP 5 Press the FLAP button and set the airflow direction as desired Refer to ADJUSTING THE AIRFLOW DIRECTION on page 12 To stop the air conditioner press the ON OFF operation button again Choose the best position in the room for the remote controller which also acts as the sensor for room comfort and transmits the operating instructions Once you v...

Page 11: ...oor unit being protected from ice or frost when combined with the outdoor unit for Low Ambient Cooling models In the event of power failure the unit will stop When the power is resumed the unit will restart automatically in approximately 5 minutes by the remote controller Clicking sound is heard from the air conditioner In cooling operation any plastic parts may shrink due to a sudden temperature ...

Page 12: ...Press the CLOCK button once if the time indicator is not flashing The time indication alone flashes 2 Press the Advance Return button until PM 10 30 is displayed The time can be set in 1 minute increments Holding down the button advances the time rapidly in 10 minute increments 3 Press the CLOCK button again This completes the setting of the current time Operation Indication 1 Press the OFF TIME s...

Page 13: ...let direct sunlight into the room Use sunshades blinds or curtains If the walls and ceiling of the room are warmed by the sun it will take longer to cool the room Do Always try to keep the air filter clean Refer to CARE AND CLEANING A clogged filter will impair the performance of the unit To prevent conditioned air from escaping keep windows doors and any other openings closed ADJUSTING THE AIRFLO...

Page 14: ...ing a footstool or the like be careful not to let it tip over Cleaning the main unit and Remote Controller Wipe clean using a soft dry cloth To remove stubborn dirt moisten a cloth in warm water no hotter than 104 F wring thoroughly and then wipe INDOOR UNIT OPERATION button OPERATION lamp Cooling operation Stop NOTE Cleaning and maintenance operations must be carried out by specially trained pers...

Page 15: ... the two air intake grille hinges 4 Clean the grille gently using a soft sponge or the like Then dry it with care Neutral detergent may be used to remove stubborn dirt Then rinse thoroughly with water and dry it Care After a prolonged idle period Check the indoor and outdoor unit air intakes and outlets for blockage if there is a blockage remove it Care Before a prolonged idle period Operate the f...

Page 16: ... Outdoor Unit Remove obstruction Poor cooling performance 1 Dirty or clogged air filter 1 Clean air filter to improve airflow 2 Heat source or many people in room 2 Eliminate heat source if possible 3 Doors and or windows are open 3 Shut them to keep the heat out 4 Obstacle near air intake or air discharge port 4 Remove it to ensure good airflow 5 Thermostat is set too high for cooling 5 Set the t...

Page 17: ...ration Outdoor Hi Indoor H M L Outdoor Hi Indoor H M L Heating Operation dB A dB A Indoor Unit CS KS12NB41 34 32 31 11 5 32 22 5 8 22 5 8 283 575 575 35 3 16 0 Indoor Unit CS KS18NB4UW 44 40 36 11 5 32 22 5 8 22 5 8 283 575 575 35 3 16 0 Outdoor Unit CU KS12NK1A 47 21 9 16 28 11 32 10 7 16 548 720 265 75 0 34 0 Outdoor Unit CU KS18NKU CU KS18NKUA 51 26 3 8 34 21 32 11 7 32 670 880 285 90 4 41 0 Mo...

Page 18: ... 575 35 3 16 0 Model No Outdoor Unit CU 4KS24NBU CU 3KS19NBU Single phase 208 230 V 60 Hz Heating Capacity Operation Sound Unit Dimensions H W D Net Weight Power Source Cooling Capacity kW BTU h kW BTU h inch mm lbs kg Cooling Operation Hi Heating Operation Hi dB A dB A 50 18 800 9 800 18 800 5 50 2 90 5 50 29 1 8 35 7 16 12 19 32 740 900 320 138 9 63 0 50 25 400 9 800 25 400 7 50 2 90 7 50 29 1 8...

Reviews: