background image

16

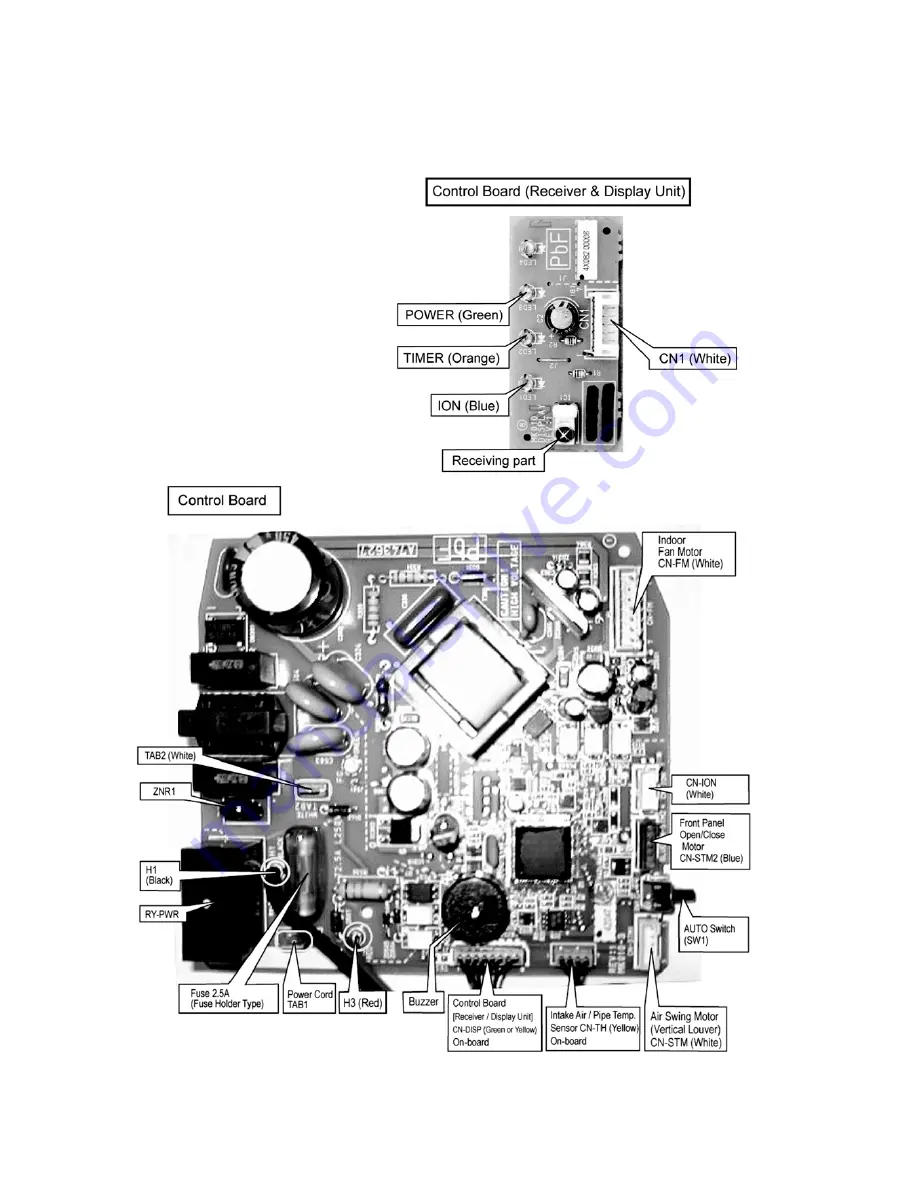
10 Printed Circuit Board

10.1. Indoor Unit

10.1.1.

Printed Circuit Board

Summary of Contents for CS-TE15HKE

Page 1: ...Overview 7 5 Dimensions 8 5 1 Indoor Unit 8 5 2 Outdoor Unit 9 6 Refrigeration Cycle Diagram 10 7 Block Diagram 11 8 Wiring Connection Diagram 12 8 1 Indoor Unit 12 8 2 Outdoor Unit 13 9 Electronic C...

Page 2: ...e to properties This symbol denotes item that is PROHIBITTED from doing 1 Engage dealer or specialist for installation and servicing If installation or servicing done by the user is defective it will...

Page 3: ...mentioned in installation instructions If drainage is not perfect water may enter the room and damage the furniture 3 Tighten the flare nut with torque wrench according to specified method If the flar...

Page 4: ...min Cooling 6 2 219 Heating 8 5 300 Me m3 min ft3 min Cooling 8 1 286 Heating 10 0 353 Hi m3 min ft3 min Cooling 10 2 360 Cooling 32 5 1150 Heating 11 5 410 Heating 31 3 1100 Refrigeration Control Dev...

Page 5: ...20 1450 Hi Cool Heat rpm 1570 1630 870 850 SHi Cool Heat rpm 1610 1630 Heat Exchanger Fin Material Aluminium Pre Coat Aluminium Fin Type Slit Fin Corrugated Fin Row x Stage x FPI 2 1 x 11 4 x 23 2 x 2...

Page 6: ...A Long Installation Piping CS CU TE15HKE long piping up to 15 meters Quality Improvement Random auto restart after power failure for safety restart operation Gas leakage protection Prevent compressor...

Page 7: ...7 4 Location of Controls and Components 4 1 Product Overview 4 1 1 Indoor Unit 4 1 2 Outdoor Unit 4 1 3 Remote Control...

Page 8: ...8 5 Dimensions 5 1 Indoor Unit...

Page 9: ...9 5 2 Outdoor Unit...

Page 10: ...10 6 Refrigeration Cycle Diagram...

Page 11: ...11 7 Block Diagram...

Page 12: ...12 8 Wiring Connection Diagram 8 1 Indoor Unit...

Page 13: ...13 8 2 Outdoor Unit...

Page 14: ...14 9 Electronic Circuit Diagram 9 1 Indoor Unit...

Page 15: ...15 9 2 Outdoor Unit...

Page 16: ...16 10 Printed Circuit Board 10 1 Indoor Unit 10 1 1 Printed Circuit Board...

Page 17: ...17 10 2 Outdoor Unit 10 2 1 Main Printed Circuit Board...

Page 18: ...is built over the unit to prevent direct sunlight or rain be careful that heat radiation from the condenser is not obstructed There should not be any animal or plant which could be affected by hot ai...

Page 19: ...from the sideways arrow on the installation plate see figure above The center of the left piping hole is at the intersection of lines extending vertically from the downward arrow on the installation p...

Page 20: ...20 3 For the embedded piping This can be used for left rear piping and left bottom piping also...

Page 21: ...lexible cord type designation 245 IEC 57 H05RN F or heavier cord Ensure the colour of wires of outdoor unit and the terminal Nos are the same to the indoor s respectively Earth lead wire shall be long...

Page 22: ...torque wrench in specified torque as stated in the table Connecting The Piping To Outdoor Unit Decide piping length and then cut by using pipe cutter Remove burrs from cut edge Make flare after inser...

Page 23: ...ve 6 Tighten the service port caps of the 3 way valve at a torque of 18 NO m with a torque wrench 7 Remove the valve caps of both of the 2 way valve and 3 way valve Position both of the valves to OPEN...

Page 24: ...entioned in Indoor Outdoor Unit Installation Diagram Please wrap the insulated piping end to prevent water from going inside the piping 2 If drain hose or connecting piping is in the room where dew ma...

Page 25: ...ng on the air conditioner settings and the operation environment The final shifted value will be used as internal setting temperature and it is updated continuously whenever the electrical power is su...

Page 26: ...Operation A Basic Rotation Speed rpm i Manual Fan Speed Cooling Dry Fan motor s number of rotation is determined according to remote control setting Heating Fan motor s number of rotation is determin...

Page 27: ...indoor heat exchanger temperature as Figure 1 below When the air conditioner is stopped using remote control the vane will shift to close position 2 Manual vertical airflow direction can be set using...

Page 28: ...ng conditions is satisfied quiet operation stops a Powerful button is pressed b Stop by OFF ON switch c Timer off activates d Quiet button is pressed again 2 When quiet operation is stopped operation...

Page 29: ...temperature and outdoor air temperature in order to judge the operation starting time From the judgment the decided operation will start operate earlier than the set time as shown below 12 6 OFF Time...

Page 30: ...r Operation Stop Condition When one of the following condition is satisfied ION operation stops a Stopped by ON OFF switch b Timer OFF activates c ION feedback signal shows error 3 Ionizer operation s...

Page 31: ...ncel this error c Ionizer Control Power Supply Error Detection During ionizer stopped power is supplied to the ionizer due to indoor PCB error During this error TIMER LED blinks and unit stop operatio...

Page 32: ...Y value compressor will be stopped immediately for 3 minutes 4 The first 30 minutes of cooling operation A will be applied 13 1 4 IPM Power transistor Prevention Control A Overheating Prevention Contr...

Page 33: ...re indoor piping temperature is below 4qC During Heating operations Indoor piping temperature indoor suction is under 5qC b Control contents Compressor stops and restart after 2 minutes If the conditi...

Page 34: ...ncy The compressor stop if outdoor pipe temperature exceeds 63qC If the compressor stops 4 times in 20 minutes Timer LED blinking F95 outdoor high pressure rise protection 13 2 3 Freeze Prevention Con...

Page 35: ...e is 30qC or above 13 3 2 Outdoor Air Temperature Control The Max current value is regulated when the outdoor air temperature rise above 14qC in order to avoid compressor overloading 13 3 3 Overload P...

Page 36: ...ch Mode is in standby condition and press any button at remote control to transmit and store the desired transmission code to the EEPROM For transmission code selection explanation please refer to Sel...

Page 37: ...operate for 30 seconds 14 3 2 CLOCK BUTTON To change the remote control s time format Press for more than 5 seconds 14 3 3 RESET RC To clear and restore the remote control setting to factory default...

Page 38: ...problems before inspecting the refrigeration cycle Such problems include insufficient insulation problem with the power source malfunction of a compressor and a fan The normal outlet air temperature a...

Page 39: ...s after an operation is started Cooling Mode Heating Mode Low Pressure High Pressure Electric current during operating Low Pressure High Pressure Electric current during operating Condition of the air...

Page 40: ...isplay Signal is transmitted to the main unit 5 Press the TEMP or button When button is pressed the display goes back repeatedly and slowly until Beep sound about 5 seconds intermittently is heard fro...

Page 41: ...r defective or disconnected H26 Ionizer abnormality Indoor PCB Ionizer H27 Outdoor air temperature sensor abnormality Continue for 5 sec O Outdoor temperature sensor defective or disconnected H28 Outd...

Page 42: ...t 16 1 1 Removal of the Front Panel and Front Grille High voltages are generated in the electrical parts area by the capacitor Ensure that the capacitor has discharged sufficiently before proceeding w...

Page 43: ...43 16 1 2 Removal of Electronic Controller...

Page 44: ...44 16 1 3 Removal of Control Board...

Page 45: ...45 16 1 4 Removal of Fan Motor and Cross Flow Fan...

Page 46: ...46...

Page 47: ...er be careful of electrostatic discharge 1 Remove the 3 screws of the Top Panel Fig 1 2 Remove the 6 screws of the Front Panel Fig 2 3 Remove the screw of the Terminal Board Cover 4 Remove the Top Cov...

Page 48: ...48 17 Technical Data 17 1 Operation Characteristics...

Page 49: ...49...

Page 50: ...50...

Page 51: ...51...

Page 52: ...0qC 4 27 3 23 1 21 3 99 3 10 1 30 3 71 2 98 1 39 3 37 2 83 1 50 19 0qC 4 30 1 32 19 5qC 4 68 3 39 1 23 4 38 3 25 1 33 4 07 3 13 1 42 3 70 2 98 1 53 22 0qC 5 10 3 51 1 25 4 77 3 38 1 35 4 44 3 26 1 42...

Page 53: ...Exploded View and Replacement Parts List 18 1 Indoor Unit Note The above exploded view is for the purpose of parts disassembly and replacement The non numbered parts are not kept as standard service...

Page 54: ...1 CWA743634 O 21 POWER SUPPLY CORD 1 CWA20C2679 22 ELECTRONIC CONTROLLER MAIN 1 CWA73C3239 O 23 CONTROL COVER LOWER 1 CWH131229 24 CONTROL COVER PLASTIC PLATE UPPER 1 CWH131232 25 CONTROL COVER STEEL...

Page 55: ...55 18 2 Outdoor Unit Note The above exploded view is for the purpose of parts disassembly and replacement The non numbered parts are not kept as standard service parts...

Page 56: ...1021 15 2 WAYS VALVE LIQUID 1 CWB021333 O 16 V COIL CO FOR 4 WAY VALVE 1 CWA43C2144J O 17 V COIL COMPLETE FOR EXP VALVE 1 CWA43C2058J O 18 SOUND PROOF BOARD 1 CWH151188 19 REACTOR 1 G0C193J00004 O 20...

Reviews: