ー
151
ー
Installation Instructions
Intelligent Controller
3
Design Control Box
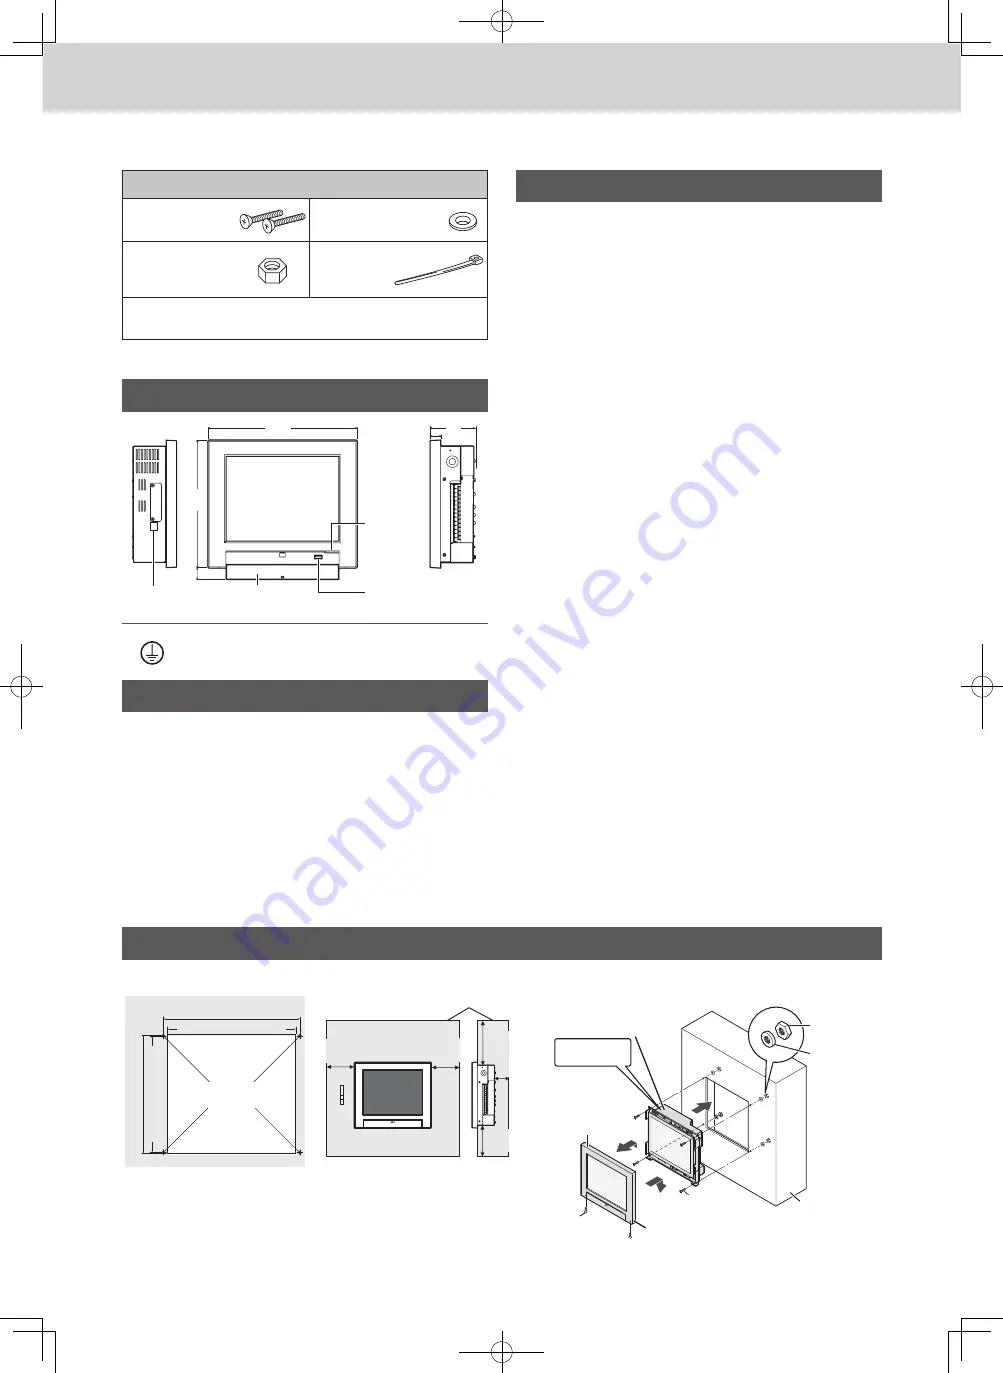
Mounting Position
How to Mount (Control Box)
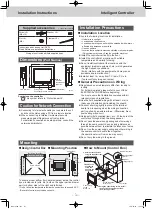
224 (Hole of control box)
218 (Screw hole pitch)
255 (Screw hole pitch)
242 (Hole of the control box)
Screw hole φ5
(mm)
100
or more
100
or more
100
or more
Control box
150
or more
50
or more
< >: Number of pieces
Nut (supplied)
M4<4>
Washer
(Supplied) <4>
Screw (supplied)
M4×10 <4>
Panel-fixing
screw
M3×6 <2>
Embed into the
control box.
1. Remove the
panel-fixing
screw and
panel (to the
upper side).
2. Install to the control box
using the supplied screws,
nuts and washers.
3. Using the panel-fixing screw, install
the panel to the original position
(from the upper side).
Control box
To ensure proper airflow (for heat dissipation) inside the control
box, provide vents (slits, etc.) both on the upper part and lower
part (or bottom side) of the right and left sides.
• Do not allow the temperature inside the control box to exceed 40 °C.
• Be careful not to block the above vents.
Mounting
Supplied accessories
< >: Number of pieces
Screw <4>
(M4×10)
Washer <4>
Nut <4>
(M4)
Clamper <4>
Instructions and License List (DVD),
Quick Reference, Installation Instructions
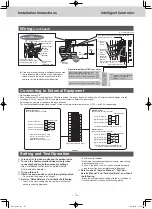
* Wiring are not included (field supplied item).
Dimensions
(Part Names)
20
85
280
240
22
USB terminal
Storage door
Push lightly to open or close.
Power
indicator
Illuminates at
power-on.
LAN terminal
(mm)
Symbols on the controller
This symbol refers to “Protective earth”.
Caution for Network Connection
z
Connecting to Internet will enable you to operate the unit
and check the status using a PC from a remote location.
z
When connecting to Internet, implement security
measures against illegal access from outside.
For detailed connection and setup method, consult the
network administrator.
Installation Precautions
Installation Location
z
Avoid the following locations for installation.
• Under direct sunlight
• Location near heat source
• Location where the controller will be splashed with water or
affected by dampness or humidity
• Uneven surface
• Location that is subject to excessive vibration or physical impacts.
(Fixing screws may come off, and the controller may drop.)
z
Install the controller vertically to the floor.
z
Install the controller at a location with suitable
temperature and humidity for using.
z
Do not install controller at the locations with the
equipment (medical equipment, etc.) which generates
the high-frequency emissions.
(It may interfere with the equipment and may cause
accidents due to malfunction.)
z
Install at least 1 m away from TV, radio, PC. etc.
(To prevent fuzzy images or noise)
General Precautions on Wiring
z
Regulations on wire diameters differ from locality to
locality.
For field wiring rules, please refer to your LOCAL
ELECTRICAL CODES before beginning.
You must ensure that installation complies with all
relevant rules and regulations.
z
Use the field supplied wiring with at least 1 mm in
thickness of insulation part including the sheath.
z
Connect all wiring tightly to prevent the terminal
board from loosening when the wiring connection
part is pulled by an external force. (Otherwise, fire or
overheating may occur.)
z
Using putty (field supplied item), etc., fill the hole of the
control box through which the wiring passes.
z
Do not pass the power supply wiring and other wirings
through the same conduit. Keep as long a distance as
possible between them to alleviate the influence of noise.
z
Do not run the power supply wiring and other wiring in
the same conduit or bundle them together.
(An operational error from noise may occur.)
z
Do not bury the wiring in the ground.
TGR-318_ENG.indb 151
2017/04/06 10:44:40

