background image

REFERENCE NO.

85464849341000

SERVICE MANUAL

SM830241-00

Optional Controller

Order No.SBPAC1503015CE

Model No.

CZ-RTC4
CZ-RWSU2N
CZ-RWSD2
CZ-RWST3N
CZ-RWSL2N
CZ-CSRC3

Timer Remote Controller

Wireless Remote Controller

Remote Sensor

SM830241-00_2WAY SYS.indb   1

15/03/24   14:23:38

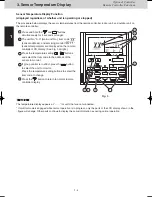
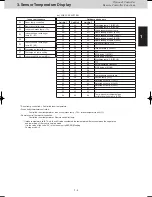
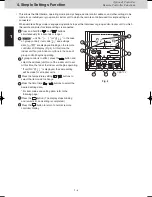
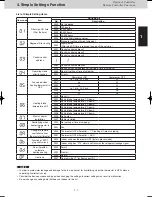
Summary of Contents for CZ-CSRC3

Page 1: ...85464849341000 SERVICE MANUAL SM830241 00 Optional Controller Order No SBPAC1503015CE Model No CZ RTC4 CZ RWSU2N CZ RWSD2 CZ RWST3N CZ RWSL2N CZ CSRC3 Timer Remote Controller Wireless Remote Controller Remote Sensor ...

Page 2: ... 6 5 Detailed Settings Function 1 8 6 Automatic Address Setting 1 14 Section 2 MANUAL OF CONTROLLER 2 1 1 Timer Remote Controller CZ RTC4 2 2 Operating Instructions 2 2 Installation Instructions 2 15 2 Wireless Remote Controller CZ RWSU2N CZ RWSD2 CZ RWST3N CZ RWSL2N 2 27 Operating Instructions 2 27 Installation Instructions 2 39 3 Remote Sensor CZ CSRC3 2 48 Installation Instructions 2 48 ...

Page 3: ...ons 1 1 REMOTE CONTROLLER FUNCTIONS CZ RTC4 1 Remote Controller Servicing Functions 1 2 2 Test Run Function 1 3 3 Sensor Temperature Display 1 4 4 Simple Settings Function 1 6 5 Detailed Settings Function 1 8 6 Automatic Address Setting 1 14 Contents ...

Page 4: ... remote controller the indoor unit where that remote controller is connected stops Detailed settings System address indoor unit address central control address and other settings Automatic address Automatic address setting based on command from the wired remote controller Automatic reset Entire system stops Address change Change of indoor unit address Press the button Timer Remote Controller CZ RT...

Page 5: ...ess the button to return to normal remote controller display The temperature cannot be adjusted in Test Run mode This mode places a heavy load on the machines Therefore use it only when performing the test run The test run can be performed using the HEAT COOL or FAN operation modes To prevent continuous test runs this remote controller includes a timer function that cancels the test run after 60 m...

Page 6: ... monitor button Press the temperature setting buttons to select the item code to change 5 Press the button to return to normal remote controller display Fig 3 A 4 3 4 3 4 5 1 2 Sensor Temperature Display Function displayed regardless of whether unit is operating or stopped The procedure below displays the sensor temperatures from the remote controller indoor unit and outdoor unit on the remote con...

Page 7: ...ower area of the room in heating mode It is the value of the code 06 in the indoor unit s EEPROM setting Cooling mode 0 Indoor unit MOV pulse MOV Outdoor unit sensors Unit No 1 Unit No 2 Unit No 3 Discharge temp 1 DISCH1 Discharge temp 2 DISCH2 Discharge temp 3 DISCH3 High pressure sensor temp Heat exchanger gas 1 EXG1 Heat exchanger liquid 1 EXL1 Heat exchanger gas 2 EXG2 Heat exchanger liquid 2 ...

Page 8: ...nd settings data are displayed blinking on the remote controller LCD display Fig 4 At this time the indoor unit fan or all indoor unit fans in the case of group control begins operating 3 If group control is in effect press the select the address unit No of the indoor unit to set button and At this time the fan at the indoor unit begins operating If unit No is displayed the same setting will be ma...

Page 9: ...ifts intake temperature 1 C down 0002 Shifts intake temperature 2 C down 0003 Shifts intake temperature 3 C down 0004 Shifts intake temperature 4 C down 0005 Shifts intake temperature 5 C down 0006 Shifts intake temperature 6 C down Electric heater installation 0000 No heater 0001 Heater installed Humidifying when heater thermostat is OFF 0000 No setting at time of shipping 0001 Yes Change to remo...

Page 10: ...r 2 unit No item code and settings data are displayed blinking on the remote controller LCD display Fig 5 At this time the indoor unit fan begins operating 3 If group control is in effect press the select the address unit No of the indoor unit to set button and At this time the fan at the indoor unit begins operating If unit No is displayed the same setting will be made for all indoor units 4 Pres...

Page 11: ...mperature 9 C up Cooling intake temperature shift 0010 Shifts intake temperature 10 C up 0000 Function disabled 0001 Stops automatically 5 minutes after operation starts 0002 Stops automatically 10 minutes after operation starts 0123 Stops automatically 615 minutes after operation starts 0124 Stops automatically 620 minutes after operation starts Automatic stop time after operation start Can be se...

Page 12: ...g range Cooling 0018 18 C Lower limit at shipment 0019 19 C Lower limit 0029 29 C 0030 30 C Upper limit at shipment Upper limit Heating 0016 16 C Lower limit at shipment 0017 17 C Lower limit 0029 29 C 0030 30 C Upper limit at shipment Upper limit Drying 0018 18 C Lower limit at shipment 0019 19 C Lower limit 0029 29 C 0030 30 C Upper limit at shipment Upper limit Auto heat cool 0017 17 C Lower li...

Page 13: ...perature 25 C 0026 Control temperature 26 C Fan output switching 0000 Output linked with fan ON when indoor unit fan is operating 0001 Fan mode operation output Drain pump delayed start time 0000 No delayed start 0001 1 second delayed start Except Indoor unit Type U1 F2 T1 E1 1 minute delayed start Indoor unit Type U1 F2 T1 E1 0002 2 seconds delayed start 2 minutes delayed start 0058 58 seconds de...

Page 14: ... 0002 2 seconds 0058 58 seconds 0059 59 seconds 0060 Continuously ON Repeat timer switching 0000 Function disabled 0001 Function enabled Timer function change prohibit 0000 Function disabled 0001 Function enabled Smudging control 0000 No smudging control Setting the Flap Separately Only for 4 way Cassette type 0000 0001 0002 0003 0004 0005 0006 Setting the Flap Separately Only for 4 way Cassette t...

Page 15: ... data Purpose of use names of accessories 0000 1 0001 3 Standard setting at time of shipping High ceiling setting Discharge grille purchased separately is installed 2 way lowered ceiling system Table 3 Table of DC Fan Motor Tap Settings 1 Way Cassette type Failure to make this setting may result in decreased airflow and condensation Stop the system before performing these steps 1 Press and hold th...

Page 16: ...ame time Press and hold for 4 seconds or longer Next press either the temperature setting button Check that the item code is A1 Use either the button to set the system No to perform automatic address setting Then press the button Automatic address setting for one refrigerant system begins When automatic address setting for one system is completed the system returns to normal stopped status Approxi...

Page 17: ...or 4 seconds or longer simple settings mode 2 The address is displayed for the indoor unit that is connected to the remote controller Only the address of the indoor unit that is connected to the remote controller can be checked 3 Press the button again to return to normal remote controller mode If multiple indoor units are connected to 1 remote controller group control 1 button and button for 4 se...

Page 18: ... MEMO 1 16 ...

Page 19: ...mer Remote Controller CZ RTC4 2 2 Operating Instructions 2 2 Installation Instructions 2 15 2 Wireless Remote Controller CZ RWSU2N CZ RWSD2 CZ RWST3N CZ RWSL2N 2 27 Operating Instructions 2 27 Installation Instructions 2 39 3 Remote Sensor CZ CSRC3 2 48 Installation Instructions 2 48 ...

Page 20: ...and keep them for future reference CV6233312187 Panasonic Corporation http www panasonic com 26 EN Speci cations Model No CZ RTC4 Dimensions H 120 mm x W 120 mm x D 20 4 75 mm Weight 160 g Temperature Humidity range 0 C to 40 C 20 to 80 no condensation Indoor use only Power Source DC16 V supplied with indoor unit Clock Precision 30 seconds month at normal temperature 25 C Adjust periodically Holdi...

Page 21: ...r product or property damage Matters to be observed Prohibited matters 2 EN Preparations How to Use Setting Change When Necessary Page Thank you for purchasing the Panasonic timer remote controller Read the Operating Instructions carefully for safe use This manual describes the Operating Instructions of the timer remote controller Read this manual as well as operating instructions supplied with in...

Page 22: ...les Operation is subject to the following two conditions 1 This device may not cause harmful interference and 2 this device must accept any interference received including interference that may cause undesired operation This equipment has been tested and found to comply with the limits for a Class B digital device pursuant to Part 15 of the FCC Rules These limits are designed to provide reasonable...

Page 23: ... programmed time 7 Displays the present time on a 24 hour clock Also displays settings in the various setting modes 8 Appears when the time program is being set 9 Indicates the unit No of the selected indoor unit 10 Appears during the peak cut mode Demand if an electric heat pump EHP air conditioner is used or during standby if a gas heat pump GHP air conditioner is used 11 Appears when the fan of...

Page 24: ... you enter the setting mode SETTING day and time ash 2 Set to today s day of the week Press to move ashing on the display in the order of Su Mo Tu Press to move it in the order of Su Sa Fr Press SET to store 3 Press to change the present hour in the range of 0 to 23 1 Set the present hour and press SET The hour digits light up and the minute digits start ashing 1 If the clock uses the 12 hours AM ...

Page 25: ...L CANCEL DEL CANCEL PROGRAM SET CANCEL DEL SET CANCEL Program Changing hour digits Changing minute digits Changing patterns Selecting copy source Selecting copy destination Weekly Program Function 10 EN Checking the Weekly Timer Set the weekly program assigning a given timer to each day of the week Maximum of 6 programs a day and 42 programs a week can be set Select the day and the TIMER number yo...

Page 26: ...ting the Program Timer 12 EN 4 Set the program pattern Program step 3 There are 4 program patterns Pressing repeats the following display patterns Pattern 1 Default display Pattern 2 Pattern 4 Pattern 3 The indoor unit starts operation at the programmed time The indoor unit starts operation at the programmed time and changes the temperature settings The indoor unit stops operation at the programme...

Page 27: ...preprogrammed day is selected as a copy source Duplicating the Program Timer 14 EN Weekly Program Function Invalidating the Program Timer If you want to stopping the program operation for more than 1 week you can invalidate all the timer settings Once the timer settings are invalidated the program will not be operated until the invalidation is cancelled How to invalidate the program timer 1 Press ...

Page 28: ...outing function when operation is started At this time an air conditioner does not stop at outing function 16 EN Before Asking Repair Work Before asking repair work please check the following Trouble Possible Cause Remedy ERROR is displayed when the minute digits are entered If there is another TIMER No which has the program of the same time and same day you cannot overlap the setting The set data...

Page 29: ... 2 seconds to display the upper limit temperature setting screen SETTING and the upper limit temperature start fl ashing The default value of the upper limit temperature is 38 C A 1 2 3 2 3 2 3 2 Press to select the upper limit temperature and press SET to x the value The lower limit temperature setting screen is displayed 3 Press to select the lower limit temperature and press SET to x the value ...

Page 30: ...on 3 When the centralized control unit is prohibited from stopping the unit or changing the temperature setting Note Trouble Possible Cause Remedy The temperature setting does not decrease increase The temperature over the upper or lower limit or each operation mode cannot be set Operation under the sleeping function does not nish Note if you change the time after the sleeping function started The...

Page 31: ...ure is 1 C lower than the set temperature Low activity Cooling Target temperature is 1 C higher than the set temperature Heating Target temperature is the same as the set temperature No one in the room No one in the room for 20 minutes Cooling Target temperature is 2 C higher than the set temperature Heating Target temperature is 2 C lower than the set temperature No one in the room for 3 hours Co...

Page 32: ...eaker and consult the dealer of purchase about the symptom and Model No Is the circuit breaker turned off Turn it on and press Start Stop again If operation does not start turn off the circuit breaker and consult the dealer of purchase about the symptom and Model No Is blinking After blinking stops press Start Stop again If operation does not start turn off the circuit breaker and consult the deal...

Page 33: ...ρ Κωδικού Στοιχείο Ορίστε τα δεδομένα 0000 0001 01 Κύριο δευτερεύον Δευτερεύον Κύριο 02 Τύπος ρολογιού 24 ώρες 12 ώρες ΠΜ ΜΜ Λειτουργία λεπτομερών ρυθμίσεων Detailed setting mode 1 Πατήστε και κρατήστε ταυτόχρονα πατημένα τα 3 πλήκτρα για μερικά δευτερόλεπτα 2 Επιλέξτε το Code no Αρ κωδικού 3 Επιλέξτε το Αρ μονάδας 4 Επιλέξτε το Set data Ορισμός δεδομένων Η ένδειξη αναβοσβήνει και κατόπιν μένει αν...

Page 34: ...o segura que pueden producir daños personales en los productos o en la propiedad ADVERTENCIA Apague el disyuntor del circuito de las unidades antes de realizar la instalación Solicite al proveedor o a un profesional que realicen la instalación y el trabajo eléctrico Este receptor deberá instalarse de acuerdo con la normativa eléctrica nacional Conecte y je de forma segura los cables especi cados p...

Page 35: ...αγγλικό κείμενο είναι οι πρωτότυπες οδηγίες Οι άλλες γλώσσες είναι μεταφράσεις των πρωτότυπων οδηγιών 業務用リモコン CZ RTC4据付書 indd 5 2015 01 15 18 24 13 4 Safety Precautions Continued DE Sicherheitsvorkehrungen Vor dem Einbau durchlesen Für einen sicheren und sachgemäßen Einbau der Fernbedienung lesen Sie die Einbauanleitung gründlich durch Insbesondere müssen die Sicherheitsvorkehrungen vor dem Einbau...

Page 36: ...na distanza di 5 mm a destra e a sinistra e 50 mm in alto e in basso Evitare i seguenti siti per l installazione Vicino alla nestra ecc in un punto esposto direttamente alla luce solare o all aria All ombra o dietro oggetti esterni al usso d aria del locale Siti in cui si veri ca condensa Il telecomando non è a prova di umidità né di gocciolio Sito vicino a fonte di calore Super cie irregolare Man...

Page 37: ...istancia Máx 2 Unidades interiores Máx 8 Atención Utilice el cableado RC suministrado por separado con un componente aislante de al menos 1 mm de espesor incluida la funda La normativa sobre el diámetro de los cables di eren de una localidad a otra Para más información sobre las reglas del cableado de campo consulte sus CÓDIGOS ELÉCTRICOS LOCALES antes de comenzar Debe asegurarse de que la instala...

Page 38: ...ούν να συνδεθούν με οποιαδήποτε εσωτερική μονάδα για λειτουργία Installation example 業務用リモコン CZ RTC4据付書 indd 11 2015 01 15 18 24 17 10 EN Wiring as shown below is prohibited FR Un câblage comme indiqué ci dessous est interdit ES Realizar el cableado como se muestra a continuación está prohibido DE Die nachfolgend dargestellten Verdrahtungsarten sind nicht zulässig I T Sono proibite le cablature co...

Page 39: ...ση του κάτω καλύμματος Σφίξτε τις βίδες καλά έως ότου οι κεφαλές των βιδών ακουμπήσουν στο κάτω κάλυμμα Αλλιώς οι χαλαρές κεφαλές των βιδών μπορεί να χτυπήσουν στην πλακέτα και να προκαλέσουν δυσλειτουργία κατά τη στερέωση του επάνω καλύμματος Μην σφίγγετε υπερβολικά τις βίδες Το κάτω κάλυμμα μπορεί να παραμορφωθεί προκαλώντας την πτώση της μονάδας Σύνδεση της καλωδίωσης του τηλεχειριστηρίου Τακτο...

Page 40: ...στε την επικάλυψη Περίπου 150 mm Αφαιρέστε την επίστρωση Περίπου 6 mm Συνδέστε την καλωδίωση του τηλεχειριστηρίου Βεβαιωθείτε ότι η σύνδεση της καλωδίωσης είναι προς την σωστή κατεύθυνση Τακτοποιήστε τα καλώδια κατά μήκος της οπής του καλύμματος Αποφεύγετε να πιάνεται το καλώδιο Στερεώστε το επάνω κάλυμμα Ευθυγραμμίστε τις δαγκάνες του επάνω καλύμματος και μετά ευθυγραμμίστε τις δαγκάνες του κάτω ...

Page 41: ...μματος Αφαιρέστε την επικάλυψη Περίπου 50 mm Αφαιρέστε την επίστρωση Περίπου 6 mm Συνδέστε την καλωδίωση του τηλεχειριστηρίου Βεβαιωθείτε ότι η σύνδεση της καλωδίωσης είναι προς την σωστή κατεύθυνση Αποφεύγετε να πιάνεται το καλώδιο Στερεώστε το επάνω κάλυμμα Ευθυγραμμίστε τις δαγκάνες του επάνω καλύμματος και μετά ευθυγραμμίστε τις δαγκάνες του κάτω καλύμματος 業務用リモコン CZ RTC4据付書 indd 17 2015 01 1...

Page 42: ...le de 25 C Ajustez la périodiquement Autonomie 24 heures après un chargement complet Env 8 heures sont nécessaires pour une recharge complète Nombre d unités intérieures connectées 8 appareils maximum FR Con guration Test Spéci cations 業務用リモコン CZ RTC4据付書 indd 19 2015 01 15 18 24 24 18 Setting Test operation Speci cations Setting Clock RC setting mode Main sub Clock type Detailed setting mode Venti...

Page 43: ...ungefähr 8 Stunden erforderlich Anzahl der anschließbaren Innengeräte Bis zu 8 Geräte DE Einstellung Testbetrieb Technische Daten 業務用リモコン CZ RTC4据付書 indd 21 2015 01 15 18 24 27 20 Setting Test operation Speci cations Continued Ajuste Reloj Modo mando distanc Ppal secund Tipo reloj Modo de con g detallada Con g salida ventil Sensor de la temperatura de la sala Ajuste de la visualización de temperat...

Page 44: ...8 horas para carregamento total Número de unidades interiores ligadas Até 8 unidades P T Con guração Teste de funcionamento Especi cações 業務用リモコン CZ RTC4据付書 indd 23 2015 01 15 18 24 31 22 Setting Test operation Speci cations Continued Impostazione Orologio Modal telecomando Princ second Tipo orologio Modalità Impost dettagliate Impostazione uscita ventola di ventilazione Sensore della temperatura ...

Page 45: ... язково прочитайте розділ Запобіжні заходи перед використанням Збережіть її на майбутнє Panasonic Corporation 1006 Kadoma Kadoma City Osaka Japan 81405230185020 CV6233317755 4 24 69 90 135 156 25 46 91 112 157 178 47 68 113 134 179 200 201 223 Panasonic Corporation Website http www panasonic com E NGLISH I TALIANO E SPAÑOL E ΛΛΗΝΙΚΆ Р УССКИЙ F RANÇAIS P ORTUGUÊS D EUTSCH T ÜRKÇE У КРАЇНСЬКА Operat...

Page 46: ... OPERATION STANDBY 1 2 2 3 3 4 4 5 5 For wall mounted type indoor unit CZ RWSK2 Pour montage mural type appareil intérieur CZ RWSK2 Unidad interior de tipo montaje en pared CZ RWSK2 Für Wandgeräte CZ RWSK2 Per apparecchio interno di tipo da muro CZ RWSK2 Para unidade interior do tipo de parede CZ RWSK2 Για επιτοίχια εσωτερική μονάδα CZ RWSK2 Duvar tipi iç ünite için CZ RWSK2 Для устанавливаемый на...

Page 47: ... Rules Operation is subject to the following two conditions 1 This device may not cause harmful interference and 2 this device must accept any interference received including interference that may cause undesired operation This equipment has been tested and found to comply with the limits for a Class B digital device pursuant to Part 15 of the FCC Rules These limits are designed to provide reasona...

Page 48: ...irregularities Continuing operation when the system is out of order can result in electric shock re and damage to the system Contact your distributor Do not swallow the battery Moving and Repair Precautions Do not repair Never repair the system yourself Contact your distributor before moving the system Contact your distributor or a professional service provider about moving and reinstalling the sy...

Page 49: ...perature sensor on the remote controller instead of the one on the indoor unit The temperature sensor on the indoor unit is selected before shipment At this time is shown on the display 16 Clock button Use this to set the clock From this page the names of remote controller s buttons will be indicated with the above illustrations E g Start Stop button 00 OI 303000 indb 8 2015 02 20 16 23 01 ENGLISH...

Page 50: ...he gure 3 Gently insert one end of an unfolded paper clip or a similar object that can t into the Reset hole and press the Reset button inside the hole then put the cover back on Notes Change the batteries when the display of the remote controller gets weak or if it will not work unless close to the receiver Alkaline batteries generally last about one year When changing batteries always use two fr...

Page 51: ... stop automatically When the drying mode stops operating the indoor unit s fan blows a gentle breeze in order to keep the moisture from returning to the room at a minimum Depending on the indoor unit used and or the temperature in the room the fan speed may not be adjustable Depending on the unit used when the outside air temperature is 15 C or less the dry function will not operate 5 Operation Co...

Page 52: ... Timer Operation Cont 00 OI 303000 indb 15 2015 02 20 16 23 05 6 Timer Operation 14 EN When setting the timer make sure the current time on the remote controller is accurate The timer s clock can only be set when the display of the remote controller is ON After setting the timer put the remote controller for in a place where its signal will reach the receiver of the indoor unit When the time set f...

Page 53: ...the ap up down wind direction plate faces upwards Also bear in mind that the ap starts swinging after the heating standby mode is released but the display on the remote controller indicates Auto Flap during standby heating as well CZ RWSU2N CZ RWSD2 CZ RWSL2N For wall mounted type indoor unit CZ RWSK2 CZ RWST3N Setting the Wind Direction While the unit is operating every time you press the directi...

Page 54: ...ile holding down every time you press it cycles from ALL 1 2 3 6 ALL Set it to the receiver address switch of the indoor unit you wish to operate 3 When you release the address that was displayed is set When you do this if it corresponds to the receiver s address setting the buzzer sounds 00 OI 303000 indb 19 2015 02 20 16 23 06 9 Using the Remote Controller 18 EN Point the transmitter of the remo...

Page 55: ... 2015 02 20 16 23 08 20 EN Wireless remote controller address display Address switch position Address Address Address Address Address Address Address ALL 1 2 3 4 5 6 Receiving is possible at all address positions 䠍 䠎 䠏 䠐 㻻㻲㻲 㻻㻺 䠍 䠎 䠏 䠐 㻻㻲㻲 㻻㻺 䠍 䠎 䠏 䠐 㻻㻲㻲 㻻㻺 䠍 䠎 䠏 䠐 㻻㻲㻲 㻻㻺 䠍 䠎 䠏 䠐 㻻㻲㻲 㻻㻺 䠍 䠎 䠏 䠐 㻻㻲㻲 㻻㻺 Setting Addresses CZ RWSK2 Setting the address of the indoor unit 1 Set the address for the remot...

Page 56: ...ton on the remote controller See page 10 The timer cannot be set Make the settings when the remote controller is in Operation Display See page 14 If the problem persists even after you check the foregoing items stop the unit disconnect the power to the indoor unit and contact the distributor where the product was purchased with the model number and problem you are having As it is dangerous under n...

Page 57: ... en la página 36 DEUTSCH Lesen Sie die Einbauanleitung bevor Sie mit der Installation beginnen Insbesondere müssen die Sicherheitsvorkehrungen auf Seite 52 gründlich durchgelesen werden ITALIANO Leggere le Istruzioni di installazione prima di procedere con l installazione Prestare particolare attenzione alla sezione Precauzioni di Sicurezza a pagina 68 PORTUGUÊS Leia cuidadosamente as instruções d...

Page 58: ...ly supports the weight of the remote controller CAUTION Do not use the remote controller at the following locations Location where condensation occurs Location where flammable gases etc may leak Location where corrosive gases etc may leak Location with lots of water or oil droplets including machine oil Location where voltage fluctuation frequently occurs Location where there is a machine producin...

Page 59: ...ed area with a screwdriver or similar implement to allow the wire to pass through Fix it in place with the clamper Pin Fix the screw Make sure the three clips on the corner cover are located over the holes on the ceiling panel and fix it in place with the supplied screws Receiver position Adjustable corner cover Ceiling panel Adjustable corner cover Fig C Screw Fig D 1 4 Wiring for the Receiver Wi...

Page 60: ...tion Fig A Fig B Fig C Fig D Panel Side panel Plastic tape Slotted screwdriver Wrapped with plastic tape Cover Insert it under the O marked surface of the cover Cable clip Receiver Cable clip Panel Air inlet grill 2 4 Wiring for the Receiver Wiring Diagram How to Connect the Wires Connect the wires from the receiver to the terminals for RC wiring on the indoor unit No polarity CN001 1 2 Receiver P...

Page 61: ...nel The projecting parts of the receiver are fixed in the hole in the panel 3 Route the lead wire from the receiver along the rib on the back of the panel Pass it through the cutout Fig B 4 Install the panel on the indoor unit 5 Fasten the lead wire sticking out from the panel with the clamper in the indoor unit Fig C 6 Draw the lead wire into the electrical box through the hole on the bottom and ...

Page 62: ...he operation panel appropriately and fasten it with the supplied clamper 6 Install the ceiling panel Fig A Cover A Fig B Supplied screws 4 10 Operation panel Receiver wiring Fig C Fig D Cover B Connect Receiver Receiver Indoor unit Wiring Diagram 4 4 Wiring for the Receiver How to Connect the Wires 1 Connect the remote controller wiring to the terminals for RC wiring on the indoor unit No polarity...

Page 63: ...RC Main Wired RC Main Indoor unit Using 1 indoor unit Using more than 1 indoor unit RC wiring field supply No polarity Installation example R1 R2 R1 R2 R1 R2 1 2 1 2 1 2 Wired RC Receiver Indoor unit Indoor unit Indoor unit RC wiring Receiver Wiring shown below is prohibited 270059_all indb 13 2015 1 20 9 53 48 12 CZ RWSL2N Metal Panel Installing the Operation Panel 1 Remove the 2 screws and remov...

Page 64: ...s heat pump air conditioner A01 A31 Simultaneously Inconsistency in Cooling Heating Including an auto temp setting for a model without auto temp settings Alternately Oil alarm Same as operation of outdoor protection device Alternately Test operation Simultaneously OFF ON Illuminated Blinking 0 5 seconds interval 270059_all indb 15 2015 1 20 9 53 50 14 Common to All Models Preparation Turn on the c...

Page 65: ...ote controller can be set on site These settings are saved in nonvolatile memory in the remote controller Therefore the settings do not revert to the defaults even when its batteries are changed Note Only service personnel should make the settings because the operation of the air conditioner may be affected depending on the settings made Furthermore making changes to these settings may cause actua...

Page 66: ...anic solvents spread Location where acidic or alkaline solutions or special sprays are frequently used Do not operate with wet hands Do not wash with water Note This device complies with Part 15 of the FCC Rules Operation is subject to the following two conditions 1 This device may not cause harmful interference and 2 this device must accept any interference received including interference that ma...

Page 67: ...iring eld supply No polarity Indoor unit Indoor unit Indoor unit Indoor unit 1 2 1 2 R1 R2 Terminals for RC wiring Remote sensor Remote sensor Wired RC Main Wired RC Main Indoor unit Using 1 indoor unit Using more than 1 indoor unit RC wiring eld supply No polarity Installation example 1 Remove the bottom case Attention Mounting the bottom case Tighten the screws securely until the screw heads tou...

Page 68: ...201504 ...

Reviews: