background image

- 2 -

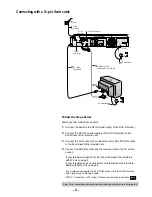
Connecting with a 21-pin Scart cable

If your television supports Q Link or RGB, connect it to the DVD Recorder 
with a fully wired 21-pin Scart cable.

If your television supports Q Link follow the steps for Auto-Setup 
with Q Link on page 4
If your television does not support Q Link follow the steps for Auto-
Setup without Q Link on page 4

.

Follow the steps below.

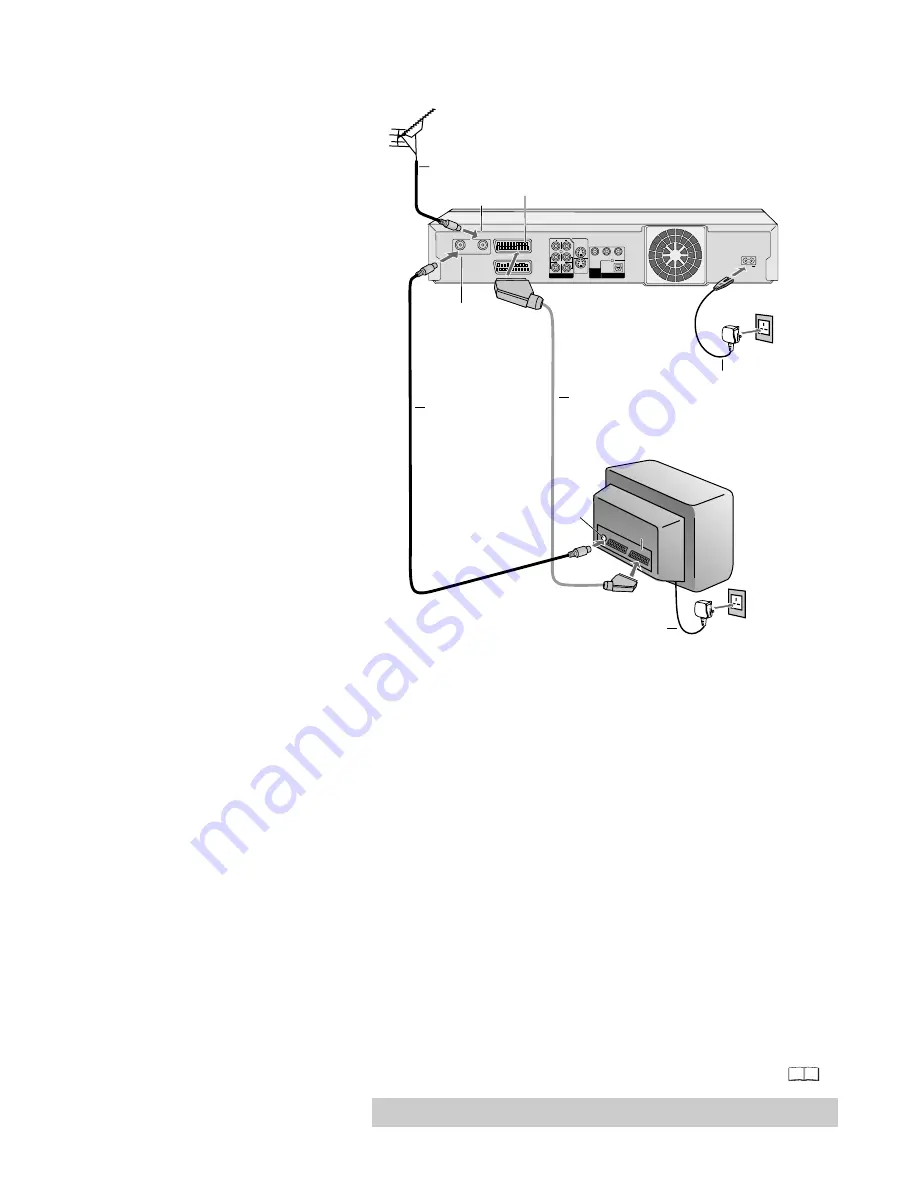
Disconnect AC mains from all units.

1

Connect the aerial to


the


RF IN (Aerial input) of the DVD Recorder.

2

Connect the


RF OUT


(Aerial output) of the DVD Recorder to the 

Aerial input of the television set.

3

Connect the


AV1 socket (21-pin Scart socket) of the DVD Recorder

to the Scart input of the television set.

4

Connect the DVD Recorder and the television set to the AC mains 
socket.

53

SETUP - Connection - [AV1 Output

]

. Please see Operating Instructions.

Y

PB

PR

OPTICAL

COMPONENT

VIDEO OUT

(PROGRESSIVE/

INTERLACE)

DIGITAL AUDIO OUT

(PCM/BITSTREAM)

S VIDEO OUT

S VIDEO 

AV4 IN

AV4 IN

OUT

AUDIO

R

R

L

L

VIDEO

AC IN

AV1  (TV)

AV2  (EXT)

RF OUT

RF IN

1

Aerial

RF IN

Aerial input

RF OUT

Aerial output

AC mains lead

AV1 21-pin Scart socket

RF  cable /
Aerial cable

erial

A


input

AC mains lead

21-pin Scart cable

RF cable /
Aerial cable

Necessary for TV with Q-Link

4

4

TV

AV1

3

2

DVD Recorder

AC IN~

Note: For all connections additional cables and equipments shown are not supplied.

Summary of Contents for Diga DMR-EH60DEB

Page 1: ... for the remote control R6 size Operating Instructions Audio Video cable Fit the batteries into the remote control Sales and Support Information Customer Care Centre For customers within the UK 08705 357357 Visit our website for product information www panasonic co uk E mail customer care panasonic co uk Direct Sales at Panasonic UK Order accessory and consumable items for your product with ease a...

Page 2: ...sion set 3 Connect the AV1 socket 21 pin Scart socket of the DVD Recorder to the Scart input of the television set 4 Connect the DVD Recorder and the television set to the AC mains socket 53 SETUP Connection AV1 Output Please see Operating Instructions Y PB PR OPTICAL COMPONENT VIDEO OUT PROGRESSIVE INTERLACE DIGITAL AUDIO OUT PCM BITSTREAM S VIDEO OUT S VIDEO AV4 IN AV4 IN OUT AUDIO R R L L VIDEO...

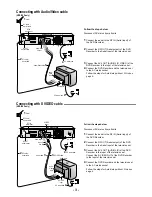
Page 3: ...l output Aerial 3 Audio Video cable RF cable Aerial cable DVD Recorder 4 4 AC IN 2 1 TV Y PB PR OPTICAL COMPONENT VIDEO OUT PROGRESSIVE INTERLACE DIGITAL AUDIO OUT PCM BITSTREAM S VIDEO OUT S VIDEO AV4 IN AV4 IN OUT AUDIO R R L L VIDEO AC IN AV1 TV AV2 EXT RF OUT RF IN DVD Recorder 4 TV 2 3 Audio output Aerial input RF cable Aerial cable AC mains lead RF IN Aerial input RF OUT Aerial output Aerial...

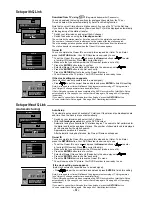
Page 4: ...R button to confirm each entry Press the RETURN button to leave the Owner ID screen You will now see the TV picture Your DVD Recorder is now ready to use Owner ID Registered trademark of Panasonic Note that you must first perform a station search if you use the TV for the first time If you have a Panasonic television Download from TV will be displayed automatically at the beginning of the station ...

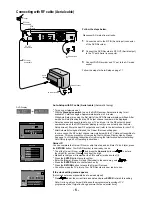
Page 5: ...ay interfere with the TV stations transmitted in your area This may prevent you from seeing the On Screen Display clearly Please see page 15 of Operating Instructions for removing the interference before restarting Auto Setup page 49 of Operating Instructions You can complete the Owner ID now or skip this step and do it later To do it later press the RETURN button Your DVD Recorder is now ready to...

Page 6: ... 5 6 7 8 9 0 SETUP Disc Picture Sound Display Connection Others Edit Profiles Auto Setup Restart Add New DVB Service Tuning Manual Download from TV Digital Analogue Signal Quality Manual Tuning Pos Name Ch Pos Name Ch 901 BBC1 22 906 30 914 915 913 912 911 905 CH5 26 903 ITV 24 904 CH4 25 902 BBC2 23 916 Delete 907 909 910 908 RETURN SELECT ENTER 917 919 920 918 FUNCTIONS DVD RAM Disc Protection O...

Reviews: