background image


ENTER

ENTER

Picture

Settings

Option  

Tuning

Others

Disc

Picture

Sound

Display
Connection

SETUP

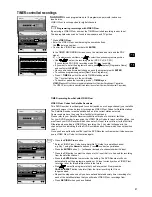
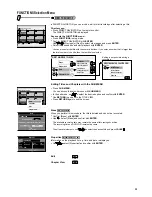
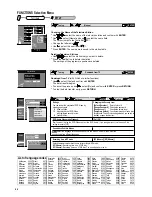
Comb Filter

On

Still Mode

Automatic

SELECT

RETURN

TAB

Comb Filter

Still Mode

Frames are still images that together form a moving picture. A full frame is made up of 
2 half frames. The picture can appear blurry but the overall quality is good. 
A half frame only contains half of the information of a full frame and has a poorer picture quality. 

[On] [Off]

[Automatic] [Field]  [Frame]

On: 

The picture becomes clear and contour-rich. This setting is always set to [On] if you 

have selected [TV System - NTSC].

Off: 

If the picture to be recorded is grainy.

Select the display of the still image.

Field: 

Select this function, if the picture is disturbed with the [Automatic] setting.

Frame:

 Select this function if small text or line structures are not displayed clearly with the [Automatic] 

setting.

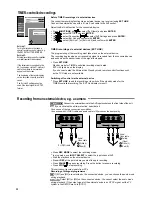
Seamless Play

On

Seamless Play

[On] [Off]

On:  

When playing playlists, the transitions from one chapter to the next are improved. 

The end and beginning of the chapters can shift slightly and the transition is smooth.

Off: 

The transitions between the chapters are played as they were recorded. The picture may freeze for a second 
during the transition.

Seamless Play does not work if several audio channels are recorded..


ENTER

ENTER

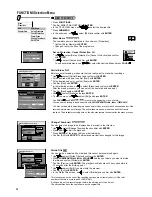
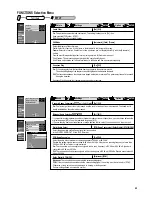
Sound

Settings

Option 

Tuning

Others

Disc

Picture

Sound

Display
Connection

SETUP

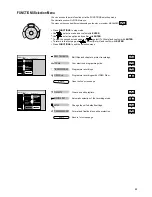
Dynamic Range Compression

Off

Bilingual Audio Selection

M1

Digital Audio Output

SELECT

RETURN

TAB

Dynamic Range Compression

Bilingual Audio Selection

If you want to record programmes on discs that were broadcast in dual channel tone, you can choose between the 
original language [M 1] or another available language [M 2]. 
If you are copying from an external source or a tape position to disc, select the sound track on the other unit.

[M 1] [M 2]

Select the appropriate setting if an external unit is connected 
to the DIGITAL AUDIO OUT of the DVD Recorder.

On:

. The sound is still 

clearly audible when the volume is decreased.


The level of quiet sections is increased and the level of loud sections is decreased

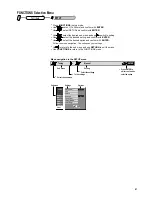
Bitstream: 

The connected unit can decode the corresponding signal.

PCM:

 If the connected unit cannot decode the corresponding signal, the setting must be switched to [PCM]. 

Otherwise, strong noise can cause damage to hearing or loudspeakers.
Perform settings based on your audio system.

On: 

The connected unit cannot process signals with a scan frequency of


96 kHz or 88.2 kHz. Signals are 

converted to 48 kHz or 44.1 kHz.

Off:

 The connected unit can process signals with a scan frequeny of 96 kHz or 88.2 kHz. Signals are output as 96 

kHz or 88.2 kHz.

[On] [Off]

[On] [Off]

Select the audio output mode at a scanning frequency of 96 kHz or 88.2 kHz. 
Despite this setting, signals are converted to 48 kHz or 44.1 kHz if they have a scanning frequency of more than 
96 kHz or 88.2 kHz or a disc is copy-protected. 

[Bitstream] [PCM]

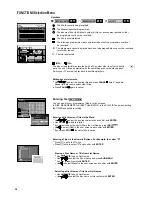
Digital Audio Output

PCM Down Conversion 

Dolby Digital, DTS, MPEG

[PCM Down Conversion], [Dolby Digital], [DTS], [MPEG]

DVD-V

-R

( )

-RW V +R

(only Dolby Digital)

Tuning

Others

Disc

Picture

Sound

SETUP

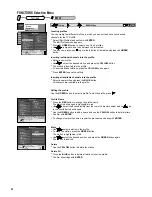
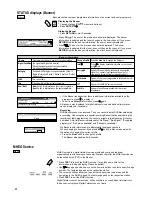
Digital Audio Output

Display
Connection

PCM Down Conversion

Off

Dolby Digital

Bitstream

DTS

Bitstream

MPEG

PCM

45

FUNCTIONS Selection Menu

SETUP

To Others

F

U

N

C

T

IO

N

S

Ext Link 1

Dolby Digital

Bitstream
PCM

RETURN

SELECT

ENTER

Summary of Contents for Diga DMR-ES20DEB

Page 1: ...s î Or go online through our Internet Accessory ordering application at www panasonic co uk î Most major credit and debit cards accepted î All enquiries transactions and distribution facilities are provided directly by Panasonic UK Ltd î It couldn t be simpler î Also available through our internet is direct shopping for a wide range of finished products take a browse on our website for further det...

Page 2: ...with S Video cable 12 OTR Connecting with RF cable Aerial cable Aerial cable Single frame playback Splitting a recording into chapters 24 TIME SLIP 24 Delayed playback 24 Select Edit Playlists One touch recording Direct TV recording Playback during recording Simultaneous recording and playback Auto Setup with RF cable Manual programming Disc formats 20 21 Programming recordings with VIDEO Plus TIM...

Page 3: ...orm causing malfunction Dispose of batteries in accordance with the instructions given in this book Place the unit on a flat stable surface Do not place heavy object on top of the unit Your attention is drawn to the fact that recording of pre recorded tapes or discs or other published or broadcast materials may infringe copyright laws This unit is designed for indoor use only Do not use in area wi...

Page 4: ...ic is one of the leading manufacturers of entertainment electronics devices We are sure that you will be completely satisfied with this device With the new Quick Start feature the unit is ready for use within approx 1 second Thus if a DVD RAM was previously inserted recording can begin immediately after the unit is switched on from Standby mode Connecting with 21 pin Scart cable Setup with Q Link ...

Page 5: ...t has many additional useful features especially for the digital channels TV Guide Electronic programme guide with current information on the programme and a 7 day preview Broadcasts can also be sorted by categories Recording is easy by selecting the desired station Edit Profiles Create profiles station lists in which your preferred stations can be sorted and saved Find your favourite stations qui...

Page 6: ...ATE CHAPTER 18 24 Launch the TV Guide Launch the MHEG service Exit in the MHEG service T C E R I D R O T A G I V A N U N E M P O T 1 2 3 4 5 6 7 8 9 0 CH AV DVD TV DIRECTTV REC VOLUME VIDEO Plus DISPLAY CANCEL REC EXT LINK TIMER STTL Panasonic DVD TV INPUT SELECT REC MODE PROG TIME SLIP PAGE CH SKIP SLOW SEARCH STOP PAUSE PLAY x1 3 MANUALSKIP ERASE CREATE CHAPTER STATUS F U N C T I O N S ENTER T C...

Page 7: ...ome television models of the brands listed above e g older Panasonic units cannot be operated using the remote control Press AV Each press of the button switches between TV reception and AV input Remote control signal sensor 30 30 7m X HOLD If you use another Panasonic device at the same location change the mode of the remote control so that you can operate the units independently of each other Pr...

Page 8: ... RECORDER DMR ES20D 1 6 Disc Tray Display 5 9 7 8 4 2 3 8 Rear Panel Y PB PR OPTICAL S VIDEO OUT S VIDEO AV4 IN AUDIO R L VIDEO AC IN AV1 TV AV2 EXT RF OUT RF IN 1 8 6 7 5 4 9 10 2 3 DVD Recorder RF IN Aerial input RF OUT Aerial output AV1 TV 21 pin Scart socket TV connection AV2 EXT 21 pin Scart socket connection to an external unit 1 3 AV4 IN Audio input right left channel Video input 4 7 8 2 5 ...

Page 9: ... 9 11 13 15 17 19 21 2 4 6 8 10 12 14 16 18 20 The 21 pin Scart socket transmits both input and output signals for picture and sound TVs equipped with the same type of socket can be connected here This type of socket is also called Peritel Euro Connector and Euro AV 21 pin Scart Socket AV1 Scart Socket NORMAL 1 Audio output CH2 R 2 Audio input CH2 R 3 Audio output CH1 L 4 Audio ground 5 Blue groun...

Page 10: ...ed If your television supports Q Link or RGB connect it to the DVD Recorder with a fully wired 21 pin Scart cable SETUP Connection AV1 Output 46 If your television supports Q Link follow the steps for Auto Setup with Q Link on page 11 If your television doesn t support Q Link follow the steps for Auto Setup without Q Link on page 11 Follow the steps below Disconnect AC mains from all units 1 Conne...

Page 11: ...splayed on the screen after the station search Then the analogue station positions are automatically transferred from the television The station transfer is complete when the Owner ID screen appears Auto Setup Ch 4 Suche Sender bitte warten RETURN abbrechen 35 Digital Auto Setup in progress please wait RETURN to abort RETURN Auto Setup Ch 4 Suche Sender bitte warten RETURN abbrechen 35 Analogue Au...

Page 12: ...4 AC IN 2 1 TV Connecting with Audio Video cable Y PB PR OPTICAL COMPONENT VIDEO OUT PROGRESSIVE INTERLACE DIGITAL AUDIO OUT PCM BITSTREAM S VIDEO OUT S VIDEO AV4 IN AV4 IN OUT AUDIO R R L L VIDEO AC IN AV1 TV AV2 EXT RF OUT RF IN DVD Recorder 4 TV 4 2 3 Audio input Connecting with S VIDEO cable AC mains lead Audio output Aerial input RF cable Aerial cable AC mains lead RF IN Aerial input RF OUT A...

Page 13: ...V2 21 pin Scart socket of the DVD Recorder and to the 21 pin Scart socket of the Connect a 21 pin Scart cable fully wired to the AV1 21 pin Scart socket of the DVD Recorder and to the 21 pin Scart socket of the TV set satellite receiver Connect the s DVD Recorder and TV set to the AC mains supply atellite receiver Switch on the TV set and DVD Recorder Set the settings for AV2 according to the conn...

Page 14: ...s the RF output channel may interfere with the TV stations transmitted in your area This may prevent you from seeing the On Screen Display clearly Please see page 15 for removing the interference before restarting Auto Setup You can complete the Owner ID now or skip this step and do it later To do it later press the RETURN button Your DVD Recorder is now ready to use To set the Owner ID now use an...

Page 15: ...N RF OUTPUT CHANNEL CH 31 DVD 1 2 3 4 5 6 7 8 9 0 PAGE CH F U N C T I O N S SETUP Disc Picture Sound Display Connection Others Edit Profiles Auto Setup Restart Add New DVB Service Tuning Manual Download from TV Digital Analogue Signal Quality Manual Tuning Pos Name Ch Pos Name Ch 901 BBC1 22 906 30 914 915 913 912 911 905 CH5 26 903 ITV 24 904 CH4 25 902 BBC2 23 916 Delete 907 909 910 908 RETURN S...

Page 16: ...a screen supports the progressive procedure connect it to the COMPONENT VIDEO OUT sockets If you want to enjoy progressive quality video set Progressive to On Red R White L Audio cable A B Video cable Audio input L R Green Y Blue PB A B Red PR C AUDIO OUT L R A B TV COMPONENT VIDEO IN PB PR Y A B C VIDEO AUDIO L R OUT S VIDEO AV4 IN S VIDEO OUT PB PR Y OPTICAL PCM BITSTREAM DIGITAL AUDIO OUT DVD R...

Page 17: ...ing to your connected digital amplifier You cannot use DTS Digital Surround decoders that are not suitable for DVD This device can playback stereo sound in Dolby Digital 2 channels Connect an amplifier with built in Dolby Digital decoder in order to be able to enjoy Surround Sound Connect this unit to a device with a DTS decoder in order to be able to play DVDs with this symbol 45 Before you conne...

Page 18: ...s GUIDE to open the TV Guide Use to navigate within the TV Guide list Only current and future programmes are shown You can also turn the smart wheel on your remote control to select an item Turning right Move the cursor keys downwards Turning left Move the cursor keys upwards Use PAGE to browse through the TV Guide list Jump ahead 24 hours Press the Green button to jump ahead by one day Jump back ...

Page 19: ...gby 20 30 21 00 Terminator 2 Scrapheap Chal 21 30 Red Cap Emmer Scrapheap Chall D I Y SOS Holiday Programme The Bill Easten Sex and the City News Pop Idol News ENTER RETURN SELECT 1 BBC 1 2 BBC 2 3 ITV 1 6 ITV 2 7 S4C 4 Chan 5 Five Prog Type Movies Category All Services Movies All Types News Entertainment Sports Children s Education Lifestyle Drama Prog Type Action News on BBC1 Abenteuer Wildnis T...

Page 20: ... facing upwards With double sided discs place the side that you want to play with the label facing up RAM Cartridge discs When the write protection device is activated you can neither record nor edit or delete the contents of a disc Remove 8cm discs from the cartridge before you use them on the unit Cartridge write protection DVD Video Recording Format VR This format enables the free editing of re...

Page 21: ...ype the regional code and the recording conditions it may not always be possible to play the discs listed Disc formats DVD RW DVD Video format Playback discs DIGITAL VIDEO SUPER VIDEO 21 49 RAM R RW V R RAM In order to playback a DVD R DVD RW DVD Video format or R recorded using this unit on another unit the disc may need to be finalised The disc may also not be able to be played back on other uni...

Page 22: ...sc TOP MENU Menu Menu Menu Title Title Title 5 15 0 0 0 0 0 0 0 0 0 0 0 0 0 0 0 0 0 0 0 0 0 0 0 0 0 0 0 0 0 0 0 0 0 0 0 0 0 0 0 0 0 0 0 0 0 0 0 0 0 0 0 0 0 0 0 0 0 0 0 0 0 0 0 0 0 0 0 0 0 0 0 0 0 0 0 0 0 0 0 0 0 0 0 0 0 0 0 0 0 0 0 0 0 0 0 0 5 5 5 5 5 5 5 5 5 5 5 5 5 5 5 5 5 5 5 5 5 5 5 5 5 5 5 5 5 5 5 5 5 5 5 5 5 5 5 5 5 5 5 5 5 5 5 5 5 5 5 5 5 5 5 5 5 5 5 5 5 5 5 5 5 5 5 5 5 5 5 5 5 5 5 5 5 5 5 ...

Page 23: ...direction Not SLOW SEARCH SKIP T C E R I D R O T A G I V A N T C E R I D R O T A G I V A N CD CD RAM R RW V R The pause function is automatically switched on after 5 minutes RAM R RW V R DIRECT NAVIGATOR TITLE VIEW DVD RAM Previous Next Page 02 02 BBC1 12 9 THU 07 RETURN ENTER Select S SUB MENU Previous Next DVD RAM PLAY x1 3 RAM Quick View Play x1 3 Increase playback speed without negative effect...

Page 24: ...icture Currently received picture receive channel The receive channel can be switched using the CH button This is not possible during a recording The TV picture is shown as picture in picture Playback started 30 seconds ago Image currently being recorded Press STOP to end the playback After 2 seconds press STOP again to stop the recording Use TIMER to stop a TIMER controlled recording Delayed play...

Page 25: ...etween 32 kbps and 320 kbps Compatible scan rate 44 1 kHz and 48 kHz Maximum number of recognisable Tracks and groups 999 Tracks and 99 groups The device is not compatible with ID3 Tags or Packet Writing If there are a lot of still images or Sessions the readout and playback of the disc can take some time Selecting a group using the tree structure After selecting a track in the file list press The...

Page 26: ...ide Show with ENTER The pictures in the folder are displayed in the selected interval The Slide Show stops after the last picture Use STOP or DIRECT NAVIGATOR to return to PICTURE JPEG VIEW In PICTURE JPEG VIEW use to select Folder If you confirm Folder with ENTER you can use in the following menu to select the desired Folder and confirm with ENTER Selecting a Folder Slide Interval Start Slide Sho...

Page 27: ...nit display changes with each press of the button This is not possible with FLEXIBLE REC or TIMER controlled recordings If you press STOP the recording will be stopped and the time setting deleted Direct TV recording Press DIRECT TV REC for 3 seconds The recording begins Press STOP to end the recording If your television is equipped with analogue tuner and Q Link functionality you can directly rec...

Page 28: ... position name of the TV station Date You can also programme titles to be recorded on a daily or weekly basis Start Start time Stop Stop time If you press and hold the buttons the time increases decreases in 30 minute increments Mode Recording mode XP SP LP EP FR STTL Subtitles ON or OFF Recorded subtitles cannot be switched off later For digital channels PDC cannot be selected PDC ON or For analo...

Page 29: ...on programme then you will be reminded of the pending start 1 minute before the recording starts Press TIMER if you want to start the timer recording Press RETURN if want to cancel the timer recording Even if you forget or don t want to press TIMER to switch to TIMER standby the recorder will start recording You have to press RETURN for cancelling the timer recording Checking changing or deleting ...

Page 30: ...U A currently running programme cannot be transfer to the TIMER RECORDING menu with ENTER Such programmes can be identified by the changed cursor It appears as a yellow frame around the selected entry If you want to record a programme that is currently running launch the TIMER RECORDING menu and perform the entries manually or press REC TIMER RECORDING from analogue channels 30 TIMER RECORDING CAN...

Page 31: ...DEO Plus Codes for Satellite stations The Satellite Receiver must be switched on and the correct station selected Some receivers have their own timer facility for this purpose Please refer to your Satellite Receiver instructions for use of such timer facilities For your DVD Recorder to recognise the VIDEO Plus Codes for each satellite station you must teach your DVD Recorder which channel or AV in...

Page 32: ...transmission of the signal is stopped Press EXT LINK Standby mode for TIMER controlled recordings is activated EXT Link lights up on the display Tuning Disc Picture Sound Display SETUP AV2 Input Video AV2 Settings Ext Link Ext Link 1 Connection Others Ext Link 2 Ext Ext Link 1 Ext Link 2 Ext Link SELECT RETURN ENTER RAM RAM RAM R RW V R R RW V R Recording from an external device e g a camera If yo...

Page 33: ...nd chapters protect recordings Create and edit playlists Format and finalize discs write protection Change the unit s default settings Automatic selection of the recording mode Programme recordings Open the 2nd screen page Back to 1st screen page Programme recordings with VIDEO Plus FUNCTIONS Selection Menu Disc Protections Off DVD RAM To Others Return SETUP DISCMANAGEMENT PLAYLISTS FLEXIBLEREC DI...

Page 34: ... this name Add Cancel SELECT 01 ASTRA 02 TERRALUNA RETURN SELECT ENTER SUB MENU S List Names Erase Name This title is currently being recorded The title overlaps other programmes The disc was full or the highest number of titles or scenes was reached so that the programme could not be recorded W F The title is write protected The television programme was copy protected so that the programme could ...

Page 35: ...P TERRALUNA RETURN SELECT ENTER BBC1 12 9 THU 01 DIRECT NAVIGATOR TITLE VIEW Previous Nächste DVD RAM Erase Properties Edit Chapter View RETURN ENTER 36 37 In the sub menu use Us o exit the screen to select the desired option and confirm with ENTER e RETURN to go back to the TITLE VIEW Press RETURN again t Erase When you perform this procedure the title is deleted and cannot be recovered Confirm E...

Page 36: ...witches to pause when the end of the track is reached The available recording time on the disc may remain the same after the erase process Use PAUSE and SKIP to jump to the beginning or end of a title You can search for begin and end points with SLOW SEARCH TIME SLIP or 36 DIRECT NAVIGATOR F U N C T I O N S Enter Name Set up Protection Cancel Protection Partial Erase Change Thumbnail Divide Title ...

Page 37: ...nd confirm with ENTER To edit several elements use to select the desired title and press PAUSE DIRECT NAVIGATOR CHAPTER VIEW Combine Chapters Select Chapter Following Chapter Combine chapters 03 ITV 1 10 FRI 001 002 Next Previous Erase Chapter Create Chapter Combine Chapters Title View Combine Cancel 17 ITV 1 10 FRI CARS DIRECT NAVIGATOR CHAPTER VIEW RETURN DIRECT NAVIGATOR TITLE VIEW Previous Nex...

Page 38: ...confirm a selected source title with ENTER the entire title is saved into the PLAYLISTS PLAYLISTS Create 03 ITV 1 10 FRI CARS 01 Source Title Source Chapter Chapters in PLAYLIST 001 Page 01 01 Page 001 001 Page 001 001 DVD RAM 04 002 003 002 PLAYLISTS Create 03 ITV 1 10 FRI CARS 01 Source Title Source Chapter Chapters in PLAYLIST Page 01 01 Page 001 001 Page 001 001 DVD RAM 04 PLAYLISTS Create 03 ...

Page 39: ...ge to be displayed as the preview in TITLE VIEW The image will be displayed as the preview for approx 1 second after the beginning of the title Use to select Change Thumbnail and confirm with ENTER In the Change Thumbnail menu press PLAY to start the playback Press ENTER at the selected spot Confirm Exit with ENTER The displayed preview is exchanged for this image Press FUNCTIONS Use to select To ...

Page 40: ...e 001 001 Page 001 001 Press RETURN to exit Erase Properties Edit Chapter View DVD RAM DVD RAM DVD RAM RETURN ENTER S SUB MENU 01 03 001 003 01 03 001 Create Chapter Press ENTER at the spot where you want to create the chapter Repeat this step to create a chapter at another spot Use to select Exit and confirm with ENTER A short section of the recording right before the dividing point can be lost C...

Page 41: ...gation The unit saves your settings Use to return to the sub menu and use RETURN to exit the menu Use FUNCTIONS to return to the FUNCTIONS menu Tuning Disc Picture Sound Display Connection SETUP Others Clock Quick Start Owner ID Shipping Condition On Remote Control DVD 1 Default Settings Sub menu Settings Options RETURN SELECT TAB ENTER Tuning Manual Menu navigation in the SETUP menu Sub menu Sett...

Page 42: ...the 4 profiles Use to jump back and forth between the two tables To edit a new profile use to go to the left side of the table and press the GREEN button Use to select the desired station and press the YELLOW button The station is inserted into the profile To insert additional stations press the YELLOW button again Press ENTER to save the setting Select a new profile and press the BLUE button All ...

Page 43: ...e Television Station Use to select an empty station position and confirm ENTER Enter the channel using or The channel tuning starts Wait until the desired station is set and confirm the settings with ENTER 0 0 0 0 0 0 0 0 0 0 0 0 0 0 0 0 0 0 0 0 0 0 0 0 0 0 0 0 0 0 0 0 0 0 0 0 0 0 0 0 0 0 0 0 0 0 0 0 0 0 0 0 0 0 0 0 0 0 0 0 0 0 0 0 0 0 0 0 0 0 0 0 0 0 0 0 0 0 0 0 0 0 0 0 0 0 0 0 0 0 0 0 0 0 0 0 9 ...

Page 44: ...orarily unlock a disc for playback The unit is locked again when you switch to standby or open the disc tray Soundtrack Subtitle Menus Recording time in EP mode EP 6Hours Recording time on a 4 7GB disc EP 8Hours Recording time on a 4 7GB disc The sound quality is lower Select the maximum number of hours for recording in EP mode EP 6Hours EP 8Hours Select the language for Soundtrack Subtitle and Me...

Page 45: ...grammes on discs that were broadcast in dual channel tone you can choose between the original language M 1 or another available language M 2 If you are copying from an external source or a tape position to disc select the sound track on the other unit M 1 M 2 Select the appropriate setting if an external unit is connected to the DIGITAL AUDIO OUT of the DVD Recorder On The sound is still clearly a...

Page 46: ...VB Preferred Subtitles New Service Message On Off Select the language for DVB Subtitles Tuning Disc Picture Sound Display SETUP AV2 Settings Connection AV2 Input RGB Video Others Ext Link Ext Link 1 New Service Yes No A new DVB service has been found Add to the list of All Services Tuning Others Disc Picture Sound Display Connection SETUP On Screen Messages Automatic Grey Background On FL Display ...

Page 47: ... On the unit press STOP for more than 5 seconds Use to switch automatic mode to Off and confirm with ENTER Use and to change Time and Date Confirm the change with ENTER ENTER ENTER Others Clock Option The PIN number is not displayed After 30 seconds this menu automatically disappears The clock will normally be set correctly during Auto Setup however in some circumstances the DVD Recorder cannot se...

Page 48: ...ne The software download will not be executed if the unit is in EXT Link mode between 3 05 am and 5 05 am If the system finds an update a message appears on the screen Press Yes to load the new software to your unit The download takes approximately 15 minutes Do not switch your unit off while the update is running This may result in data loss A message appears on the screen when the update is comp...

Page 49: ...cted discs or titles cannot be erased RAM RAM R RW V R RAM DISC MANAGEMENT DISC MANAGEMENT DVD RAM Remain 0 59 XP Off Disc Name Title No 1 Used 0 01 Format Disc Disc Protection Erase all titles RETURN SELECT ENTER Format Disc Formatting will erase all contents This will take approximately 1 minute Start formatting Format Disc All contents will be erased even if protected Start formatting Yes No St...

Page 50: ... Video format Use to select Yes and confirm with ENTER Use to select Start and confirm with ENTER The finalisation process begins and takes approx 15 minutes When this process is finished a confirmation message appears Press ENTER Do not unplug the unit while the disc is being finalized You can only finalize Discs that were recorded on this unit You can no longer record to already finalized Discs ...
Page 51: ...how Display only VCD RAM RW VR Disc Option Setting DISPLAY Repeat Play On Off Title Chapter Off Track All Off Track Group Off PL PLAYLISTS Off Playback NR Picture Option Setting V S S Sound Option Setting Natural Emphasis Off Dialog Enhancer CD VCD MP3 DVD A RAM On Off On Off Playback NR Off V S S Off Position 1 Dialog Enhancer Off Position Other Option Setting 1 5 Repeat Play Off Disc Play Pictur...

Page 52: ...le 1 Change Category 11 BBC NEWS 24 10 46 All Services Business Today 20 30 21 00 Now Exit info Business News from the world TXT Subtitle T X E T MANUALSKIP ERASE CREATE CHAPTER No Banners with information are displayed for analogue channels When changing channels or if you press the button a Banner appears with the option of changing the current profile Press the blue button to change the profile...
Page 53: ...symbol are trademarks of Dolby Laboratories DTS Digital Theater Systems Sound system used in cinemas or movie theaters all over the world DTS and DTS 2 0 Digital Surround are trademarks of Digital Theater Systems Inc MP3 or MPEG 1 Audio Layer 3 is a file compression format used for digital audio files It provides files of an extremely small size and may cause a consequential loss of quality MPEG L...

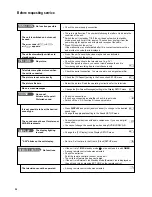
Page 54: ...provide the code that is displayed No sound Volume set to quiet Distorted sound It is not possible to hear the desired sound type The sound cannot be set for stereo or NICAM broadcasts î Check the connections î If you have connected an amplifier check its input mode î Switch off the V S S function if it causes problems î Press DISPLAY and select audio channel to change to the desired sound type î ...

Page 55: ...î In the case of a TIMER controlled recording via an external device press EXT LINK EXT L disappears 49 49 29 32 TV Guide 20 55 EXTERNAL INPUT 17 î The external device is not connected correctly î The correct external input channel AV2 or AV3 was not selected Video or audio from external device is not recorded EXTERNAL INPUT PLAYBACK 44 44 7 53 DVD Video will not play A title or chapter is not pla...
Page 56: ...x 4 hours EP Approx 6 hours 8 hours Playable discs DVD RAM DVD R DVD RW R RW DVD Video DVD Audio CD Audio CD DA Video CD CD R RW MP3 CD DA Video CD JPEG formatted discs SVCD conforming to IEC62107 Video Video System PAL colour signal 625 lines 50 fields NTSC colour signal 525 lines 60 fields Recording system MPEG2 Hybrid VBR Video In PAL NTSC AV1 AV2 21 pin AV3 AV4 pin jack 1 Vp p 75 Ù termination...
Reviews: