13
RQT8859
1
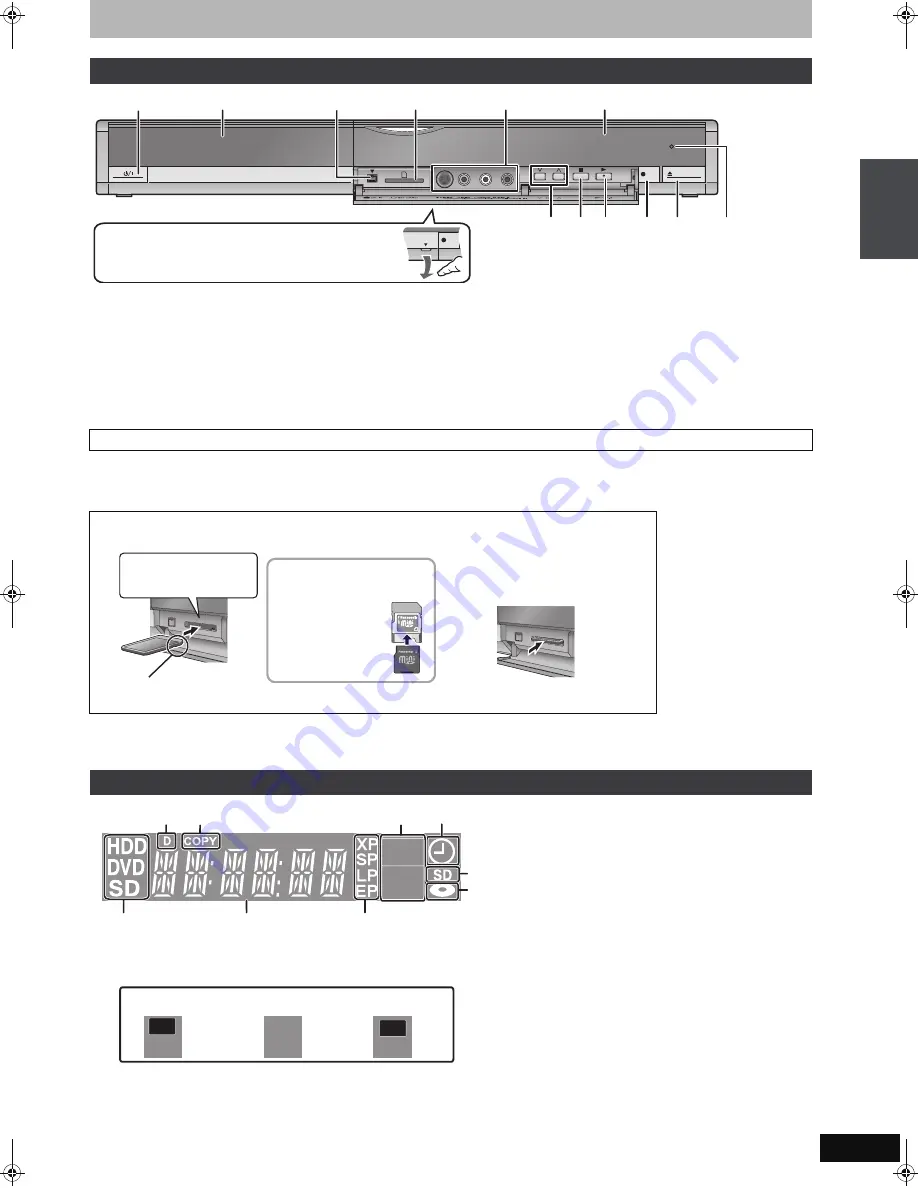
Standby/on switch (
Í
/I)
(
➡
20)
Press to switch the unit from on to standby mode or vice versa. In
standby mode, the unit is still consuming a small amount of power.
2
Disc tray (
➡
24, 34)
3
Connection for digital video (DV) camcorder (
➡
58)
4
SD Card slot (
➡
below)
5
Connection for VCR, camcorder etc. (
➡
58)
6
Display (
➡
below)
7
Channel select (
➡
23, 24)
8
Stop (
➡
24, 35)
9
Start play (
➡
34)
:
Start recording (
➡
24)/Specify a time to stop recording (
➡
26)
;
Open/close disc tray (
➡
24, 34)
<
Remote control signal sensor
Rear panel terminals (
➡
14–17)
When the card indicator (“SD”) on the unit’s display is flashing, the card is being read from or written to. Do not turn off the unit or remove the card.
Such action may result in malfunction or loss of the card’s contents.
≥
Inserting foreign objects can cause a malfunction.
≥
You can use SD Cards with capacities from 8 MB to 4 GB (
➡
7).
Automatic drive select function
≥
If you insert an SD Card while the unit is stopped, the “SD Card” screen is displayed. Select an item and press [OK] to switch to the SD drive
(
➡
40, 56).
If you remove an SD Card, the HDD drive is automatically selected.
4
Timer recording indicator
5
SD Card slot indicator
6
Disc indicator
Lights when a disc that is supported by this unit is inserted in the
tray.
7
Drive (HDD, DVD or SD) indicator
Lights when the HDD, DVD or SD drive is selected.
8
Main display section indicator
9
Recording mode indicator
Main unit
REC
OPEN/CLOSE
REC
1
2
4
5
6
7 8 9
: ;
<
3
Opening the front panel
Place your finger on the protruding section below the
4
and
press down to flip open the front panel.
Inserting, Removing the SD Card
Inserting the card
Removing the card
The unit’s display
ADAPTER
If you are using a
miniSD card, insert it
into the miniSD card
adaptor that comes
with the card.
Insert and remove this
adaptor from the unit.
Press on the centre of the
card until it clicks into
place.
Insert the card label up with
the cut-off corner on the right.
1
2
Press on the centre of
the card.
Pull it straight out.
PLAY
PLAY
PLAY
REC
REC
REC
1
2
4
3
8
9
5
6
7
3
1
Digital broadcast indicator
Lights when the unit is receiving digital broadcast or TV Guide data.
2
Copying indicator
Lights during copy.
Recording
indicator
Playback
indicator
Recording/
Playback indicator
Playback
indicator
Contr
o
l r
e
fe
re
nc
e
guide
EX77_87GN.book Page 13 Wednesday, May 30, 2007 1:10 PM


