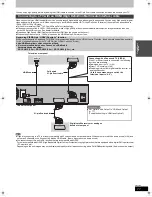
12
VQT2J46
STEP
2
Channel reception settings and TV aspect settings
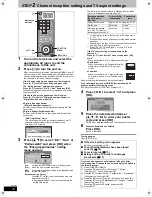
1
Turn on the television and select the
appropriate AV input to suit the
connections to this unit.
2
Press [
Í
] to turn the unit on.
When connecting to a television that has the VIERA Link or Q
Link functions (
>
46), downloading from the television starts.
You can download the tuning positions from the television for
the channels in this unit’s channel coverage.
“DVB Auto-Setup” starts.
The unit will search for the terrestrial digital channels. TV
channels will be located and stored ready for use.
This takes 5-10 minutes.
3
Press [
3
,
4
] to select “Ein”, “Aus” or
“Zeitauswahl” and press [OK] when
the “Energiesparmodus” setting
menu appears.
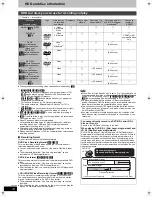
The features of the Power Save in Standby function when
the unit is in standby mode are as below.
§
1
“Unit’s Display” is set to “Automatic” in the Setup menu.
(
>
76)
§
2
It is possible to startup and start recording within several
seconds.
– Depending on the type of TV or the connected terminal, it
may take time to display the screen.
§
3
When “RF OUT ( Aerial Signal )” is set to “Off” in the
Setup menu (
>
79)
If the TV aspect setting screen appears on the
television.
Press [
3
,
4
] to select the TV aspect and press [OK].
≥
16:9:
When connected to a 16:9 widescreen television.
≥
Pan & Scan:
When connected to a 4:3 aspect television,
side picture is trimmed for 16:9 picture
(
>
96).
≥
Letterbox:
When connected to a 4:3 aspect television.
16:9 picture is shown in the letterbox style
(
>
96).
When television picture appears, set up is complete.
If the confirmation screen of GUIDE Plus+ data download
appears, perform the following steps.
(For information about GUIDE Plus+ system
>
13)
4
Press [
2
,
1
] to select “Ja” and press
[OK].
5
Press the numbered buttons or
[
3
,
4
,
2
,
1
] to enter your postal
code and press [OK].
GUIDE Plus+ data download starts. This takes about 30 minutes.
6
When the download has finished
Press [OK].
Set up is complete.
To stop partway
Press [RETURN ].
If the Country setting menu appears on the television.
Press [
3
,
4
] to select the country and press [OK].
The “Aktive Antenne” setting menu appears.
Press [
3
,
4
] to select “Ein” or “Aus” and press [OK].
When using indoor antenna that is not equipped with power
supply, select “Ein”.
If the Auto setup menu appears on the television.
Press [
3
,
4
] to select “Digitale & analoge Sender” or
“Digitale Sender” and press [OK].
≥
Digitale & analoge Sender
(Digital & Analogue channels):
Perform the analogue Auto-Setup after performing the DVB
Auto Setup.
≥
Digitale Sender (Digital channels):
Perform the DVB Auto Setup. (analogue Auto-Setup is not
performed)
Ein
(On):
It will go into the Power Save in Standby mode
when the unit is in standby mode.
Aus
(Off):
It is possible to start quickly from the standby mode.
(Quick Start mode)
Zeitauswahl (On Timer):
Press [
3
,
4
,
2
,
1
]
to set the start and stop time
and then press [OK].
≥
“Energiesparmodus” is set to activate during the
setting time period.
MANUAL SKIP
STOP
PAUSE
PLAY
INPUT
SELECT
0
9
8
7
6
5
4
3
2
1
CH
CH
TRACKING/V-LOCK/PAGE
ShowView
PROG/CHECK
SKIP/INDEX
REW
FF
SLOW/SEARCH
PAUSE LIVE TV
RESET
VOL
AV
DRIVE
SELECT
TV
STATUS
EXIT
OPTION
RETURN
DELETE
OK
DIR
ECT
NA
VIG
ATO
R
FUN
CTIO
N M
ENU
GUIDE
OK
,
,
,
OK
0
9
8
7
6
5
4
3
2
1
RETURN
FUN
CTIO
N M
ENU
FUNCTION
MENU
Numbered
buttons
DVB Auto-Setup
Suchlauf
Kan 5
69
Kanal
Qualität
Sendername
Typ
ABC
ABC 2
1
2
TV
Daten
9
9
Energiesparmodus
Energiesparmodus
Ein
Bis
6
:00
Von
0
:00
Minimiert Stromverbrauch im Standby-Modus
d
h D
k i i
d
S h
ll
Energiesparmodus
(Power Save in
Standby)
Activated (
Ein
/
Zeitauswahl)
§
1
Deactivated
(
Aus
)
Power consumption
Approx. 0.5 W
§
3
Approx. 16 W
Startup time
Not Quick
Quick
§
2
Watching the picture
(e.g. Pay TV) from the
device connected to AV2
Cannot do
Can do
∫
If the clock setting menu appears
Set the clock manually (
>
78).
∫
To confirm that stations have been tuned
correctly (
>
74)
∫
To restart set up (
>
73)
∫
Settings of the TV Guide for Analogue
broadcasts (
>
13)
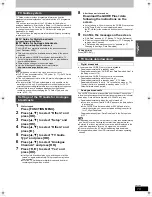
On screen messages are not displayed in English. After
completing step 6, change the on-screen display to
En
g
lish
in
the following steps.
1
Press [FUNCTION MENU].
2
Press [
3
,
4
] to select “Weit. Funktionen” / “Autres” /
“Altre funzioni” / “Otras” and press [OK].
3
Press [
3
,
4
] to select “Setup” / “Configuration” / “Impostazioni” /
“Configuración” and press [OK].
4
Press [
3
,
4
] to select “Display” / “Affichage” and press [
1
].
5
Press [
3
,
4
] to select “Sprachauswahl” / “Langue” / “Lingua” /
“Idioma” and press [OK].
6
Press [
3
,
4
] to select “English” and press [OK].
7
Press [EXIT].
Postleitzahl
Gewähltes Land : XXXXXX
Dieses Gerät aktualisiert die
GUIDE Plus+ Daten
mehrmals pro Tag.
CHANGE
DMR-EX99VEG-VQT2J46_eng.book 12 ページ 2010年1月14日 木曜日 午前10時31分


