background image

7

VQT1B86

• [AUDIO REC.] 

Recording still pictures with audio .... 62

• [AF MODE]

Setting the focus method.................. 62

• [STABILIZER]

Detecting jitter and compensating 
for it .................................................. 63

• [BURST]

Taking Pictures using Burst.............. 64

• [AF ASSIST LAMP]

Focusing in low light conditions 
becomes easier ................................ 65

• [SLOW SHUTTER]

Recording bright pictures in 
dark places ....................................... 66

• [COL.MODE]

Setting a color effect and picture 
quality for the recorded picture ......... 66

Advanced (Playback)

Displaying Multiple Screens 

(Multi Playback)................................... 67

Displaying Pictures by Recording Date 

(Calendar Playback)............................ 67

Using the Playback Zoom ....................... 68
Playing Back Motion Pictures/

Pictures with Audio.............................. 69

Creating still pictures from a 

motion picture...................................... 70

Using the [PLAY] mode menu ................ 72

• [SLIDE SHOW]

Playing back pictures in order 
for a fixed duration............................ 72

• [FAVORITE]

Setting your favorite pictures ............ 74

• [ROTATE DISP.]/[ROTATE]

To display the picture rotated ........... 74

• [DATE STAMP]

Stamping information such as the 
date on the recorded pictures........... 75

• [DPOF PRINT]

Setting the picture to print and the 
number of prints ............................... 77

• [PROTECT]

Preventing accidental erasure of 
pictures ............................................. 79

• [AUDIO DUB.] 

Adding audio after taking pictures .... 80

• [RESIZE]

Making the picture smaller................ 80

• [TRIMMING]

Enlarging a picture and trimming it...... 81

• [ASPECT CONV.]

Changing the aspect ratio of 
a 16:9 picture.................................... 82

• [COPY]

Copying the picture data................... 83

• [FORMAT] 

Initializing the built-in memory or 
a card................................................ 84

Connecting to other equipment

Connecting to a PC................................. 85
Printing the Pictures................................88
Playing Back Pictures on a TV Screen ...... 92

Others

Screen Display........................................93
Cautions for Use ..................................... 95
Message Display ....................................97
Troubleshooting ......................................99
Number of Recordable Pictures and 

Available Recording Time .................104

Specifications........................................107
Digital Camera Accessory System........ 110
Digital Camera Accessory Order Form

(For USA Customers)........................ 111

Request for Service Notice 

(For USA Only)..................................112

Limited Warranty (For USA Only) .........113
Customer Services Directory 

(For USA Only)..................................115

Précautions à prendre 

(pour le Canada) ............................... 116

Index .....................................................118

Summary of Contents for DMC-FX30A - Lumix Digital Camera

Page 1: ...rating or adjusting this product please read the instructions completely For USA assistance please call 1 800 272 7033 or send e mail to digitalstillcam us panasonic com For Canadian assistance please call 1 800 99 LUMIX 1 800 995 8649 or send e mail to lumixconcierge ca panasonic com PC P ...

Page 2: ...fety Carefully observe copyright laws Recording of pre recorded tapes or discs or other published or broadcast material for purposes other than your own private use may infringe copyright laws Even for the purpose of private use recording of certain material may be restricted Model No Serial No WARNING TO REDUCE THE RISK OF FIRE ELECTRIC SHOCK OR PRODUCT DAMAGE DO NOT EXPOSE THIS APPARATUS TO RAIN...

Page 3: ...to Part 15 of the FCC Rules These limits are designed to provide reasonable protection against harmful interference in a residential installation This equipment generates uses and can radiate radio frequency energy and if not installed and used in accordance with the instructions may cause harmful interference to radio communications However there is no guarantee that interference will not occur i...

Page 4: ...ian ICES 003 Information on Disposal in other Countries outside the European Union This symbol is only valid in the European Union If you wish to discard this product please contact your local authorities or dealer and ask for the correct method of disposal CAUTION Battery pack Lithium ion battery pack Use the specified unit to recharge the battery pack Do not use the battery pack with equipment o...

Page 5: ...camera becomes close to the ambient temperature Read together with the Cautions for Use P95 About cards that can be used in this unit You can use an SD Memory Card an SDHC Memory Card and a MultiMediaCard When the term card is used in these operating instructions this refers to the following types of Memory Cards SD Memory Card 8 MB to 2 GB SDHC Memory Card 4 GB MultiMediaCard More specific inform...

Page 6: ...ormation displayed 31 Brightening the LCD Monitor Power LCD High angle mode 33 Taking Pictures using the Built in Flash 34 Taking Pictures with the Self timer 38 Compensating the Exposure 39 Taking Pictures using Auto Bracket 40 Changing the sensitivity according to the movement of the subject being recorded 41 Taking Close up Pictures 42 Taking pictures that match the scene being recorded Scene m...

Page 7: ... 74 DATE STAMP Stamping information such as the date on the recorded pictures 75 DPOF PRINT Setting the picture to print and the number of prints 77 PROTECT Preventing accidental erasure of pictures 79 AUDIO DUB Adding audio after taking pictures 80 RESIZE Making the picture smaller 80 TRIMMING Enlarging a picture and trimming it 81 ASPECT CONV Changing the aspect ratio of a 16 9 picture 82 COPY C...

Page 8: ...l You can record or play back pictures on the built in memory when you are not using a card P13 For information about optional accessories refer to the Digital Camera Accessory System P110 If any accessories are lost customers in the USA should contact Panasonic s parts department at 1 800 833 9626 and customers in Canada should contact 1 800 99 LUMIX 1 800 995 8649 for further information about o...

Page 9: ...51 62 80 14 Shutter button P22 51 15 Mode dial P15 16 Strap eyelet 17 Lens barrel 18 AV OUT DIGITAL socket P85 88 92 19 DC IN socket P85 88 Always use a genuine Panasonic AC adaptor DMW AC5PP optional This camera cannot charge the battery even though the AC adaptor DMW AC5PP optional is connected to it 20 Tripod receptacle When you use a tripod make sure the tripod is stable when the camera is att...

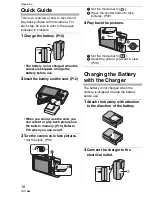
Page 10: ...ou can record or play back pictures on the built in memory P13 Refer to P13 when you use a card 3 Turn the camera on to take pictures Set the clock P14 1 Set the mode dial to 2 Press the shutter button to take pictures P22 4 Play back the pictures 1 Set the mode dial to 2 Select the picture you want to view P29 Charging the Battery with the Charger The battery is not charged when the camera is shi...

Page 11: ...able pictures By CIPA standard in normal picture mode Recording conditions by CIPA standard Temperature 23 C 73 4 F Humidity 50 when LCD monitor is on Using a Panasonic SD Memory Card 16 MB Using the supplied battery Starting recording 30 seconds after the camera is turned on When the optical image stabilizer function is set to MODE1 Recording once every 30 seconds with full flash every second rec...

Page 12: ...tween 10 oC to 35 oC 50 oF to 95 oF The battery temperature should also be the same The performance of the battery may temporarily deteriorate and the operating time may become shorter in low temperature conditions e g skiing snowboarding Inserting and Removing the Card optional the Battery Check that this unit is turned off Prepare a card optional You can record or play back pictures on the built...

Page 13: ...nic card About the Built in Memory the Card optional The built in memory can be used as a temporary storage device when the card being used becomes full Built in Memory You can record or play back pictures with the built in memory The built in memory cannot be used when a card is inserted The built in memory capacity is about 27 MB Picture size is fixed to QVGA 320k240 pixels when recording motion...

Page 14: ...nd the available recording time for each Card We recommend using High Speed SD Memory Cards SDHC Memory Cards when recording motion pictures P51 The data on the built in memory or the card may be damaged or lost due to electromagnetic waves static electricity or breakdown of the camera or the card We recommend storing important data on a PC etc Do not format the card on your PC or other equipment ...

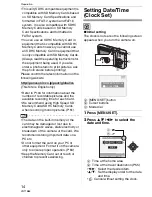
Page 15: ...the clock setting is canceled after this length of time In this case set the clock again You can set the year from 2000 to 2099 The 24 hour system is used If the clock is not set the correct date cannot be printed when you stamp the date on the pictures with DATE STAMP P75 or order a photo studio to print the pictures P78 About the Mode Dial If you turn on this unit and then rotate the mode dial y...

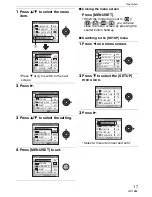
Page 16: ...int pictures Setting the Menu Displaying the menu screens Press MENU SET e g The first page of the total 3 pages is displayed A Menu icons B Current page C Menu items and settings Rotate the zoom lever while selecting the menu item to switch to the next previous page easily The menu icons and the menu items that are displayed differ depending on the position of the mode dial About the menu icons R...

Page 17: ...TY PICT SIZE ASPECT RATIO AWB W BALANCE REC 1 3 QUALITY EXIT MENU SELECT REC 2 3 AF ASSIST LAMP ON AF MODE OFF BURST AUDIO REC STABILIZER MODE1 OFF SET MENU SELECT REC 2 3 AF ASSIST LAMP BURST STABILIZER OFF MODE1 ON AF MODE OFF AUDIO REC ON REC 2 3 AF ASSIST LAMP BURST STABILIZER AF MODE SET MENU SELECT OFF MODE1 ON OFF AUDIO REC ON SET MENU REC 2 3 AF ASSIST LAMP ON BURST STABILIZER SELECT AF MO...

Page 18: ...hen AUDIO REC or SELF PORTRAIT in scene mode is set to ON POWER SAVE Turning off this unit automatically Press to display the SETUP menu and select the item to set P16 Power save mode is activated the camera is automatically turned off to save the battery life if the camera has not been used for the time selected on the setting 1MIN 2MIN 5MIN 10MIN OFF Press the shutter button halfway or turn this...

Page 19: ...hen the guide lines are displayed REC INFO ON OFF HISTOGRAM ON OFF PATTERN TRAVEL DATE P53 Press to display the SETUP menu and select the item to set P16 Set the departure date and the return date of the vacation SET OFF BEEP Press to display the SETUP menu and select the item to set P16 This allows you to set the beep BEEP LEVEL No operation sound Soft operation sound Loud operation sound BEEP TO...

Page 20: ...match the color television system in each country NTSC Video output is set to NTSC system PAL Video output is set to PAL system TV ASPECT Playback mode only Press to display the SETUP menu and select the item to set P16 Set to match the type of TV When connecting to a 16 9 screen TV When connecting to a 4 3 screen TV SCENE MENU Press to display the SETUP menu and select the item to set P16 Set the...

Page 21: ...n memory When using the card Do not do the following when the access indication lamps lights The card or the data on the card may be damaged and this unit may no longer operate normally Turn this unit off Remove the battery or the card when using a card Shake or bump this unit Disconnect the AC adaptor DMW AC5PP optional when using the AC adaptor Do not do the above when pictures are being read or...

Page 22: ...en and the AF area 1 turns from white to green 3 Aperture value 4 Shutter speed The focus range is 50 cm 1 64 feet to The subject is not focused in the following cases The focus indication blinks green The AF area turns white to red or there is no AF area The focus sound beeps 4 times If the distance is beyond the focus range the picture may not be properly focused even if the focus indication lig...

Page 23: ...ject When taking a picture in dark places When the subject is moving fast When the scene has low contrast When recording a very bright subject When taking close up pictures of a subject When jitter occurs Try the AF AE lock technique or macro mode Color P58 The color of the subject will differ if the color of the light surrounding it differs such as when the light comes from sunlight or halogen li...

Page 24: ...ment the shutter button is pressed until the picture appears on the screen We recommend using a tripod Slow sync Red eye reduction P34 NIGHT PORTRAIT P45 NIGHT SCENERY P45 PARTY P46 CANDLE LIGHT P46 STARRY SKY P48 FIREWORKS P49 When the shutter speed is slowed in SLOW SHUTTER P66 Taking Pictures in Simple Mode This mode allows beginners to take pictures easily Only the basic functions appear in th...

Page 25: ...ITY P60 This setting becomes the same as when the highest ISO sensitivity is set to ISO800 in Intelligent ISO sensitivity mode P41 ASPECT RATIO PICT SIZE QUALITY P60 61 ENLARGE 7M 4qk6q 10k15cm 2 5M EZ E MAIL 0 3M EZ AF MODE P62 AF ASSIST LAMP P65 ON You cannot use the following functions High angle mode White balance fine adjustment Exposure compensation Auto bracket AUDIO REC D ZOOM BURST SLOW S...

Page 26: ... zoom lever towards Tele To make subjects appear further away use Wide Rotate the zoom lever towards Wide Picture size and maximum zoom magnification Available Not available Extended optical zoom mechanism When you set the picture size to 3M EZ 3 million pixels the 7M 7 million pixels CCD area is cropped to the center 3M 3 million pixels area allowing a picture with a higher zoom effect The optica...

Page 27: ...k digital zoom Menu operation 1 Press MENU SET When a scene mode is selected select the REC menu and then press 1 2 Press 3 4 to select D ZOOM and then press 1 3 Press 4 to select ON and then press MENU SET 4 Press MENU SET to close the menu You can also press the shutter button halfway to close the menu Entering the digital zoom range The on screen zoom indication may momentarily stop moving when...

Page 28: ...picture 1 Play back the next picture Enlarging the picture 1 Rotate the zoom lever towards T Rotate the zoom lever to T for a 4k magnification and then rotate it even more for a 8k magnification When you rotate the zoom lever towards W after enlarging the picture the magnification becomes lower 2 Press 3 4 2 1 to move the position When you change the magnification or the position to be displayed t...

Page 29: ...d on the DCF standard Design rule for Camera File system which was established by the JEITA Japan Electronics and Information Technology Industries Association The LCD monitor may not be able to display the details of the recorded pictures You can use the playback zoom P68 to check the details of the pictures If you play back pictures that have been recorded with other equipment the picture qualit...

Page 30: ...lt in memory and the card at the same time DELETE ALL PICTURES ON THE BUILT IN MEMORY or DELETE ALL PICTURES ON THE MEMORY CARD is displayed when using ALL DELETE and DELETE ALL EXCEPT is displayed when using ALL DELETE EXCEPT If you press MENU SET while deleting pictures using ALL DELETE or ALL DELETE EXCEPT the deleting will stop halfway Do not turn off the camera while deleting When deleting pi...

Page 31: ...LINE in SETUP menu P19 You can also set whether or not to have the recording information and histogram displayed when the guide lines are displayed In playback mode H Normal display I Display with recording information and histogram J No display 3 Displayed if BIRTHDAY SET and WITH AGE were set in BABY1 BABY2 P46 or PET P47 in scene mode before taking pictures 4 The number of days that have passed...

Page 32: ...ram feature allows you to get the maximum performance from your camera A When the values are concentrated on the left the picture is under exposed B When the values are distributed evenly the exposure is proper and the brightness is well balanced C When the values are concentrated on the right the picture is overexposed Examples of histogram A Under Exposed B Properly Exposed C Overexposed Histogr...

Page 33: ...ISPLAY LCD LCD MODE SET SELECT MENU LCD OFF POWER LCD HIGH ANGLE POWER LCD The LCD monitor becomes brighter and easier to see even when taking pictures outdoors HIGH ANGLE The LCD monitor is easier to see when taking pictures with the camera held high above your head This is useful when you cannot get close to the subject because there is a person in the way However it becomes more difficult to se...

Page 34: ...reen is difficult to see because of light from the sun etc shining on it use your hand or another object to block the light High angle mode is not activated in the following cases In simple mode In playback mode In print mode While the menu screen is displayed While the review screen is displayed Taking Pictures using the Built in Flash A Photo flash Do not cover it with your fingers or other obje...

Page 35: ...RTY P46 or CANDLE LIGHT P46 in scene mode Slow sync Red eye reduction 1 If you take a picture with a dark background landscape this feature will slow the shutter speed when the flash is activated so that the dark background landscape will become bright Simultaneously it reduces the red eye phenomenon Use this when you take pictures of people in front of a dark background Forced OFF The flash is no...

Page 36: ...rded picture may become dark Rotate the zoom lever slightly and then take the picture Available flash range in Intelligent ISO sensitivity mode ISO sensitivity Available flash range AUTO Wide 60 cm 1 97 feet to 5 0 m 16 4 feet Tele 30 cm 0 98 feet to 2 5 m 8 20 feet ISO100 Wide 60 cm 1 97 feet to 2 0 m 6 56 feet Tele 30 cm 0 98 feet to 1 0 m 3 28 feet ISO200 Wide 60 cm 1 97 feet to 2 8 m 9 19 feet...

Page 37: ...rging This does not happen when using the AC adaptor DMW AC5PP optional If the remaining battery power is low the length of time that the LCD monitor turns off to charge may become longer When you take a picture beyond the available flash range the exposure may not be adjusted properly and the picture may become bright or dark When the flash is being charged the flash icon blinks red and you canno...

Page 38: ...canceled When using a tripod etc setting the self timer to 2 seconds is a convenient way to avoid the jitter caused by pressing the shutter button When you press the shutter button once fully the subject is automatically focused just before recording In dark places the self timer indicator will blink and then may turn on brightly operating as an AF assist lamp P65 to allow the camera to focus on t...

Page 39: ...nsate from j2 EV to i2 EV in steps of 1 3 EV Select 0 EV to return to the original exposure 2 Press MENU SET to finish You can also press the shutter button halfway to finish EV is an abbreviation of Exposure Value It refers to the amount of light given to the CCD by the aperture value and the shutter speed The exposure compensation value appears on the lower left of the screen The set exposure va...

Page 40: ...ng the exposure compensation range the pictures taken are based on the selected exposure compensation range When the exposure is compensated the exposure compensation value appears on the lower left of the screen The auto bracket setting is canceled if you turn the camera off or power save mode is activated When setting auto bracket and burst mode simultaneously auto bracket will be performed When...

Page 41: ...eed faster Noise is avoided when taking pictures indoors of a subject with no movement by decreasing the ISO sensitivity When you press the shutter button halfway A appears When you press the shutter button fully the shutter speed and the ISO sensitivity appear for a while The focus range becomes the same as macro mode 5 cm 0 16 feet Wide 30 cm 0 98 feet Tele to When the flash is activated the ISO...

Page 42: ... timer P38 in macro mode When a subject is close to the camera the effective focus range depth of field is significantly narrowed Therefore if the distance between the camera and the subject is changed after focusing on the subject it may become difficult to focus on it again If the distance between the camera and the subject is beyond the focus range of the camera the picture may not be properly ...

Page 43: ...mode are displayed If you press DISPLAY again the screen returns to the SCENE MODE menu Refer to P37 for information about the shutter speed The flash setting is memorized even if the camera is turned off However the scene mode flash setting is reset to the initial setting when the scene mode is changed When you take a picture with a scene mode that is not adequate for the purpose the hue of the p...

Page 44: ...ISO100 Press to display the SCENE MODE menu and select a scene mode P43 Select this to take pictures of yourself Technique for Self portrait mode Press the shutter button halfway to focus The self timer indicator lights up when you are brought into focus Making sure you hold the camera still press the shutter button fully to take the picture The subject is not focused when the self timer indicator...

Page 45: ...ctures of a person and the background with near real life brightness Technique for Night portrait mode Use the flash Since the shutter speed becomes slower we recommend using a tripod and the self timer P38 for taking pictures Keep the subject still for about 1 second after taking the picture We recommend rotating the zoom lever to Wide 1k and being about 1 5 m 4 92 feet from the subject when taki...

Page 46: ...m 4 92 feet from the subject when taking pictures The flash setting can be set to Slow sync Red eye reduction or Forced ON Red eye reduction The white balance cannot be set Press to display the SCENE MODE menu and select a scene mode P43 This mode allows you to take pictures with a candle lit atmosphere Technique for Candle light mode If you make the most of the candle light you can take successfu...

Page 47: ...tures The birthday setting can be reset with RESET P20 You cannot use the following functions D ZOOM SLOW SHUTTER Press to display the SCENE MODE menu and select a scene mode P43 Select this when you want to take pictures of a pet such as a dog or a cat This allows you to set the birthday of your pet You can display the set age when playing back the pictures and stamp the age on the recorded pictu...

Page 48: ... want to change the number of seconds press MENU SET press 1 again to select STARRY SKY and then set the number of seconds again 2 Take pictures Press the shutter button fully to display the countdown screen Do not move the camera after this screen is displayed When countdown finishes PLEASE WAIT is displayed for the same length of time as the set shutter speed for signal processing Press MENU SET...

Page 49: ... of the blue color of the sea sky etc It also prevents under exposure of people under strong sunlight Do not touch the camera with wet hands Sand or seawater will cause the camera to malfunction Make sure that sand or seawater does not get into the lens or the terminals Problems caused by sand or seawater are not covered by the product warranty The white balance cannot be set Press to display the ...

Page 50: ...e appears on the screen in red or blue Select 0 if you do not want to finely adjust the white balance Fixing the focus underwater AF Lock You can fix the focus before taking a picture with AF lock This is useful if you want to take pictures of a fast moving subject etc 1 Aim the AF area at the subject 2 Press 2 to fix the focus The AF lock icon A appears when the subject is focused Press 2 again t...

Page 51: ...s fixed to MODE1 2 Press the shutter button fully to stop recording If the built in memory or the card becomes full in the middle of recording the camera stops recording automatically Changing the settings for the aspect ratio and the picture quality 1 Press MENU SET 2 Press 3 4 to select ASPECT RATIO and then press 1 3 Press 3 4 to select the item and then press MENU SET 4 Press 3 4 to select PIC...

Page 52: ... quality to 30fpsVGA or 30fps16 9 we recommend using a high speed SD Memory Card with 10MB s or greater displayed on the package Depending on the type of SD Memory Card or SDHC Memory Card recording may stop in the middle We recommend using Panasonic s SD Memory Cards SDHC Memory Cards Depending on the type of SD Memory Card or SDHC Memory Card the card access indication may appear for a while aft...

Page 53: ...printing refer to the separate operating instructions for PC connection Setting the departure return date e g The following are examples of the screen in normal picture mode 1 Press MENU SET and then press 2 2 Press 4 to select the SETUP menu icon and then press 1 3 Press 3 4 to select TRAVEL DATE and then press 1 4 Press 4 to select SET and then press MENU SET 5 Press 3 4 2 1 to set the departure...

Page 54: ...ing P14 and the departure date you set If you set WORLD TIME P55 to the travel destination the travel date is calculated using the date in the clock setting and the travel destination setting The travel date setting is memorized even if the camera is turned off If you set a departure date and then take a picture on a date before this departure date minus is displayed in orange and the day of the v...

Page 55: ...rom the screen shown in step 2 in Setting the home area HOME Setting the home area HOME Perform steps 1 2 and 3 1 Press 4 to select HOME and then press MENU SET to set 2 Press 2 1 to select your home area and then press MENU SET to set The current time is displayed on the top left of the screen and the time difference from GMT Greenwich Mean Time is displayed on the bottom left of the screen If da...

Page 56: ...he travel destination is in and then press MENU SET to set The current time at the selected travel destination area is displayed on the top right of the screen and the time difference from the home area is displayed at the bottom left of the screen If daylight saving time is used at the travel destination press 3 The time advances by one hour Press 3 again to return to the original time 3 Press ME...

Page 57: ...rsor buttons B MENU SET button C FUNC button 1 Press and hold FUNC when recording 2 Press 3 4 2 1 to select the menu item and the setting and then press MENU SET to close the menu You can also close the menu by pressing FUNC The White Set setting does not appear when using the quick setting Menu screen Item 1 3 W BALANCE P58 SENSITIVITY P60 ASPECT RATIO P60 PICT SIZE P61 QUALITY P61 2 3 AUDIO REC ...

Page 58: ...h Even within the confines of the range the auto white balance may not operate properly if there are many light sources or there is no color close to white In these cases set the white balance to a mode other than AWB Setting the white balance manually 1 Select and then press MENU SET 2 Aim the camera at a sheet of white paper etc so that the frame in the center is filled by the white object only ...

Page 59: ...subject The white balance setting is memorized even if the camera is turned off However the white balance setting for a scene mode returns to AWB when the scene mode is changed The white balance cannot be set in the following cases In simple mode In SCENERY NIGHT PORTRAIT NIGHT SCENERY FOOD PARTY CANDLE LIGHT SUNSET STARRY SKY FIREWORKS BEACH SNOW AERIAL PHOTO and UNDERWATER in scene mode About th...

Page 60: ...ensitivity cannot be set in the following cases Simple mode Motion picture mode Scene mode Press to display the REC mode menu and select the item to set P57 By changing the aspect ratio you can select an angle of view that matches the subject In motion picture mode you cannot select P51 The ends of the recorded pictures may be cut at printing P102 SENSITIVITY Setting the light sensitivity ISO sens...

Page 61: ...nge the aspect ratio set the picture size EZ is an abbreviation of Extended optical Zoom P26 The extended optical zoom does not work in HIGH SENS in scene mode so the picture size for EZ is not displayed Pictures may appear mosaic depending on the subject and the recording conditions Refer to P104 for information about the number of recordable pictures The number of recordable pictures depends on ...

Page 62: ... STARRY SKY in scene mode You cannot use the following functions with pictures with audio DATE STAMP RESIZE TRIMMING ASPECT CONV Press to display the REC mode menu and select the item to set P57 Select the mode that matches the recording conditions and the composition AUDIO REC Recording still pictures with audio SET MENU AF MODE Setting the focus method 5 area focusing The camera focuses on any o...

Page 63: ...nnot be set in simple mode SELF PORTRAIT or FIREWORKS in scene mode Press to display the REC mode menu and select the item to set P57 About demonstration of jitter movement detection screen Press 1 to display JITTER SUBJ MOVE DEMO when the STABILIZER screen is displayed Pictures cannot be recorded when the JITTER SUBJ MOVE DEMO screen appears Press 1 again to finish this mode A Jitter detection de...

Page 64: ...ded in burst mode The burst speed is constant regardless of the transfer speed of the card The number of pictures indicated is when the shutter speed is faster than 1 60 and the flash is not activated The burst speed pictures second may become slower depending on the recording environment such as in dark places or if the ISO sensitivity is high Hold down the shutter button fully to activate the bu...

Page 65: ...tivated AUDIO REC cannot be used Burst mode cannot be set in simple mode and STARRY SKY in scene mode Press to display the REC mode menu and select the item to set P57 Illuminating the subject makes it easier for the camera to focus when recording in low light conditions that make focusing difficult If the AF assist lamp is set to ON an AF area with a size wider than usual is displayed and the AF ...

Page 66: ... the screen When the shutter speed is made slower using SLOW SHUTTER jitter is likely to occur We recommend using a tripod and the self timer P38 for taking pictures You cannot set the slow shutter in Intelligent ISO sensitivity mode and simple mode and SPORTS NIGHT SCENERY BABY1 BABY2 PET STARRY SKY and FIREWORKS in scene mode Press to display the REC mode menu and select the item to set P57 Sele...

Page 67: ...k Rotate towards T or press MENU SET The picture that was selected will appear To delete a picture during multi playback 1 Press 3 4 2 1 to select a picture and then press 2 Press 3 to select YES 3 Press MENU SET The recording information etc on the LCD monitor cannot be deleted in multi playback even if you press DISPLAY Pictures will not be displayed in the rotated direction even if ROTATE DISP ...

Page 68: ...you set ROTATE DISP to ON P74 You can display the calendar between January 2000 and December 2099 If the recording date of the picture selected in 25 screen multi playback is not between January 2000 and December 2099 the camera displays it in the oldest recording date in the calendar Pictures edited on a PC will be displayed with dates different from the actual recording dates If the date is not ...

Page 69: ...ipment Playing Back Motion Pictures Pictures with Audio Motion pictures Press 2 1 to select a picture with a motion picture icon and then press 4 to play back A The motion picture recording time B Motion picture icon After playback starts the elapsed playback time is displayed on the bottom right of the screen For example 1 hour 20 minutes and 30 seconds is displayed as 1h20m30s The cursor display...

Page 70: ... play back When using a high capacity card it is possible that fast rewinding may be slower than usual You cannot use the following functions with motion pictures and pictures with audio Playback zoom during motion picture playback pause ROTATE DISP ROTATE AUDIO DUB Motion pictures only DATE STAMP RESIZE TRIMMING ASPECT CONV Creating still pictures from a motion picture You can create a single sti...

Page 71: ... intervals 1 frame is skipped every second frame is displayed as a still picture 1 5th second intervals You can move forward frame by frame by pressing 3 4 2 1 3 4 Move forward backward 3 frames at a time 2 1 Move forward backward 1 frame at a time 3 Press the shutter button The message SAVE THESE NINE PICTURES AS ONE SINGLE PICTURE appears Also the message SAVE AS A SINGLE PICTURE appears if you ...

Page 72: ...recommended when playing back pictures on a TV screen You can skip unwanted pictures if FAVORITE P74 has been set When FAVORITE is set to ON step 1 When FAVORITE is set to OFF step 2 1 Press 3 4 to select ALL or and then press MENU SET PLAY 1 3 ON OFF EXIT MENU SELECT FAVORITE ROTATE DISP ROTATE SLIDE SHOW PLAY 2 3 EXIT MENU SELECT RESIZE TRIMMING AUDIO DUB PROTECT DPOF PRINT DATE STAMP Menu scree...

Page 73: ...UDIO to ON and then play back a picture with audio the next picture will be displayed after the audio has finished You cannot play back motion pictures and use power save in a slide show However the setting for power save mode is fixed to 10MIN while pausing a slide show or playing back a manual slide show ALL Displays all pictures Displays only those pictures that have been set as favorites P74 A...

Page 74: ...se the menu When printing pictures at a photo printing store ALL DELETE EXCEPT P30 is useful so only the pictures you want to be printed remain on the card Use LUMIX Simple Viewer or PHOTOfunSTUDIO viewer on the CD ROM supplied to set confirm or delete favorites For information about this refer to the separate operating instructions for PC connection You may not be able to set pictures taken with ...

Page 75: ...es Association Rotated pictures are displayed rotated when they are played back in review playback and playback zoom however are displayed without being rotated when they are played back in multi playback It may not be possible to rotate pictures that have been recorded with other equipment Press to display the PLAY mode menu and select the item to set P72 You can stamp the date and time of record...

Page 76: ...The message DELETE ORIGINAL PICTURE appears if the picture was recorded with a picture size or less The picture is overwritten when you select YES Pictures stamped with date stamp cannot be restored when they are overwritten The picture stamped with date stamp is newly created when you select NO If the original picture is protected you cannot overwrite it Select NO and newly create the picture sta...

Page 77: ...DPOF print RESIZE TRIMMING ASPECT CONV Press to display the PLAY mode menu and select the item to set P72 DPOF Digital Print Order Format is a system that allows the user to select which pictures to print how many copies of each picture to print and whether or not to print the recording date on the pictures when using a DPOF compatible photo printer or photo printing store For details ask at your ...

Page 78: ...hen a card is not inserted DPOF print settings on the card are canceled when a card is inserted To print the date After setting the number of prints set cancel printing with the recording date by pressing DISPLAY The date print icon C appears When you go to a photo printing store for digital printing be sure to order the printing of the date additionally if required Depending on the photo printing...

Page 79: ... Press 2 1 to select the picture and then press 4 to SET CANCEL 2 Press MENU SET twice to close the menu Multi setting To cancel all settings Perform the same operation as in DPOF PRINT Setting the picture to print and the number of prints P77 to 79 If you press MENU SET while canceling protection the canceling will stop halfway The protect setting may not be effective on other equipment If you wa...

Page 80: ...dio dubbing may not work properly on pictures recorded by other equipment Press to display the PLAY mode menu and select the item to set P72 This function is useful if you want to reduce the file size of a picture to attach it to an e mail or upload it to a website 1 Press 2 1 to select the picture and then press 4 The following pictures cannot be resized Motion pictures Pictures with audio Pictur...

Page 81: ...the important part of the recorded picture 1 Press 2 1 to select the picture and then press 4 The following pictures cannot be trimmed Motion pictures Pictures with audio Pictures stamped with DATE STAMP It may not be possible to trim pictures recorded with other equipment 2 Enlarge or decrease the parts to be trimmed with the zoom lever 3 Press 3 4 2 1 to move the position of the part to be trimm...

Page 82: ...NU SET The following pictures cannot be converted Pictures with audio Motion pictures Pictures stamped with DATE STAMP You may not be able to convert pictures taken on other equipment 2 Press 2 1 to select a picture and then press 4 If you select and set a picture with an aspect ratio other than the message CANNOT BE SET ON THIS PICTURE is displayed on the screen 3 Press 2 1 to determine the horiz...

Page 83: ...elect YES and then press MENU SET The illustration shows the screen when pictures are copied from the built in memory to a card The message COPY THIS PICTURE TO BUILT IN MEMORY appears when you copy pictures from the card to the built in memory If you press MENU SET while copying pictures from the built in memory to the card the copying will stop halfway Do not turn the camera off or perform any o...

Page 84: ... the built in memory the formatting will stop halfway However all the pictures will be deleted Formatting irretrievably deletes all the data including any protected pictures Check the data carefully before formatting If the card has been formatted on a PC or other equipment format it on the camera again Use a battery with sufficient battery power P21 or the AC adaptor DMW AC5PP optional when forma...

Page 85: ...onal Set the camera to a mode other than mode 1 Turn on the camera and the PC 2 Connect the camera to a PC via the USB connection cable A supplied Connect the USB connection cable with the mark facing the 2 mark on the DIGITAL socket Hold the USB connection cable at C and insert straight in or take straight out If you forcibly insert the USB connection cable at a slant or upside down you can defor...

Page 86: ... previously recorded picture It is recorded in a folder with a new number 1 When the folder just recorded to contains a picture file with the number 999 in it example P1000999 JPG 2 When the card just recorded to contains for example a folder with the number 100 100_PANA in it and that card is removed and replaced with a card that has a folder with the number 100 in it recorded by a camera from a ...

Page 87: ...replace the card while the camera and the PC are connected The information on the card may be damaged Use Safely Remove Hardware in the task tray on your PC when replacing the card Pictures edited or rotated with a PC may be displayed in black in playback mode P29 multi playback P67 and calendar playback P67 Read the operating instructions for the PC If a card is not inserted when the camera is co...

Page 88: ...lied Connect the USB connection cable with the mark facing the 2 mark on the DIGITAL socket Hold the USB connection cable at C and insert straight in or take straight out Do not use any other USB connection cables except the supplied one If the mode dial is not set to when the camera is connected to the printer disconnect the USB connection cable set the mode dial to and then connect the USB conne...

Page 89: ...cting multiple pictures and printing them 1 Press 3 2 Press 3 4 to select an item and then press MENU SET This only appears when FAVORITE P74 is set to ON However if none of the pictures have displayed you cannot select it even if FAVORITE is set to ON PLEASE SELECT THE PICTURE TO PRINT PictBridge 1 3 PRINT SELECT MULTI PRINT MENU SET MENU OFF SINGLE SELECT NUM OF PRINTS 1 PRINT WITH DATE PAPER SI...

Page 90: ...r details refer to the operating instructions of the printer PRINT WITH DATE If the printer does not support date printing the date cannot be printed on the picture NUM OF PRINTS Set the number of prints You can set up to 999 prints PAPER SIZE Paper sizes that can be set with this unit The paper sizes are displayed on pages 1 2 and 2 2 Press 4 to select These items cannot be displayed when the pri...

Page 91: ...ile the camera and the printer are connected the status indicator blinks and the alarm beeps If this happens during printing press MENU SET and stop printing at once If not printing disconnect the USB connection cable The camera is receiving an error message from the printer when the indication lights orange during printing After finishing printing make sure there are no problems with the printer ...

Page 92: ...nd bottom or the left and right of the pictures Do not use any other AV cables except the supplied one Audio playback is monaural Read the operating instructions for the TV When you play back a picture vertically it may be blurry You can view pictures on TVs in other countries regions which use the NTSC or PAL system when you set VIDEO OUT in the SETUP menu Even if you set VIDEO OUT to PAL the out...

Page 93: ...2 Age P46 This is displayed for about 5 seconds when this unit is turned on in BABY1 BABY2 or PET in scene mode Number of days that have passed since the travel date P53 23 Travel date P53 24 Elapsed recording time P51 25 Current date and time Travel destination setting P55 This is displayed for about 5 seconds when the camera is turned on after setting the clock and after switching from playback ...

Page 94: ...ack 1 Playback mode P29 2 Number of DPOF prints P77 3 Protected picture P79 4 Picture with audio Motion pictures P69 5 Picture size P61 6 Quality P61 In Motion picture mode P69 4 3 16 9 In Simple mode P24 ENLARGE 4qk6q 10k15cm E MAIL 7 Battery indication P21 8 Folder File number P86 Built in memory P13 Card P13 9 Picture number Total pictures 10 Cable disconnection warning icon P91 Motion picture ...

Page 95: ...processors may adversely affect the camera disturbing the pictures and sound If the camera is adversely affected by electromagnetic equipment and stops functioning properly turn the camera off and remove the battery or disconnect AC adaptor DMW AC5PP optional Then reinsert the battery or reconnect AC adaptor and turn the camera on Do not use the camera near radio transmitters or high voltage lines...

Page 96: ...eries when going out Be aware that the operating time of the battery becomes shorter in low temperature conditions such as at a ski resort When you travel do not forget to bring the battery charger supplied so that you can charge the battery in the country that you are travelling in Dispose of unusable battery The battery has a limited life Do not throw the battery into fire because it may cause a...

Page 97: ...e battery from the camera and store it again after it has completely discharged We recommend storing the camera with a desiccant silica gel when you keep it in a closet or a cabinet Message Display Confirmation messages or error messages will be displayed on the screen in some cases The major messages are described below as examples THIS MEMORY CARD IS LOCKED The Write Protect switch on the SD Mem...

Page 98: ...n READ ERROR PLEASE CHECK THE CARD An error has occurred reading the data Insert the card again Make sure the card is inserted properly and then play back again WRITE ERROR PLEASE CHECK THE CARD An error has occurred writing the data Turn the camera off and remove the card Insert the card again and turn the camera on Make sure the camera is turned off before removing or inserting the card to avoid...

Page 99: ...save mode P18 or economy mode P18 activated Press the shutter button halfway to cancel these modes Is the battery exhausted Use a battery that has been sufficiently charged 3 The camera turns off immediately after it is turned on Is the battery charge insufficient to operate the camera Use a battery that has been sufficiently charged If you leave the camera on the battery will be exhausted Turn th...

Page 100: ...escent light It is not a malfunction 9 A reddish vertical line appears on the LCD monitor when the shutter button is pressed halfway or when recording motion pictures This is a phenomenon called smear It is a characteristic of CCD and appears when the subject has a bright part Black or green vertical lines may also appear or uneven colors may appear around the smear This is not a malfunction It is...

Page 101: ...recording Playback 1 The picture being played back is rotated and displayed in an unexpected direction The camera has a function that automatically rotates the display of pictures recorded holding the camera vertically If you take pictures when aiming the camera up or down the camera may recognize that it is being held vertically You can display the pictures without being rotated when ROTATE DISP ...

Page 102: ...g to play back the motion pictures by directly inserting the card in the card slot of the TV Connect the camera to the TV with the AV cable supplied and then play back the pictures on the camera P92 4 The picture is not displayed fully on the TV Set the aspect of the TV on the camera P20 5 The picture cannot be transferred when the camera is connected to a PC Is the camera connected to the PC corr...

Page 103: ...gain P14 When you take a picture before setting the clock 0 00 0 0 0 is recorded 8 The displayed picture is slightly distorted Depending on the zoom magnification the recorded picture is slightly distorted This is called distortion aberration The closer you get to the subject to take pictures of in wide angle the more distorted the picture you take is However this is not a malfunction 9 Colors app...

Page 104: ...els Quality Built in Memory Approx 27 MB 7 14 10 21 16 33 Card 16 MB 3 7 5 10 8 16 32 MB 7 16 11 23 18 36 64 MB 16 34 24 48 38 75 128 MB 35 69 50 99 78 150 256 MB 68 135 98 190 150 290 512 MB 135 270 195 380 300 590 1 GB 270 540 390 770 600 1180 2 GB 550 1090 790 1530 1220 2360 4 GB 1090 2150 1560 3010 2410 4640 Aspect ratio Picture size 2M EZ 1600k1200 pixels 1M EZ 1280k960 pixels 0 3M EZ 640k480...

Page 105: ...7 150 170 330 512 MB 150 300 340 650 1 GB 300 600 680 1310 2 GB 620 1220 1360 2560 4 GB 1230 2410 2680 5020 Aspect ratio Picture size 5 5M 3072k1728 pixels 2M EZ 1920k1080 pixels Quality Built in Memory Approx 27 MB 9 19 25 48 Card 16 MB 4 10 12 25 32 MB 10 21 27 53 64 MB 22 45 57 105 128 MB 46 92 115 220 256 MB 91 180 230 430 512 MB 180 350 450 860 1 GB 360 710 910 1720 2 GB 730 1420 1800 3410 4 ...

Page 106: ...displayed Aspect ratio Picture quality setting 30fps VGA 10fps VGA 30fps QVGA 10fps QVGA 30fps 16 9 10fps 16 9 Built in Memory Approx 27 MB j j 53 s 2 min 40 s j j Card 16 MB 6 s 26 s 26 s 1 min 23 s 5 s 22 s 32 MB 17 s 59 s 59 s 2 min 55 s 14 s 50 s 64 MB 39 s 2 min 2 min 6 min 33 s 1 min 46 s 128 MB 1 min 23 s 4 min 10 s 4 min 10 s 12 min 20 s 1 min 11 s 3 min 35 s 256 MB 2 min 45 s 8 min 10 s 8...

Page 107: ...io setting is 640k480 pixels Only when using a Card 320k240 pixels When the aspect ratio setting is 848k480 pixels Only when using a Card 30 or 10 frames second with audio Burst recording Burst speed 3 pictures second High speed 2 pictures second Low speed Approx 2 pictures second Unlimited Number of recordable pictures Max 7 pictures Standard max 5 pictures Fine Depends on the remaining capacity ...

Page 108: ...536 pixels 1600k1200 pixels 1280k960 pixels 640k480 pixels When the aspect ratio setting is 3072k2048 pixels 2048k1360 pixels When the aspect ratio setting is 3072k1728 pixels 1920k1080 pixels Motion pictures When the aspect ratio setting is 640k480 pixels Only when using a Card 320k240 pixels When the aspect ratio setting is 848k480 pixels Only when using a Card Quality Fine Standard Recording fi...

Page 109: ... excluding the projecting parts Mass Approx 132 g 4 66 oz excluding card and battery Approx 154 g 5 43 oz with card and battery Operating temperature 0 oC to 40 oC Operating humidity 10 to 80 Battery Charger Panasonic Information for your safety Battery Pack lithium ion Input 110 V to 240 V 50 60 Hz 0 2 A Output CHARGE 4 2 V 0 8 A Voltage capacity 3 6 V 1000 mAh ...

Page 110: ... Card 2 GB SD Memory Card 2 GB SD Memory Card 1 GB SD Memory Card 1 GB SD Memory Card 1 GB SD Memory Card 512 MB SD Memory Card 512 MB SD Memory Card 256 MB SD Memory Card 256 MB SD Memory Card 128 MB SD Memory Card 64 MB SD Memory Card RP SDR04GU1K RP SDK02GU1A RP SDR02GU1A RP SDK01GU1A RP SDH01GU1A RP SDR01GU1A RP SDK512U1A RP SDR512U1A RP SDH256U1A RP SDR256U1A RP SD128BU1A RP SD064BPPA DMW CXA...

Page 111: ...ER OFFICE 20421 84th Avenue South Kent WA 98032 Ship To Mr Mrs Ms First Last Street Address City State Zip Phone Day Night 4 Shipping information UPS delivery requires complete street address Please photocopy this form when placing an order 3 Method of payment check one Check of Money Order enclosed NO C O D SHIPMENTS VISA MasterCard Make Check or Money Order to PANASONIC ACCESSORIES Please do not...

Page 112: ...ouhy Ave Elk Grove Village IL 60007 Request for Service Notice USA Only Please photocopy this form when making a request for service notice In the unlikely event this product needs service Please include your proof of purchase Failure to do so will delay your repair To further speed your repair please provide an explanation of what wrong with the unit and any symptom it is exhibiting ...

Page 113: ...ce it with a new or refurbished product The decision to repair or replace will be made by the warrantor During the Labor warranty period there will be no charge for labor During the Parts warranty period there will be no charge for parts You must carry in or mail in your product during the warranty period If non rechargeable batteries are included they are not warranted This warranty only applies ...

Page 114: ...IES EXCEPT AS LISTED UNDER LIMITED WARRANTY COVERAGE THE WARRANTOR IS NOT LIABLE FOR INCIDENTAL OR CONSEQUENTIAL DAMAGES RESULTING FROM THE USE OF THIS PRODUCT OR ARISING OUT OF ANY BREACH OF THIS WARRANTY As examples this excludes damages for lost time travel to and from the servicer loss of media or images data or other memory content The items listed are not exclusive but are for illustration o...

Page 115: ...he Elk Grove Village Centralized Factory Service Center Customer s in Puerto Rico please ship or carry in to location below Service in Puerto Rico Service in Puerto Rico Panasonic Puerto Rico Inc Ave 65 de Infantería Km 9 5 San Gabriel Industrial Park Carolina Puerto Rico 00985 Phone 787 750 4300 Fax 787 768 2910 Accessory Purchases Purchase Parts Accessories and Instruction Books online for all P...

Page 116: ...DITÉ À L ÉGOUTTEMENT OU AUX ÉCLABOUSSEMENTS ET NE PLACEZ SUR L APPAREIL AUCUN OBJET REMPLI DE LIQUIDE COMME PAR EXEMPLE DES VASES UTILISEZ EXCLUSIVEMENT LES ACCESSOIRES RECOMMANDÉS NE RETIREZ PAS LE COUVERCLE OU LE PANNEAU ARRIÈRE IL N Y A AUCUNE PIÈCE RÉPARABLE PAR L UTILISATEUR À L INTÉRIEUR CONFIEZ TOUTE RÉPARATION À UN TECHNICIEN DE SERVICE QUALIFIÉ LA PRISE DE COURANT DOIT SE TROUVER À PROXIM...

Page 117: ...il photo à proximité d un émetteur radio ou de lignes à haute tension L utilisation de l appareil photo à proximité d un émetteur radio ou de lignes à haute tension pourrait nuire à l image ou au son À propos du bloc batterie À propos du chargeur de batterie ATTENTION Batterie batterie au lithium ion Utilisez l unité spécifiée pour recharger la batterie N utilisez la batterie avec aucun autre appa...

Page 118: ...6 Charging 11 Clock Set 14 18 Color 23 Color Mode 66 Condensation 5 Copy 83 D Date Printing 78 90 91 Date Stamp 75 Deleting Pictures 29 Demonstration of the Optical Image Stabilizer 63 Dial Display 20 Digital Zoom 27 DPOF Print Setting 77 E Economy Mode 18 Exposure 23 Exposure Compensation 39 Extended Optical Zoom 26 EZ 26 61 F File Number 86 94 Fine 61 Fireworks Mode 49 Focus 23 Folder Compositio...

Page 119: ...Mode 88 Protect 79 Q Quality 61 Quick Setting 57 R Reset of Setting 20 Resizing 80 Review 28 Rotate 74 Rotate Display 74 S Scene Menu 20 Scene Mode 43 Scenery Mode 45 Self Portrait Mode 44 Self timer 38 Setting Favorites 74 Setup Menu 18 Shutter sound 19 Simple Mode 24 Slide Show 72 Slow Shutter 66 Snow Mode 49 Soft Skin Mode 44 Speaker 19 Sports Mode 45 Spot focusing 62 Standard 61 Starry Sky Mod...

Page 120: ...c Ave 65 de Infantería Km 9 5 San Gabriel Industrial Park Carolina Puerto Rico 00985 Panasonic Canada Inc 5770 Ambler Drive Mississauga Ontario L4W 2T3 C 2007 Matsushita Electric Industrial Co Ltd VQT1B86 F0107Sy0 12000 A C P QuickTime and the QuickTime logo are trademarks or registered trademarks of Apple Computer Inc used under license therefrom P ...

Reviews: