22
8.3.
Disassembly Procedure
8.3.1.
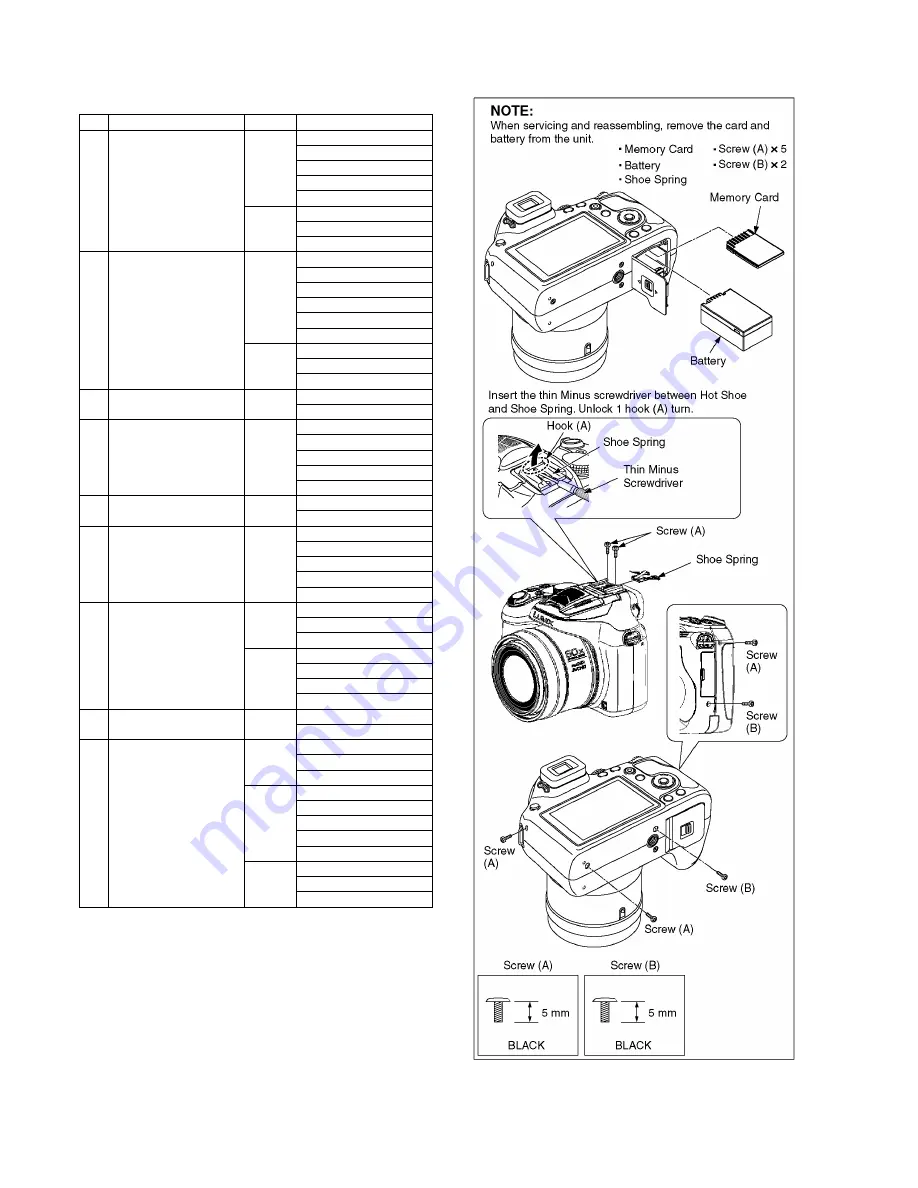
Removal of the Rear Case Unit
Fig. D1
No.
Item
Fig.
Removal
1
Rear Case Unit
Fig. D1 Memory Card
Battery
Shoe Spring
5 Screws (A)
2 Screws (B)
Fig. D2 FP9003 (Flex)
FP9007 (Flex)
Rear Case Unit
2
Main P.C.B.
Fig. D3 FP9001 (Flex)
FP9002 (Flex)
FP9004 (Flex)
FP9005 (Flex)
FP9008 (Flex)
FP9010 (Flex)
Fig. D4 2 Screws (C)
PP8001 (Connector)
Main P.C.B.
3
Top Operation Unit
Fig. D5 1 Screw (D)
Top Operation Unit
4
Battery Case Unit,
EVF Unit,
Flash Unit
Fig. D6 1 Screw (E)
1 Screw (F)
Battery Case Unit
EVF Unit
Flash Unit
5
Lens Unit
Fig. D7 3 Screws (G)
Lens Unit
6
LCD Unit
Fig. D8 5 Screws (H)
2 Locking tabs
Strap Holder L
LCD Holder
LCD Unit
7
Flash P.C.B.
Fig. D9 2 Locking tabs (A)
1 Locking tab (B)
Condenser Cover
Fig. D10 1 Screw (I)
1 Locking tab
4 Solders
Flash P.C.B.
8
EVF Unit
Fig. D11 2 Locking tabs
EVF Unit
9
Hot Shoe Flex Unit,
ECM Flex Unit,
Flash Unit
Fig. D12 2 Screws (J)
2 Screws (K)
Hot Shoe Flex Unit
Fig. D13 2 Screws (L)
4 Locking tabs
Flash Case Top Unit
Flash Shaft
Flash Pop Up Spring
Fig. D14 MIC Damper
MIC Cushion
ECM Flex Unit
Summary of Contents for DMC-FZ70GC
Page 21: ...21 8 Disassembly and Assembly Instructions 8 1 Disassembly Flow Chart 8 2 P C B Location ...
Page 23: ...23 Fig D2 8 3 2 Removal of the Main P C B Fig D3 Fig D4 ...
Page 25: ...25 8 3 5 Removal of the Lens Unit Fig D7 8 3 6 Removal of the LCD Unit Fig D8 ...
Page 26: ...26 8 3 7 Removal of the Flash P C B Fig D9 Fig D10 ...
Page 28: ...28 Fig D13 Fig D14 ...


