52
11.2.1.
Method of cleaning inside of lens
11.2.1.1. Disassembly procedure
Important:
It must be performed inside of satisfied clean level.
(Satisfied clean level: Less than class 10,000 (Federal
Standard 209D))
1.
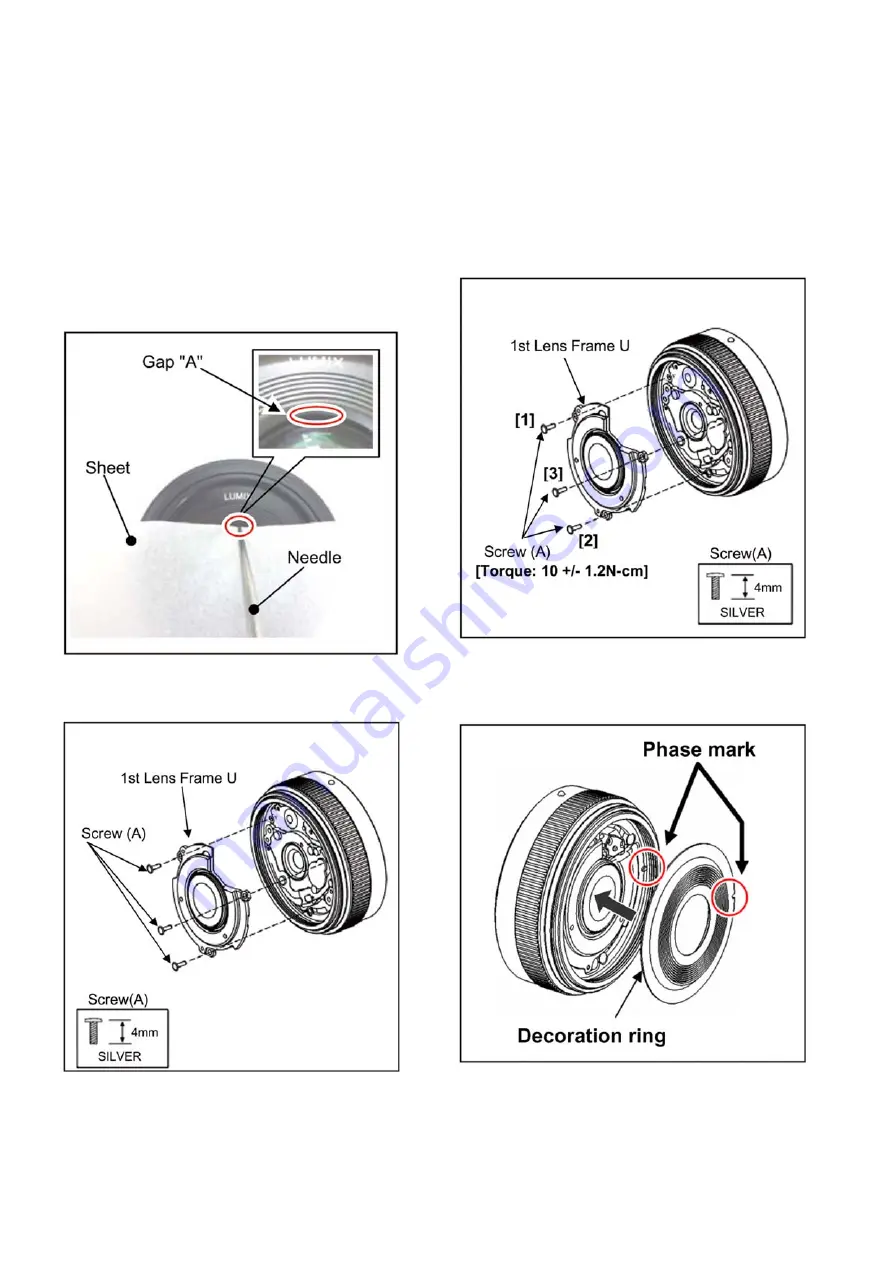
Removal of the Decoration Ring
*.Decoration ring is sticked on the 1st lens frame unit.
*.Put the sheet so that the lens glass is fully covered.
*.Insert the needle to Gap “A” (between the Decoration
ring and Lens glass), and peel off the Decoration ring
gentlly.
2.
Removal of the 1st Lens frame unit
*.Remove 3 screws (A).
*. Blow off the dust on the surface of the lens with a blower
brush.
*. Use lens cleaning KIT (BK)(VFK1900BK), if necessary.
11.2.1.2. Assembly procedure
IMPORTANT NOTICE:
*.When tightening the screw, use a Torque driver
(RFKZ0456) by ordering the screwing order with specified
torque descrived in each step.
1.
Installation of the 1st Lens frame unit
*Tighten the 3 screws (A) with specified torgue in
numerical order.
2.
Installation of the Decoration ring
*Install the Decoration ring by referring the phase mark.
(Use new one, Do not use the one which is removed.)
* After installing the Decoration ring, press the decoration ring
with your finger.
Summary of Contents for DMC-GF2CEB
Page 3: ...3 11 3 General description Lens cleaning Interchangeable Lens H FS014042 53 ...
Page 17: ...17 4 Specifications ...
Page 23: ...23 7 Troubleshooting Guide 7 1 Checking Method of Body and Interchangeable Lens ...
Page 24: ...24 ...
Page 25: ...25 ...
Page 26: ...26 ...
Page 34: ...34 9 1 3 1 Removal of the Rear Case Unit Fig D1 ...
Page 35: ...35 Fig D2 9 1 3 2 Removal of the LCD Unit Fig D3 ...
Page 36: ...36 Fig D4 9 1 3 3 Removal of the Main P C B Fig D5 ...
Page 37: ...37 Fig D6 9 1 3 4 Removal of the Front Case Mount Box Unit Fig D7 Fig D8 ...
Page 39: ...39 Fig D11 9 1 3 7 Removal of the Top Case Flash Unit Fig D12 ...
Page 47: ...47 Fig K1 ...


