background image

- 2 -

Contents

Before Use

Standard Accessories ...............................5
Names and Functions of Components......6
About the Lens ........................................12

Preparation

Attaching/Detaching the Lens .................15
Attaching the Shoulder Strap ..................17
Charging the Battery ...............................18

• Approximate operating time and 

number of recordable pictures ..........21

Inserting and Removing the 
Card (optional)/the Battery ......................24
About the Card ........................................25

• About cards that can be used 

with this unit ......................................25

• Approximate number of recordable 

pictures and operating time ..............26

Setting Date/Time (Clock Set).................28

Basic

Selecting the [REC] Mode.......................30
Taking a Still picture................................32

•  How to set focus when taking 

a still picture (AFS/AFC) ...................32

• Taking Pictures with Your Favorite 

Settings (Program AE Mode)............34

• Taking pictures using the 

Touch Shutter function......................37

Playing Back Pictures .............................38

• Changing the information displayed 

on the playback screen.....................39

Recording Motion Picture........................43

• How to set focus when recording 

a motion picture (Continuous AF) .....43

• Recording Motion Picture..................44

Playing Back Motion Pictures..................46

Taking Pictures using the 
Automatic Function 
(Intelligent Auto Mode) ............................48
Deleting Pictures .....................................53
Setting the Menu .....................................55

• Setting menu items ...........................56

Setting the Quick Menu ...........................58
About the Setup Menu.............................60

Recording

Switching the display 
of the LCD Monitor ..................................67

• Switching the Information Displayed 

on the recording screen ....................67

Taking Pictures with the Zoom ................69

• Using the Optical Zoom/Using 

the Extended Tele Conversion (EX)/
Using the Digital Zoom......................69

Taking Pictures using 
the Built-in Flash......................................71

• Switching to the appropriate 

flash setting .......................................71

Optical Image Stabilizer ..........................76
Compensating the Exposure ...................78
Taking Pictures using Burst Mode...........79
Taking Pictures using Auto Bracket ........81
Taking Pictures with the Self-timer..........83
Setting the Method used to Focus 
(AF Mode) ...............................................85
Taking Pictures with Manual Focus.........91
Adjusting the White Balance ...................93
Setting the Light Sensitivity .....................98
Taking Pictures by Specifying the 
Aperture/Shutter Speed.........................100

• Aperture-priority AE.........................100
• Shutter-priority AE ...........................100

Taking Picture by Setting the Exposure 
Manually ................................................102
Using the function button.......................104

• Fixing the Focus and the Exposure 

(AF/AE Lock)...................................105

• Confirm the Effects of Aperture and 

Shutter Speed (Preview Mode).......106

Summary of Contents for DMC-GF2CS

Page 1: ...1 VQT3H68 Before use please read these instructions completely Operating Instructions for advanced features Digital Camera Model No DMC GF2...

Page 2: ...ures 46 Taking Pictures using the Automatic Function Intelligent Auto Mode 48 Deleting Pictures 53 Setting the Menu 55 Setting menu items 56 Setting the Quick Menu 58 About the Setup Menu 60 Recording...

Page 3: ...ctions at Travel Destinations 125 Entering Text 128 Using the REC Mode Menu 129 ASPECT RATIO 129 PICTURE SIZE 130 QUALITY 131 FACE RECOG 131 FOCUS MODE 132 QUICK AF 132 METERING MODE 133 FLASH 134 RED...

Page 4: ...r of pixels 156 CROPPING 157 ASPECT CONV 158 ROTATE ROTATE DISP 159 FAVORITE 160 PRINT SET 161 PROTECT 163 FACE REC EDIT 164 Connecting to other equipment Enjoying 3D pictures 165 Playing Back Picture...

Page 5: ...SD Memory Card SDHC Memory Card and SDXC Memory Card are indicated as card in the text The card is optional Description in these operating instructions is based on the interchangeable lens H H014 Abo...

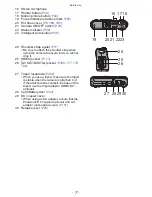
Page 6: ...Rear dial P10 11 Touch panel LCD monitor P9 38 67 192 12 Playback button P38 46 13 Q MENU Fn button P11 58 89 104 Delete Return button 14 MENU SET button P10 56 15 Cursor buttons P10 3 ISO P98 1 WB W...

Page 7: ...nsure that you will not drop it 25 HDMI socket P171 26 AV OUT DIGITAL socket P169 177 179 182 27 Tripod receptacle P202 When you use a tripod make sure the tripod is stable when the camera is attached...

Page 8: ...sh be sure to attach the hot shoe cover Please be careful not to lose the hot shoe cover When not using the hot shoe cover be careful not to let liquid sand or any other foreign matter enter the conne...

Page 9: ...y with finger prints and others Do not scratch or press the LCD monitor too hard For information about the icons displayed on the touch panel refer to Screen Display on P192 About the Stylus pen It is...

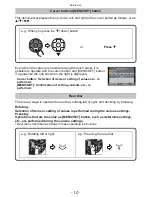
Page 10: ...Confirmation of setting contents etc is performed There are 2 ways to operate the rear dial rotating left or right and deciding by pressing Rotating Selection of items or setting of values is perform...

Page 11: ...t to Quick Menu To switch the setting select using Q MENU Fn in CUSTOM menu Some of the menus can be called up easily when Q MENU Quick Menu is selected Refer to P58 for details about the Quick Menu S...

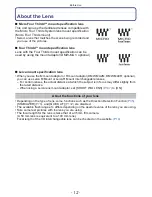
Page 12: ...e Leica M Mount or Leica R Mount interchangeable lenses For certain lenses the actual distance at which the subject is in focus may differ slightly from the rated distance When using a Leica lens moun...

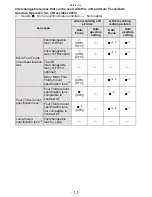
Page 13: ...ure setting Micro Four Thirds mount specification lens Interchangeable lens H H014 AFS AFC 4 5 7 Interchangeable lens H FS014042 AFS AFC 4 5 7 The 3D interchangeable lens H FT012 optional Other Micro...

Page 14: ...and AFC P43 5 AF tracking is slower than the HD motion picture compatible lens also the sound of Auto Focus operation may be recorded 6 Auto Focus is activated only when the shutter button is pressed...

Page 15: ...direction of the arrow to detach them Do not put your hands inside the mount Align the lens fitting marks C red marks on the camera body and the lens and then rotate the lens in the direction of the...

Page 16: ...P191 In bright sunlight or backlight the lens hood will minimize lens flare and ghosting The lens hood cuts off excess lighting and improves the picture quality To attach the lens hood flower shape t...

Page 17: ...en pass it through the stopper Pass the end of the shoulder strap through the hole on the other side of the stopper Pull the other side of the shoulder strap and then check that it will not come out P...

Page 18: ...Panasonic products Charging The battery is not charged when the camera is shipped Charge the battery before use Charge the battery with the charger indoors It has been found that counterfeit battery p...

Page 19: ...r or the battery are dirty In this case wipe them with a dry cloth Connect the charger to the electrical outlet Disconnect the charger from the electrical socket and detach the battery after charging...

Page 20: ...a long time may be longer than normal Note Do not leave any metal items such as clips near the contact areas of the power plug Otherwise a fire and or electric shocks may be caused by short circuitin...

Page 21: ...blinks Recharge the battery or replace it with a fully charged battery Recording still pictures when using the LCD monitor By CIPA standard in Program AE Mode Approximate operating time and number of...

Page 22: ...cordings and leaving it until the temperature of the battery decreases The number of recordable pictures varies depending on the recording interval time If the recording interval time becomes longer t...

Page 23: ...s shorten and the number of recordable pictures is reduced In low temperature environments such as on ski slopes Using the AUTO of LCD MODE or MODE1 of LCD MODE P61 When flash is used repeatedly When...

Page 24: ...he card may be damaged if it is not fully inserted 1 Close the card battery door 2 Slide the release lever in the direction of the arrow If the card battery door cannot be completely closed remove the...

Page 25: ...or card or disconnect the AC adaptor optional when the access indication is lit when pictures are being written read or deleted or the card is being formatted P66 Furthermore do not subject the camer...

Page 26: ...or the card We recommend storing important data on a PC etc Do not format the card on your PC or other equipment Format it on the camera only to ensure proper operation P66 Keep the Memory Card out of...

Page 27: ...battery level P21 Motion picture recorded continuously in MOTION JPEG is up to 2 GB Only the maximum recordable time for 2 GB is displayed on the screen Picture size 2 GB 4 GB 16 GB 64 GB L 12M 290 5...

Page 28: ...Time at the home area B Time at the travel destination P127 You can continue to switch the settings by continuously touching 3 4 Touch CANCEL to cancel the date and time settings without setting a da...

Page 29: ...ttery even without the battery Leave the charged battery in the unit for 24 hours to charge the built in battery The clock is displayed when is touched several times during recording You can set the y...

Page 30: ...n in REC Mode Touch the REC Mode to select is displayed when is touched and a description of the REC Mode is displayed when REC Mode is touched It will return to the screen listing the REC Mode when C...

Page 31: ...Exposure Mode P102 The exposure is adjusted by the aperture value and the shutter speed which are manually adjusted Intelligent Auto Mode P48 The subjects are recorded using settings automatically sel...

Page 32: ...ly by continuously focusing on the movement of the subject while the shutter button is pressed halfway When taking pictures of a moving subject the camera predicts the movement of the subject and cont...

Page 33: ...to When the interchangeable lens H FS014042 is used 0 3 m 0 99 feet to Subjects and recording conditions which are difficult to focus Fast moving subjects extremely bright subjects or subjects without...

Page 34: ...SENSITIVITY is set to ISO100 When the aperture value is set to F2 5 when the interchangeable lens H H014 is attached When the aperture value is set to F3 5 when the interchangeable lens H FS014042 is...

Page 35: ...low lying subjects such as flowers etc P198 Direction Detection Function Pictures recorded with the camera held vertically are played back vertically rotated Only when ROTATE DISP P159 is set to ON Th...

Page 36: ...the screen when Program Shift is activated To cancel Program Shift turn the camera off or rotate the rear dial until the Program Shift indication disappears Example of Program Shift When the intercha...

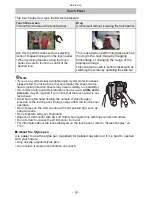
Page 37: ...xtreme edges of the screen If the histogram is displayed on top of the subject you want to touch touch the subject after first moving the histogram P68 3 Touch to cancel the Touch Shutter function Not...

Page 38: ...res continuously by keeping your finger on the left or right sides of the screen after forwarding rewinding a picture Pictures are displayed reduced in size To finish playback Press again press the mo...

Page 39: ...Normal display B Detailed information display C Histogram display D Highlight display 1 2 E No display 2 1 This is displayed if HIGHLIGHT P142 in the CUSTOM menu is set to ON 2 icon will remain if you...

Page 40: ...possible to switch the playback screen by touching the following icons 1 screen 12 screens 30 screens Calendar screen display Screen can be switched by dragging the slide bar up or down P9 The screen...

Page 41: ...D TIME the pictures are displayed by the dates at the travel destination in Calendar Playback Displaying Pictures by Recording Date Calendar Playback Rotate the rear dial left to display the Calendar...

Page 42: ...turned off including Sleep Mode The zoom position returns to the center in the following images Images with different aspect ratios Images with different numbers of recorded pixels Images with a diffe...

Page 43: ...nd may be recorded when the Auto Focus is operated while recording a motion picture It is recommended to record with CONTINUOUS AF in the MOTION PICTURE Mode menu set to OFF if the sound of operation...

Page 44: ...Mode Start recording by pressing the motion picture button A Elapsed recording time B Available recording time Sound will be heard when pressing the motion picture button indicating start stop of moti...

Page 45: ...isabled in the AF Mode It will switch to Multi Auto Focus Mode for motion pictures Direction Detection Function FACE RECOG ISO LIMIT SET It is recommended to use a fully charged battery or AC adaptor...

Page 46: ...cameras LUMIX only Press Select a picture with a Motion Picture icon and then touch to play back A Motion picture icon B The motion picture recording time After playback starts the elapsed playback ti...

Page 47: ...through the speaker Refer to VOLUME P60 for information about how to adjust the volume in the SETUP menu To play back the motion pictures recorded by this unit on a PC use the QuickTime or the PHOTOfu...

Page 48: ...Intelligent Auto Mode was set when it is pressed again It is also possible to switch to Intelligent Auto Mode from the screen listing the REC Mode P30 The following functions are activated automatica...

Page 49: ...f registered faces already set only when the face of a person 3 years old or younger is detected Note Due to conditions such as the ones below a different scene may be identified for the same subject...

Page 50: ...of the screen AF Tracking frame is displayed in the center of the screen Press 2 again to cancel Tracking AF can also be canceled by touching 2 Place the subject in the Tracking frame and press the sh...

Page 51: ...f the lens and it is not a malfunction Depending on the lens used operational sound of the Defocus Control may be recorded during the recording of a motion picture when the function is used Depending...

Page 52: ...menu and CUSTOM menu can be set in a mode such as the Program AE Mode What is set will be reflected in the Intelligent Auto Mode Flash Open the flash when the flash is to be used P71 While using the I...

Page 53: ...53 Basic Deleting Pictures Once deleted pictures cannot be recovered Press A button To delete a single picture Select the picture to be deleted and then touch Touch DELETE SINGLE Touch YES...

Page 54: ...ALL DELETE EXCEPT the deleting will stop halfway Depending on the number of pictures to be deleted it may take some time to delete them If pictures do not conform to the DCF standard or are protected...

Page 55: ...USTOM menu P142 to 147 For details on setting up REC Mode refer to P30 Operation of the unit such as displaying of the screen and button operations can be set up according to your preferences Also it...

Page 56: ...ress to return to the recording screen It can also be set by the touch operation Press MENU SET to display the menu A Menu item B Settings Select the menu item by pressing 3 4 or by rotating the rear...

Page 57: ...e SETUP menu icon 3 Press 1 or the rear dial Select a menu item next and set it Select the settings by pressing 3 4 or by rotating the rear dial The figure on the right is an example of setting I DYNA...

Page 58: ...by the mode or a display style the camera is in Items that cannot be used are displayed in gray Press Q MENU Fn to display the Quick Menu A Touch Quick Menu icon Quick Menu can also be displayed by to...

Page 59: ...anceled and that space will become empty Menu item or Settings can be switched by touching 2 1 Items that can be set are as follows 3 Touch EXIT It will return to screen of above step 1 Touch EXIT to...

Page 60: ...rs does not change U CLOCK SET 1 Press 2 1 to select the items and press 3 4 to set A Time at the home area B Time at the travel destination P127 Cancel without setting the clock To set the display or...

Page 61: ...in AUTO and MODE1 AUTO is only available in the Recording Mode AUTO is disabled during motion picture recording When the menu screen is displayed in a dark environment etc the LCD monitor becomes dark...

Page 62: ...ill not hold Under these conditions AUTO REVIEW is disabled If HIGHLIGHT P142 is set to ON white saturated areas appear blinking in black and white when the Auto Review function is activated AUTO REVI...

Page 63: ...mmunication system after or before connecting the camera to your PC or your printer with the USB connection cable supplied y SELECT ON CONNECTION Select either PC or PictBridge PTP if you connected th...

Page 64: ...optional AUTO The output resolution is automatically set based on the information from the connected TV 1080i The interlace method with 1080 available scan lines is used for output 720p The progressiv...

Page 65: ...connecting to a 3D compatible television Set when connecting to a television not compatible with 3D Set this when you would like to view pictures in 2D conventional image on a 3D compatible televisio...

Page 66: ...ATE P125 departure date return date location The WORLD TIME P127 setting The folder number and the clock setting are not changed Use a battery with sufficient battery power or the AC adaptor optional...

Page 67: ...ou align the subject on the horizontal and vertical guide lines or the cross point of these lines you can take pictures with well designed composition by viewing the size the slope and the balance of...

Page 68: ...istogram Set the HISTOGRAM in the CUSTOM menu to ON Touch the histogram and drag it to the position you want to move it to P9 You can also set the position of the histogram with the cursor button in t...

Page 69: ...When Recording Mode AVCHD 720p is selected or recording quality setting HD or WVGA is selected When Recording Mode AVCHD 1080i is selected there will be no enlarging with the Extended Tele Conversion...

Page 70: ...em Angle of view for recording can be checked beforehand by matching the REC AREA P145 setting to the mode you wish to record in If you use the zoom function after focusing on the subject focus on the...

Page 71: ...e careful when opening the flash as the flash will jump out Be careful not to catch a finger when closing a flash bulb Applicable modes Set the built in flash to match the recording Open the flash 1 S...

Page 72: ...vated every time regardless of the recording conditions Simultaneously it reduces the red eye phenomenon Use this when your subject is back lit or under fluorescent light Slow Sync When taking picture...

Page 73: ...situations but not all Available flash settings by Recording Mode The available flash settings depend on the Recording Mode Available Not available Initial setting of Scene Mode is displayed or is se...

Page 74: ...042 is used Available flash range Available flash range Wide Tele AUTO 50 cm 1 64 feet to 4 8 m 15 7 feet 1 0 m 3 28 feet to 3 4 m 11 2 feet 30 cm 0 99 feet to 2 1 m 6 88 feet ISO100 50 cm 1 64 feet t...

Page 75: ...ash is charging When you take a picture beyond the available flash range white balance may be set incorrectly When you use certain lenses light from the flash may be blocked or fail to cover the lens...

Page 76: ...the lens you are using has an internal stabilizer A lens which supports the stabilizer function is required The interchangeable lens H H014 does not supports the stabilizer function The interchangeabl...

Page 77: ...he Optical Image Stabilizer when using a tripod is displayed on the screen at that time The stabilizer function may not be effective in the following cases When there is a lot of jitter When the zoom...

Page 78: ...y time the rear dial is pressed In the Aperture Priority AE Mode Aperture Setting operation P100 and Exposure Compensation operation is switched every time the rear dial is pressed In the Shutter Prio...

Page 79: ...lity and the type of card used First burst speed has no relation with the transfer speed of the card The burst speed values given above apply when the shutter speed is 1 60 or faster and when the flas...

Page 80: ...er When the burst speed is set to H when FOCUS MODE is AFC M or L they are adjusted each time you take a picture If you are following a moving subject while taking pictures in a place indoors outdoors...

Page 81: ...NCE 0 s r Press 4 Touch Auto Bracket icon etc Select and touch the step Touch SET Focus on the subject and take a picture A Auto Bracket indication If you press and hold the shutter button the number...

Page 82: ...res taken are based on the selected Exposure Compensation range The exposure may be compensated incorrectly depending on the brightness of the subject When taking pictures continuously using Auto Brac...

Page 83: ...fway If you want to press the shutter button fully to take a picture even when the subject is not focused set FOCUS PRIORITY in the CUSTOM menu to OFF P144 The self timer indicator B blinks and the sh...

Page 84: ...econds is a convenient way to avoid the jitter caused by pressing the shutter button We recommend using a tripod when recording with the self timer Depending on the recording conditions the recording...

Page 85: ...cording conditions and the composition Set the FOCUS MODE to AFS or AFC P32 AFS or AFC will not operate with certain lenses For details refer to P13 Press 2 Touch the item Touch SET Note The is disabl...

Page 86: ...is set to multiple C the camera will adjust the exposure to suit the person s face P133 Under certain picture taking conditions including the following cases the Face Detection Function may fail to w...

Page 87: ...e AF area turns yellow when the shutter button is released Lock is canceled when MENU SET is pressed Note If it fails to lock AF area will flash in red and disappear Try to lock again AF Tracking may...

Page 88: ...ra is focusing on all the AF areas using when multiple AF areas max 23 areas light at the same time If you want to determine the focus position to take pictures switch the AF Mode to The camera focuse...

Page 89: ...area with the same function as is displayed in the touched position when the is selected Setting of the AF area is cleared when is touched When selecting The 23 AF areas can be divided into 9 areas a...

Page 90: ...et Move the AF area easily with DIRECT FOCUS AREA function When the DIRECT FOCUS AREA in the CUSTOM menu is set to ON while or is selected it is possible to move the AF area directly with the cursor b...

Page 91: ...rged area by pressing the cursor button when the DIRECT FOCUS AREA in the CUSTOM menu is set to ON Moving the enlarged area The enlarged area can be moved by dragging the screen P9 or pressing the cur...

Page 92: ...fore if the distance between the camera and the subject is changed after focusing on the subject it may become difficult to focus on it again The resolution of the periphery of the picture may decreas...

Page 93: ...ght source Press 1 Touch the White Balance to select Touch SET It will operate as AWB during motion picture recording Item Recording conditions AWB Automatic adjustment V When taking pictures outdoors...

Page 94: ...ill differ depending on the type of halogen lighting being recorded under so use AWB or The White Balance is only calculated for subjects within the range of the camera s flash The set White Balance i...

Page 95: ...adjusting to appropriate brightness Setting the color temperature You can set the color temperature manually for taking natural pictures in different lighting conditions The color of light is measure...

Page 96: ...ue the White Balance icon on the screen will change to blue If you finely adjust the White Balance to G_ green or M magenta _ green or magenta appears beside the White Balance icon on the screen Selec...

Page 97: ...rocedure and touch to set the bracket Bracket settings can also be made by rotating the rear dial or rear dial right Horizontal A to B or rear dial left Vertical Gi to Mj 2 Touch SET Note is displayed...

Page 98: ...ghtness within a maximum setting of ISO400 When setting to ISO sensitivity will adjust automatically depending on brightness within the maximum setting of ISO800 ISO400 when the flash is used The ISO...

Page 99: ...on is limited and related to the scene characteristics Detection of image movement of small objects or objects located at the perimeter of the picture can be difficult The setting is fixed to in the f...

Page 100: ...sure Compensation operation every time the rear dial is pressed Rotate the rear dial to display the EXPO METER P143 When you want to take a sharp picture of a fast moving subject set with a faster shu...

Page 101: ...te the aperture ring to the A position and the aperture ring setting takes priority if you rotate the aperture ring to a position other than A in Aperture Priority AE Mode The aperture value and the s...

Page 102: ...speed setting operation every time the rear dial is pressed Rotate the rear dial to display the EXPO METER P143 You can also set the focus manually by setting the FOCUS MODE to MF P91 Press the shutt...

Page 103: ...ayback screen If the exposure is not adequate the aperture value and the shutter speed turn red and blink when the shutter button is pressed halfway In Manual Exposure Mode and are disabled The SENSIT...

Page 104: ...et Q MENU Fn in the CUSTOM menu to Fn P56 A Q MENU Fn button Select Fn BUTTON SET in CUSTOM menu Select the function you want to assign and press MENU SET Note Some functions cannot be used depending...

Page 105: ...when the AE lock is performed AF Lock only is effective when taking pictures in Manual Exposure Mode AE Lock only is effective when taking pictures with Manual Focus AE Lock and AF Lock must be activ...

Page 106: ...water 1 Set Fn BUTTON SET in the CUSTOM menu to PREVIEW P56 2 Switch to confirmation screen by pressing Q MENU Fn Screen is switched every time Q MENU Fn is pressed Depth of field properties 1 Record...

Page 107: ...u take a picture with a Scene Mode that is not adequate for the purpose the hue of the picture may differ from the actual scene The following items cannot be set in Scene Mode because the camera autom...

Page 108: ...e background etc is a color close to skin color this part is also smoothed This mode may not be effective when there is insufficient brightness The initial setting for the AF Mode is This allows you t...

Page 109: ...ctures P92 AF Mode will be fixed to a small point Flowers outdoors are recorded with natural colors in macro settings The guide lines are displayed P67 Technique for Flower Mode We recommend using a t...

Page 110: ...ote Refer to FLOWER for other information about this mode This allows you to take pictures of a person and the background with near real life brightness Technique for Night Portrait Mode Open the flas...

Page 111: ...ng and is not a malfunction Noise may become visible when you take pictures in dark places The initial setting for the AF Mode is Illuminations are photographed beautifully Technique for ILLUMINATIONS...

Page 112: ...ancel AGE and NAME Select the OFF setting in step 2 of the Birthday Name setting procedure It can also be set with touch operation Note During motion picture recording settings for PORTRAIT are used T...

Page 113: ...g for the AF Mode is Refer to BABY1 BABY2 for other information about this mode Select this when you want to take pictures at a wedding reception an indoor party etc This allows you to take pictures o...

Page 114: ...e out bright and slightly bluish ELEGANT This is an image effect that creates a tranquil atmosphere and projects a feeling of stateliness The image will come out slightly dark and amberish CINEMA This...

Page 115: ...le to record a picture by touching Defocus Control is canceled by touching Note Blurriness may change during motion picture recording depending on the recording conditions Aperture is controlled withi...

Page 116: ...the adjusted items are displayed in the screen when the CUSTOM are adjusted Displayed icon is the one for direction of adjustment For best results when using the AF Tracking mode use the default SATU...

Page 117: ...fer to P30 Select and touch the custom settings Settings for the selected custom set are displayed Only some of the menu items are displayed Refer to the following for the menu items that are displaye...

Page 118: ...ttings that were previously stored are overwritten When changing the menu settings Even if the menu settings are changed temporarily with or selected what has been registered will remain unchanged To...

Page 119: ...t to During the Burst Mode FACE RECOG picture information can be attached to only the first picture After pressing the shutter halfway down a different person s picture information may be added when t...

Page 120: ...SENSITIVITY setting P123 When a person who is registered is not recognized correct by re registering Example of faces that are hard to recognize Face Recognition may not be possible or may not recogn...

Page 121: ...select the face recognition frame that is not registered and then press MENU SET Take the picture adjusting the face with the guide The faces of subjects other than people pets etc cannot be registere...

Page 122: ...haracters refer to Entering Text section on P128 AGE It is possible to register the birthday 1 Press 4 to select SET and then press MENU SET 2 Press 2 1 to select the items Year Month Day and then pre...

Page 123: ...ress MENU SET 4 Press a few times to exit the menu Item Description of settings INFO EDIT Changing the information of an already registered person Perform step 6 in Registering face image of new perso...

Page 124: ...ation in Step 6 and following in Registering face image of new person Note If the registration screen will not display it may display easier by recording in the same conditions or with the same expres...

Page 125: ...ce P28 1 Select TRAVEL DATE from the SETUP menu and then press MENU SET 2 Press 3 to select TRAVEL SETUP and then press MENU SET 3 Press 4 to select SET and then press MENU SET 6 Press 4 to select LOC...

Page 126: ...ized even if the camera is turned off In order to record the number of days that have passed since your departure the TRAVEL DATE must be set to SET Which day of the vacation you took them is not disp...

Page 127: ...n in the areas displayed on the screen set by the time difference from the home area Recording Dates Times at Overseas Travel Destinations World Time 3 Press 2 1 to select the home area and then press...

Page 128: ...selecting the item and pressing MENU SET _ Enter a blank Text between A capitals a small case 1 numbers and special characters DELETE Delete a character Move the entry position cursor to the left Move...

Page 129: ...nging these settings in one of these menus is reflected in other menu This allows you to select the aspect ratio of the pictures to suit printing or the playback method Applicable modes Note The ends...

Page 130: ...l picture is made of numerous dots called pixels The higher the numbers of pixels the finer the picture will be when it is printed on a large piece of paper or displayed on a PC monitor A Many pixels...

Page 131: ...llowing effects are not reflected in RAW images RED EYE REMOVAL I RESOLUTION I DYNAMIC PICTURE ADJUST and COLOR SPACE in REC Mode Menu Scene Mode My Color Mode images are recorded with a smaller data...

Page 132: ...en you do not want to miss a picture taking opportunity Applicable modes OFF ON Note The battery will be consumed faster than usual Press the shutter button halfway again when it is difficult to focus...

Page 133: ...o the locked subject METERING MODE C Multiple This is the method in which the camera measures the most suitable exposure by judging the allocation of brightness on the whole screen automatically Usual...

Page 134: ...tilising the Intelligent Resolution Technology Applicable modes OFF LOW STANDARD HIGH EXTENDED Note EXTENDED allows you to take natural pictures with a higher resolution The speed of burst and continu...

Page 135: ...te The upper limit of the ISO sensitivity can be set The higher the value set for the ISO sensitivity the more the jitter is reduced but the greater the amount of picture noise It will work when the S...

Page 136: ...era at this time After the countdown is finished PLEASE WAIT is displayed for the same time as the selected shutter speed for signal processing We recommend using a tripod when the shutter speed is sl...

Page 137: ...in dark places To avoid picture noise we recommend setting NOISE REDUCTION towards _ or setting the items except NOISE REDUCTION towards to take pictures SELF TIMER PICTURE ADJUST Item Effect CONTRAST...

Page 138: ...ar with AdobeRGB The setting is fixed to sRGB when recording motion pictures OFF MODE1 MODE2 MODE3 Note Refer to P76 for details COLOR SPACE sRGB Color space is set to sRGB color space This is widely...

Page 139: ...to record HD high definition video for playback on your HDTV using an HDMI connection It can be played back as is by inserting the card into a device compatible with AVCHD Refer to the instructions of...

Page 140: ...an abbreviation of Megabit Per Second and it represents the speed of transmission When MOTION JPEG is selected 3 This item cannot be set in the Intelligent Auto Mode With the AVCHD or HD for MOTION J...

Page 141: ...ed on the screen Applicable modes OFF ON Adjust the sound input level to 4 different levels Applicable modes LEVEL1 to LEVEL4 The shutter speed can be fixed to reduce the flicker or striping in the mo...

Page 142: ...may result in a better quality picture There may be white saturated areas if the distance between the camera and the subject is too close when taking pictures with the flash If HIGHLIGHT is set to ON...

Page 143: ...red When EXPO METER is not displayed switch the display information for LCD monitor by touching P67 The EXPO METER disappears after approximately 4 seconds if no operation is performed Refer to P105...

Page 144: ...e The AF Assist Lamp may be greatly blocked and it may become harder to focus when a lens with large diameter is used The setting for the AF ASSIST LAMP is fixed to OFF in SCENERY ARCHITECTURE NIGHT S...

Page 145: ...LD It will switch to Intelligent Auto Mode by pressing for a while BUTTON Enables disables the motion picture button OFF ON REC AREA This changes the angle of view during motion picture recording and...

Page 146: ...and Defocus Control cannot be used ON is displayed on the screen and Defocus Control can be used when is touched TOUCH SHUTTER Enables disables the Touch Shutter function OFF or is not displayed on t...

Page 147: ...n using a Leica lens mount adaptor DMW MA2M DMW MA3R optional set it to ON DIAL GUIDE Select whether or not to display the operation switch guide when the REC Mode is set to etc OFF ON MENU RESUME The...

Page 148: ...o finish Note It will be saved with PICTURE SIZE set to S 2 M ASPECT RATIO set to W and QUALITY set to Still pictures created from a motion picture may be coarser than with normal picture quality Whil...

Page 149: ...the pictures You can also put together a slide show composed of only still pictures only motion pictures only 3D pictures only pictures of a particular category or only favorites We recommend this fea...

Page 150: ...SELECTION has been selected The pictures are played back with the recommended effects in each category EFFECT is set to OFF when playing a slide show with motion pictures only While viewing pictures i...

Page 151: ...on the card If you press while searching the searching will stop halfway Pictures are sorted into the categories shown below Press 3 4 2 1 to select the person to playback and then press MENU SET Fac...

Page 152: ...ext does not fit on the screen You can print out texts comments using the PHOTOfunSTUDIO 6 0 HD Edition bundled software on the CD ROM supplied You can set up to 100 pictures at one time with MULTI Ti...

Page 153: ...and then press MENU SET 4 Press 3 4 to select SET and then press MENU SET 5 Press 3 4 to select text stamp items and then press MENU SET TEXT STAMP 3 Select the picture and then press MENU SET to set...

Page 154: ...riorate when text stamping is carried out Depending on the printer being used some characters may be cut at printing Check before printing The TEXT STAMP feature is disabled during the following condi...

Page 155: ...de motion picture near the very beginning or end of the motion picture The VIDEO DIVIDE feature only works on motion pictures recorded on this camera With MOTION JPEG motion pictures the order of pict...

Page 156: ...ay not be possible to resize pictures recorded with other equipment The RESIZE feature is disabled during the following conditions Motion pictures Pictures stamped with TEXT STAMP Pictures taken with...

Page 157: ...pending on the cut size the picture size of the cropped picture may become smaller than that of the original picture The picture quality of the cropped picture will deteriorate It may not be possible...

Page 158: ...r converting the aspect ratio the picture size may become larger than that of the original picture You may not be able to convert pictures taken on other equipment The ASPECT CONV feature is disabled...

Page 159: ...ed with the lens P12 compatible with the Direction Detection Function P35 When you play back pictures on a PC they cannot be displayed in the rotated direction unless the OS or software is compatible...

Page 160: ...own in step 2 and then press MENU SET 2 Press 3 to select YES and then press MENU SET At least one picture must be designated as FAVORITE otherwise the CANCEL feature will be disabled In PLAYBACK MODE...

Page 161: ...s 3 4 to set the number of prints and then press MENU SET to set When MULTI has been selected repeat steps 3 and 4 for each picture Press to return to the menu screen Canceling all the PRINT SET setti...

Page 162: ...ing store or refer to the operating instructions for the printer The date print feature is disabled for pictures that are stamped with text Note The number of prints can be set from 0 to 999 With a pr...

Page 163: ...this camera Even if you protect pictures on a card they will be deleted if the card is formatted Even if you do not protect pictures on a card they cannot be deleted when the card s Write Protect swit...

Page 164: ...formation has not been registered 5 Press 3 4 2 1 to select the person to replace and then press MENU SET 6 Press 3 to select YES and then press MENU SET Press to return to the menu screen Note Cleare...

Page 165: ...ion It is recommended to use a tripod or a flash to record steady pictures When a distance to the subject is 0 6 m 1 97 feet to approximately 1 m 3 28 feet horizontal disparity becomes too great and y...

Page 166: ...unusable REC Mode menu PICTURE SIZE 2 QUALITY 3 QUICK AF RED EYE REMOVAL I RESOLUTION I DYNAMIC EX TELE CONV DIGITAL ZOOM STABILIZER 2 The setting is fixed as shown below 3 When attaching 3D interchan...

Page 167: ...ecorded in 3D Select 3D PLAY in PLAYBACK MODE in the PLAYBACK Mode menu P151 Playback as a 3D slide show by selecting only the still pictures recorded in 3D Select 3D in SLIDE SHOW in the PLAYBACK Mod...

Page 168: ...3D pictures your eyes may become tired if you are too close to the television screen If your television does not switch to a 3D picture make the necessary settings on the TV For details refer to the o...

Page 169: ...plug them straight in or unplug them straight out Otherwise the connectors may be bent out of shape which may cause malfunction Connect the AV cable B supplied to the video input and the audio input...

Page 170: ...the AV cable Change the screen mode on your TV if the picture is displayed with the top or bottom cut off AV output is disabled when recording The recorded still pictures can be played back on a TV wi...

Page 171: ...HDMI mini cable optional Check the direction of the terminals and plug in out straight holding onto the plug It may result in malfunction if it is plugged in obliquely or in the wrong direction Conne...

Page 172: ...and right of the pictures Always use a genuine Panasonic HDMI mini cable RP CDHM15 RP CDHM30 optional Part numbers RP CDHM15 1 5 m 5 feet RP CDHM30 3 0 m 10 feet Output from the HDMI mini cable has p...

Page 173: ...has been connected to a VIERA Link compatible device using a HDMI mini cable optional for automatic linked operations Not all operations are possible VIERA Link is a unique Panasonic function built o...

Page 174: ...en when ALL is selected One screen display Select the image while in Multi Playback and then press OK 2 1 Go to previous next image 3 2D 3D switch 1 4 Return to Multi Playback OK Playback the motion p...

Page 175: ...tomatically switches to this unit s screen If the TV s power is in standby status it will turn on automatically if Set has been selected for the TV s Power on link setting Depending on your TV s HDMI...

Page 176: ...e details of copying and playing back Note that the equipment described may not be available in certain countries and regions It is possible to copy onto Blu ray disc DVD disc or hard disk by insertin...

Page 177: ...supplied 2 Start the playback of this unit 3 Start the recording on the recording equipment When ending the recording copying stop the playback on this unit after stopping the recording in recording e...

Page 178: ...These pictures can then be stored onto a DVD 1 Install PHOTOfunSTUDIO 6 0 HD Edition to the PC Read the separate operating instructions for the supplied software for more information about the softwar...

Page 179: ...undled software on the CD ROM supplied is a convenient way of doing this Read the separate operating instructions for the supplied software for more information about the software in the CD ROM suppli...

Page 180: ...he camera from the PC Then set USB MODE to PC again Double click on Removable Disk in My Computer When using a Macintosh the drive is displayed on the desktop LUMIX NO_NAME or Untitled is displayed Do...

Page 181: ...ontaining a folder with the same folder number has been inserted Such as when pictures were taken using another make of camera When there is a picture with file number 999 inside the folder Connection...

Page 182: ...ct PictBridge PTP and then press MENU SET Preparations Turn on the camera and the printer Perform the print quality and other settings at the printer before printing the pictures A USB connection cabl...

Page 183: ...printed out Selecting a single picture and printing it 1 Press 2 1 to select the picture and then press MENU SET The message disappears in about 2 seconds 2 Press 3 to select PRINT START and then pres...

Page 184: ...NU SET is pressed again the setting is canceled Once the selection is completed press 2 a few times to select OK and press MENU SET SELECT ALL Prints all the stored pictures PRINT SET DPOF Prints the...

Page 185: ...nting the date cannot be printed on the picture Since the printer s settings may take precedence over the print with date setting check the printer s print with date setting as well When printing imag...

Page 186: ...tem Description of settings Settings on the printer are prioritized L 3 5qk5q 89 mmk127 mm 2L 5qk7q 127 mmk178 mm POSTCARD 100 mmk148 mm 16 9 101 6 mmk180 6 mm A4 210 mmk297 mm A3 297 mmk420 mm 10k15c...

Page 187: ...t NUM OF PRINTS to 1 for each of the 4 pictures Note The camera is receiving an error message from the printer when the indication lights orange during printing After finishing printing make sure ther...

Page 188: ...t does not display Switch to and from the Optional Live Viewfinder by pressing LVF LCD Optional Live Viewfinder You can switch between LCD LCD monitor display and LVF Live Viewfinder display Some touc...

Page 189: ...nd carefully The Optional Live Viewfinder cannot be used with the external flash When a strap is fitted do not allow it to snag on the optional live viewfinder When attaching the optional live viewfin...

Page 190: ...sing other commercially available external flashes without communication functions with the camera DMC GF2 It is necessary to set the exposure on the external flash If you want to use the external fla...

Page 191: ...bottom of the recorded picture Read the operating instructions of the external flash for details The MC protector optional is a transparent filter which affects neither the colors nor the amount of li...

Page 192: ...Menu P58 Recording state Flashes red Focus P32 Lights green 10 Touch Shutter P37 11 Display P39 67 12 Number of recordable pictures 2 P27 13 Dial operation guide P147 14 Exposure meter P143 15 Exposur...

Page 193: ...5 44 Name 5 P112 Number of days that have passed since the departure date 4 P125 45 Self timer 6 P83 46 Spot metering target P133 47 Digital Zoom P69 48 Picture quality adjustment P137 1 Only availabl...

Page 194: ...since the departure date P125 22 Stamped with text indication P153 Elapsed playback time P46 1 23 Favorites P160 Cable disconnection warning icon P182 24 Folder File number 2 P181 25 Color space 4 P13...

Page 195: ...gnetic fields created by speakers or large motors Electromagnetic wave radiation generated by microprocessors may adversely affect this unit disturbing the pictures and or sound If this unit is advers...

Page 196: ...nd the lens buttons etc This camera is not waterproof If water or seawater splashes on the camera use a dry cloth to wipe the camera body carefully If the unit does not operate normally please contact...

Page 197: ...f dust and always attach the body cap when a lens is not attached to the camera so that dirt or dust does not get inside the camera body Remove any dirt on the body cap before attaching it Removing di...

Page 198: ...or near a window When there is dirt water oil and fingerprints etc on the surface of the lens the picture may be affected Lightly wipe the surface of the lens with a soft dry cloth before and after ta...

Page 199: ...hen you travel do not forget to bring the battery charger supplied so that you can charge the battery in the country that you are traveling in Dispose of unusable battery The battery has a limited lif...

Page 200: ...ease rest appropriately after stopping the viewing When viewing 3D pictures we recommend taking a break every 30 to 60 minutes Viewing for extended periods may cause eye fatigue Short sighted or long...

Page 201: ...f data in the memory card is the responsibility of the user If a name or birthday is set for BABY1 BABY2 Face Recognition function this personal information is kept in the camera and recorded in the i...

Page 202: ...n you use a tripod make sure the tripod is stable when this unit is attached to it You may not be able to remove the card or the battery when using a tripod or unipod Make sure that the screw on the t...

Page 203: ...duce the number of pictures set and then repeat the operation More than 999 favorites have been set CANNOT BE SET ON THIS PICTURE TITLE EDIT TEXT STAMP or PRINT SET cannot be set for pictures not base...

Page 204: ...ken Insert a different card CANNOT RECORD DUE TO INCOMPATIBLE FORMAT NTSC PAL DATA ON THIS CARD If you want to delete some pictures format the card after saving necessary data on a PC etc P66 Insert a...

Page 205: ...r number is reset to 100 P66 PICTURE IS DISPLAYED FOR 16 9 TV PICTURE IS DISPLAYED FOR 4 3 TV The AV cable is connected to the camera Press MENU SET if you want to delete this message at once Select T...

Page 206: ...unit also turns off If you are not using VIERA Link set VIERA Link to OFF P64 Is the temperature of the battery excessively high or low If it is it will take longer than usual to charge the battery o...

Page 207: ...d the focus range of the camera P33 There is camera shake jitter or the subject is moving slightly P77 Is FOCUS PRIORITY in the CUSTOM menu set to OFF P144 In this case the picture may not be properly...

Page 208: ...TR NR to ON P136 Is the PICTURE SIZE P130 or the QUALITY P131 set low Is the DIGITAL ZOOM set P69 Taking pictures using White Balance Bracket is not possible The recorded picture looks rough Noise app...

Page 209: ...a malfunction It is recorded in motion pictures but is not recorded on still pictures It is recommended that you take pictures while taking care not to expose the screen to sunlight or any other sour...

Page 210: ...lacked out momentarily or the unit may record noise due to static electricity or electromagnetic waves etc depending on the environment of the motion picture recording Object seems to be warped slight...

Page 211: ...re of the digital camera at the following website http panasonic jp support global cs dsc download When using this lens with another make of digital cameras the Optical Image Stabilizer function will...

Page 212: ...printer This is not a malfunction These pixels do not affect the recorded pictures In dark places noise may appear to maintain the brightness of the LCD monitor This is a characteristic of the drive s...

Page 213: ...ictures mentioned above P66 Other pictures will be deleted as well and it will not be possible to restore them Therefore check well before formatting Is the clock in the camera set properly P60 Images...

Page 214: ...he TV Depending on the TV model the pictures may be extended horizontally or vertically or they may be displayed with their edges cut off Are you trying to play back the motion pictures by directly in...

Page 215: ...d in the camera Check if your PC is compatible with SDXC memory cards http panasonic net avc sdcard information SDXC html A message prompting to format the card may be displayed when connecting but do...

Page 216: ...ON In dark places the AF Assist Lamp P144 lights red to make it easier to focus on a subject Is AF ASSIST LAMP on the CUSTOM menu set to ON P144 The AF Assist Lamp does not turn on in bright places T...

Page 217: ...d file numbers for the pictures taken will not be stored in the memory When the power is then turned back on and pictures are taken they may be stored under file numbers which should have been assigne...

Page 218: ...he United States and other countries HDAVI Control is a trademark of Panasonic Corporation QuickTime and the QuickTime logo are trademarks or registered trademarks of Apple Inc used under license ther...

Reviews: