background image

18   

VQT2R24

VQT2R24

   19

Setting the clock


(Continued)

 Setting the clock

( The clock is not set when the 

camera is shipped.)

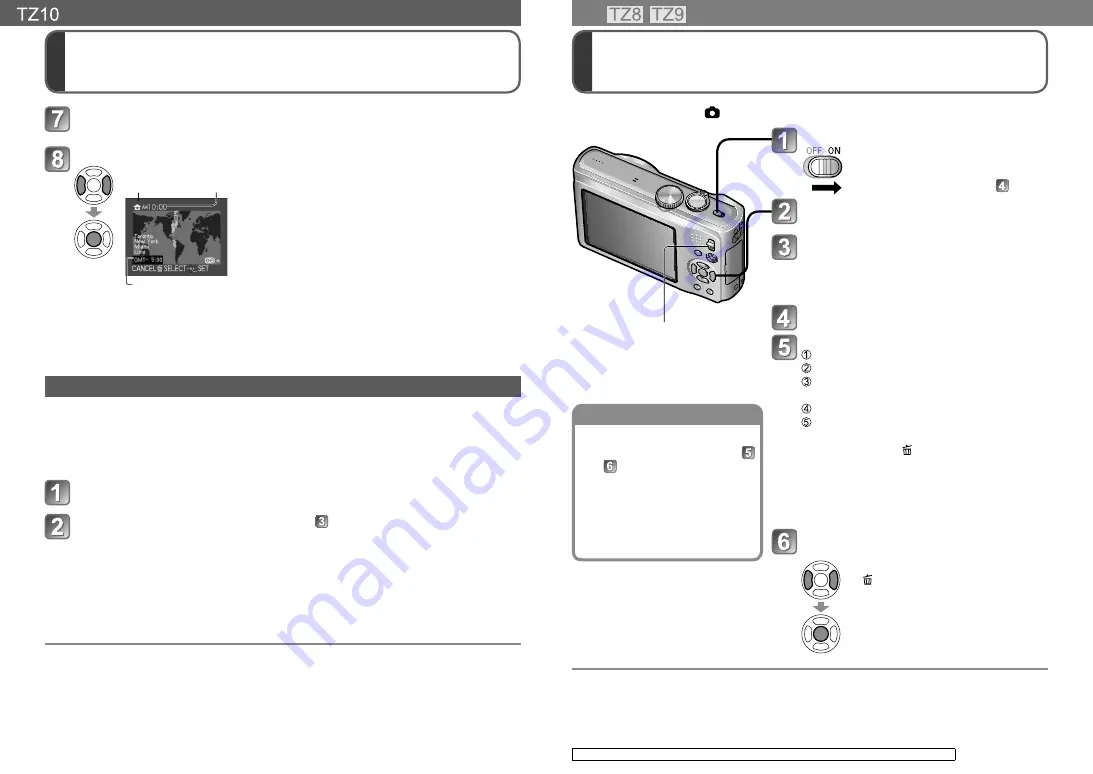
When [PLEASE SET THE HOME AREA] is displayed, press 

[MENU/SET]
Set your home area

City or area 

name

Current time

Difference from GMT 

(Greenwich Mean Time) 

The current time and home area are set. 


[GPS SETTING] turns [[ON]]. (

85) 


About automatic time correction

(

88)

To change time setting

When resetting date and time, select [CLOCK SET] from [SETUP] menu. 


• Clock settings will be saved for approx. 3 months even after battery is removed, 

provided a fully-charged battery was installed in camera for the 24 hours beforehand.


Using the GPS function, you can make settings to automatically correct the current 
time. (

88) 

Select [CLOCK SET] from [REC] menu or [SETUP] menu (

22)

Set the date and time 

(start from Step   on previous page)


To set local time at travel destination

[WORLD TIME] (

90)


The GPS function is not usable unless the clock is set.


Failure to set the date and time will cause the date/time to be improperly printed when 
printing pictures in digital photo centre or when using [TEXT STAMP].


Year can be set between 2000 and 2099.


After the time has been set, the date can be printed correctly even if the date is not 
displayed on the camera screen.

Turn on the power

The power is turned on.
If the language select screen is not 
displayed, proceed to step  .

Press [MENU/SET] while the 

message is displayed
Press 

▲▼

 to select the language, 

and press [MENU/SET]


The [PLEASE SET THE CLOCK] message 

appears. (This message does not appear in 

playback mode.)

Press [MENU/SET]

Setting time, date and display format 

 Use 

▲▼

 to set year and press 

 Use 

▲▼

 to set month and press 

  Do the same to set day, hour and minute 

and press 

  Use 

▲▼

 to select display order and press 

  Use 

▲▼

 to select time display format and 

press [MENU/SET] 


• To cancel 

 Press  .


• Setting example of display order and time display format

[M/D/Y] [24HRS]: 12:34  APR.15.2010

[D/M/Y] [AM/PM]: PM 12:34  15.APR.2010

[Y/M/D] [24HRS]: 2010.4.15  12:34


When set to [AM/PM], 0:00 midnight is AM 12:00, 

and 0:00 noon is PM 12:00.

Confirm the setting and press 

[MENU/SET]


To return to the previous screen, press 

Turn on power again and check time 
display.
(Time and date can be displayed by 
pressing [DISPLAY] several times.)

Set REC/PLAY switch to 

 before turning on power.

REC/PLAY switch

To change time setting

Select [CLOCK SET] from 
[SETUP] menu (

22), perform   

and  .


• Clock settings will be saved for 

approx. 3 months even after 
battery is removed, provided 
a fully-charged battery was 
installed in camera for the 24 
hours beforehand.


To set local time at travel 

destination

[WORLD TIME] (

90)


Failure to set the date and time will cause the date/time to be improperly printed when printing 

pictures in digital photo centre or when using [TEXT STAMP].


Year can be set between 2000 and 2099.


After the time has been set, the date can be printed correctly even if the date is not displayed on the 

camera screen.

For the operating procedures for the DMC-TZ10 (

17)

Summary of Contents for DMC-TZ9

Page 1: ...Operating Instructions for advanced features Digital Camera Model No DMC TZ10 DMC TZ9 DMC TZ8 Before use please read these instructions completely VQT2R24 ...

Page 2: ... Basic shooting operation 28 Holding the camera Direction detection function 29 Mode dial 29 Basic shooting operation 30 Holding the camera Direction detection function 31 Mode dial 31 Taking picture with automatic settings 32 Face Detection and Face Recognition 34 AF TRACKING 34 Taking pictures with your own settings 35 Align focus for desired composition 36 Taking pictures motion pictures with z...

Page 3: ... playback methods 85 SLIDE SHOW 86 MODE PLAY 87 CATEGORY PLAY FAVORITE PLAY 88 Using PLAYBACK menu 89 CALENDAR TITLE EDIT 89 Text input method 89 TEXT STAMP 90 RESIZE 91 TRIMMING 92 LEVELING FACE RECOG 93 ASPECT CONV ROTATE DISP 94 FAVORITE 95 PRINT SET 96 PROTECT AUDIO DUB 97 COPY 98 Connecting with other devices Copying recorded pictures 99 Dubbing playback images via AV cables 99 Copying to com...

Page 4: ...y fingerprints etc Turn the power on hold the extracted lens barrel with your fingers and gently wipe the lens surface with a soft dry cloth Do not leave the lens exposed to direct sunlight Camera ON OFF switch Do not touch the lens barrier as this may damage lens Be careful when removing camera from bag etc When using a tripod or unipod Do not apply excessive force or tighten screws when they are...

Page 5: ... as of February 2010 These will not be updated Depending on the country or area little location name and landmark information may be available Positioning Because the positions of the GPS satellites are constantly changing depending on the recording location and conditions it may not be possible to position such satellites accurately or positioning discrepancy may occur When using in another count...

Page 6: ...tton Exposure compensation 53 Auto bracket 54 Multi aspect 55 White balance fine adjustment 96 Right cursor button Flash 47 In this manual the button that is used is shaded or indicated by Camera ON OFF switch 19 Shutter button 34 Mode dial 33 Flash 47 Self timer indicator 52 AF assist lamp 104 Lens barrel Lens 7 Zoom lever 39 Microphone 1 76 Speaker 22 LCD monitor 2 6 23 46 156 REC PLAY switch 32...

Page 7: ...continuously in MOTION JPEG is up to 2 GB Example 8 m 20 s with HD Remaining time for continuous recording is displayed on the screen 3 The time you can actually record when repeatedly turning power on and off starting and stopping recording and using zoom Viewing pictures Playback time About 300 minutes The number of recordable pictures or available recording time may vary slightly according to b...

Page 8: ...ler optional you can record and play back without worrying about remaining battery Purchase the AC adaptor and DC coupler as a set They cannot be used individually with this camera DC IN terminal DC coupler DC coupler cover Align the marks to connect AC adaptor Insert DC coupler instead of battery previous page Open DC coupler cover If difficult to open with the card battery door open press the co...

Page 9: ...ats Before using SDXC memory cards check your computer and other devices support this type of card http panasonic net avc sdcard information SDXC html Cards in capacities not listed at left are not supported SDHC memory cards 4 GB 32 GB SDXC memory cards 48 GB 64 GB Please reformat the card with this camera if it has already been formatted with a computer or another device 28 If the write protect ...

Page 10: ... while the message is displayed Press to select the language and press MENU SET The PLEASE SET THE CLOCK message appears This message does not appear in playback mode Press MENU SET Setting time date and display format Use to set year and press Use to set month and press Do the same to set day hour and minute and press Use to select display order and press Use to select time display format and pre...

Page 11: ...to mode dial set to Shutter button REC PLAY switch Camera ON OFF switch Mode dial REC menu REC PLAY switch MOTION PICTURE menu REC PLAY switch Changing picture preferences 93 107 Displays settings such as white balance sensitivity aspect ratio and picture size TRAVEL MODE menu REC PLAY switch Categorize your travel pictures 90 92 You can set the GPS settings travel date settings and more SETUP men...

Page 12: ...epending on how bright it is around the camera POWER LCD Makes screen brighter than normal for outdoor use AUTO POWER LCD does not work in the following cases During playback during menu display when connected to computer printer POWER LCD returns to ordinary brightness if there is no operation for 30 seconds when recording Press any button to make brighter again Because the picture shown on the L...

Page 13: ...oom area Note however that there is no effect on the recorded picture When LCD MODE is set the brightness of the LCD monitor follows the setting in LCD MODE but the picture quality of the LCD monitor stays at a low level Item Settings notes For details about the setting procedure in the SETUP menu 20 AUTO REVIEW Automatically display still pictures immediately after taking them OFF No auto review ...

Page 14: ...esolution is automatically determined based on information from the connected TV 1080i Outputs 1080 effective scanning lines in interlaced format 720p Outputs 720 effective scanning lines in progressive format 576p 1 480p 2 Outputs 576 or 480 effective scanning lines in progressive format Interlaced and Progressive Formats In i interlaced format interlaced scanning half of the effective scanning l...

Page 15: ...form other operations during formatting Formatting the built in memory may take several minutes Consult your nearest Service Centre if format cannot be successfully completed LANGUAGE Change display language Set the language displayed on the screen For details about the setting procedure in the SETUP menu 20 DEMO MODE View demonstration of functions STABILIZER DEMO Only during recording Extent of ...

Page 16: ...shutter button Press halfway Adjust the focus Press and hold the shutter button to take picture Press fully Flash AF assist lamp Stand with your arms close to your body and with your legs apart Do not touch the lens Do not block the microphone when recording audio 9 Do not block the flash or the lamp Do not look at it from close range Make sure that the camera does not move at the moment the shutt...

Page 17: ...shutter button to take picture Press fully Flash AF assist lamp Stand with your arms close to your body and with your legs apart Do not touch the lens Do not block the microphone when recording audio 10 Do not block the flash or the lamp Do not look at it from close range Make sure that the camera does not move at the moment the shutter button is pressed INTELLIGENT AUTO Mode Take pictures with au...

Page 18: ...mend using a tripod and the self timer with i NIGHT SCENERY and i NIGHT PORTRAIT When jitter is small e g using tripod with i NIGHT SCENERY shutter speed can reach a maximum of 8 seconds Do not move the camera The settings for the following functions are fixed AUTO REVIEW 2 SEC SLEEP MODE 5 MIN GUIDE LINE WHITE BALANCE AWB QUALITY Fine STABILIZER AUTO AF MODE Face detection 3 AF ASSIST LAMP ON MET...

Page 19: ...where the focus was locked AF Lock moves the camera can continue to keep it in focus Set AF MODE to AF tracking To cancel AF tracking Press again AF tracking frame Align the AF tracking frame with the subject and then lock To cancel AF Lock Press The optimum scene is detected for the subject where the focus was locked AF Lock AF Lock successful Yellow AF Lock failed Red flash Face recognition will...

Page 20: ...bar Zoom speed can be adjusted Zoom slowly turn slightly Zoom quickly turn completely Adjust the focus after adjusting the zoom You can zoom in up to 12 times with optical zoom and up to 23 4 times with Extra optical zoom pictures only with lower picture quality To zoom further you can use iA ZOOM or DIGITAL ZOOM Do not block the lens barrel movement while zooming The focus display flashes and bee...

Page 21: ...M RESUME 25 allows zoom ratio to be memorised even if power is turned off Maximum zoom ratios by picture size Optical zoom Extra optical zoom PICTURE SIZE 12 M 8 M 5 M 3 M 0 3 M 11 5 M 7 5 M 4 5 M 2 5 M 0 3 M 10 5 M 7 M 4 5 M 2 M 0 2 M Max enlargement 12 x 14 7 x 18 8 x 23 4 x When the picture aspect ratio is What is Extra optical zoom EZ If for example set to 3M equivalent to 3 million pixels a p...

Page 22: ...one touch Press to change zoom ratio Each time you press the ratio changes Change of zoom ratio When the picture size is 10 5 M or more Current recording ratio or 1 X Optical zoom Maximum ratio Extra optical zoom Maximum ratio Digital zoom Maximum ratio When the picture size is 8 M or less Current recording ratio or 1 X Extra optical zoom Maximum ratio Digital zoom Maximum ratio The picture size t...

Page 23: ...red To delete multiple up to 50 or all pictures after step DISPLAY Zoom lever Set to Scroll through pictures Previous Next File number Picture number Total pictures Hold down to quickly scroll forwards backwards Only file numbers change while held down picture is displayed when released Scroll speed increases the longer you press Speed may vary according to playback conditions If file number is no...

Page 24: ...ot be displayed simultaneously Recording information Recording information or histogram 1 No display Display FLASH Select the desired type Can also be selected with Example displayed about 5 seconds PROGRAM AE mode Type operations Uses AUTO Automatically judges whether or not to flash Normal use AUTO RED EYE 1 Automatically judges whether or not to flash reduce red eye Taking pictures of subjects ...

Page 25: ...ording mode Scene mode flash settings are restored to default when scene mode is changed Edges of picture may become slightly dark if using flash at short distances without using zoom close to max W This may be remedied by using a little zoom If flash is to be emitted flash type marks e g will turn red when shutter button is pressed halfway No pictures may be taken if these marks e g are flashing ...

Page 26: ...range in PROGRAM AE mode Focus range Distance between the lens and the subject 3 cm 0 10 feet 50 cm 1 64 feet 1 m 3 28 feet 2 m 6 57 feet Zoom ratio 1 1 x max W 3 cm 0 10 feet 50 cm 1 64 feet 2 x 20 cm 0 66 feet 50 cm 1 64 feet 3 x 50 cm 1 64 feet 50 cm 1 64 feet 4 x 1 m 3 28 feet 1 m 3 28 feet 5 x 8 x 2 m 6 57 feet 2 m 6 57 feet 9 x 1 5 m 4 93 feet 2 m 6 57 feet 10 x 12 x max T 1 m 3 28 feet 2 m ...

Page 27: ...me duration Can also be selected with Displayed for approx 5 sec Can also be selected with Take a picture Press fully the shutter button to start recording after the preset time To cancel while in operation Press MENU SET Self timer indicator Flashes for set duration Corrects exposure when adequate exposure cannot be obtained if difference between brightness of object and background etc Depending ...

Page 28: ...once automatically takes 3 still pictures in each of 3 aspect ratios 4 3 3 2 and 16 9 The shutter sound is made only once After MULTI ASPECT is set is displayed on the left side of the screen Shutter speed aperture focus EXPOSURE WHITE BALANCE and SENSITIVITY settings will be constant for all three pictures MULTI ASPECT is disabled when the number of recordable pictures is two or less It is also c...

Page 29: ... reduce the aperture Determine aperture and record APERTURE PRIORITY Mode Recording mode When recording you can control the shutter speed to meet your recording purposes Aperture is automatically adjusted to be appropriate for the set shutter speed Set to recording Set to SHUTTER PRIORITY Mode Determine shutter speed At faster shutter speeds movements by the subject show as if they are still At sl...

Page 30: ...e aperture value Aperture values that can be set vary depending on zoom position The above table is at Max W LCD monitor brightness may vary from the actual still picture recorded In manual exposure mode cannot be set Determine aperture and shutter speed and record MANUAL EXPOSURE Mode Recording mode Registering your preferred recording mode REC menu settings etc to CUST SET MEM and setting mode d...

Page 31: ... of each scene Select scene and press DISPLAY button To take motion pictures 72 Registering commonly used scenes MY SCN MODE 71 MY SCENE MODE 71 Selecting a scene mode inappropriate for the actual scene may affect the colouring of your picture Following REC menu settings will be automatically adjusted and cannot be selected manually available settings vary according to scene setting INTELLIGENT IS...

Page 32: ...matically 2 second self timer recommended To take pictures with audio 104 self timer indicator illuminated during recording Main fixed settings ZOOM RESUME OFF SELFTIMER OFF 2SEC STABILIZER MODE 2 AF ASSIST LAMP OFF AF MODE default setting is face detection Scene Uses Tips Notes Scene Uses Tips Notes SCENERY Takes clear pictures of wide distant subjects Tips Stand at least 5 m 16 4 feet away Main ...

Page 33: ...ips Notes CANDLE LIGHT Brings out the atmosphere of a candlelit room Tips Focus Max W 3 cm 0 10 feet and above Max T 1 m 3 28 feet and above 5 to 8 is 2 m to Do not use flash Tripod self timer recommended Shutter speed max 1 sec When the camera is set to STABILIZER and there is very little jitter or if STABILIZER is set to OFF shutter speed may slow down up to 1 second AF MODE default setting is f...

Page 34: ...te balance shutter speed and ISO sensitivity are fixed to the settings for the first picture The following functions cannot be used Extra optical zoom DIGITAL ZOOM AUTO BRACKET MULTI ASPECT SELFTIMER AUDIO REC BURST If recording is repeated depending on the usage conditions there may be a delay before the camera takes pictures again Scene Uses Tips Notes Scene Uses Tips Notes FLASH BURST Enables c...

Page 35: ... around the screen for a retro effect Tips Focus Max W 3 cm 0 10 feet and above Max T 1 m 3 28 feet and above 5 to 8 is 2 m to The Face detection function 97 may not work properly in the darkened area around the screen The following functions cannot be used DIGITAL ZOOM AUTO BRACKET MULTI ASPECT BURST Scene Uses Tips Notes Scene Uses Tips Notes FILM GRAIN Produces black and white pictures with a g...

Page 36: ...ration again Taking motion pictures 72 You can register commonly used scene mode in for on the mode dial After the settings are made pictures can be taken in the preset scene mode by simply setting the mode dial to for PHOTO FRAME A frame is superimposed over the image Press to select the frame and then press MENU SET The recording pixel level is 2 M The following function is fixed AUTO REVIEW 2 S...

Page 37: ...record high definition motion pictures Can record high definition motion pictures longer than MOTION JPEG on cards of the same size Pictures can be played back by inserting the card in an AVCHD compatible device MOTION JPEG With change of picture quality settings can record high definition motion pictures small QVGA size motion pictures etc Recorded motion pictures can be played back with QuickTim...

Page 38: ...as new sound recording specifications to improve sound quality Therefore in some cases motion pictures recorded in MOTION JPEG may not be able to play back in Panasonic s LUMIX digital cameras Motion pictures recorded with Panasonic s LUMIX digital camera can be played back with this digital camera Applies to LUMIX cameras sold through December 2008 and some sold in 2009 FS LS series When recordin...

Page 39: ...ording Press fully Remaining recording time approx Elapsed recording time approx REC QUALITY Changing the motion picture size When recording motion picture use a card rated with an SD speed class 1 of Class 6 or higher 1 SD speed class refers to a specification for sustained write speeds Display REC menu Select REC QUALITY Select the desired picture quality Close menu Picture Quality Picture Size ...

Page 40: ...n CATEGORY PLAY Even if face recognition information is changed 81 face recognition information for previously recorded pictures is not changed For example if a name is changed pictures recorded before the change are not categorized for face recognition in CATEGORY PLAY To change name information for pictures already recorded perform a REPLACE 133 in FACE REC EDIT Registering face pictures Up to 6...

Page 41: ... with and then press MENU SET ADDITIONAL IMAGE Up to 3 face pictures of the person can be registered Select the unregistered frame with and then press MENU SET If a registered face picture is selected a screen to confirm deletion is displayed If YES is selected the face picture is deleted Record the picture Close menu To set the face recognition function to OFF Select FACE RECOG from the REC menu ...

Page 42: ...o be displayed is 3 times estimate This does not occur in BURST AUDIO REC AUTO BRACKET or MULTI ASPECT If the registration screen is not displayed easily recording in the same environment and with the same expression will make it display more easily If a face is not recognised despite being registered re registering the person from REC menu s FACE RECOG at that location will make it easier for the...

Page 43: ...be performed when the camera is covered by a material such as metal GPS antenna Status indicator Using in locations such as airplanes or hospitals When GPS SETTING is set to ON the GPS function operates even when the camera s power is off When turning off the camera s power in an airplane hospital or other restricted area set GPS SETTING to OFF or 85 If the GPS status indicator flashes while the c...

Page 44: ...ded However note that in the following cases the location name recording is deleted so the location name is not recorded on the pictures When GPS SETTING is set to OFF or before turning off the camera s power If the GPS function stopped while GPS SETTING is set to ON and the camera s power is off 85 Because the GPS satellites are constantly moving for positioning to be performed first the orbit in...

Page 45: ...f positioning is successful Corrects automatically to the current time Corrects to the local time after moving to a country or region in a different time zone When AUTO CLOCK SET is turned to ON WORLD TIME is set to AUTO When WORLD TIME is set to something other than AUTO AUTO CLOCK SET is turned to OFF Time and date corrected by AUTO CLOCK SET is not as accurate as radio clocks If the time and da...

Page 46: ... recorded at the same time It is recorded separately from the place name information recorded for pictures by GPS SETTING To print the destination either use TEXT STAMP or print using the software on the supplied CD ROM PHOTOfunSTUDIO WORLD TIME Set the date and time for the destination Set the recording date and time with local time at your destination Perform CLOCK SET in advance Select WORLD TI...

Page 47: ...ding conditions Setting guide Larger picture size Smaller picture size 2 2 For example 0 3 M is suitable for e mail attachments or longer recording Crisper picture Coarser picture Lower recording capacity Higher recording capacity Recording only Cannot set TRAVEL DATE Record the travel date If you set your travel schedule and record pictures which day of your trip the picture was recorded will be ...

Page 48: ...h Shutter speed Slow Fast Interference Low High Slow moving subject Fast moving subject ISO sensitivity 200 Shutter speed 1 30 ISO sensitivity 800 Shutter speed 1 125 Shutter speed and ISO sensitivity are displayed in the screen for a few seconds after recording If interference becomes noticeable we recommend reducing the setting or selecting OFF in the COLOR EFFECT Blurring may occur depending on...

Page 49: ... Only takes pictures of white objects within frame step MENU SET Even if the camera s power is OFF the set white balance is remembered It may not be possible to set the correct white balance if subjects are too bright or too dark In this case adjust the brightness and try to set the white balance again FACE RECOG Registering people that appear frequently in your pictures allows them to be given pr...

Page 50: ...The location is too bright or dark A similarly coloured subject or background Zoom is used When AF tracking does not work focus will be on 1 area focusing Cannot set to in the following cases PANORAMA ASSIST STARRY SKY FIREWORKS PIN HOLE FILM GRAIN or HIGH DYNAMIC scene modes B W SEPIA COOL and WARM in COLOR EFFECT While recording motion pictures and the setting is other than face detection focus ...

Page 51: ...O BURST Enables a rapid succession of still pictures to be taken Succession of still pictures taken while shutter button is held down Recording mode REC menu Settings BURST setting Speed No of pictures OFF No burst Burst 2 3 pictures sec Fine Max 3 Standard Max 5 When using self timer Fixed at 3 pictures Focus exposure and white balance are fixed in the first picture Burst speed may be reduced if ...

Page 52: ...tical zoom by up to 4 times For details 43 Recording mode REC menu Settings OFF ON This is fixed at ON when MACRO ZOOM is set COLOR EFFECT Set colour effects Recording mode REC MOTION PICTURE menu REC menu Settings OFF B W SEPIA COOL more blue WARM more red HAPPY only If interference is noticeable in dark locations Set to OFF In INTELLIGENT AUTO only OFF HAPPY B W or SEPIA can be set these are set...

Page 53: ...These are AVCHD Lite motion pictures to which location name information for the location where recording was started has been added AVCHD Lite This is a data format suitable for playback on high definition TVs MOTION JPEG This is a data format suitable for playback on computers that allows even small picture sizes to be recorded For details about REC MODE 73 The REC QUALITY options vary based on t...

Page 54: ... recording time is shorter when recording a subject with rapid movements 2 The frame rate is the number of frames per second WVGA cannot be set in INTELLIGENT AUTO Mode QVGA only can be recorded to the built in memory REC QUALITY For details 77 CONTINUOUS AF Either allow the focus to be constantly adjusted during motion picture recording or fix the focus position at the start of recording Recordin...

Page 55: ...es and maps instead of taking memos Regardless of presence of card pictures will always be saved to clipboard folder of built in memory so that they can be distinguished from normal pictures and viewed immediately Beware of copyrights etc 6 Taking clipboard pictures Zoom mark Useful for enlarging and saving parts of maps etc To register zoom enlarged size and position Enlarge with zoom lever and s...

Page 56: ... fit on the screen To print the text you have specified use TEXT STAMP 125 or use the PHOTOfunSTUDIO software on the CD ROM supplied On the setting screen of each menu Select the type of character Changes each time you press the button カーソル移動W T スペース 消去 かな カナ DISPLAY 中止 終了 あかさたなはまやらわ あいうえおぁぃぅぇぉ 文字切替 選択 入力 Upper lower case alphabet Symbols numbers Select characters and press MENU SET repeat カーソル移動W...

Page 57: ... date Select week with and date with and press MENU SET to display that date s pictures on a 12 screen display Calendar screen The volume for still pictures with audio can be adjusted by the speaker volume 22 Playback zoom is not available Motion pictures or still pictures with audio recorded on other devices may not be played correctly When using a large volume memory card the rewind function may...

Page 58: ...ly the motion picture is displayed and it is automatically played back Play back the motion picture and pause at the place to split Pause playback Fast rewind 2 steps during pause single frame rewind Fast forward 2 steps during pause single frame forward Decide the point to split the motion picture Select YES The motion picture is split The original motion picture that was split does not remain Th...

Page 59: ...place Use to select place name or landmark and press MENU SET 119 CATEGORY SELECTION Select category and playback still pictures only Select category with and press MENU SET 122 FAVORITE Play pictures set as FAVORITE displayed only when FAVORITE pictures present and setting set to ON TRAVEL Play only pictures that were recorded with the TRAVEL DATE or DESTINATION 120 Set playback effects EFFECT Se...

Page 60: ...atios have their edges cut so they can be displayed on the entire screen MODE PLAY This Playback Mode is useful for playing back still pictures only or only motion pictures recorded in AVCHD Lite or MOTION JPEG Select the type of data View pictures Previous Next To delete the picture Press To exit MODE PLAY set to NORMAL PLAY When playing back an AVHCD Lite GPS motion picture for which place name ...

Page 61: ...s recorded on the same date the first picture recorded on that date is displayed on the calendar screen If a DESTINATION has been set that has a different time zone the recorded picture is displayed on the calendar with the local date and time Select the week Select the day Select the picture The picture is displayed Play back by destination Pictures can be played back by destination if LOCATION w...

Page 62: ... categories with pictures dark blue No of pictures appears after a few seconds For Playback by Person use to select the person and then press MENU SET View pictures Previous Next To delete pictures Press CATEGORY Recording information such as scene modes Pictures taken using Face Recognition PORTRAIT i PORTRAIT SOFT SKIN TRANSFORM SELF PORTRAIT NIGHT PORTRAIT i NIGHT PORTRAIT BABY i BABY SCENERY i...

Page 63: ... EXIT press to return to the menu Cannot be set in CATEGORY PLAY or FAVORITE PLAY Playback Mode Cannot be used with still pictures taken on other devices protected still pictures or motion pictures To print text use TEXT STAMP or the supplied CD ROM PHOTOfunSTUDIO TEXT STAMP Stamp recording date or text registered in the BABY and PET scene modes TRAVEL DATE or TITLE EDIT into your still pictures I...

Page 64: ...settings cannot be changed on pictures Characters may be cut off on certain printers Cannot be set in CATEGORY PLAY or FAVORITE PLAY Playback Mode Do not make date printing settings in shop or on printer for still pictures with date stamps Date printing may be overlapping RESIZE Picture size can be reduced to facilitate e mail attachment and use in homepages etc Still pictures recorded at the smal...

Page 65: ...formed May not be compatible with still pictures taken on other devices Cannot be used with motion pictures still pictures with audio or still pictures with text stamp Original face recognition information will not be copied when still pictures are leveled ASPECT CONV Convert still pictures taken in to or for printing Set up Press MENU SET PLAYBACK menu Select ASPECT CONV Select or Select still pi...

Page 66: ... printing with DPOF print compatible shops or printers Ask at shop to check compatibility Set up Press MENU SET PLAYBACK menu Select PRINT SET Select SINGLE or MULTI Select picture SINGLE MULTI Set number of pictures repeat steps and when using MULTI up to 999 pictures SINGLE MULTI No to print Date print set No to print Date print set Date print setting release Press DISPLAY button After confirmat...

Page 67: ...es to be deleted If the write protect switch is set to LOCK pictures cannot be deleted even if they are not protected with the camera setting FACE REC EDIT Edit or delete the recognition information for pictures with mistaken face recognition Operation On the playback screen press MENU SET and select PLAYBACK menu FACE REC EDIT Select REPLACE or DELETE Select the picture Select a person If DELETE ...

Page 68: ...e on the card Using memory cards with higher capacities than the built in memory approx 15 MB approx 40 MB is recommended Copying pictures may take several minutes Do not turn off power or perform other operations during copying If identical names folder file numbers are present in the copy destination a new folder for copying will be created when copying from built in memory to card Identically n...

Page 69: ...ton and turning the LCD display off is recommended during dubbing operations 46 For details on dubbing and playback methods refer to your recorder s operating instructions Use PHOTOfunSTUDIO to copy to your computer Available file types Still JPEG Motion AVCHD Lite Motion JPEG With the PHOTOfunSTUDIO software on the supplied CD ROM a computer can be used to manage the recorded pictures Main PHOTOf...

Page 70: ...ck and operation depends on your computer s environment and cannot always be guaranteed 2Always use PHOTOfunSTUDIO when copying AVCHD Lite motion pictures Copying still pictures and motion pictures Getting Ready Charge the battery sufficiently Or connect the AC adaptor optional and DC coupler optional 14 15 Insert card and set mode dial to any except When importing pictures from the built in memor...

Page 71: ...in memory Card JPG Still pictures MOV Motion pictures You can save pictures to use on your computer by dragging and dropping folders and files into separate folders on your computer Folder and file names on computer DCIM Still motion pictures 100_PANA Up to 999 pictures folder P1000001 JPG P1000999 JPG 101_PANA 999_PANA MISC DPOF files Favourite PRIVATE1 clipboard pictures Built in memory MEMO0001...

Page 72: ...ion icon is displayed may not be displayed with some printers USB connection cable always use cable supplied Printing multiple pictures Select MULTI PRINT in step on the previous page Select item See below for details Print Previous page MULTI SELECT Scroll between pictures with select pictures with DISPLAY button to print Press DISPLAY button again to release selection Press MENU SET when selecti...

Page 73: ...upplied or HDMI mini cable optional Also consult TV operating manual Getting Ready Set TV ASPECT Turn off both camera and TV Connect camera to TV Turn on TV Set to auxiliary input Turn on camera Set REC PLAY switch to When TVs or DVD recorders have an SD card slot Insert the SD memory card into the SD card slot Still pictures only can be played back Motion pictures recorded in AVCHD Lite may be pl...

Page 74: ...d immediately after commencing playback or pausing on certain televisions Always read your television s operating instructions HDMI MODE 27 1080i is only effective in the following cases MODE PLAY PICTURE is selected SLIDE SHOW PICTURE ONLY is selected SLIDE SHOW CATEGORY SELECTION is selected except for Travel date In all other cases pictures will be outputted as 720p Audio output is stereo Conne...

Page 75: ...with the remote control Automatic input select This function automatically switches the television input to the camera screen whenever the camera s power is switched on while it is connected via the HDMI mini cable The television can also be switched on via the camera from standby mode if Power on link on the television is set to on The input setting may not be able to be changed automatically wit...

Page 76: ...4 White balance 96 ISO sensitivity 95 ISO max 94 Colour effect 102 15 Available recording time 72 76 16 GPS 84 17 Self timer mode 52 18 Elapsed recording time 72 76 19 Travel elapsed days 92 Age in years months 65 Destination settings 91 Place name information 84 Current date time 20 Audio recording 21 AF assist lamp 104 13 20 21 6 7 8 10 11 12 19 1 2 14 15 17 18 3 4 5 9 16 1 Playback mode 1 116 P...

Page 77: ...uter etc Reformat directly using camera Data will be deleted MEMORY CARD ERROR FORMAT THIS CARD The card format cannot be used with this camera Save needed data on a computer or other device and then use FORMAT on the camera 28 INSERT SD CARD AGAIN TRY ANOTHER CARD Access to card has failed Insert card again Try with a different card MEMORY CARD ERROR MEMORY CARD PARAMETER ERROR Card is not of SD ...

Page 78: ...or details about compatible cards 16 Recording continued Recording capacity is low Battery needs recharging Use a fully charged battery not sold pre charged 11 If you leave the camera on the battery will be exhausted Turn the camera off frequently by using SLEEP MODE 23 etc Please check the recording picture capacity for cards and built in memory 172 174 Recorded pictures look white Lens is dirty ...

Page 79: ...l elapsed days 92 and names and ages in BABY and PET 65 scene modes are only displayed for approx 5 sec when the camera is turned on after these settings are made or after switching from playback mode to recording mode etc They cannot be always displayed Flash No flash emitted Flash set to FORCED FLASH OFF 47 When set to AUTO flash may not be emitted in certain conditions Flash cannot be emitted i...

Page 80: ...pplied or HDMI mini cable optional and play on camera 145 146 Picture is not displayed on full TV screen Check TV ASPECT settings 26 VIERA Link HDMI is not working Is the HDMI mini cable optional connected correctly 146 Check that the HDMI mini cable optional is fully inserted Is the camera s VIERA Link setting set to ON 27 The input setting may not be able to be changed automatically with certain...

Page 81: ...s far away as possible from electromagnetic equipment such as microwave ovens TVs video games etc If you use the camera on top of or near a TV the pictures and sound on the camera may be disrupted by electromagnetic wave radiation Do not use the camera near cell phones because doing so may result in noise adversely affecting the pictures and sound Recorded data may be damaged or pictures may be di...

Page 82: ...her settings may be returned to the initial purchase state If the above operations cannot be performed because of a camera malfunction consult with the dealer or nearest Service Centre When transferring or disposing of your memory card see When disposing of transferring memory cards in the previous section Important Be sure to read the following before using the location names that are stored in t...

Page 83: ...TO USE THIS INFORMATION ANY DEFECT IN THE INFORMATION OR THE BREACH OF THESE TERMS OR CONDITIONS WHETHER IN AN ACTION IN CONTRACT OR TORT OR BASED ON A WARRANTY EVEN IF PANASONIC CORPORATION OR ITS LICENSORS HAVE BEEN ADVISED OF THE POSSIBILITY OF SUCH DAMAGES Some States Territories and Countries do not allow certain liability exclusions or damages limitations so to that extent the above may not ...

Page 84: ...apan ALBANIA Albania ARGENTINA Argentina AUSTRALIA Australia AUSTRIA Austria BAHAMAS The Bahamas BAHRAIN Bahrain BELGIUM Belgium BOSNIA HERZEGOVINA Bosnia and Herzegovina BRAZIL Brazil BULGARIA Bulgaria BELARUS Belarus CANADA Canada USA United States of America CHILE Chile TAIWAN Taiwan CROATIA Croatia CZECH REPUBLIC Czech Republic DENMARK Denmark ESTONIA Estonia FINLAND Finland FRANCE France MONA...

Page 85: ...nin MALI Mali SENEGAL Senegal GHANA Ghana COTE D IVOIRE IVORY COAST Ivory Coast GUINEA Guinea SIERRA LEONE Sierra Leone LIBERIA Liberia CAPE VERDE Cape Verde NIGER Niger CHAD Chad NIGERIA Nigeria CAMEROON Cameroon GABON Gabon EQUATORIAL GUINEA Equatorial Guinea SAO TOME AND PRINCIPE Sao Tome and Principe SAINT HELENA Saint Helena MOZAMBIQUE Mozambique ANGOLA Angola MADAGASCAR Madagascar Screen dis...

Page 86: ...ook Islands FRENCH POLYNESIA French Polynesia KIRIBATI Kiribati NIUE Niue SAMOA Samoa TONGA Tonga WALLIS AND FUTUNA Wallis and Futuna PHILIPPINES Philippines NORTHERN MARIANA ISLANDS Northern Mariana Islands PALAU Palau TUVALU Tuvalu TOKELAU Tokelau URUGUAY Uruguay FALKLAND ISLANDS ISLAS MALVINAS Falkland Islands Malvinas BERMUDA Bermuda CUBA Cuba JAMAICA Jamaica HAITI Haiti DOMINICAN REPUBLIC Dom...

Page 87: ...5 140 125 195 220 390 330 640 2320 3350 100 150 125 200 230 420 440 830 2740 3770 1 GB 190 280 260 390 320 560 600 1160 4310 6710 190 280 250 390 450 790 670 1280 4640 6710 200 300 250 400 470 850 880 1670 5490 7550 2 GB 380 560 520 790 650 1130 1220 2360 8770 12290 390 570 520 800 930 1610 1360 2560 8770 12290 400 610 520 820 950 1700 1800 3410 10240 15360 4 GB 760 1110 1030 1560 1280 2230 2410 4...

Page 88: ...54 45 84 200 320 7 16 10 21 20 39 31 60 8 18 11 23 23 46 41 79 Memory card 256 MB 4 9 6 12 8 16 18 35 29 55 130 200 4 10 6 13 12 25 20 39 5 11 7 14 15 30 27 51 512 MB 10 20 13 26 18 35 38 73 60 110 270 420 10 22 14 28 27 53 42 81 12 24 15 31 32 62 56 105 1 GB 21 41 28 55 37 72 77 145 120 220 550 860 22 45 30 59 56 105 87 165 25 50 32 63 66 125 110 210 2 GB 41 82 55 105 73 140 150 290 240 440 1080 ...

Page 89: ...duct names printed in these instructions are trademarks or registered trademarks of the companies concerned For DMC TZ10 users This product is licensed under the AVC patent portfolio license for the personal and noncommercial use of a consumer to i encode video in compliance with the AVC Standard AVC Video and or ii decode AVC Video that was encoded by a consumer engaged in a personal and non comm...

Reviews: