316
11. MAINTENANCE
2. Simple Troubleshooting (Cont.)
11
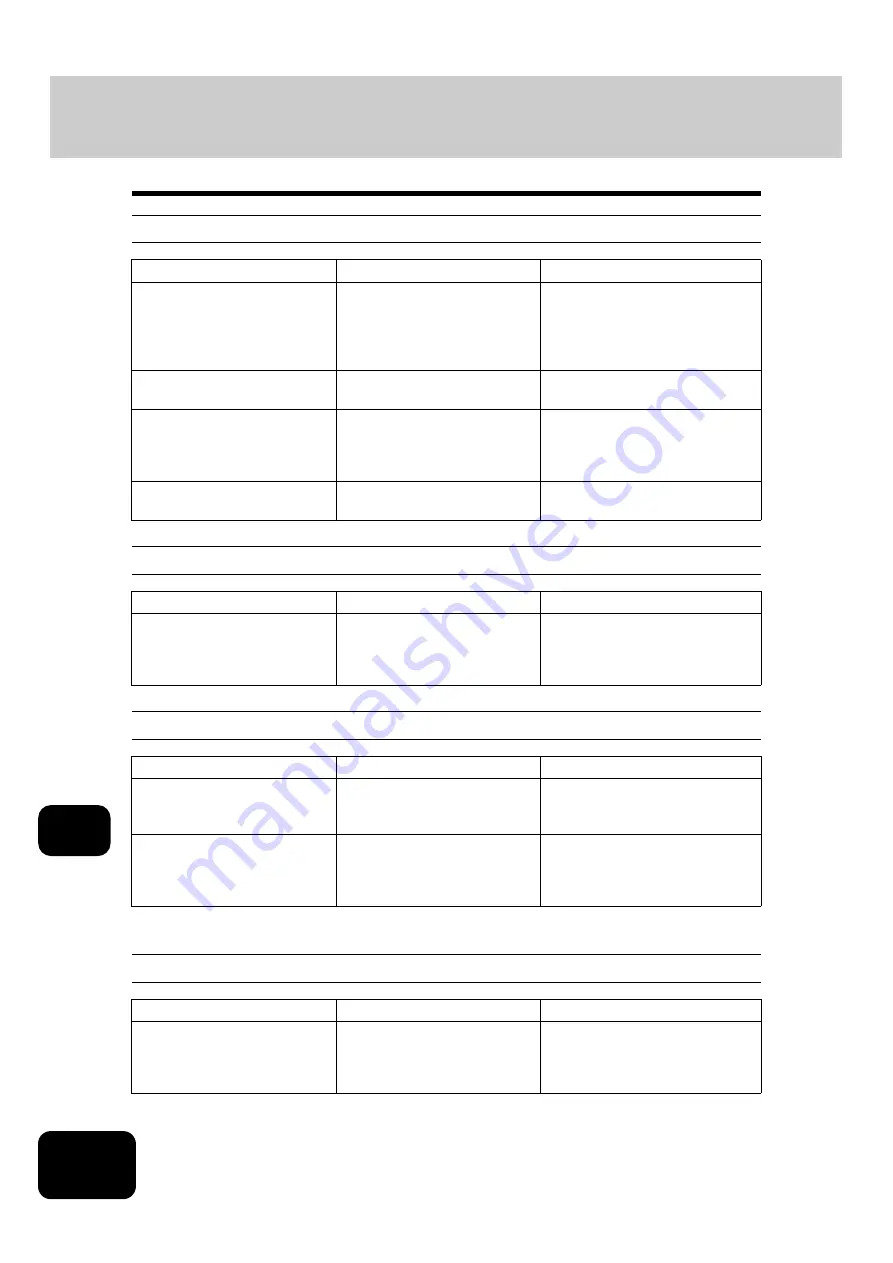
Display does not change when buttons or icons are pressed
Functions cannot be set
Image density is too low
Image density is too high
Item to be checked
Countermeasure
Reference page
Is the equipment in the energy
saving mode (Automatic energy
saving mode)?
Press the [ENERGY SAVER] or
[START] button on the control
panel to clear the mode. (It
takes a while for the equipment
to become ready.)
Is the power OFF because the
weekly timer functions?
Press the [START] button to
return the power ON.
See the Operating Instructions (For
User Functions).
When the use of the equipment
is managed under department
management, is the correct
code entered?
Key in the correct department
code.
equipment with department code”
Is the “Warming up” message
displayed?
Wait until the equipment
becomes ready.
Item to be checked
Countermeasure
Reference page
Are there functions that cannot
be combined set together?
See the copying function combi-
nation and image quality adjust-
ment combination matrices and
set again.
Item to be checked
Countermeasure
Reference page
Has the message “Install new
toner cartridge” appeared on the
screen?
Replace the toner cartridge.
Is the image density or back-
ground adjustment set lighter
than standard?
Use the manual density buttons
or the background adjustment
function to adjust the image
density properly.
Item to be checked
Countermeasure
Reference page
Is the image density or back-
ground adjustment set darker
than standard?
Use the manual density buttons
or the background adjustment
function to adjust the image
density properly.
Summary of Contents for DP-7240
Page 6: ...4 CONTENTS Cont ...
Page 73: ...71 3 2 Press the APS button 4 Press the START button ...
Page 109: ...107 4 4 IMAGE ADJUSTMENT 1 Background Adjustment 108 2 Sharpness 109 ...
Page 112: ...4 110 4 IMAGE ADJUSTMENT ...
Page 151: ...149 5 5 Press the ENTER button Select other copy modes as required 6 Press the START button ...
Page 153: ...151 5 5 Press the ENTER button Select other copy modes as required 6 Press the START button ...
Page 192: ...6 190 6 e FILING ...
Page 222: ...7 220 7 TEMPLATE ...
Page 260: ...8 258 8 JOB STATUS ...
Page 315: ...313 11 11 MAINTENANCE 1 Daily Inspection 314 2 Simple Troubleshooting 315 ...
Page 320: ...11 318 11 MAINTENANCE ...
Page 335: ......


