R
Q
T
7584
17
∫
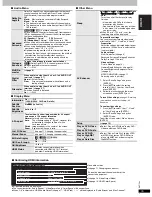
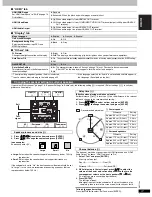
“HDMI” tab
∫
“Display” tab
∫
“Others” tab
§
1
The original language designed on the disc is selected.
§
2
Input a code number referring to the table on page 20.
§
3
If the language selected for “Audio” is not available, subtitle appear in
that language (If available on the disc).
If you select “Multi-channel” (
➜
page 16, “Speaker Settings” in “Audio” tab), the following setting (
a
) is required. (Select settings
b
c
to suit your
preference if desirable.)
1. Press [
3
4
2
1
] to select an item and press [ENTER].
2. Press [
3
4
] to change the content and press [ENTER].
Icon examples:
Surround speaker (LS)
≥
Large: Select when the speaker supports low-frequency (under 100 Hz)
reproduction.
≥
Small: Select when the speaker does not support low-frequency
reproduction.
If the subwoofer is set to “No”, the front speakers will automatically be set
to “Large”. (In this case, we recommend connecting a speaker that can
reproduce bass below 100 Hz.)
(Effective when playing multi-channel audio)
If either distance
d
or
f
is less than
e
, find the difference in the relevant
table and change to the recommended setting.
1. Press [
3
4
2
1
] to select an item and press [ENTER].
2. Press [
3
4
] to change the content and press [ENTER].
This does not work when connected with HDMI terminals and “HDMI
Audio Output” (
➜
above, “HDMI” tab) is set to “On”.
1. Select “Test” and press [ENTER].
A test signal is output.
Front (L)
_—)
Center
_—)
Front (R)
:
;
Surround (LS)
(—————=
Surround (RS)
2. While listening to the test signal, press [
3
4
] to adjust the
volume of the center and surround speakers so they are the
same apparent volume as the front speakers (
s
6 to
r
6dB).
(The front speakers cannot be adjusted here.)
3. Press [ENTER].
The test signal stops.
≥
No signal is output for the subwoofer. To adjust its volume, play
something, then return to this screen to adjust to suit your taste.
To finish the speaker setting
Press [
3
4
2
1
] to select “Exit” and press [ENTER].
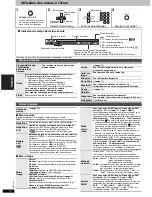
HDMI RGB Range
Set “HDMI Color Space” to “RGB” (
➜
page 14,
Picture Menu) .
≥
Standard
≥
Enhanced: When the black and white images are not distinct.
HDMI Video Mode
≥
On: When video output is from HDMI AV OUT terminal.
≥
Off: When video output is from COMPONENT VIDEO OUT terminal (output is 480p from HDMI AV
OUT terminal).
HDMI Audio Output
≥
On: When audio output is from HDMI AV OUT terminal.
≥
Off: When audio output is not from HDMI AV OUT terminal.
Menu Language
≥
English
≥
Français
≥
Español
On-Screen Messages
≥
On
≥
Off
Background during Play
Select background during JPEG and
MPEG4 playback.
≥
Black
≥
Gray
FL Dimmer
Changes the brightness of the unit’s display.
≥
Bright
≥
Dim
≥
Auto:The display is dimmed during play, but brightens when you perform some operations.
Auto Power Off
≥
On: The unit switches to standby mode after about 30 minutes in the stop mode, irrespective of the SLEEP setting.
≥
Off
QUICK SETUP
≥
Yes
≥
No
Re-initialize Setting
This returns all values in the Setup menus to
the default settings.
≥
Yes: The password screen is shown if “Ratings” (
➜
page 16) is set. Please enter the same password.
After “INIT” on the display disappears, turn the unit off and on again.
≥
No
Changing the speaker setting to suit your speakers
Speaker presence and size (
a
)
m s
m s
d B
0
d B
d B
L
Exit
Test
LS
R
SW
C
RS
d B
0
0
0.0
0
0.0
b a c
a
a
c a
(LS)
(RS)
a c b c a
Exit
Test
signal
Front (L)
Center
Front (R)
— Surround —
Subwoofer
LS
LS
No
Large
Small
Delay time (
b
)
d
Center speaker
Difference
Setting
Approx. 34 cm (1
1
⁄
10
feet)
1.0 ms
Approx. 68 cm (2
1
⁄
5
feet)
2.0 ms
Approx. 102 cm (3
3
⁄
10
feet)
3.0 ms
Approx. 136 cm (4
2
⁄
5
feet)
4.0 ms
Approx. 170 cm (5
1
⁄
2
feet)
5.0 ms
f
Surround speakers
Difference
Setting
Approx. 170 cm (5
1
⁄
2
feet)
5.0 ms
Approx. 340 cm (11 feet)
10.0 ms
Approx. 510 cm (16
1
⁄
2
feet) 15.0 ms
Channel balance (
c
)
LS
RS
L
R
SW
f
e
d
C
: Recommended placement
17

