background image

Operation

ECONAVI Operation

Model : 

NR-CY55

C

 (GK

AU

)

The refrigerator detects the opening and closing of the refrigerator door and the brightness 
around the refrigerator to automatically control operation to ensure maximum energy saving.*

1


ECONAVI operation


The refrigerator learns the lifestyle patterns of 
your family from door opening and time periods of 
infrequent use to maximise energy effi ciency.
 

The refrigerator learns your lifestyle patterns from the 
previous 3 weeks of use and uses that data from the 
4

th

 week onwards.

Therefore the ECONAVI lamp “ON/OFF” pattern may 
change from the 4

th

 week onwards.


The refrigerator performs the ECONAVI energy 
saving operation when it becomes dark*

2

 around the 

refrigerator such as overnight when you are asleep.
 

The brightness of the ECONAVI lamp is lowered 
approximately 5 minutes after it is lit.


Settings for enabling ECONAVI operation


ECONAVI operation is automatically enabled when the temperature control for both the 
freezer and refrigerator compartment is set to “Med”.
 

ECONAVI mode does not operate if the [Quick Freezing] mode is in operation.
 

It is not possible to force to start of the ECONAVI mode.

Remark

*

1

  The effectiveness of the ECONAVI mode is dependant on the ambient temperature, 

ambient brightness and the number of times the refrigerator door is opened and closed and 
the state in which food is stored.

*

2

  Darkness is detected by the light intensity sensor at approximately 3 lx to 10 lx or less.

Model : 

NR-CY55

C

 (

P

S

AU

)

This model also has ECONAVI mode, but it does not feature ECONAVI lamp and light 
intensity sensor.

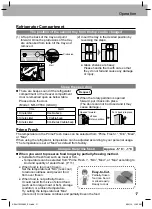
Prime Fresh +


How to operate the “Prime Fresh +” mode

1


Model :

 NR-CY55

C

 (GK

AU

)

Press the button “Prime Fresh” until the light LED “Prime Fresh +” turns on.

2


Model :

 NR-CY55

C

 (

P

S

AU

Press the button “Select” until the light “Prime Fresh” turns on, then press button “Temp. 
Control” until the light LED “Prime Fresh +” turns on.

Remark


If you want to stop the operation immediately, please repeat step 

1

 or step 

2

 until the light 

LED turns off.
 

The system will stop the operation automatically when it runs for 105 mins (as ambient 
temperature is below 18 °C) or 150 mins (as ambient temperature is above 18 °C) and 
return to normal mode (the LED turns off)
 

The LED fl ashing means that the defrosting system is now working. “Prime Fresh +” mode 
will start right after the defrosting operation is fi nished.

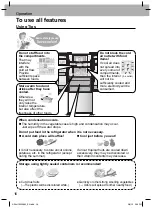
ECONAVI lamp

Light intensity sensor

13

ARAH1E200680_EN.indd   13

8/30/19   2:39 PM

Summary of Contents for ECONAVI NR-CY55C

Page 1: ...in warranty card and keep it stored together with these operating instructions in a safe place for future reference A U S ARAH1E200700 T1019 0 Printed in Thailand 10 2019 Contents Introduction Safety Precautions 2 Installation Installation 8 Operation Parts Identification 10 To use all features 11 Control Panel 11 ECONAVI Operation 13 Prime Fresh 13 Quick Freezing 14 Food Stored 15 Using Tips 16 R...

Page 2: ...sly leads to reduced insulation due to moisture and may cause fire Plug into a wall outlet of the rated voltage on its own with the rated current and insert plug fully Connect to an exclusive wall outlet for the refrigerator only Avoid connecting other appliances to the same wall outlet Unroll entire length of the cord before plugging in Unplug the unit when cleaning the refrigerator If the supply...

Page 3: ...erator whenever the refrigerator would be transferred to another location and delivered to a recycling plant Cyclo Pentane is used for insulation of this refrigerator and flammable gas is used for refrigerant When disposing of this unit please discard it by the proper method and do not dispose of the unit by burning The warning labels mentioned above should be kept throughout the life of the refri...

Page 4: ...or authorized service center On top of the refrigerator Do not put anything on top of refrigerator Otherwise it may fall due to vibration of the machine You may be injured When installing Do not install the product in locations exposed to water Provide a grounding connection or install a ground fault interrupter when the product is installed in a humid or wet location Contact your distributor Do n...

Page 5: ...as leak from the cooling range ventilate the kitchen If you have damaged the refrigerant circuit piping on the back then ventilate the kitchen and contact your distributor Refrigerator LED lamp The refrigerator LED lamp is designed specially for this product it does not function on individual replacing If replacement is required please contact your dealer or authorised service agent This appliance...

Page 6: ...not protrude from the shelf When opening closing the doors Do not open the refrigerator doors when someone is in the vicinity of the refrigerator Mind the gap between the doors They may nip your hand while closing the door Do not push drawers by holding them at the top Be careful not to place your feet under the bottom drawer When cleaning Do not place your hands or feet beneath the bottom of the ...

Page 7: ...touch the refrigerator Avoid using fire and ventilate the room and contact the service agent immediately Apply protective covering etc to floors with a fragile surface Hold the carrying handles when transporting the refrigerator When using Do not place warm hot foodstuffs in the refrigerator Store warm food and drinks after they have cooled Do not open refrigerator frequently or leave it open for ...

Page 8: ...city leakage The grounding connection can be performed in 2 ways as follows In the case that the grounding receptacle has been prepared for the socket plug socket connect the grounding wire to the screw used for grounding connection at the bottom rear of the refrigerator regarding the screw used for grounding connection please notice the symbol as shown in the illustration 1 In the case that the s...

Page 9: ...y measures taken against tipping due to earthquakes In order to prevent the refrigerator from tipping permanently fix it by using belts etc Fix the refrigerator Turn the adjuster bolts right and left until they reach the floor to stabilize the refrigerator If the door is slanted downwards Turn the adjuster bolt on the lower side as shown in the diagram in order to adjust the level The freezer refr...

Page 10: ...equired the motor will run at a higher speed A REFRIGERATOR COMPARTMENT B FREEZER COMPARTMENT C PRIME FRESH CASE with Blue AG lamp LED NR CY55C GKAU 1 LED lamp 2 Small tempered glass tray 3 Large tempered glass tray 4 Tempered glass tray crisper 5 Vegetable case 6 Ice twister 7 Ice box 8 Bottom freezer case 9 Egg shelf 10 Egg tray 11 Free rack PC 12 Door gasket 13 Bottle shelf 14 Freezing case 15 ...

Page 11: ...3 C 17 C Min Higher than Med by approx 2 C 3 C Higher than Med by approx 2 C 3 C Higher than Med by approx 2 C 3 C Generally use the refrigerator with the temperature set to Med If the temperature control of the freezer compartment or refrigerator compartment is set to other than Med ECONAVI does not operate How to operate the 9 levels mode This refrigerator is specially designed with 9 adjustable...

Page 12: ...ure for the Freezer Compartment Follow steps 1 3 above respectively while pressing the Select button and selecting Freezer freezer compartment instead of Fridge refrigerator compartment To reset the setting 9 levels mode Repeat steps 1 and 2 to return the unit to normal operation mode LED Display table Model NR CY55C GKAU Cooling Level Step Minimum Maximum LED Display 1 2 3 4 5 6 7 8 9 Lighting Bl...

Page 13: ...sible to force to start of the ECONAVI mode Remark 1 The effectiveness of the ECONAVI mode is dependant on the ambient temperature ambient brightness and the number of times the refrigerator door is opened and closed and the state in which food is stored 2 Darkness is detected by the light intensity sensor at approximately 3 lx to 10 lx or less Model NR CY55C PSAU This model also has ECONAVI mode ...

Page 14: ...during Quick Freezing mode as the compressor is already at maximum operating levels for the Quick Freezing mode Model NR CY55C PSAU Lamp is on Quick freezing is operated Lamp is off Quick freezing is not operated Press the Select button and selecting Freezer then press Temp Control button until Green LED light at Quick Freezing turns on Quick Freezing mode starts after 10 seconds The Quick Freezin...

Page 15: ...e different foodstuffs Approx 1 C 6 C Refrigerator compartment Food and drinks readily served For regular storage of food and drinks or temporary storage of these to be served soon Approx 3 C 8 C Vegetable case Fruits and vegetables A rather high humidity keep fruits and vegetables fresh and juicy Approx 5 C 1 C Prime Fresh case Partially freezing For storage of meat fish processed foods such as h...

Page 16: ... of energy saving Save cool air When condensation occurs The humidity in the vegetable case is high and condensation may occur Just wipe off the water drops Do not put food in the refrigerator when it is not necessary A cold dark place will suffice It is not necessary to store uncut onions potatoes etc in the refrigerator except during the summer Cool just before you eat If uncut tropical fruits a...

Page 17: ...orward Rotary partition Left door Put it back into place Prime Fresh The temperature in the Prime Fresh Case can be selected from Prime Fresh Min Med or Max When using the refrigerator temperature can be adjusted according to your personal usage The temperature is set at Med as default from factory Using as the prime fresh Approx 5 C 1 C When you want to preserve food longer by partially freezing ...

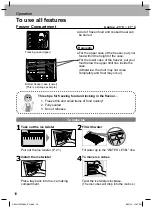
Page 18: ... freezer put your food below the upper limit line inside the case Otherwise the door may not close completely and frost may occur Three tips for freezing food and locking in the flavour 1 Freeze thin and small items of food quickly 2 Fully sealed 3 Do not refreeze To make ice 1Take out the ice twister ICE TWISTER Quick Ice Making Pull out the ice twister P 21 2Fill with water Fill water up to the ...

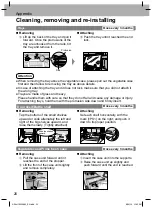
Page 19: ...ems occasionally Once a week for the ice twister As a guide remove the trays door shelves etc and wash them by immersing them in lukewarm water every three months Clean the door gasket at least once a month Clean by wiping with a soft damp cloth Petroleum gel has been applied to the door gasket on the hinge side of the unit be careful not to wipe this off Notices The door gasket is replaceable by ...

Page 20: ...or injury For attaching trays hold them with the protrusion side down and firmly insert Once every 3 months Door shelf Bottle shelf Removing Tap the bottom of the small shelves upward or slide alternately the left and right of the big shelves upward and raise them slowly Tightly attached Slide the shelves upward Attaching Set each shelf horizontally with the mark PS on the right and push it down t...

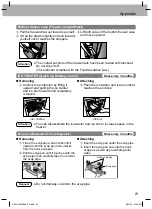
Page 21: ...y removed ICE TWISTER 1 1 1 2 2 2 Attaching 2 Push the ice twister and ice box until it reaches the end lock ICE BOX 1 1 1 2 2 2 Attention You can disassemble the ice twister and ice box to increase space in the freezer Once every 3 months Evap pan Backside of the refrigerator Removing 1 Tilt up the evap pan a bit and then lift it upward until the evap pan hole unlocks from the hook evap pan 2 Pul...

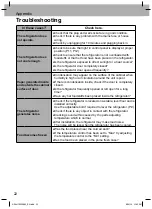
Page 22: ... the cabinet when humidity is high or air circulation around the unit is poor If there is condensation inside check if the door is completely closed Is the refrigerator frequently opened or left open for a long time Have any hot foodstuffs been placed inside the refrigerator The refrigerator generates noise Check if the refrigerator is located on a stable level floor and is installed correctly Use...

Page 23: ...ost The ECONAVI operation will rarely be performed until the learning function has collected data again ECONAVI operation is stopped part way though If the auto defrost function is turned on during ECONAVI operation the normal cooling operation will need to be performed after defrost Therefore the ECONAVI operation may be stopped during this defrost cooling process The learning function may someti...

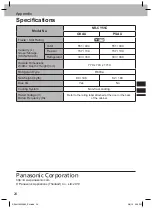
Page 24: ...9 4 l a t o T 1 5 7 1 3 4 1 5 7 1 3 4 r e z e e r F 3 9 3 3 6 0 3 9 3 3 6 0 r o t a r e g i r f e R O utside D imensions W idth x D epth x H eight mm 7 7 0 x 7 4 3 x 1 7 1 4 a 0 0 6 R e p y T t n a r e g i r f e R N et W eight kg lb 8 9 1 9 6 8 2 1 8 0 B lue A G Y es N o C ooling S ystem N on frost cooling R ated V oltage V R ated Freq uency H z R efer to the rating label attached at the door or t...

Reviews: