Attachments
ER2201
ER2211
Comb attachment for beard
‑
Comb attachment for beard and hair
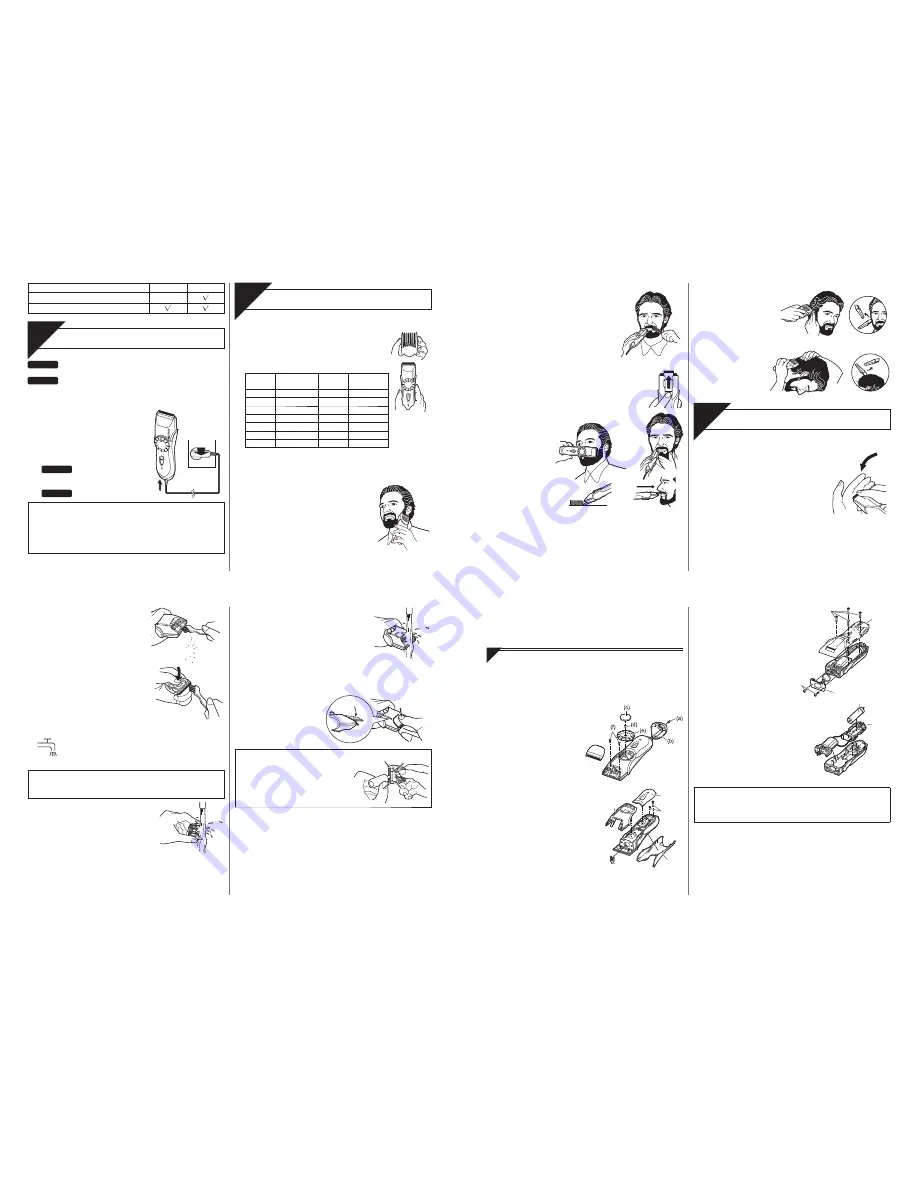
Charging the trimmer
Char
ge
ER2201
You can fully charge the trimmer in 8 hours if it is losing
speed.
ER2211
You can fully charge the trimmer in 1 hour if it is losing
speed.
A full charge supplies enough power for approximately
10 trims
(5 minutes per trim for a normal beard).
1. Plug in the AC adaptor into a
household outlet.
2. Insert the appliance plug into the
trimmer.
The charge indicator lamp lights and
stays on until the AC adaptor is
removed from a household outlet.
ER2201
The charge status lamp lights and it
flashed when charging is completed.
ER2211
•
•
Cord Trimming
If you insert the appliance plug to the trimmer and plug in the AC
adaptor into a household outlet, you can use it even if the battery
capacity is low.
If the trimmer does not work, continue charging it for approx. 1
minute.
•
•
Using the trimmer
Use
Trimming your beard and moustache
1. Apply a few drops of the oil to the blades.
(See page 6.)
2. Turn the dial to move the comb attachment
to the desired trimming length (between
1 mm and 20 mm).
Indicator
Trimming
length
Indicator
Trimming
length
1
1.0 mm
11
11.0 mm
2
2.0 mm
•
12.5 mm
•
3.5 mm
14
14.0 mm
5
5.0 mm
•
15.5 mm
•
6.5 mm
17
17.0 mm
8
8.0 mm
•
18.5 mm
•
9.5 mm
20
20.0 mm
The actual cut length of moustache and beard may be longer
than the set length.
•
3. Slide the power switch on the main body upwards to
turn on the trimmer.
4. Place the angled face of the comb
against the skin and cut the beard by
moving the trimmer in all directions to
obtain a uniform cut.
With curly facial hair, the comb attachment
may not cut all of the hair. In this case,
remove the comb attachment and use a
conventional comb to draw out the
remaining uncut hair.
•
►
Shaping your moustache
1. Remove the comb attachment.
2. Place the angled edge against the
skin and make the border of the
beard even.
Finishing the edges and Trimming the moustache
1. Slide the trimmer guide of Mini trimmer up
and turn on the trimmer.
2. Run the blade
lightly over the
surface to
smooth off a
beard surface.
Cutting of hair
Cut hair to the correct height by moving the trimmer back against
the flow of the hair.
Do not use the trimmer in an inverted position. This can cut hair
too deeply.
►
►
►
•
Cutting around the ears
Cut a little, and then gently
separate the trimmer from
the hair.
Cutting the nape of the neck
Bring the trimmer gently
away from the hair to
finish.
Cleaning the trimmer
Clean
Using the cleaning brush
1. Remove the comb attachment.
2. Hold the main body, place your thumb
against the blades and then push
them away from the main body.
►
3. Brush off any hair trimmings
from the main body and from
around the blade.
4. Brush any hair trimmings out
from between the stationary blade
and the moving blade while
pressing down the cleaning lever
to raise the moving blade.
If washing in water
The following is the symbol of washable trimmer. The
symbol means that hand‑held part may be cleaned
under water.
Warning
Disconnect the power cord from the clipper before cleaning
it in water to prevent electric shock.
1. Disconnect the power cord from
the trimmer.
2. Remove the blade.
3. Rinse off any hair trimmings that
are sticking to the blades with
running water.
►
4. Rinse out any hair trimmings that are
inside the trimmer with running water.
5. Gently shake the trimmer 4 or 5 times and then wipe off
any water drops from the trimmer and the blade.
6. Place the trimmer on a towel with the power switch on
the main body facing downwards to let it dry fully.
7. Fit the mounting hook
into the blade mounting
on the trimmer and
push in until it clicks.
Lubrication
Apply the oil to the trimmer before
and after each use. Apply a drop of
the oil to the points indicated by the
arrows.
Blade life
Blade life varies according to the frequency and length of use of
the trimmer.
For example, the blade life is approximately 3 years when using
the trimmer for 10 minutes every 3 days. Replace the blades if
cutting efficiency reduces substantially despite proper
maintenance.
Battery life
Battery life varies according to the frequency and length of use of
the appliance.
►
►
For example, the battery life is approximately 6 years when the
battery is charged 3 times a month.
The appliance should not be left for more than 6 months without
charging it. The charge drains from the battery and the battery life
may be shortened.
Removing the built-in rechargeable battery
The battery in this trimmer is not intended to be replaced by
consumers. However, the battery may be replaced at an
authorized service center.
The procedure described below is intended only for removal of the
rechargeable battery for the purpose of proper disposal.
1. Disconnect the power cord
from the trimmer.
2. Remove the blade from the
trimmer. Remove the screw
(a) and detach the bottom
cover (b).
3. Detach the dial cover (c),
remove the screw (d) and
disconnect the dial (e).
4. Remove the 2 screws (f).
5. Detach the housing (g), front panel
(h) and side panel (i), then remove
the trimmer drive rod (j).
6. Remove the 2 screws (k).
(k)
(h)
(g)
(i)
(j)
4
5
6
7
7. Remove the 2 screws (l) and
disconnect the rubber push
plate (m).
8. Remove the screws (n) and
disconnect housing (o).
(o)
(m)
(n)
( l )
9. Disconnect the battery chamber (p)
and remove the battery (q).
Discharge the battery completely
before removing it.
Be careful not to short the + and –
terminals of the battery after
removing it.
•
•
(q)
(p)
For environmental protection and recycling of materials
This trimmer contains a Nickel‑Metal Hydride battery. Please
make sure that the battery is disposed of at an officially assigned
location, if there is one in your country.


