background image

Selecting the thickness of the finish

Move the trimmer down-
wards in the direction of 
the arrows when cutting 
around the ears.

*Cutting areas with excessive hair.

Having secured the hair clipper attachment 

Make sure the switch is facing upwards and cut by 
moving the trimmer downwards.

Overall hair cutting

Cutting
procedure

approx. 7mm (1/4")

(Finishing thickness of
   approximately 7mm)

Short

 finish

Long 

finish

approx. 9mm (3/8")

Finish adjustment switch

Scalp

Scalp

9mm
   (3/8")

7mm
   (1/4")

13

(Approx. 1/4")

(Approx. 3/8")

(Finishing thickness of
   approximately 9mm)

Guard

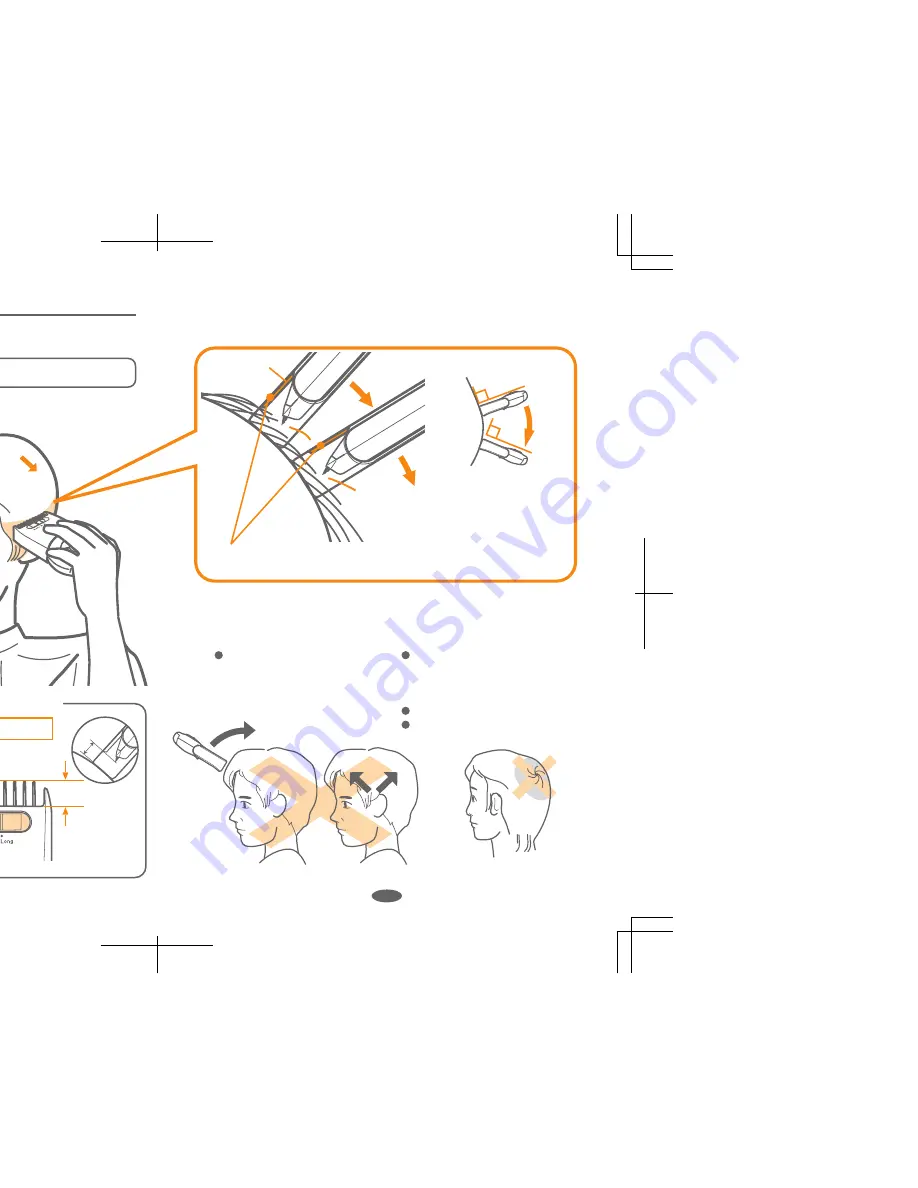
* Do not use the trimmer for the areas listed below.

The guard section of the hair clipper attachment will prevent the
blade from cutting an excessive amount of hair.

Apply the comb directly
to the scalp and move it
slowly.

90º

90º

Scalp

Do not move the trimmer 
against the direction in 
which the hair lays.

On short hair and hair 
with a tendency to stand 
up, such as cropped 
hair (tufting hair).
On scarce or thin areas.
On the crown.

14

Scalp

Summary of Contents for ER327

Page 1: ...Operating Instructions Personal Hair Trimmer Model No ER327 Before operating this unit please read these instructions carefully Printed in Japan Imprimé au Japon or seulement ...

Page 2: ...or apply to wet hair Keep out of reach of children Do not use on animals The trimmer may become warm during operation This is normal Never tamper with the moving parts Do not disassemble the trimmer Take it to a qualified serviceman when service or repair is required Store the trimmer in a dry area where it will be protected from damage Do not use new batteries and old batteries together Remove ba...

Page 3: ...ck the side without the switch and slide the battery cover in the direc tion of the arrow Attach the battery cover Hold down the cover and slide it to the left in the direction of the arrow Check the direction of the batteries and insert Two AAA alkaline batteries will last approximately 3 months under the assumption that the trimmer will be used 3 times a month for five minutes per use Match the ...

Page 4: ...n be Adjusting the length of the Trimmer Comb attachment After adjusting the length turn the switch to 1 and confirm the trimmer comb is locked in posi tion Failure to observe this may cause the attachment to shift causing a larger portion of hair to be cut 6 ars mousse will prevent a ted hair lead to unsatisfactory How to confirm this Check by pressing the attachment lightly against the palm of y...

Page 5: ... the attach ment to remove Hold down the dial dur ing removal Attaching Turn the switch to 0 and slide the attach ment to attach Hold down the dial while attaching and push the attachment until it clicks Attaching and removing the Hair Clipper attachment 8 ...

Page 6: ...ft This will result in cutting more than the desired length Side with the switch Cut from the sides and back to around the ear the collar area and the nape of neck adjusting the cutting height from 25mm 15 16 to 5mm 3 16 25mm 15 16 5mm 3 16 Make sure the sw itch is facing down wards during use g downwards before 10 m 15 16 1 9 16 m 13 16 1 3 16 m 9 16 13 16 m 3 8 9 16 m 3 16 3 8 attachment onto th...

Page 7: ...e hair clipper attachment Trimming height 10 to 5mm 3 8 to 3 16 3Cutting the nape of the neck Slowly and carefully cut a little at a time Make sure the switch is facing downwards and cut by moving the trimmer upwards Make sure the switch is facing upwards and cut by moving the trimmer downwards Bring the trimmer gently away from the hair to finish Bring the trimmer gently away from the hair to fin...

Page 8: ...elow The guard section of the hair clipper attachment will prevent the blade from cutting an excessive amount of hair Apply the comb directly to the scalp and move it slowly 90º 90º Scalp Do not move the trimmer against the direction in which the hair lays On short hair and hair with a tendency to stand up such as cropped hair tufting hair On scarce or thin areas On the crown 14 Scalp ...

Page 9: ...ts only the hairs that enter these areas Apply the blade directly to the skin The thinning plate will regulate the amount of hair reaching the blade enabling the hair to be cut in small portions 15 16 Trimming around the collar the nape of the neck and around the ears Align the trimmer with the line leading down from the ear Apply the blade directly to the skin Cutting the fine hairs on the back o...

Page 10: ...Attaching the blade e nder the blade Until there is a click Press 1Insert the hook Insert the blade A into the slot B B A 2 18 rom the back the blade ly pop out ...

Page 11: ...ings that ad here to the body Apply oil to all 4 sections 1 to 2 drops in each area indicated with the ar rows Clean the blade after every use Failure to observe this will blunt the blade 19 20 Ratings and Specifications Power source Type of batteries Weight Battery Two AAA alkaline batteries not included 110 g 3 9 oz Including the batteries This product is intended for household use only READ ALL...

Reviews: