background image

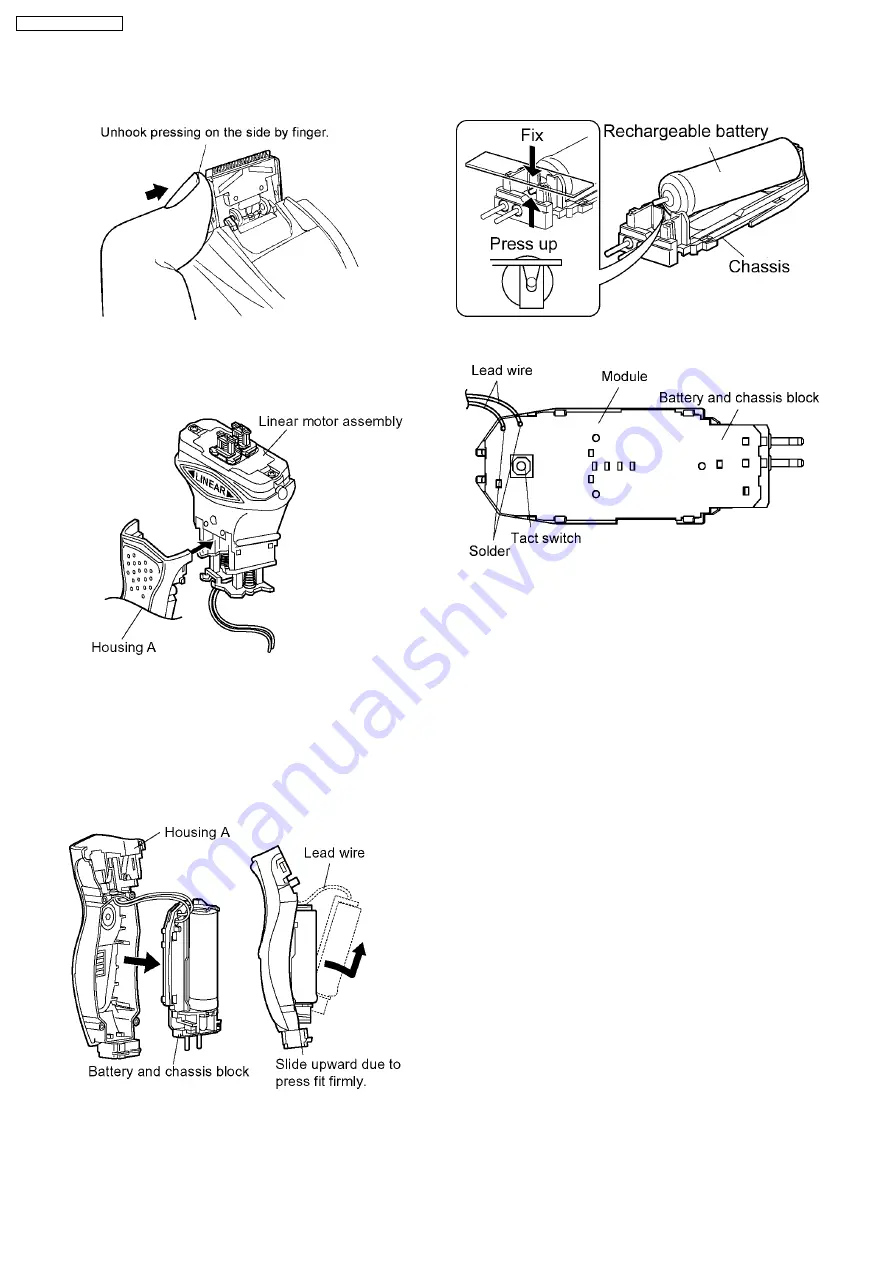
 6. Remove trimmer and trimmer handle.

 7. Move gently the linear motor assembly down and

unhook it and remove the float springs from housing A.

 8. Pull up the battery and chassis block from the linear

motor side first. Then, slide it upward and take it out
from the housing A.

NOTE:

Do not pull the battery and chassis block forcefully
due to connecting the linear motor by the lead wires.

 9. Take out the battery from the chassis.

 10. Unsolder the lead wires from the module.

4

ES8046-A3 / ES8047-A3

Summary of Contents for ES8046-A3

Page 1: ...NG GUIDE 7 5 EXPLODED VIEW REPLACEMENT PARTS LIST 9 AC Rechargeable Shaver SPECIFICATIONS Power source AC 100 240V 50 60Hz Automatic voltage conversion Power consumption Approx 7W at AC drive Motor voltage 3 6V DC Charging time 1 Hour Shaves per charge 14 times 3 minutes shave Measurement H 15 3 x W 6 2 x D 4 6 cm Weight 180g Supplied accessories Soft case Cleaning brush Charging stand CONTENTS Pa...

Page 2: ...1 SCHEMATIC DIAGRAM 1 1 ES8046 1 2 ES8047 2 ES8046 A3 ES8047 A3 ...

Page 3: ...the bottom cover Set the pivot action selector to LOCK Slide the rear panel and remove it with care of pivot action selector 4 Remove the both side of housing clips Loosen four screws and remove housing B Take out the lock lever shaft 5 Slide the trimmer handle up to open the trimmer and unhook 2 locations on both side by inserting the slit with something like a slotted head screw driver 2 DISASSE...

Page 4: ...Pull up the battery and chassis block from the linear motor side first Then slide it upward and take it out from the housing A NOTE Do not pull the battery and chassis block forcefully due to connecting the linear motor by the lead wires 9 Take out the battery from the chassis 10 Unsolder the lead wires from the module 4 ES8046 A3 ES8047 A3 ...

Page 5: ...mmer and hook the trimmer Then slide the trimmer up and hook the both sides of trimmer handle NOTE Confirm its operation or smooth movement of trimmer 5 Set the linear motor assembly on the housing A and sliding it upward to hook Confirm that the lead wire tube fits to the housing A firmly and no foreign substance sticking around Attach the head block to housing A with care of the direction And at...

Page 6: ...e four screws and set the housing clip 8 Attach the rear panel with the position LOCK 9 Set the bottom cover tighten with a screw 10 Set the trimmer driving bar and the slit blade driving bar 6 ES8046 A3 ES8047 A3 ...

Page 7: ...4 TROUBLESHOOTING GUIDE 7 ES8046 A3 ES8047 A3 ...

Page 8: ...8 ES8046 A3 ES8047 A3 ...

Page 9: ...5 EXPLODED VIEW REPLACEMENT PARTS LIST 5 1 ES8046 EXPLODED VIEW 9 ES8046 A3 ES8047 A3 ...

Page 10: ...S8045S3347 LOGO PLATE 1 18 WES8046S3348 LOGO PLATE only for KOREA 1 19 WES8176L6007 P TIGHT SCREW C M2 12 4 20 WES8045A1507 TRIMMER 1 21 WES8046A3848 BOTTOM COVER 1 21 WES8046A3849 BOTTOM COVER only for TAIWAN 1 21 WES8046A3840 BOTTOM COVER only for CHINA 1 22 WES8176L6057 TAPPING SCREW M2 8 1 23 WES8046S3038 BODY BLOCK 1 23 WES8046S3039 BODY BLOCK only for KOREA 1 23 WES8046S3030 BODY BLOCK only ...

Page 11: ...5 3 ES8047 EXPLODED VIEW 11 ES8046 A3 ES8047 A3 ...

Page 12: ...E BATTERY LITHIUM ION TYPE 1 17 WES8046H3367 REAR PANEL 1 18 WES8046N3347 LOGO PLATE 1 18 WES8047N3348 LOGO PLATE only for KOREA 1 19 WES8176L6007 P TIGHT SCREW C M2 12 4 20 WES8046H1507 TRIMMER 1 21 WES8047H3848 BOTTOM COVER 1 21 WES8047H3849 BOTTOM COVER only for CHINA 1 22 WES8176L6057 TAPPING SCREW M2 8 1 23 WES8047S3038 BODY BLOCK 1 23 WES8047S3039 BODY BLOCK only for KOREA 1 23 WES8047S3030 ...

Reviews: