ENGLISH-9
■
Case 2
z
PT-RQ13K / PT-RZ12K / PT-RS11K
z
PT-DZ21K2 / PT-DS20K2 / PT-DW17K2 / PT-DZ16K2
z
PT-DZ13K / PT-DS12K / PT-DW11K / PT-DZ10K
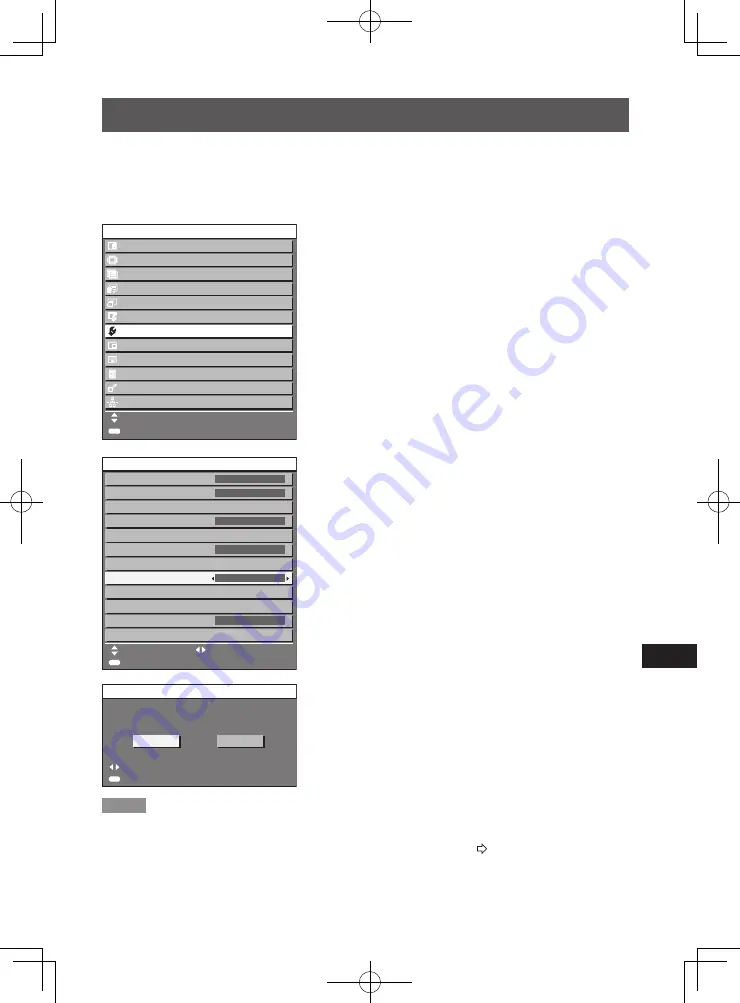
1) Press the <MENU> button.
z
The [MAIN MENU] screen appears.
2)
Use the ▲ and ▼ buttons to select
[PROJECTOR SETUP].
3) Press the <ENTER> button.
z
The [PROJECTOR SETUP] screen appears.
z
Set [PROJECTION METHOD] to [FRONT/CEILING]
or [REAR/CEILING] for floor installations or [FRONT/
FLOOR] or [REAR/FLOOR] for ceiling installations.
4)
Use the ▲ and ▼ buttons to select
[LENS CALIBRATION].
5)
Use the ◄ and ► buttons to select
[NORMAL].
6) Press the <ENTER> button.
z
The confirmation screen appears.
7)
Use the ◄ and ► buttons to select [OK],
and press the <ENTER> button.
z
Lens calibration starts.
z
The projection lens moves to the home position after
adjustment range calibration is complete.
MAIN MENU
PICTURE
POSITION
ADVANCED MENU
DISPLAY LANGUAGE
DISPLAY OPTION
3D SETTINGS
PROJECTOR SETUP
TEST PATTERN
SIGNAL LIST
SECURITY
NETWORK
MENU SELECT
SUB MENU
P IN P
ENTER
2/3
INITIAL STARTUP
DATE AND TIME
STARTUP INPUT SELECT
TIME ZONE
OFF
RS-232C
REMOTE2 MODE
FUNCTION BUTTON
LENS CALIBRATION
LENS MEMORY
NORMAL
STATUS
AC VOLTAGE MONITOR
OFF
SAVE ALL USER DATA
PROJECTOR SETUP
LAST USED
DEFAULT
LAST MEMORY
SET
CHANGE
MENU SELECT
ENTER
EXECUTE
CHANGE
ENTER
LENS CALIBRATION
OK
Proceed LENS CALIBRATION,
and return to HOME POSITION.
CANCEL
Attaching the Lens / Detaching the Lens (continued)
Note
z
The lens position set here may not match the intended standard position exactly.
z
Even after moving the lens to the home position with this procedure, you can adjust the position of the
projected image within the lens shift ranges shown in the “Lens shift ranges” (
Page 14).
Summary of Contents for ET-D3LEF70
Page 19: ...ENGLISH 19 MEMO ...


