8-ENGLISH
Lens position setup (Using projector functions)
Automatically return the lens to base position using the projector.
* The menu screens shown in these operating instructions are only provided as examples. Actual menu screens
may vary with the specific model.
Lens position setup and focus adjustment
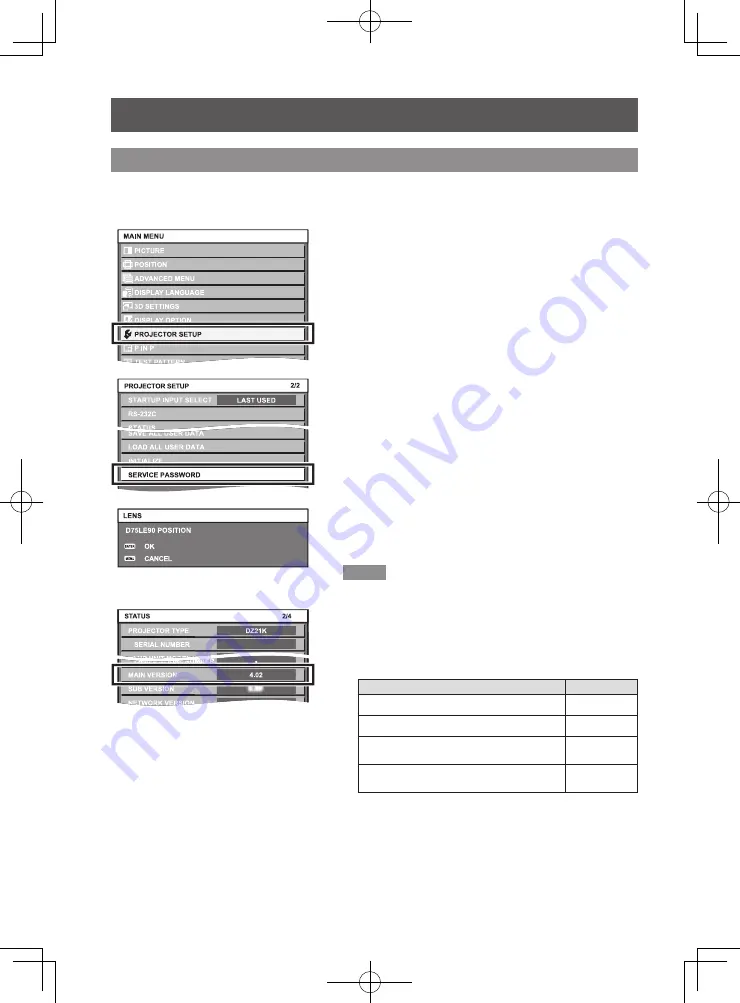
1) Turn on the projector to start the
projection.
2) Press the <MENU> button to open
the [MAIN MENU] screen. Then select
[PROJECTOR SETUP] and press the
<ENTER> button.
3) Select [SERVICE PASSWORD] in the
[PROJECTOR SETUP] menu and press
the <ENTER> button.
4) In the [SERVICE PASSWORD] entry
screen, enter "7590" using the numeric
buttons on the remote control and then
press the <ENTER> button.
z
The [D75LE90 POSITION] screen appears.
5) Press the <ENTER> button in the [D75LE90
POSITION] screen.
z
[PROGRESS] is displayed on the [D75LE90 POSITION]
screen and lens position moves to the standard projection
position for the ET-D75LE90.
Note
z
Lens position can also be set using the supplied lens shift
gauge (
Page 9).
z
The [MAIN VERSION] of the projector firmware must be the
version noted below in order to set the lens position using the
function on the projector. Check the [MAIN VERSION] of the
firmware on the [STATUS] screen and upgrade the firmware
version of the projector as needed. *
1
Projector
Main version
PT-DZ21K / PT-DS20K / PT-DW17K
4.02 or higher
PT-DZ16K
1.04 or higher
PT-DZ13K / PT-DS12K /
PT-DW11K / PT-DZ10K
4.04 or higher
Projector other than one listed above
*Only projectors that this lens is compatible with. 1.00 or higher
[STATUS] screen is displayed by selecting [Main Menu]
→
[PROJECTOR SETUP]
→
[STATUS] or by pressing the
<STATUS> button on the remote control.
*1: See software download page on Panasonic website (http://panasonic.net/avc/projector/pass/). You must be a
registered PASS user to use the site described above.
* PASS: Panasonic Professional Display and Projector Technical Support Website


