background image

7-

ENGLISH

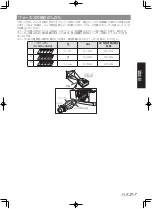
Correcting the focus

When the lens is attached to the projector and images are being projected onto the screen, the peripheral focus 

may be out of focus in some areas. If this happens, insert the spacer of attachment to a projector between the 

lens attachment and the lens to adjust the focus.

Inserting the spacer corrects the distance on the lens adjustment and improves the diagonal focus. The 

corrected distance is determined by the thickness of the used spacers. As a guide, the distance is adjusted with 

approximately 30 mm for each 0.1-mm thickness of the spacers.

Three types of spacers, four of each spacer type, are supplied. Insert these spacers to correct the distance as 

required.

Spacer

(9103016659)

Color

Thickness

Correction distance for 1.52-m 

(60") screen size projection 

1

Clear

0.1 mm

30 mm

2

Black

0.2 mm

60 mm

3

Cream

0.3 mm

90 mm

Spacer

Lens

1.52-m (60") screen 

size projection

Lens attachment

Distance

Summary of Contents for ET-ELW02

Page 1: ...he lens of PT EX12K series is an Operating Instructions of a Projector Please refer to Projector Operations section 展開モデル PT EX12K シリーズのレンズの取り付けは プロジェクターの取扱説明書 本体操作編を参照ください TQZJ464 2 液晶プロジェクター用オプションレンズ 業務用 Lens Replacement and Installation Procedure レンズ交換 取付作業手順書 ENGLISH Optional Lens for LCD Projector Commercial Use Thank you for purchasing this Panasonic product The technical staff or service pe...

Page 2: ... and related parts Doing so may affect the performance or safety of the product CAUTION Use only the specified lens Use of improper lens may result in malfunctions z z Before attaching or replacing the lens check that the Product No of the optional lens matches to the projector z z For details of the lens and attachment or replacement contact your dealer When moving or holding up the projector be ...

Page 3: ...ng bracket 6103579818 Small TYPE SC A Large Type SC B Available lens The following optional lenses are available Check the lens specifications and use the appropriate lens page ENGLISH 8 Lens No Type Focus Zoom ET ELW02 Wide zoom lens Motor driven Motor driven ET ELW03 Wide fixed lens Manual Fixed ET ELW04 1 Wide zoom lens Motor driven Motor driven ET ELW06 1 Wide zoom lens Motor driven Motor driv...

Page 4: ...s motor lead to the socket on the top right of the lens attachment the motor driven lens only Lens attachment Socket Connector Lens motor lead 2 Set the projector to the standby mode press the side of the main power switch to turn off the power and unplug the power cord from the outlet 3 Remove two screws A and slide the lens attachment cover forward to take off Lens attachment cover 4 Remove the ...

Page 5: ... the projection lens ET ELW03 only z z For details refer to Adjusting the focus page ENGLISH 6 z z If the focus adjustment is not necessary go to step 9 9 Secure the lens lock lever with the lens lock lever fixing bracket i Remove the screw fixing the lens and insert it to the lens lock lever fixing bracket 6103579818 Lens lock lever Screw Lens lock lever fixing bracket Type SC A ii Place the lens...

Page 6: ...t properly z z Turn on the projector Operate the lens shift zoom and focus fully to check that the light shielding plates are moved with the lens If the light shielding plate interferes with those operations set the light shielding plate again Attention z z Do not operate the projector with the light shielding plate removed Doing so may result in malfunction of the projector Notes on attaching ET ...

Page 7: ...the position of the focus lock screw to the mark yellow of the lens 3 Tighten the focus lock screw 4 When proper focus is not observed on outer area of the screen proceed further adjustments i Turn the focus lock ring counterclockwise ii Rotate the lens to adjust the focus on outer area of the screen iii Turn the focus lock ring clockwise If proper focus is not observed over the entire screen repe...

Page 8: ...justment and improves the diagonal focus The corrected distance is determined by the thickness of the used spacers As a guide the distance is adjusted with approximately 30 mm for each 0 1 mm thickness of the spacers Three types of spacers four of each spacer type are supplied Insert these spacers to correct the distance as required Spacer 9103016659 Color Thickness Correction distance for 1 52 m ...

Page 9: ... 0 22 2 45 5 31 1 22 6 17 5 7 62 300 11 2 8 6 4 9 12 5 9 5 9 4 7 3 16 2 12 4 21 6 16 0 37 2 26 6 54 6 37 2 27 1 20 9 8 89 350 13 1 10 1 5 8 14 6 11 1 11 0 8 5 18 9 14 5 25 3 18 7 43 4 31 0 63 6 43 4 31 5 24 4 10 16 400 15 0 11 5 6 6 16 7 12 7 12 6 9 7 21 7 16 6 28 9 21 4 49 5 35 4 72 6 49 5 36 0 27 9 12 70 500 18 8 14 4 8 3 20 9 15 9 15 8 12 1 27 1 20 8 36 2 26 8 61 9 44 2 90 7 61 8 45 0 34 8 15 2...

Page 10: ...and prevent any potential negative effects on human health and the environment which could otherwise arise from inappropriate waste handling Please contact your local authority for further details of your nearest designated collection point Penalties may be applicable for incorrect disposal of this waste in accordance with national legislation For business users in the European Union If you wish t...

Page 11: ...い内容です 実行しなければならない内容です 警告 レンズの取り付け 交換は専門の技術者または販売店に依頼する 取り付けの不備により 故障の原因となります レンズの取り付け 交換は作業手順書に従い 正しく行う 指定以外の部分に触ったり また部品を外したりしない 性能や安全が損なわれる原因となります 注意 当社で指定したレンズを使用する レンズの不備により 故障の原因となります レンズ取り付けの前に プロジェクターの品番とオプションレンズの品番をよく確認の上 プロジェ クターに適合するレンズをご使用ください 詳しい内容または疑問な点は取扱販売店にお問い合わせください 液晶プロジェクターを持ち上げたり 運んだりする場合 レンズ取り付けカバーおよびレンズは絶 対に持たない プロジェクターを破損する原因となります 安全上のご注意 必ずお守りください ...

Page 12: ...品 品名 スペーサー 3 種 9103016659 レンズ取付金具 6103531335 レンズロックレバー固定金具 6103579818 小 TYPE SC A 大 TYPE SC B 適合レンズ 以下のオプションレンズがご使用になれます 各レンズの仕様をご確認の上 ご使用場所に合ったレンズをご使 用ください z 日本語 8 ページ レンズ品番 レンズ品名 フォーカス ズーム ET ELW02 ワイドズームレンズ 電動 電動 ET ELW03 固定短焦点レンズ 手動 固定 ET ELW04 1 ワイドズームレンズ 電動 電動 ET ELW06 1 ワイドズームレンズ 電動 電動 ET ELS02 スタンダードズームレンズ 電動 電動 ET ELS03 スタンダードズームレンズ 電動 電動 ET ELT02 ロングズームレンズ 電動 電動 ET ELT03 ロングズームレンズ 手動 手動 ...

Page 13: ...レンズ取付金具 レンズモーターを右側に配置します ii レンズモーターのリード線のコネクターをレン ズ取付金具右上のソケットに接続する モー ター付レンズの場合のみ レンズ取付金具 ソケッ ト コネクタ レンズモーターのリー ド線 2 プロジェクターをスタンバイ状態にした あと 主電源スイッチの 側を押して 電源を切り 電源プラグをコンセントか ら抜く 3 ねじ A 2 本 を外し レンズ取り付け カバーを前方にスライドさせて外す レンズ取り付けカバー 4 カバープレートを外す カバープレー ト 5 取り付ける遮光プレートを選択する z遮光プレート適合表 下記の表を参考に レンズに応じてご使用くださ い 付属品 品名 レンズ品番 遮光プレート 1 6103379906 ET ELW03 1 遮光プレート 2 6103370064 ET ELW04 ET ELW06 ET ELS02 ET ...

Page 14: ...固定されているか確認してください 8 レンズ品番 ET ELW03 の場合は ここ でフォーカス調整を行う z 詳しくは フォーカス調整のしかた z 日 本語 6 ページ をご覧ください z フォーカス調整が不要な場合は 手順 9 に進 んでください 9 レンズロックレバー固定金具でレンズ ロックレバーを固定する i レンズを固定しているねじ 1 本 を外し レ ンズロックレバー固定金具に取り付ける 6103579818 レンズロックレバー ねじ レンズロックレバー固定金具 Type SC A ii レンズロックレバー固定金具を ねじを取り外 した位置に取り付ける レンズロックレバー固定金具がレンズロック レバーをロック位置に保持するように取り付 けます レンズロックレバー固定金具が図の 位置に正しく取り付けられていることを確認 してください レンズロックレバー固 定金具 Type SC ...

Page 15: ...り付けカバーをスライドさせて 取り付け ねじ A 2 本 で固定する レンズ取り付けカバー 12 レンズや遮光プレートが正しく取り付け られたか確認する z プロジェクターの電源を入れます 遮光プレー トがレンズとともに正しく動くかどうか レン ズを上下左右にレンズシフトさせたり ズーム やフォーカスを動かしたりして確認します 遮 光プレートがレンズの動きを妨げていれば 取 り付けをやり直します 遮光プレートを外した状態でプロジェク ターを動作させないでください 故障の原 因となります ET ELW03 取付上のご注意 レンズ品番 ET ELW03 には 2 種類の遮光プレー トを使用します レンズの取り付けかた z 日本語 3 ペー ジ の手順を守り 遮光プレート 3 を取り付け たあと 以下の手順で遮光プレート 1 を取り付 けます お 願 い z 遮光プレートの THIS SIDE ...

Page 16: ...のフォ カス を合わせる z プロジェクターとスクリ ンの距離が 1 m の 場合は フォ カス固定ねじの位置をレンズの 印 黄色の丸印 に合わせます 3 フォ カス固定ねじを締める 4 画面周辺のフォーカスが合っていない場 合は さらに調整する i フォ カス固定リングを左に回し緩める ii レンズを回転させ画面周辺のフォーカスを合わ せる iii フォ カス固定リングを右に回し締める 全体のフォ カスが合っていない場合は 操 作を最初からくり返し 調整してください フォーカス固定ねじ フォーカス固定リング 印 ET ELT03 の場合 1 i を回転させ ズームを調整する 2 ii を回転させ 画面中央のフォーカス を合わせる i ii ...

Page 17: ...属のスペーサーを挿入しフォーカ スを補正してください スペーサーを挿入することにより対角のベストフォーカスの距離がスクリーン側に補正されます 挿入する スペーサーの厚みにより補正距離が決まっています 補正距離の目安はスペーサーの厚さ 0 1 mm につき約 30 mm です スペーサーは 3 種類各 4 枚が付属されています 補正距離に応じてスペーサーを挿入してください スペーサー 9103016659 色 厚み 60 型投写時の補正 距離 1 クリア 0 1 mm 30 mm 2 黒 0 2 mm 60 mm 3 クリーム 0 3 mm 90 mm スペーサー レンズ スクリーン 60型投写 レンズ取付金具 距離 ...

Page 18: ...36 5 24 9 18 1 14 0 250 9 3 7 2 4 1 10 4 7 9 7 8 6 0 13 5 10 3 18 0 13 3 31 0 22 2 45 5 31 1 22 6 17 5 300 11 2 8 6 4 9 12 5 9 5 9 4 7 3 16 2 12 4 21 6 16 0 37 2 26 6 54 6 37 2 27 1 20 9 350 13 1 10 1 5 8 14 6 11 1 11 0 8 5 18 9 14 5 25 3 18 7 43 4 31 0 63 6 43 4 31 5 24 4 400 15 0 11 5 6 6 16 7 12 7 12 6 9 7 21 7 16 6 28 9 21 4 49 5 35 4 72 6 49 5 36 0 27 9 500 18 8 14 4 8 3 20 9 15 9 15 8 12 1 2...

Page 19: ...日本語 9 日本語 ヨーロッパ連合以外の国の廃棄処分に関する情報 このシンボルマークは EU 域内でのみ有効です 製品を廃棄する場合には 最寄りの市町村窓口 または販売店で 正しい廃棄方法をお問 い合わせください 中国域内での環境に関する情報 このシンボルマークは中国国内でのみ有効です ...

Page 20: ...パナソニック株式会社 コネクティッドソリューションズ社 571 8503 大阪府門真市松葉町2番 15 号 Panasonic Corporation 2011 Web Site https panasonic net cns projector SS0811NK3127 PJ Printed in Japan ...

Reviews: