background image

ENGLISH-5

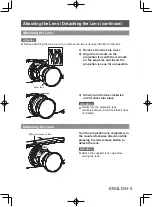
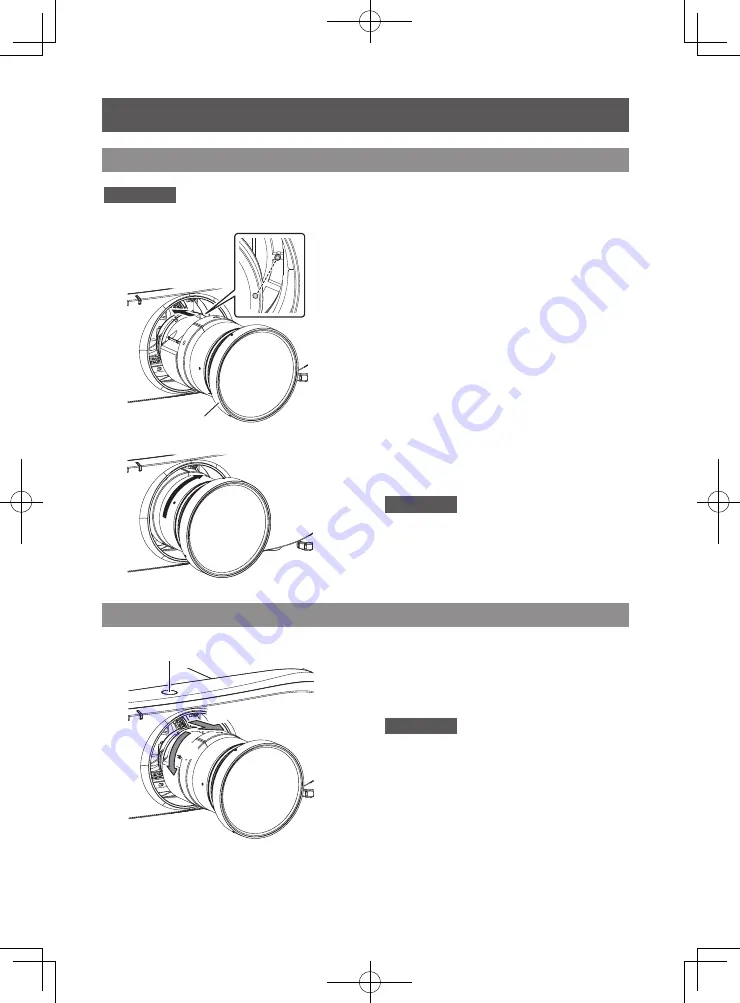
1)  Remove the lens hole cover.
2) 

Align the red mark on the 

projection lens with the red mark 

on the projector, and insert the 

projection lens as far as possible.

3) 

Slowly turn the lens clockwise 

until it clicks into place.

Attention


z

Gently turn the projection lens 

counterclockwise, and check that it does 

not detach.

Turn the projection lens completely in 

the counterclockwise direction while 

pressing the lens release button to 

detach the lens.

Attention


z

Attach the supplied lens cap before 

storing the lens.

Detaching the Lens

Attaching the Lens

Attention


z

Before attaching the lens, be sure to remove the two lens caps attached to the lens.

Attaching the Lens / Detaching the Lens (continued)

(i)

(iii)

(ii)

Lens release button

Zoom lens

Summary of Contents for ET-ELW22

Page 1: ... ensure correct use of this lens please read the operating instructions supplied with the lens and the projector carefully Before using this product be sure to read Read this first Page 3 Please save this manual for future use Product information for Turkey only EEE Yönetmeliğine Uygundur EEE Complies with Directive of Turkey ...

Page 2: ...the projection lens 4 Attaching the Lens 5 Detaching the Lens 5 Making Adjustments 6 Adjusting the Focal Balance 6 Correcting the Focus 6 Projection relationships 8 Adjustment range by the lens position shift optical shift 9 Specifications 10 Dimensions 10 Dimensional relationship Appendix Contents ...

Page 3: ...eside the projection lens z z Doing so may damage the projector Do not touch or remove any parts except for the specified parts in this Installation Instructions z z Doing so may result in malfunctions electrical shock or accidents Supplied accessories and consumables Do not open the desiccant bag Do not eat the contents Inadvertently ingesting desiccant could be harmful z z If the desiccant gets ...

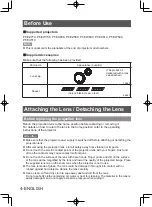
Page 4: ...ore it safely away from vibration or impacts z z Do not touch the electric contact points of the projection lens with your fingers Dust and dirt on the contacts may cause contact malfunctions z z Do not touch the surface of the lens with bare hands Finger prints and dirt on the surface of the lens will be magnified by the lens and lower the quality of the projected image Place the supplied lens ca...

Page 5: ...ens counterclockwise and check that it does not detach Turn the projection lens completely in the counterclockwise direction while pressing the lens release button to detach the lens Attention z z Attach the supplied lens cap before storing the lens Detaching the Lens Attaching the Lens Attention z z Before attaching the lens be sure to remove the two lens caps attached to the lens Attaching the L...

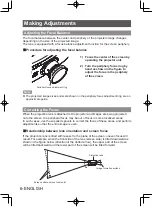
Page 6: ...ery focus adjustment ring Correcting the Focus When the projection lens is attached to the projector and images are being projected onto the screen the peripheral focus may be out of focus in some localized areas In such cases use the supplied spacers to correct the focus of these areas and perform adjustments so that the entire image is even Relationship between lens orientation and screen focus ...

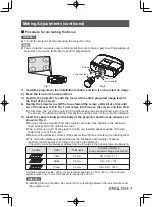
Page 7: ...osition 3 Operate the projector to shift the focus of the entire projected image toward the front of the screen 4 Operate the projector to shift the focus toward the screen a little bit at a time until one of the areas A to D in Fig 1 just comes into focus on the screen and then stop z z In this state the just focus points of the unfocused areas are positioned just in front of the screen The dista...

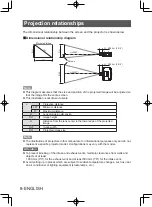
Page 8: ... L1 Lens protrusion dimension SH Image height H Distance from the lens center to the lower edge of the projected image SW Image width SD Projected image size Note z z The illustrations of projectors in this manual are for informational purposes only and do not represent a specific projector model Configurations may vary with the model Attention z z To prevent blocking of the intake and exhaust ven...

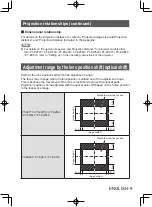
Page 9: ... 1 H 0 1 H Standard projection position Image width H Image height V PT EX800 PT EX610 PT EX510 0 35 V 0 35 V 0 1 H 0 1 H Standard projection position Image width H Image height V Adjustment range by the lens position shift optical shift Dimensional relationship For details on the projection distance L refer to Projected image size and Projection distance and Projection distance formulas in the Ap...

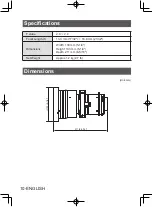
Page 10: ...mensions Specifications F value 2 0 2 4 Focal Length f 13 3 mm 17 32 16 6 mm 21 32 Dimensions Width 133 mm 5 1 4 Height 133 mm 5 1 4 Depth 211 mm 8 5 16 Net Weight Approx 1 2 kg 2 7 lb Unit mm φ133 5 1 4 211 8 5 16 ...

Page 11: ...ENGLISH 11 MEMO ...
Page 12: ...te waste handling Please contact your local authority for further details of your nearest designated collection point Penalties may be applicable for incorrect disposal of this waste in accordance with national legislation For business users in the European Union If you wish to discard electrical and electronic equipment please contact your dealer or supplier for further information Information on...

Reviews: