


2-ENGLISH
Read this first!
Always follow these precautions
WARNING
■
Do not remove any screws other than those indicated when replacing the lamp
unit.
• If this is not observed, electric shocks, burns or other injuries may occur.
■
Wait until the lamp unit has cooled sufficiently before replacing the lamp unit
(wait one hour or longer).
• The lamp cover gets very hot, and contact with it can cause burns.
■
Remove the power plug before replacing the lamp unit.
• If the lamp unit is replaced without removing the power plug, electric shocks and breakage may occur.
Notes on replacing the lamp unit, air filter, and electrostatic filter
• A Phillips screwdriver is necessary when carrying out replacement.
Hold the screwdriver firmly.
• The light source lamp is a glass component. If it is hit on a hard object or dropped, breakage may occur.
Be careful when handling a light source lamp.
• Do not disassemble or modify the lamp unit.
• Grip the handle when you remove the lamp unit. Some parts of the lamp unit are sharpened and may cause injury.
• The lamp may be ruptured. Care should be taken not to scatter pieces of the broken lamp glass when replacing the lamp
unit. Pieces of the broken lamp may fall from the lamp unit especially when the projector is mounted on the ceiling, so when
replacing the lamp unit do not stand directly underneath it or position your face close to it.
• The lamp contains mercury. Contact the local government office or distributor for the correct disposal of the old lamp unit.
Illustrations in these operating instructions
• Illustrations contained in these operating instructions that show the projector and screens may differ from the actual objects
they depict.
NOTICE
For USA only
Hg-LAMP CONTAINS MERCURY, Manage in Accord with Disposal Laws.
See: www.lamprecycle.org or 1-888-411-1996
Accessories
The following accessories (2 x filter/bagged) are included.
Air filter (black) x 1
Electrostatic filter (white) x 1
Attention
• Dispose of the packaging materials properly after unpacking the product.
ET-LAA410_TQZJ453_EN.indb 2
2012/07/23 18:46:55
ENGLISH-
3
Replacing the lamp unit, air filter, and electrostatic filter
Attention
• If the projector is operating, turn off the power by the following procedure and wait for the lamp unit to cool down before
carrying out replacement.
1) Press the power button.
The confirmation screen is displayed.
2) Select [OK] with the
◀▶
buttons and press the <ENTER>
button. (Alternatively, press the power button once more.)
The lamp extinguishes and video projection halts.
The cooling fan continues to operate and the power indicator
illuminates orange.
Wait for the power indicator to illuminate or flash red.
3) Press the <OFF> side of the <MAIN POWER> switch to turn
off the power.
Never switch off the main power or remove the power cord
when the cooling fan is running.
1) Turn off the <MAIN POWER> switch, remove the
power plug from the power outlet, and then wait at
least one hour before checking whether the area
surrounding the lamp unit has cooled down.
2) Remove the video cable connected to the
connecting terminal.
Attention
• If you open the top panel fully, it may come into contact
with connectors such as the video cable which may result
in breakage of the video cable. Before opening the top
panel, be sure to remove the connected video cables, etc.
3) Hold the protrusions at the front corner of the top
cover of the projector and push up to open.
* When the projector is mounted on the ceiling, stand
at the lens side of the projector when opening/closing
the top cover.
Top cover
Protrusion
Attention
• Be careful not to open the top panel too far. For what to
do if the top panel comes off, see “Care and replacement”
in “Operating Instructions - Functional Manual”.
4) Use a Philips screwdriver to unscrew the lamp
cover fixing screw (one) until it becomes loose, and
then remove the lamp cover.
* Slowly remove the lamp cover from the projector.
Lamp cover
Lamp
cover fixing
screw
5) Use a Phillips screwdriver to unscrew the lamp unit
fixing screws (2 screws) until loose.
6)
Hold the handle of the lamp unit and with the lamp unit
lock held in the direction of the black arrow, carefully
pull it out of the projector unit in a vertical motion.
モ
Lamp unit fixing
screws
Handle
Lamp unit lock
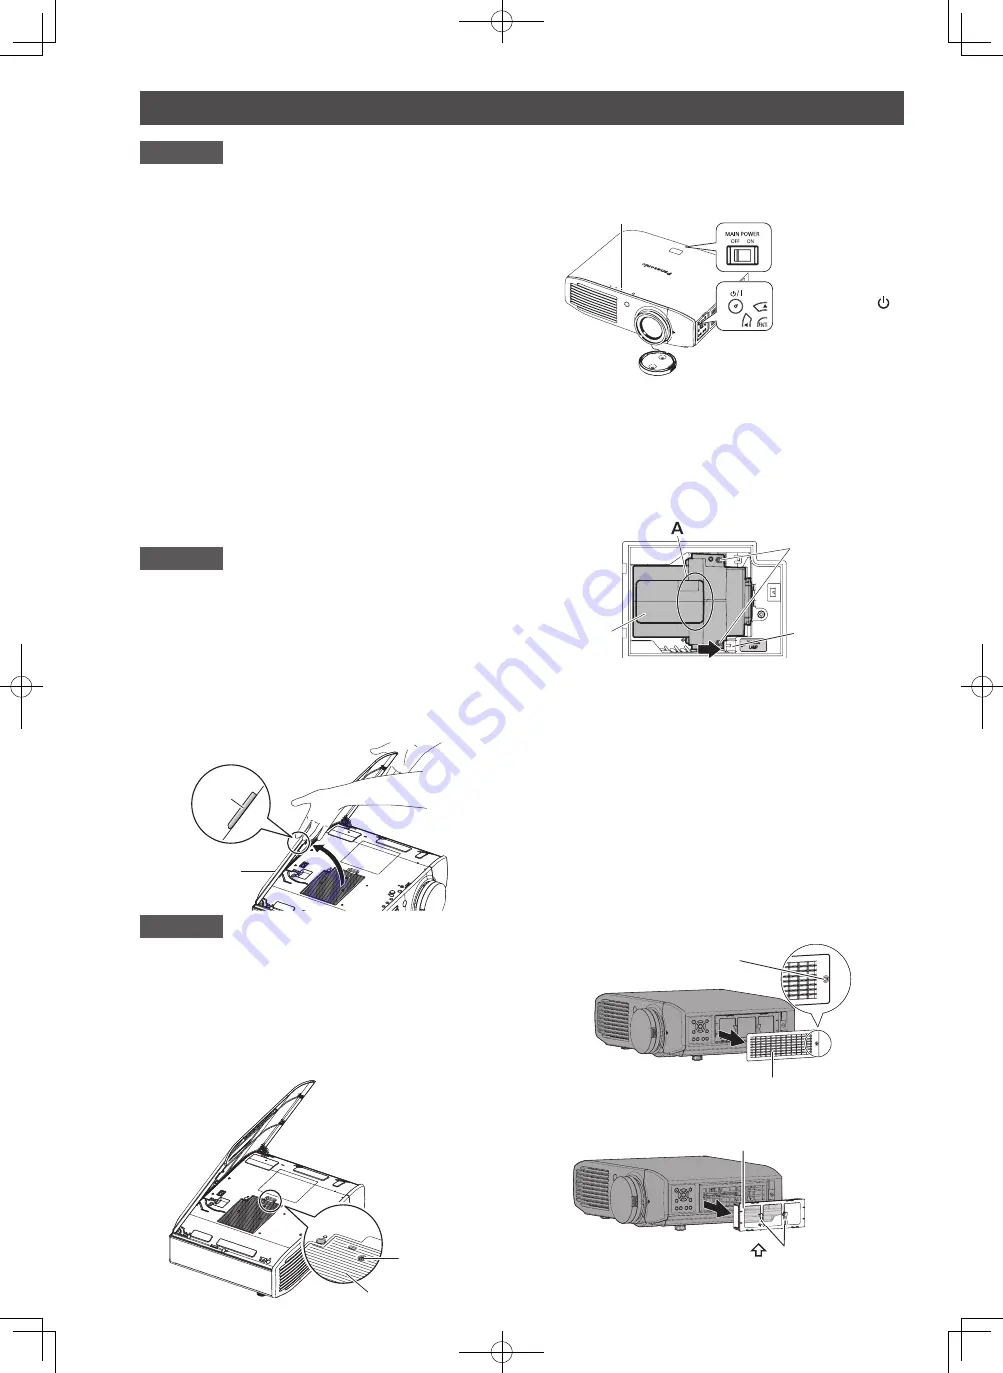
7)
Replace the new lamp unit while making sure that the
direction of insertion is correct. Press the top of the
lamp unit downwards and make sure the unit is installed
securely. Tighten the lamp unit fixing screws (2 screws)
securely with a Phillips screwdriver.
• Press down on the A part firmly when inserting the
lamp unit.
8)
Mount the lamp cover, and tighten the lamp cover fixing
screw (one screw) securely with a Phillips screwdriver.
9) Close the top cover of the projector.
• Close the top cover using the reverse of the
procedure in 3) and push the center of the top cover.
10) Reconnect the video cable disconnected in 2) to
the connecting terminal.
11) Remove the air filter cover.
• Using a Phillips screwdriver to turn the fixing screw of
the air filter cover until loose and remove the cover.
Air filter cover
Air filter cover fixing
screw
12) Remove the air filter unit.
• Hold the grips on the air filter unit, and remove it from
the projector.
Air filter unit
Grips (
UP
arrow engraved)
■
Replacement procedure
Power indicator
Main power
<MAIN POWER>
switch
Controls for device
Power < STANDBY
( )
>
button
ET-LAA410_TQZJ453_EN.indb 3
2012/07/23 18:46:58


