background image

7

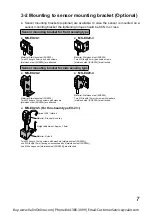
3-2 Mounting to sensor mounting bracket (Optional)


 Sensor mounting brackets (optional) are available. In case the sensor is mounted on a 

sensor mounting bracket the tightening torque should be 0.5N·m or less.

Sensor mounting bracket for front sensing type

Sensor mounting bracket for side sensing type


MS-EX20-1

Material: Stainless steel (SUS304)
Two M3 (length 5mm) pan head screws 
[stainless steel (SUS304)] are attached.


MS-EX20-3

Material: Stainless steel (SUS304)
Two M3 (length 5mm) pan head screws 
[stainless steel (SUS304)] are attached.


MS-EX20-2

Material: Stainless steel (SUS304)
Two M3 (length 14mm) screws with washers 
[stainless steel (SUS304)] are attached.


MS-EX20-4

Material: Stainless steel (SUS304)
Two M3 (length 14mm) screws with washers 
[stainless steel (SUS304)] are attached.


MS-EX20-5


Two M3 (length 12mm) screws with washers [stainless steel (SUS304)],
one M3 (length 10mm) hexagon-socket-head bolt [stainless steel (SUS304)],
one M3 hexagon nut [stainless steel (SUS304)] are attached.

Material: Die-cast zinc alloy

Material: Nylon 6

Swivel: 360° rotation

Height adjustment: Approx. 15mm

Buy: www.ValinOnline.com | Phone 844-385-3099 | Email: CustomerService@valin.com

Summary of Contents for EX-21 Series

Page 1: ...Amplifier Built in Ultra compact Type Photoelectric Sensor EX 20 Series USER S MANUAL WUME EX20 3 Buy www ValinOnline com Phone 844 385 3099 Email CustomerService valin com ...

Page 2: ...unting to mounting spacer Optional Front sensing type 8 3 4 Installation interval 9 3 5 13 4 I O Circuit Diagram 14 5 Adjustment 15 5 1 Beam alignment Thru beam type 15 5 2 16 6 Stability Indicator 18 7 Option 19 7 1 Slit mask Thru beam type 19 20 21 9 Dimensions 24 Buy www ValinOnline com Phone 844 385 3099 Email CustomerService valin com ...

Page 3: ...the frame ground F G terminal of the power supply is connected to an actual ground In case noise generating equipment switching regulator inverter motor etc is used in the vicinity of this product connect the frame ground F G terminal of the equipment to an actual ground Do not run the wires together with high voltage lines or power lines or put them in the same raceway This can cause malfunction ...

Page 4: ...ained when the operation mode switch is turned fully counterclockwise D side Note Use the accessory adjusting screwdriver to turn the operation mode switch slowly Turning with excessive strength will cause damage to the adjuster Operation mode switch Receiver Operation indicator Orange Lights up when the output is ON Stability indicator Green Lights up under stable light received condition or stab...

Page 5: ...eiving part Beam emitting part Sensitivity adjuster Sensing range increases when turned clockwise Beam emitting part Beam receiving part Stability indicator Green Lights up under stable light received condition or stable dark condition Operation indicator Orange Lights up when the output is ON Buy www ValinOnline com Phone 844 385 3099 Email CustomerService valin com ...

Page 6: ...he sensor Mount using M3 screws The tightening torque should be 0 5N m or less K Q M3 pan head screws Note Front sensing type M3 screws Side sensing type Buy www ValinOnline com Phone 844 385 3099 Email CustomerService valin com ...

Page 7: ...length 5mm pan head screws stainless steel SUS304 are attached MS EX20 2 Material Stainless steel SUS304 Two M3 length 14mm screws with washers stainless steel SUS304 are attached MS EX20 4 Material Stainless steel SUS304 Two M3 length 14mm screws with washers stainless steel SUS304 are attached MS EX20 5 Two M3 length 12mm screws with washers stainless steel SUS304 one M3 length 10mm hexagon sock...

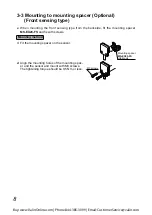
Page 8: ...t the mounting spacer on the sensor 2 Align the mounting holes of the mounting spac er and the sensor and mount with M3 screws The tightening torque should be 0 5N m or less Mounting spacer MS EX20 FS Optional M3 screws Buy www ValinOnline com Phone 844 385 3099 Email CustomerService valin com ...

Page 9: ...9 In case using at sensing distance L2 2m the op W _ diagram The installation interval is Approx 66 9mm 2 approx 133 8mm Thus install EX 23 ZQQ away EX 21 K ZZ EX 23 K ZQQ EX 21 K Z EX 23 K EX 21 K ZZ EX 23 K ZQQ Parallel deviation diagram typical of Thru beam type EX 23 100 W 50 0 50 100 1 2 L2 0 Setting distance L mm Center Left Right W Parallel deviation diagram typical of Thru beam type EX 21 ...

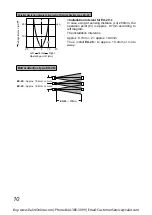
Page 10: ...ram The installation interval is Approx 9 7mm 2 approx 19 4mm Thus install EX 29 Z_ away EX 29 K Z_ EX 29 K EX 29 K Z_ 99 9 95 20 WQ 10 0 10 20 100 200 L3 0 Setting distance L mm Center Left Right W Buy www ValinOnline com Phone 844 385 3099 Email CustomerService valin com ...

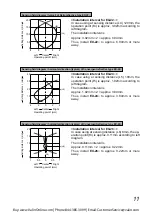
Page 11: ...hus install EX 24 Q away 67 99 9 In case using at sensing distance L6 8mm the op W ZZ diagram The installation interval is Approx 0 11mm 2 approx 0 22mm Thus install EX 26 away 1 W 0 5 0 0 5 1 10 20 L6 0 15 5 Setting distance L mm Center Left Right W 9 B 9 95 9 B 9 95 4 W 2 0 2 4 20 40 L5 0 30 10 Setting distance L mm Center Left Right W 9 95 4 W 2 0 2 4 100 200 L4 0 150 50 Setting distance L mm C...

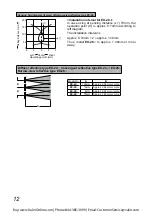
Page 12: ...Thus install EX 28 Z away H B A B Model No A B EX 22 120mm Approx 6 04mm or more EX 24 19mm Approx 3 84mm or more EX 26 8mm Approx 0 22mm or more EX 28 70mm Approx 1 48mm or more 9 95 4 W 2 0 2 4 100 200 L7 0 150 50 Setting distance L mm Center Left Right W Buy www ValinOnline com Phone 844 385 3099 Email CustomerService valin com ...

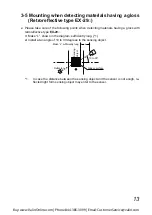
Page 13: ... care of the following points when detecting materials having a gloss with EX 29 1 X Z 2 Install at an angle of 10 to 30 degrees to the sensing object ZK L X Sensing object 10 to 30 Glossy surface Buy www ValinOnline com Phone 844 385 3099 Email CustomerService valin com ...

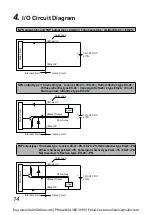
Page 14: ...0 Color code Black Output Blue 0V Load 12 to 24V DC 10 Users circuit Internal circuit Main circuit Brown V 50mA max Color code Black Output Blue 0V Load 12 to 24V DC 10 Users circuit Internal circuit Main circuit Brown V 50mA max Color code Buy www ValinOnline com Phone 844 385 3099 Email CustomerService valin com ...

Page 15: ...e of EX 23 Light ON or Dark ON as per your requirement with the operation mode switch 1 Turn the sensitivity adjuster fully clockwise to the maximum sensitivity position MAX 2 along a straight line move the reflector in the up down left and right directions in order to de termine the range of the light received condition with the help of the operation indicator orange 3 Similarly adjust for up dow...

Page 16: ...e the sensor just returns to the Dark state operation If the sensor does not enter the Light state operation even when the sensitivity adjuster is turned fully clock wise the position is point B 4 The position at the middle of points A and B is the opti mum sensing position Notes 1 Use the accessory adjusting screwdriver to turn the adjuster slowly Turning with excessive strength will damage the a...

Page 17: ... Orange Stability indicator Green Lights up Lights up ON Stable light receiving OFF Turns OFF Lights up Turns OFF Unstable light receiving Turns OFF Turns OFF OFF Unstable dark receiving ON Lights up Lights up Stable dark receiving Lights up Emitter Receiver Sensor Sensor Sensing object Sensor Sensing object Sensor Emitter Receiver Sensing object Sensor Sensor Sensing object Buy www ValinOnline co...

Page 18: ...ight received operation and the light interrupted operation being af fected by a change in ambient temperature or supply voltage Approx 15 Output operation level Output operation Operation of stability indicator Light up Light OFF Light received operation 0 0 100 Incident light intensity Setting distance Incident light margin Light interruption margin Approx 25 Light up Light interrupted operation...

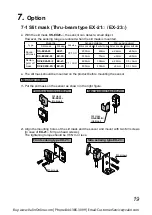
Page 19: ...E 05 EX 23 350mm 70mm ø3mm ø0 5mm Rectan gular slit mask OX EX20 05 3 EX 21 0 5 3mm 600mm 300mm ø2 6mm 0 5 3mm OX EX20E 05 3 EX 23 800mm 400mm ø3mm 0 5 3mm The slit mask should be mounted on the product before mounting the sensor Mounting method 1 2 Align the mounting holes of the slit mask and the sensor and mount with two M3 screws in case of EX 21 Q The tightening torque should be 0 5N m or les...

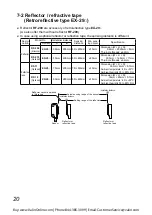
Page 20: ... ø30mm Y Y K 33 3mm 12 8mm 11mm Thru hole threads ø3 4mm tape RF 11 Optional EX 29 70mm 200mm 70 to 200mm ø15mm Y Y K 30mm 8mm 0 7mm Ambient temperature 25 to 50ºC Ambient humidity 35 to 85 RH RF 12 Optional EX 29 60mm 280mm 60 to 280mm ø15mm Y Y K 30mm 25mm 0 7mm Ambient temperature 25 to 50ºC Ambient humidity 35 to 85 RH Installation distance A Actual sensing range of the sensor Sensor Installat...

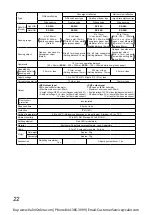
Page 21: ... Residual voltage 2V or less at 50mA sink current 1V or less at 16mA sink current PNP output type PNP open collector transistor Maximum source current 50mA Applied voltage 30V DC or less between output and V Residual voltage 2V or less at 50mA source current 1V or less at 16mA source current Short circuit protection Incorporated Response time 0 5ms or less Protection IP67 IEC Ambient temperature 2...

Page 22: ...m or less Setting distance 10mm 0 3mm or less Supply voltage 12 to 24V DC 10 Ripple P P 10 or less Current consumption 13mA or less 15mA or less Output NPN output type NPN open collector transistor Maximum sink current 50mA Applied voltage 30V DC or less between output and 0V Residual voltage 2V or less at 50mA sink current 1V or less at 16mA sink current PNP output type PNP open collector transis...

Page 23: ...le length type of EX 29A Y EX 29A Y C5 3 Either Light ON or Dark ON can be selected by the operation mode switch located on the receiver 4 The sensing range and the sensing object of the retroreflective type sensor are specified for the RF 200 R Q Z sensing object should be opaque 5 In case of using this product at a sensing range of 50mm or less take care that the sensitivity adjust ment range be...

Page 24: ...e 16 2 3 10 9 18 Beam emitting part Unit mm 8 2 Emitter 3 ø2 5 cable 2m long 2 ø3 2 mounting hole 10 5 13 2 8 3 5 6 5 Beam emitting part 3 19 9 5 Sensitivity adjuster 8 2 Receiver 3 10 5 13 2 8 3 5 6 5 3 19 9 5 Operation mode switch ø2 5 cable 2m long 2 ø3 2 mounting hole Beam receiving part Buy www ValinOnline com Phone 844 385 3099 Email CustomerService valin com ...

Page 25: ... 2 8 5 3 5 5 Beam emitting part 3 22 11 Sensitivity adjuster Beam receiving part 5 10 Unit mm 4 5 3 ø2 5 cable 2m long 2 ø3 2 mounting hole 16 2 3 10 9 18 Beam receiving part 5 Beam emitting part Buy www ValinOnline com Phone 844 385 3099 Email CustomerService valin com ...

Page 26: ...ing holes for mounting at the side 2 ø3 4 thru holes 6 deep for mounting at the back 2 ø3 4 thru holes for mounting at the side 2 M3 nut mounting holes for mounting at the back Unit mm 30 28 0 7 Adhesive tape 8 6 Unit mm 30 28 0 7 25 23 Adhesive tape Buy www ValinOnline com Phone 844 385 3099 Email CustomerService valin com ...

Reviews: