background image

- 12 -

EN

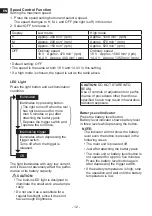
Speed Control Function

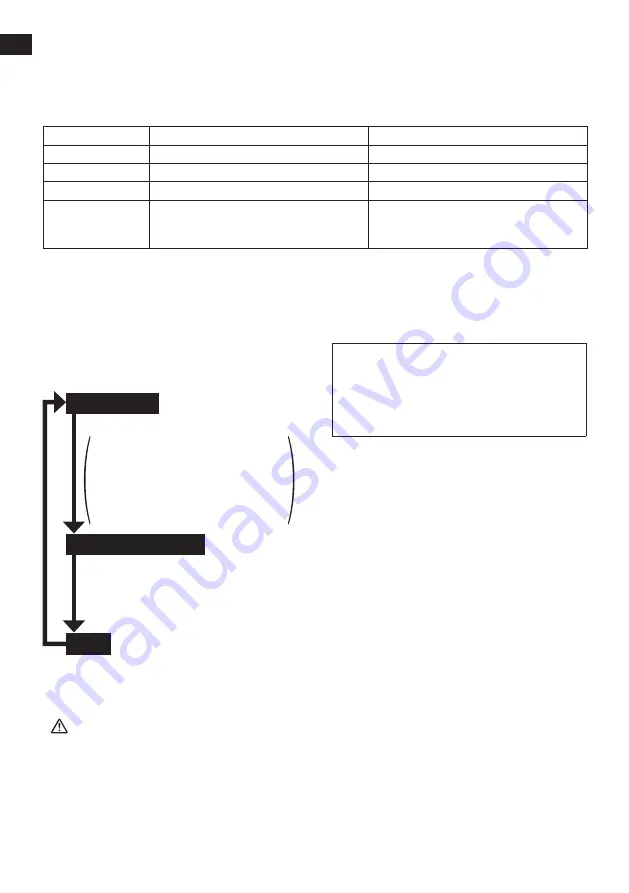
Setting the maximum speed.
1.  Press the speed setting button and select a speed. 

The speed changes to H, M, L and OFF (the light is off) in this order.

2.  Select OFF to release it.

Display

Low mode

High mode

H

Approx. 300 min

-1

 (rpm)

Approx. 1000 min

-1

 (rpm)

M

Approx. 200 min

-1

 (rpm)

Approx. 670 min

-1

 (rpm)

L

Approx. 150 min

-1

 (rpm)

Approx. 500 min

-1

 (rpm)

OFF

Ordinary speed

18 V  Approx. 470 min

-1

 (rpm)

14.4 V  Approx. 400 min

-1

 (rpm)

Ordinary speed

18 V  Approx. 1580 min

-1

 (rpm)

14.4 V  Approx. 1350 min

-1

 (rpm)

 •Default setting: OFF
 •The speed is the same at both 18 V and 14.4 V in this setting.
 •If a high mode is chosen, the speed is set as the table above.

LED Light

Press the light button and set illumination 

condition.

Illuminated

Illuminates by pressing button.

The light turns off when the tool 

has not been used for more 

than 5 minutes or just after 

attaching the battery pack.

Depress the trigger switch and 

operate the tool once.

Interlocking trigger

Illuminates when depressing the 

trigger switch.

Turns off when the trigger is 

released.

Off

The light illuminates with very low current, 

and it does not adversely affect the perfor-

mance or its battery capacity.

 CAUTION:

 •The built-in LED light is designed to 

illuminate the small work area tempo-

rarily.

 •Do not use it as a substitute for a 

regular flashlight, since it does not 

have enough brightness.

CAUTION:

 DO NOT STARE INTO 

BEAM.

Use of controls or adjustments or perfor-

mance of procedures other than those 

specified herein may result in hazardous 

radiation exposure.

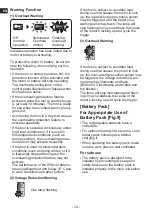
Battery Level Indicator

Press the battery level button. 

Battery level indicator shows battery level 

in three levels while pressing the button.

NOTE:

The indicator will not show the battery 

level even the button is pressed in the 

following cases.

 •The main unit is powered off.
 •Just after attaching the battery pack
 •The main unit or battery level button is 

not operated for approx. five minutes. 

Press the battery level button again 

after depressing the trigger switch.

 •If the battery temperature is high, stop 

the operation and wait until the battery 

temperature is low.

Summary of Contents for EY74A2X

Page 1: ...future use IMPORTANT Ce mode d emploi contient des informations sur la sécurité Lisez le en entier avant d utiliser le produit et conservez le pour référence IMPORTANTE Este manual contiene información de seguridad Lea completamente este manual antes de utilizar por primera vez este producto y guárdelo para poder consultarlo en el futuro Questo manuale d istruzione è fornito da trovaprezzi it Scop...

Page 2: ... 2 Index Index Indice English Page 5 Français Page 19 Español Página 34 FUNCTIONAL DESCRIPTION DESCRIPTION DES FONCTIONS DESCRIPCIÓN FUNCIONAL O D N Q E G H M L K J I B C A F P R ...

Page 3: ... batterie Indicateur de réglage de la vitesse Indicador de nivel de la batería Indica dor de ajuste de la velocidad K Speed setting button Bouton de réglage de la vitesse Botón de ajuste de la velocidad L Light button Bouton d éclairage Botón de la luz M Overheat warning lamp motor battery Témoin d avertissement de surchauffe moteur batterie Luz de advertencia de sobrecalenta miento motor batería ...

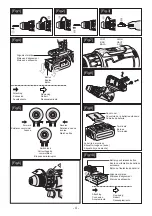
Page 4: ...mal Avance Switch lock Verrouillage du commutateur Bloqueo delinterruptor Fig 6 Fig 9 Pack cover Couvercle de la batterie autonome Cubierta de batería Terminals Bornes Terminales Label red or yellow Etiquette rouge ou jaune Etiqueta roja o amarilla Fig 8 Fig 10 Attaching Connexion Acoplamiento Removing Retrait Desacoplamiento Alignment marks Marques d alignement Marcas de alineación Battery pack r...

Page 5: ...s listed below refers to your main operated corded power tool and battery operated cord less power tool SAVE THESE INSTRUCTIONS Work Area Safety 1 Keep work area clean and well lit Cluttered or dark areas invite acci dents 2 Do not operate power tools in explosive atmospheres such as in the presence of flammable liquids gases or dust Power tools create sparks which may ignite the dust or fumes 3 K...

Page 6: ...rds Power Tool Use and Care 1 Do not force the power tool Use the correct power tool for your application The correct power tool will do the job better and safer at the rate for which it was designed 2 Do not use the power tool if the switch does not turn it on and off Any power tool that cannot be controlled with the switch is danger ous and must be repaired 3 Disconnect the plug from the power s...

Page 7: ...s of control can cause personal injury 3 Hold power tools by insulated gripping surfaces when performing an operation where the cutting tool may contact hidden wiring Contact with a live wire will make exposed metal parts of the tool live and shock the operator 4 Be aware that this tool is always in an operating condition since it does not have to be plugged into an electrical outlet 5 If the bit ...

Page 8: ...c Battery Pack as shown in last page Other types of batteries may burst causing personal injury and damage 4 Do not expose charger and battery pack to rain or snow 5 To reduce risk of damaging the elec tric plug and cord pull by plug rather than cord when disconnecting char ger 6 Make sure cord is located so that it will not be stepped on tripped over or otherwise subjected to damage or stress 7 A...

Page 9: ...er is designed to operate on standard household electrical power only Do not attempt to use it on any other voltage 20 Do not abuse cord Never carry charger by cord or yank it to discon nect from outlet Keep cord away from heat oil and sharp edges 21 Charge the battery pack in a well ventilated place do not cover the charger and battery pack with a cloth etc while charging 22 Use of an attachment ...

Page 10: ... pack and place the battery pack separately from metal objects screws nails etc when storing in the tool case Do not handle the rechargeable power tools in the following way There is a hazard of smoke genera tion fire and rupturing Use or leave in places exposed to rain or moisture Use submerging in water V ASSEMBLY Attaching or Removing Bit NOTE When attaching or removing a bit disconnect battery...

Page 11: ...as not been used for at least 1 minute or at least 5 minutes when the LED is on Rotation will start without any lag during second and subsequent opera tions CAUTION To prevent damage do not operate Forward Reverse lever until the bit comes to a complete stop Clutch Torque Setting Adjust the torque to one of the 18 clutch settings or position CAUTION Set the clutch setting at this mark Fig 6 before...

Page 12: ...king trigger Illuminates when depressing the trigger switch Turns off when the trigger is released Off The light illuminates with very low current and it does not adversely affect the perfor mance or its battery capacity CAUTION The built in LED light is designed to illuminate the small work area tempo rarily Do not use it as a substitute for a regular flashlight since it does not have enough brig...

Page 13: ...ew or to loosen an extremely tight screw Changing the Belt Hook Location Side Fig 8 The belt hook can be attached to either side of the unit 1 Removing the hook 1 Remove the nut 2 Draw out the hook 2 Attaching the hook to the other side 1 Insert the hook in the other side 2 Tighten the nut fully so that it securely fastened WARNING Be sure to attach the belt hook securely to the main unit with the...

Page 14: ...tection feature may not activate The performance of the EY9L42 deterio rates significantly at and below 10 C due to work conditions and other factors 2 Voltage Reduction Warning One lamp flashing If the tool is subject to a sudden load during use that causes the motor to lock up the overdischarge prevention sensor may be triggered and the battery low warning lamp may flash The lamp will stop flash...

Page 15: ...leave the battery pack at the place and wait for more than one hour to warm up the battery to the level of the ambient temperature 5 Cool down the charger when charging more than two battery packs consecu tively 6 Do not insert your fingers into contact hole when holding charger or any other occasions 7 Unplug the charger when not in use NOTE Your battery pack is not fully charged at the time of p...

Page 16: ...o charge Charging Status Lamp Left green Right orange will be displayed Battery pack is cool The battery pack is being charged slowly to reduce the load on the battery Battery pack is warm Charging will begin when temperature of battery pack drops If the temperature of the battery pack is 10 or less the charging status lamp orange will also start flashing Charging will begin when the temperature o...

Page 17: ...ain and allow to dry as soon as possible Carefully remove any dust or iron filings that collect inside the tool If you experience any problems operating the tool consult with a repair shop X SPECIFICATIONS NOTE Weight indication Greater than or equal to 1 kg indicated by 0 05 kg 0 11 lbs Less than 1 kg indicated by 0 01 kg 0 02 lbs MAIN UNIT Model No EY74A2 Motor voltage 14 4 V DC 18 V DC No load ...

Page 18: ...ent does cause harmful interference to radio or television reception which can be determined by turning the equipment off and on the user is encouraged to try to correct the interference by one of the following measures Reorient or relocate the receiving antenna Increase the separation between the equipment and receiver Connect the equipment into an outlet on a circuit different from that to which...

Page 19: ... les avertissements ci des sous se réfère aux outils mécaniques opérés par cordons d alimentation et par batterie sans fil CONSERVEZ CES INSTRUCTIONS Sécurité de la zone de travail 1 Gardez la zone de travail propre et bien aérée Les endroits encombrés et sombres invitent les accidents 2 Ne faites pas fonctionner les outils mécaniques dans des atmosphères explosives comme en présence de liquides i...

Page 20: ...prise au sol et votre équilibre à tout moment Ceci permet un meilleur contrôle de l outil mécanique dans des situations inatten dues 6 Habillez vous correctement Ne portez pas de vêtements lâches ou de bijoux Gardez vos cheveux vêtements et gants éloignés des pièces en mouve ment Des vêtements lâches des bijoux ou des cheveux longs peuvent se faire prendre dans les pièces en mouvement 7 Si des dis...

Page 21: ...péciale ment conçus pour eux L utilisation de tout autre bloc de batterie peut entraîner un risque de blessure et d incendie 4 Lorsqu un bloc de batterie n est pas utilisé gardez le éloigné d objets métalliques comme agrafes pièces de monnaie clés clous vis ou tout autre petit objet métallique pouvant établir une connexion entre les deux bornes Si les bornes de la batterie sont mises en court circ...

Page 22: ...e augmentation de la température et de surchauffer le moteur 12 Ne laissez pas tomber l outil 13 Mettez un masque antipoussière si les travaux produisent de la poussière 14 La température du chargeur peut s élever en cours d utilisation Ce n est pas là le signe d une anomalie de fonctionnement NE chargez PAS la batterie pendant une longue période Symbole Signification Volts Courant continu Vitesse...

Page 23: ...des conducteurs en bon état et être elle même en bon état d utilisation c La taille des conducteurs doit être suffisante pour les normes d intensité en ampères du chargeur comme indiqué ci dessous TAILLE AWG MINIMUM RECOMMANDÉE DES RALLONGES POUR CHARGEURS DE BATTERIES Norme d entrée CA Ampères Taille AWG du cordon Egal ou supérieur à Mais inférieur à Longueur du cordon pieds 25 50 100 150 0 2 18 ...

Page 24: ...rise de courant adéquate Ne modifiez la fiche en aucune façon AVERTISSEMENT N utilisez que la batterie autonome Panaso nic conçue pour l utilisation avec cet outil rechargeable Panasonic décline toute responsabilité en cas de dommage ou d accident causé par l utilisation d une batterie autonome recy clée ou de contrefaçon Ne mettez pas la batterie autonome au rebut dans un feu ou ne l exposez pas ...

Page 25: ...tterie autonome jusqu à ce qu elle se verrouille en position 2 Pour retirer la batterie autonome Fig 4 Appuyez sur le bouton et faites glisser la batterie autonome vers l avant VI FONCTIONNEMENT AVERTISSEMENT Ne respirez pas la fumée dégagée par l outil ou la batterie car elle pourrait être nocive Corps principal MISE EN GARDE Lorsque vous rangez ou transportez l outil mettez le levier d inversion...

Page 26: ...ection de vitesse avant l utilisation Utilisez à basse vitesse lorsqu un couple de serrage élevé est nécessaire pendant le fonctionnement L utilisation à haute vitesse lorsqu un couple de serrage élevé est néces saire peut entraîner une panne du moteur Afin d empêcher la température de la surface de l outil d augmenter excessive ment ne faites pas fonctionner l outil continuellement en utilisant d...

Page 27: ...u de la batterie L indicateur de niveau de la batterie affiche le niveau de la batterie selon trois niveaux lorsque le bouton est actionné REMARQUE L indicateur n affiche pas le niveau de la batterie même lorsque le bouton est actionné dans les cas suivants L unité principale est hors tension Immédiatement après avoir connecté la batterie autonome L unité principale ou le bouton de niveau de la ba...

Page 28: ...rant bien la vis Si le crochet de ceinture n est pas bien fixé à l unité principale le crochet peut se décrocher et l unité peut tomber Cela pourrait entraîner un accident ou des blessures Vérifiez régulièrement le serrage de la vis Si elle est desserrée resserrez la bien Assurez vous d accrocher fermement et de manière sûre le crochet de ceinture sur une ceinture de taille ou une autre ceinture F...

Page 29: ...rait être déclenché et le voyant de batterie faible pourrait clignoter Le voyant arrêtera de clignoter une fois que vous aurez géré la raison du verrouillage du moteur et que vous aurez activer la gâchette 3 Avertissement de surcharge Si l outil est soumis à une charge soudaine pendant son utilisation cela provoque le verrouillage du moteur l éventuel déclenche ment du détecteur de prévention des ...

Page 30: ...rgeur lorsque vous ne l utilisez pas REMARQUE Votre batterie autonome n est pas complètement chargée au moment de l achat Veillez à bien charger complètement la batterie avant son utilisation Procédure de recharge 1 Branchez le cordon d alimentation du chargeur dans une prise secteur REMARQUE Des étincelles peuvent être produites lorsque la fiche est introduite dans la prise d alimentation secteur...

Page 31: ...e est chaude La charge commence lorsque la température de la batterie autonome descend Lorsque la température de la batterie autonome est de 10ºC ou moins le témoin de charge orange se met également à clignoter La charge commence lorsque la température de la batterie autonome augmente Impossible de charger Colmatage par la poussière ou mauvais fonctionnement de la batterie autonome Vert Orange VII...

Page 32: ...gneusement toutes saletés ou limailles de fer qui s accu mulent à l intérieur de l outil Si vous rencontrez des problèmes lors de l utilisation de l outil prenez contact avec votre centre de service agréé le plus proche X CARACTERISTIQUES TECHNIQUES REMARQUE Indication de poids Égal à ou plus d 1 kg indiqué par 0 05 kg 0 11 lbs Moins d 1 kg Indiqué par 0 01 kg 0 02 lbs UNITE PRINCIPALE N du modèle...

Page 33: ...e des brouillages préjudiciables à la réception de la radio ou de la télévision ce qui peut être vérifié en mettant en marche puis en arrêtant l équipe ment l utilisateur est encouragé à éliminer le brouillage selon l une des mesures suivantes Réorienter ou déplacer l antenne réceptrice Augmenter l espacement entre l équipement et le récepteur Brancher l équipement à une prise d un circuit différe...

Page 34: ...nta eléctrica conectada al tomaco rriente cableado y a la herramienta eléctrica que funciona con batería sin cable GUARDE ESTAS INSTRUCCIONES Seguridad del lugar de trabajo 1 Mantenga el lugar de trabajo limpio y bien iluminado Un área desprolija u oscura es una causa de accidentes 2 No haga funcionar herramientas eléctri cas en un ambiente explosivo como en lugares donde hay líquidos inflamables ...

Page 35: ...floja joyas o cabello largo puede quedar atrapado en piezas móviles 7 Si se entregan dispositivos para reco lección y extracción de polvo asegúre se que estén conectados y se utilicen bien El uso de estos dispositivos puede reducir los peligros relacionados con el polvo Uso y cuidados de herramientas eléctricas 1 No fuerce la herramienta eléctrica Utilice la herramienta eléctrica correcta según su...

Page 36: ...uras Servicio 1 Solicite el servicio de la herramienta eléctrica a un técnico cualificado utilizando sólo repuestos idénticos Esto mantendrá la seguridad de la herra mienta eléctrica III NORMAS DE SEGURIDAD ESPECÍFICAS 1 Utilice protectores auditivos Una exposi ción prolongada a ruidos de alta intensi dad puede provocar pérdida de audición 2 Utilice el mango auxiliar entregado con la herramienta U...

Page 37: ...ontra el polvo que hayan sido diseñadas especialmente para no dejar pasar las partículas microscópicas IV PARA EL CARGADOR DE BATERIA Y LA BATERIA Instrucciones de seguridad importantes 1 GUARDE ESTAS INSTRUCCIONES Este manual contiene instrucciones de seguridad importantes y de funcionamien to para el cargador de batería 2 Antes de utilizar el cargador de batería lea todas las instrucciones y mar...

Page 38: ...a esté por DEBAJO de 0 C 32 F o por ENCIMA de 40 C 104 F Esto es muy importante para mantener la batería en perfectas condiciones 17 No incinere la batería Puede explotar en el fuego 18 Evite ambientes peligrosos No utilice el cargador en lugares húmedos o mojados 19 El cargador fue diseñado para funcionar sólo con la corriente eléctrica normal del hogar No trate de utilizar con otro voltaje 20 No...

Page 39: ...amien ta colóquela en un lugar que no esté en contacto con objetos metálicos tornillos clavos etc No maneje las herramientas eléctricas recargables de la siguiente manera Existe el riesgo de que se produzcan humos incendios y reventones Usar o dejar en lugares expuestos a la lluvia o la humedad Usar dentro del agua V MONTAJE Colocación o extracción de la broca NOTA Al poner o extraer una broca o c...

Page 40: ...menos 5 minutos desde que el LED está encendido La rotación se iniciará sin ningún intervalo durante segundas y subsiguientes operaciones PRECAUCIÓN Para impedir que se produzcan daños no utilice la unidad de palanca de avance marcha atrás la broca se detiene del todo Ajuste de torsión del embrague Ajuste la torsión a uno de los 18 ajustes de embrague o a la posición PRECAUCIÓN Realice el ajuste d...

Page 41: ...presionar el disparador de la herramienta Se apaga cuando se suelta el dispara dor Apagado La luz se enciende con muy poca corriente y no afecta adversamente el funcionamiento de la herramienta ni la capacidad de la batería PRECAUCIÓN La luz LED integrada se ha diseñado para iluminar la pequeña area de trabajo temporalmente No lo utilice en lugar de una linterna normal ya que no tiene suficiente b...

Page 42: ...ubicación del gancho de cinturón Fig 8 El gancho de cinturón puede acoplarse en cualquier costado de la unidad 1 Cómo sacar el gancho 1 Extraiga el tornillo 2 Retire el gancho 2 Cómo acoplar el gancho al otro lado 1 Inserte el gancho en el otro lado 2 Apriete completamente el tornillo hasta que quede bien fijado ADVERTENCIA Asegúrese de acoplar bien el gancho del cinturón a la unidad principal apr...

Page 43: ...ontra sobrecalentamiento quizás no se active El funcionamiento de la EY9L42 se deteriora mucho por debajo de los 10 ºC debido a las condiciones de trabajo y a otros factores 2 Advertencia de reducción de voltaje Una luz parpadeando Si la herramienta está sujeta a una carga repentina durante su uso que cause que el motor de bloquee puede que se dispare el sensor de prevención de sobrecarga y la lám...

Page 44: ...ación durante al menos una hora y cárguela cuando se haya calentado a la temperatu ra de la habitación 5 Deje que se enfríe el cargador al cargar más de dos baterías de forma consecutiva 6 No introduzca sus dedos dentro del hueco del contacto cuando esté sujetando el cambiador o en ninguna otra ocasión 7 Desenchufe el cargador cuando no lo utilice NOTA Su batería no está totalmente cargada al mome...

Page 45: ... de estado de carga Aparecerá Izquierda verde Derecha naranja La batería está fría La batería se esta cargando lentamente para reducir la carga de la batería La batería está caliente La carga comenzará cuando baje la temperatura de la batería Si la temperatura de la batería es de 10 C o menos la luz de carga naranja también empezará a destellar La carga empezará cuando sube la temperatura de la ba...

Page 46: ...stén expuestos al agua drénelo o séquelo lo antes posible Retire cuidadosamente cualquier polvo o restos de acero que queden dentro de la herramienta Si experimenta problemas al utilizar la herramienta póngase en contacto con su centro de servicio autorizado más cercano X ESPECIFICACIONES TÉCNICAS NOTA Indicación de peso Mayor que o igual a 1 kg indicado por 0 05 kg 0 11 lbs Menos de 1 kg indicado...

Page 47: ...erferencias perjudiciales en la recep ción de radio o televisión lo que se puede determinar apagando y encendiendo el equipo se reco mienda al usuario intentar corregir la interferencia adoptando una de las siguientes medidas Cambie la orientación o posición de la antena receptora Aumente la separación entre el equipo y el receptor Conecte el equipo en una toma de corriente de un circuito que no s...

Page 48: ...FR ES EY981074A201 2016 04 F Printed in China Panasonic Eco Solutions North America Two Riverfront Plaza Newark NJ 07102 Panasonic Canada Inc 5770 Ambler Drive Mississauga Ontario L4W 2T3 www panasonic ca ...

Reviews: