background image

12

Ref. No. 2A

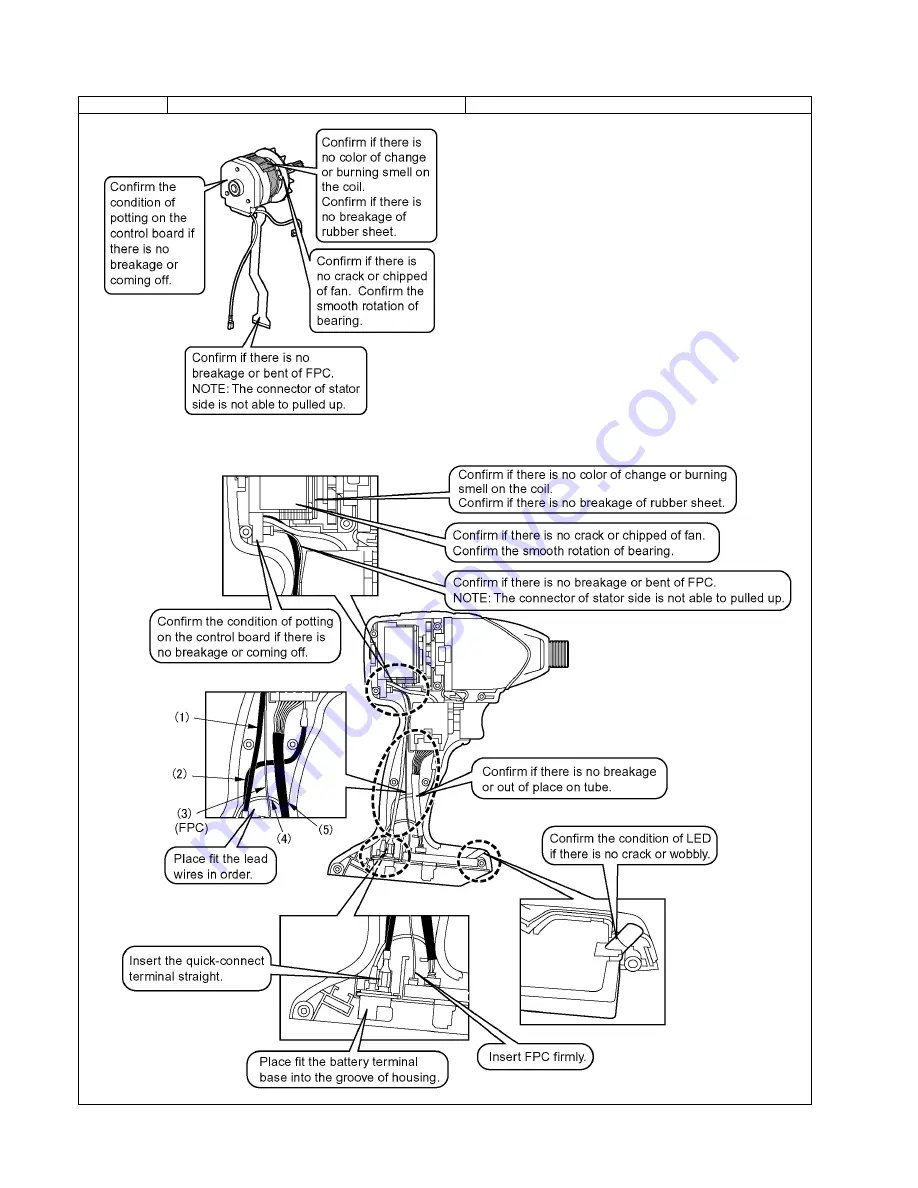
Procedure  2A

Assembly of Main unit.

1. Assemble the fixation cover and the driving shaft assembly.
2. Check the condition of motor assembly and attach the above #1.
3. Insert the above #2 into the housing.
4. Connect the lead wires in (1) - (5) order as shown the figure.
5. Place the lead wires properly.

Summary of Contents for EY7546

Page 1: ...iver Cordless Impact Wrench Model No EY7546 EY7550 Cordless Impact Driver Model No EY7547 EY7551 Cordless Impact Wrench Europe and Oceania TABLE OF CONTENTS PAGE PAGE 1 Warning 2 2 Specifications 2 3 Troubleshooting Guide 3 4 Disassembly and Assembly Instructions 7 5 Wiring Connection Diagram 13 6 Schematic Diagram 13 7 Exploded View and Replacement Parts List 14 ...

Page 2: ...0 C higher Please use a soldering iron with temperature control and adjust it to 750 20 F 400 10 C In case of using high temperature solder ing iron please be careful not to heat too long Pb free solder will tend to splash when heated too high about 1100 F 600 C 2 Specifications 2 1 MAIN UNIT 2 2 MAXIMUM RECOMMENDED CAPACITIES ...

Page 3: ...3 3 Troubleshooting Guide 3 1 Troubleshooting Guide Refer to Wiring Connection Diagram ...

Page 4: ...4 ...

Page 5: ...5 ...

Page 6: ...terminals 5 Confirm if there is no dirt when repairing 3 2 2 OPERATION 1 Confirm the forward and reverse side of rotation 2 Confirm if LED rights ON Once battery pack is removed and attached press the switch handle otherwise LED does not right ON 3 Confirm the rotation of speed if it changes in proportion to the amount of pushing level on switch handle 4 Confirm if the rotation stops when releasin...

Page 7: ...7 4 Disassembly and Assembly Instructions Ref No 1A Procedure 1A Removal of Housing 1 Loosen a screw 2 Take out the plate hook 3 Remove nine housing screws ...

Page 8: ...embly and Driving shaftassembly 1 Take out the motor assembly with the driving shaft assembly from the housing 2 Separate the motor assembly from the driving shaft assembly with holding the motor mounting plate 3 Pull off the fixation cover assembly ...

Page 9: ...the stop ring removal pliers NOTE Make sure to pull out straight away Ref No 1D Procedure 1A 1B 1C 1D Removal or attachment of FPC Removal 1 Slightly pull up the connector NOTE Connector is not able to remove from the control PCB 2 Pull out FPC NOTE Make sure to handle FPC gently in order to avoid the breakage Attachment 1 Apply the grease on the places where insert into the connectors ...

Page 10: ...sembly Removal 1 Pull out the connector from the module assembly NOTE Make sure hold the connector at the bottom area Attachment 1 Apply the permalub grease around the tact switch and connectors NOTE Make sure to apply the grease to keep IP56 2 Insert the connector firmly ...

Page 11: ...11 Ref No 1F Procedure 1A 1B 1C 1D 1E 1F Removal of Fixation cover assembly 1 Take out the motor mounting plate assembly 2 Pull out the driving shaft assembly from the fixation cover ...

Page 12: ... Assemble the fixation cover and the driving shaft assembly 2 Check the condition of motor assembly and attach the above 1 3 Insert the above 2 into the housing 4 Connect the lead wires in 1 5 order as shown the figure 5 Place the lead wires properly ...

Page 13: ...13 5 Wiring Connection Diagram 6 Schematic Diagram ...

Page 14: ...Model No EY7546 Exploded View for EY7546 7 Exploded View and Replacement Parts List ...

Page 15: ...OTOR MOUNTING PLATE ASSEMBLY 1 5 WEY7546L1108 MOTOR ASSEMBLY 1 6 WEY7546K2007 SWITCH ASSEMBLY 1 7 WEY7546L2127 MODULE ASSEMBLY 1 8 WEY7547H3247 F R SELECTOR HANDLE 1 9 WEY7546K3338 OPERATION PANEL 1 10 WEY7543K3187 PLATE HOOK 1 11 WEY7441L6487 NUT 1 12 WEY7441K6217 SCREW 1 4 14 13 WEY7441K9038 TORX TAPPING SCREW 9 3 20 WEY9L40R2788 BATTERY PACK COVER 1 WEY9633K7010 TOOL CASE 1 WEY7550K8109 OPERATI...

Page 16: ...Model No EY7547 Exploded View for EY7547 ...

Page 17: ...WEY7546L1067 DRIVING SHAFT ASSEMBLY 1 8 WEY7546L0027 MOTOR MOUNTING PLATE ASSEMBLY 1 9 WEY7546L1108 MOTOR ASSEMBLY 1 10 WEY7546K2007 SWITCH ASSEMBLY 1 11 WEY7547L2127 MODULE ASSEMBLY 1 12 WEY7547H3247 F R SELECTOR HANDLE 1 13 WEY7546K3338 OPERATION PANEL 1 14 WEY7543K3187 PLATE HOOK 1 15 WEY7441L6487 NUT 1 16 WEY7441K6217 SCREW 1 4 14 17 WEY7441K9038 TORX TAPPING SCREW 9 3 20 WEY9L40R2788 BATTERY ...

Page 18: ...Model No EY7550 Exploded View for EY7550 ...

Page 19: ...OTOR MOUNTING PLATE ASSEMBLY 1 5 WEY7550L1108 MOTOR ASSEMBLY 1 6 WEY7546K2007 SWITCH ASSEMBLY 1 7 WEY7550L2127 MODULE ASSEMBLY 1 8 WEY7547H3247 F R SELECTOR HANDLE 1 9 WEY7546K3338 OPERATION PANEL 1 10 WEY7543K3187 PLATE HOOK 1 11 WEY7441L6487 NUT 1 12 WEY7441K6217 SCREW 1 4 14 13 WEY7441K9038 TORX TAPPING SCREW 9 3 20 WEY9L40R2788 BATTERY PACK COVER 1 WEY9633K7010 TOOL CASE 1 WEY7550K8109 OPERATI...

Page 20: ...Model No EY7551 Exploded View for EY7551 ...

Page 21: ...VING SHAFT ASSEMBLY 1 7 WEY7546L0027 MOTOR MOUNTING PLATE ASSEMBLY 1 8 WEY7550L1108 MOTOR ASSEMBLY 1 9 WEY7546K2007 SWITCH ASSEMBLY 1 10 WEY7551L2127 MODULE ASSEMBLY 1 11 WEY7547H3247 F R SELECTOR HANDLE 1 12 WEY7546K3338 OPERATION PANEL 1 13 WEY7543K3187 PLATE HOOK 1 14 WEY7441L6487 NUT 1 15 WEY7441K6217 SCREW 1 4 14 16 WEY7441K9038 TORX TAPPING SCREW 9 3 20 WEY9L40R2788 BATTERY PACK COVER 1 WEY9...

Reviews: