background image

- 6 - 

  7) An extension cord should not be 

used unless absolutely necessary.

  Use of improper extension cord 

could result in a risk of fire and 
electric shock. If extension cord 
must be used, make sure: 
a. that pins on plug of extension 

cord are the same number, size 
and shape as those of plug on 
charger.

b. that extension cord is proper-

ly wired and in good electrical 
condition.

c.  that wire size is large enough 

for ampere rating of charger as 
specified below.

RECOMMENDED MINIMUM AWG SIZE OF

EXTENSION CORDS FOR

BATTERY CHARGERS

AC Input Rating.

Amperes

AWG Size of Cord

Equal to or 
greater than

But less 
than

Length of Cord, Feet

25

50 100 150

0

2

18

18

18

16

  8) Do not operate charger with dam-

aged cord or plug

replace them 

immediately.

  9) Do not operate charger if it has re-

ceived a sharp blow, been dropped, 
or otherwise damaged in any way; 
take it to a qualified serviceman. 

 10) Do not disassemble charger; take 

it to a qualified serviceman when 
service or repair is required. Incor-
rect reassembly may result in a risk 
of electric shock or fire.

  11)  To reduce the risk of electric shock, 

unplug charger from outlet before 
attempting any maintenance or 
cleaning.

 12) The charger and battery pack are 

specifically designed to work togeth-
er. Do not attempt to charge any 
other cordless tool or battery pack 
with this charger.

  13)  Do not attempt to charge the battery 

pack with any other charger.

  14) Do not attempt to disassemble the 

battery pack housing.

 15) Do not store the tool and battery 

pack in locations where the tempera-
ture may reach or exceed 50°C (122°F) 
(such a metal tool shed, or a car in 
the summer), which can lead to de-
terioration of the storage battery.

 16) Do not charge battery pack when the 

temperature is BELOW 0°C (32°F) 
or ABOVE 40°C (104°F). This is very 
important.

  17) Do not incinerate the battery pack. 

It can explode in a fire.

 18) Avoid dangerous environment. Do not 

use charger in damp or wet locations.

  19) The charger is designed to operate 

on standard household electrical 
power only. Do not attempt to use it 
on any other voltage!

 20) Do not abuse cord. Never car-

ry charger by cord or yank it to dis-
connect from outlet. Keep cord away 
from heat, oil and sharp edges.

 21) Charge the battery pack in a well 

ventilated place, do not cover the 
charger and battery pack with a 
cloth, etc., while charging.

 22) Use of an attachment not recom-

mended may result in a risk of fire, 
electric shock, or injury to persons.

 23) Do not short the battery pack. A bat-

tery short can cause a large current 
flow, over heating and burns.

 24) NOTE: If the supply cord of this appli-

ance is damaged, it must only be re-
placed by a repair shop appointed by 
the manufacturer, because special 
purpose tools are required.

  25)  TO REDUCE THE RISK OF ELEC-

TRIC SHOCK, THIS APPLIANCE 
HAS A POLARIZED PLUG (ONE 
BLADE IS WIDER THAN THE 
OTHER).

  This plug will fit in a polarized outlet 

only one way. If the plug does not fit 
fully in the outlet, reverse the plug. If 
it still does not fit, contact a qualified 
electrician to install the proper outlet. 
Do not change the plug in any way.

!EY7880.indb   6

!EY7880.indb   6

2007/08/07   12:14:52

2007/08/07   12:14:52

Summary of Contents for EY7880LN2S

Page 1: ...n Read manual completely before first using this product and save this manual for future use IMPORTANT Ce mode d emploi contient des informations sur la sécurité Lisez le en entier avant d utiliser le produit et conservez le pour référence IMPORTANTE Este manual contiene información de seguridad Lea completamente este manual antes de utilizar por primera vez este producto y guárdelo para poder con...

Page 2: ...e controle K LED light on off button Bouton Marche Arrêt de la lumière DEL Botón ON OFF de luz LED L Overheat warning lamp motor battery Témoin d avertissement de surchauffe moteur batterie Luz de advertencia de sobrecalentamiento motor batería M Battery low warning lamp Témoin d avertissement de batterie basse Luz de aviso de baja carga de batería N Battery pack release button Bouton de libératio...

Page 3: ...en operating a power tool out doors use an extension cord suit able for outdoor use Use of a cord suitable for outdoor use reduces the risk of electric shock Personal Safety 1 Stay alert watch what you are doing and use common sense when operating a power tool Do not use a power tool while you are tired or under the influence of drugs alcohol or medication A moment of inattention while oper ating ...

Page 4: ...pack into pow er tools that have the switch on in vites accidents 2 Recharge only with the charger specified by the manufacturer A charger that is suitable for one type of battery pack may create a risk of fire when used with another battery pack 3 Use power tools only with specif ically designated battery packs Use of any other battery packs may create a risk of injury and fire 4 When battery pac...

Page 5: ...tation only WARNING Some dust created by power sand ing sawing grinding drilling and other construction activities contains chemicals known to the State of Cal ifornia to cause cancer birth defects or other reproductive harm Some examples of these chemicals are Lead from lead based paints Crystalline silica from bricks and cement and other masonry prod ucts Arsenic and chromium from chem ically tr...

Page 6: ...he battery pack housing 15 Do not store the tool and battery pack in locations where the tempera ture may reach or exceed 50 C 122 F such a metal tool shed or a car in the summer which can lead to de terioration of the storage battery 16 Do not charge battery pack when the temperature is BELOW 0 C 32 F or ABOVE 40 C 104 F This is very important 17 Do not incinerate the battery pack It can explode ...

Page 7: ...erly to the main body before use Battery pack Installation and Removal For removal Push the battery holder While the battery pack release button is held up move the battery pack laterally and pull out the pack Battery holder Release lever For installation To attach the battery pack line up the alignment marks on the body of the tool and the battery pack and insert the battery pack After you hear t...

Page 8: ...saw Slow speed drilling mode This mode is suitable for wood drill with high torque Wood drill Variable speed control trigger To set the center of a hole pull the trig ger slightly to start the drill rotation slowly Support handle Place the support handle at your favorite position and tighten the handle securely Loosen Tighten Depth gauge Loosen the support handle and adjust the depth gauge at your...

Page 9: ...he driver is ready for use when the overheat warning lamp goes out Avoid using the driver in a way that causes the overheating protection feature to activate repeatedly NOTE In summer or in other situations where the temperature is high the overheating protection feature may activate and prevent continual use 3 LED light Pressing the but ton toggles the LED light on and off The light illuminates w...

Page 10: ...w 10 C 14 F charging will automatically stop to prevent degradation of battery Common Cautions for the Li ion Ni MH Ni Cd Battery Pack The ambient temperature range is be tween 0 C 32 F and 40 C 104 F If the battery pack is used when the bat tery temperature is below 0 C 32 F the tool may fail to function properly When charging a cool battery pack below 0 C 32 F in a warm place leave the battery p...

Page 11: ...ate the charging is completed 9 Remove the battery pack while the battery pack release button is held up Ni MH Ni Cd Battery Pack NOTE When you charge the battery pack for the first time or after prolonged stor age charge it for about 24 hours to bring the battery up to full capacity Battery charger EY0L80 1 Plug the charger into the AC outlet NOTE Sparks may be produced when the plug is inserted ...

Page 12: ...o reduce the load on the battery Li ion only Orange Flashing Battery pack is warm Charging will begin when temperature of battery pack drops If the temperature of the battery pack is 10 C 14 F or less the charging status lamp orange will also start flashing Charging will begin when the temperature of the battery pack goes up Li ion only Charging Status Lamp Left green Right orange will be displaye...

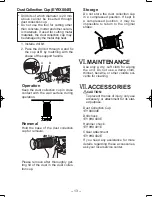
Page 13: ...d the base of the dust collection cup for removal Base Please remove after thoroughly get ting rid of the dust in the dust collec tion cup Storage Do not store the dust collection cup in a compressed position If kept in a compressed position it may be impossible to return to the original shape MAINTENANCE Use only a dry soft cloth for wiping the unit Do not use a damp cloth thinner benzine or othe...

Page 14: ... This is because the grease becomes stiffer in low temperatures increasing fric tion If this should happen operating hammering mode with no load for approximately 30 seconds and repeat this 3 times This will restore its blowing power SPECIFICATIONS MAIN UNIT Maximum Drilling Diameter Concrete 20 mm 25 32 Steel 13 mm 33 64 Wood 27 mm 1 1 16 Motor Voltage 28 8 V DC Speed At No Load RPM Slow Mode 0 5...

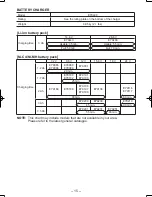
Page 15: ...i Cd Ni MH battery pack Charging time 7 2 V 9 6 V 12 V 15 6 V 18 V 24 V 1 2 Ah EY9065 EY9066 EY9080 EY9086 EY9001 20 min 1 7 Ah EY9180 EY9182 EY9101 EY9103 25 min 2 Ah EY9168 EY9188 EY9106 EY9107 EY9108 EY9136 EY9116 EY9117 30 min 60 min 3 Ah EY9200 EY9230 EY9210 45 min 90 min 3 5 Ah EY9201 EY9231 EY9251 55 min 65 min NOTE This chart may include models that are not available in your area Please re...

Page 16: ...lectrocution 5 Lorsdufonctionnementdesoutilsméca niques à l extérieur utilisez une rallonge adaptée à l utilisation à l extérieur L utilisation d un cordon adapté à l utilisation à l extérieur réduit les risques d électrocution Sécurité personnelle 1 Restez alerte regardez ce que vous fai tes et faites preuve de bon sens lorsque vous utilisez un outil mécanique N uti lisez pas un outil mécanique a...

Page 17: ...nditions de travail et de la tâche à exécuter L utilisation de l outil mécanique à des fins autres que celles pour les quelles il a été conçu peut présen ter une situation à risque Utilisation et soins de la batterie de l outil 1 Assurez vous que l interrupteur est dans la position d arrêt avant d insérer le bloc de batterie L insertion du bloc de batterie dans un outil mécanique dont l interrup t...

Page 18: ...rmal 9 Evitez la pénétration de poussière dans le mandrin 10 Ne touchez pas les pièces rotatives pour éviter toute blessure 11 N utilisez pas l outil continuellement pendant une longue période Arrêtez d utiliser l outil de temps en temps pour éviter une augmentation de la tempé rature et de surchauffer le moteur 12 Ne laissez pas tomber l outil 13 Ne déposez pas l outil si la protec tion du mandri...

Page 19: ...subi une chute ou s il a été endommagé de quelque manière que ce soit confiez le à un technicien qualifié 10 Ne démontez pas le chargeur si des travaux d entretien ou de réparation sont nécessaires confiez le à un technicien qualifié Si vous le remontez incorrectement vous risquez de causer une électrocution ou un incendie 11 Pour réduire le risque d électrocution débranchez le chargeur de la pris...

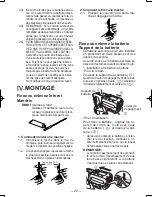
Page 20: ...Introduisez la mèche dans le trou de montage puis tournez la légèrement de manière à localiser une position engagée 1 2 À la position engagée repoussez la mèche le plus loin possible Assurez vous que la mèche est bien en place en tirant dessus Tige de type SDS PLUS 2 Comment retirer une mèche 2 1 Pressez le couvercle du porte mè che et dégagez la mèche Fixez ou enlevez la batterie Support de la ba...

Page 21: ...ement Mode de perçage à grande vitesse Ce mode est adapté pour percer le métal à une vi tesse de rotation élevée Perçage du métal Découpage de trou dans le métal Mode de perçage à vitesse réduite Ce mode est adapté au perçage du bois à haut couple Perçage du bois Gâchette de commande de vitesse Pour ajuster le centre du trou tirez légè rement sur la gâchette pour démarrer lentement la rotation de ...

Page 22: ...éristique est active Lorsque la caractéristique de pro tection contre la surchauffe s acti ve laissez l outil se refroidir complète ment au moins 30 minutes L outil est prêt à être utilisé lorsque le témoin d avertissement de surchauffe s éteint Evitez d utiliser l outil d une façon qui activerait de façon répétée la caractéris tique de protection contre la surchauffe REMARQUE En été ou dans d aut...

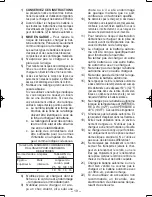
Page 23: ...sse Si la température de la batterie tombe ap proximativement en dessous de 10 C 14 F le chargement s arrêtera automatiquement afin d éviter une dégradation de la batterie Mises en garde communes pour la batterie autonome Li ion Ni MH Ni Cd Le niveau de température ambiante moyenne se situe entre 0 C 32 F et 40 C 104 F Si la batterie autonome est utilisée alors que sa température est inférieure à ...

Page 24: ...e bou ton de dégagement de la batterie est en position haute Batterie autonome Ni MH Ni Cd REMARQUE Chargez une nouvelle batterie autonome ou une batterie autonome qui n a pas été utilisée pendant une période prolongée pendant 24 heures pour lui redonner sa pleine capacité Chargeur de batterie EY0L80 1 Branchez le cordon d alimentation du chargeur dans une prise secteur REMARQUE Des étincelles peu...

Page 25: ... ef fort de la batterie Li ion seulement Clignotant en orange La batterie autonome est chaude La charge commence lors que la température de la batterie autonome descend Lorsque la température de la batterie autonome est de 10ºC 14ºF ou moins le témoin de charge orange se met égale ment à clignoter La charge commence lorsque la température de la batterie autonome augmente Li ion seulement Témoin de...

Page 26: ...ur pendant l utilisation Retrait Maintenir la base du collecteur de poussière pour le retirer Base Déposer après avoir bien enlevé la poussière du capteur de poussière Rangement Ne pas ranger le collecteur de pous sière en position rétractée S il est maintenu en position rétractée il pourra ne plus pouvoir retrouver sa forme d origine ENTRETIEN Utilisez essentiellement du tissu sec et souple pour ...

Page 27: ...ébut Ceci est causé par le fait que la graisse durcit à basses températures ce qui aug mente le frottement Si ceci se produit utilisez le mode de martelage sans charge pendant 30 secon des environ et répétez trois fois pour rétablir une puissance pneumatique correc te CARACTÉRISTIQUES TECHNIQUES UNITE PRINCIPALE Diamètre de forage maxi mum Béton 20 mm 25 32 Acier 13 mm 33 64 Bois 27 mm 1 1 16 Tens...

Page 28: ...tes Plein 70 minutes Batterie autonome Ni MH Ni Cd Durée de char gement 7 2 V 9 6 V 12 V 15 6 V 18 V 24 V 1 2 Ah EY9065 EY9066 EY9080 EY9086 EY9001 20 min 1 7 Ah EY9180 EY9182 EY9101 EY9103 25 min 2 Ah EY9168 EY9188 EY9106 EY9107 EY9108 EY9136 EY9116 EY9117 30 min 60 min 3 Ah EY9200 EY9230 EY9210 45 min 90 min 3 5 Ah EY9201 EY9231 EY9251 55 min 65 min REMARQUE Ce tableau peut inclure des modèles n...

Page 29: ...Nunca utilice el ca ble para transportar tirar de o desen chufar la herramienta eléctrica Man tenga el cable lejos de fuentes de calor aceite bordes afilados o piezas móviles Un cable dañado o enredado puede au mentar el riesgo de descarga eléctrica 5 Cuando haga funcionar una herra mienta eléctrica en exteriores uti lice un cable de extensión ade cuado para uso en exteriores El uso de un cable ad...

Page 30: ...arse y son más fáciles de controlar 7 Utilice la herramienta eléctrica accesorios y brocas de herramienta etc de acuerdo con estas instrucciones y la forma especi ficada para el tipo particular de herramien ta eléctrica teniendo en cuenta las condi ciones de trabajo y el trabajo a hacer El uso de la herramienta eléctrica para un funcionamiento diferente del especificado puede traducirse en una sit...

Page 31: ... la herramienta con cuidado para que no entre polvo por el portabroca 10 No toque las piezas giratorias para evitar herirse 11 No utilice la herramienta continua mente durante un largo período de tiempo Deje de utilizar la herra mienta de vez en cuando para evi tar que suba la temperatura y se caliente excesivamente el motor 12 No deje caer la herramienta 13 No coloque la herramienta en lugares do...

Page 32: ...e el cargador llévelo al per sonal de servicio calificado cuando sea necesario un servicio o reparación Un rearmado incorrecto puede traducirse en un riesgo de descarga eléctrica o fuego 11 Para reducir el riesgo de descarga eléctrica desenchufe el cargador del tomacorriente antes de proce der a un mantenimiento o limpieza 12 El cargador de batería y la batería fueron diseñados específicamente par...

Page 33: ...el tipo SDS PLUS 2 Para desmontar la broca 2 1 Presione la cubierta del portabro cas y tire de la broca Instalación o extracción de la batería Soporte de la batería La batería está diseñada para instalarse si guiendo dos pasos por motivos de seguridad Compruebe que la batería está insta lada correctamente en el cuerpo prin cipal antes de utilizar la herramienta Instalación y traslado de la batería...

Page 34: ...al con rotación de alta velocidad Perforación de metal Serrado para orificios de metal Modo de perforación a baja velocidad Este modo es ade cuado para perforar madera con alto par de torsión Perforación de ma dera Disparador del control de velocided variable Para determinar el centro de un orificio tire ligeramente del gatillo para que empiece la rotación lenta del taladro Mango de soporte Posici...

Page 35: ...calentamiento espere hasta que el des tornillador se haya enfriado completamente por lo menos 30 minutos El destornilla dor está listo para usar cuando se apaga la luz de advertencia de sobrecalentamiento Evite utilizar el destornillador de tal forma que la función de protección de sobreca lentamiento se active repetidamente NOTA En verano o en otras situaciones donde se den temperaturas elevadas ...

Page 36: ... detendrá automáticamente para impedir que la batería se estropee Precauciones comunes para las baterías Li ión Ni MH Ni Cd La variación de temperatura ambiente es de entre 0 C 32 F y 40 C 104 F Si la batería se utiliza cuando la temperatura de la batería es infe rior a 0 C 32 F la herramienta puede no funcionar correctamente Cuando se vaya a cargar una batería fría unos 0 C 32 F o menos en un cua...

Page 37: ...ar que la carga se ha completado 9 Extraiga la batería mientras man tiene levantado el botón de desblo queo de la batería Batería Ni MH Ni Cd NOTA Cargue una nueva batería o una batería que no haya sido utilizado durante mucho tiempo durante 24 horas seguidas para que la batería se cargue totalmente Cargador de batería EY0L80 1 Enchufe el cargador en la fuente de alimentación de CA NOTA Se pueden ...

Page 38: ... está fría La batería se esta cargando lentamente para reducir la carga de la batería sólo Li ión Destella en naranja La batería está caliente La carga comenzará cuando baje la temperatura de la batería Si la temperatura de la batería es de 10 C 14 F o menos la luz de carga naranja también empezará a destellar La car ga empezará cuando sube la temperatura de la batería sólo Li ión Luz de estado de...

Page 39: ...re estos accesorios hable con su centro de servicio local Fuelle recolector de polvo EY9X004E Brocas de taladro cuyo diámetro sea de más de 20 mm no pueden insertar se por la taza de recolección de polvo No utilice ésta herramienta para cortar otros materiales fuera de hormigón yeso y cerámica Si se utiliza para cor tar materiales de metal el fuelle reco lector de polvo puede ser dañado por los fr...

Page 40: ... la etapa inicial Esto se debe a que la grasa se endurece a bajas temperaturas aumentando la fricción En este caso haga funcionar en el modo de martillo sin carga durante unos 30 segundos y repita esto 3 veces Esto recuperará su potencia de soplado ESPECIFICACIONES UNIDAD PRINCIPAL Diámetro de perforación máximo Hormigón 20 mm 25 32 Acero 13 mm 33 64 Madera 27 mm 1 1 16 Voltaje del motor 28 8 V CC...

Page 41: ...55 min Completa 70 min Batería Ni MH Ni Cd Tiempo de carga 7 2 V 9 6 V 12 V 15 6 V 18 V 24 V 1 2 Ah EY9065 EY9066 EY9080 EY9086 EY9001 20 min 1 7 Ah EY9180 EY9182 EY9101 EY9103 25 min 2 Ah EY9168 EY9188 EY9106 EY9107 EY9108 EY9136 EY9116 EY9117 30 min 60 min 3 Ah EY9200 EY9230 EY9210 45 min 90 min 3 5 Ah EY9201 EY9231 EY9251 55 min 65 min NOTA Este cuadro puede contener modelos no disponibles en s...

Page 42: ......

Page 43: ......

Page 44: ...PANASONIC CONSUMER ELECTRONICS COMPANY One Panasonic Way Secaucus New Jersey 07094 EN FR ES EY981078801 H1907 Printed in China ...

Reviews: