EN
EN
- 7 -
EN
EN
V.
OPERATION
[Main Body]
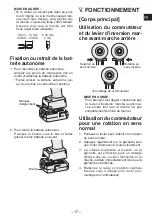
Switch and Forward/Reverse
Lever Operation
Forward
Reverse
Switch lock
CAUTION:
To prevent damage, do not operate
Forward/Reverse lever until the bit comes
to a complete stop.
Forward Rotation Switch
Operation
1. Push the lever for forward rotation.
2. Depress the trigger switch slightly to start
the tool slowly.
. The speed increases with the amount of
depression of the trigger for efficient tight
-
ening of screws. The brake operates and
the bit stops immediately when the trigger
is released.
4. After use, set the lever to its center posi
-
tion (switch lock).
Reverse Rotation Switch
Operation
1.
Push the lever for reverse rotation. Check
the
direction of rotation before use.
.
Depress the trigger switch slightly to start the
tool slowly.
3. After use, set the lever to its center posi
-
tion (switch lock).
CAUTION:
• To eliminate excessive temperature
increase of the tool surface, do not
operate the tool continuously using two
or more battery packs. Tool needs cool
off time before switching to another
pack.
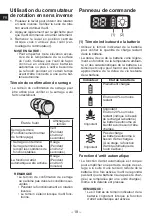
Tightening confirmation lamp
• The tightening confirmation lamp can be
used to check whether tightening has been
completed properly.
Tool status
Lamp display
Tightening complete
(Normal clutch operation)
Green
(For approx.
seconds)
• Tightening not complete
• Tightening complete
without fulfilling the set
function conditions
Red
(For approx.
seconds)
The automatic power-
off function has been
activated.
Red
(For approx. 5
minutes)
NOTE
• The tightening confirmation lamp will
not turn on under the following condi
-
tions:
• During reverse rotation operation
• The lamp turns off when the tool is in
operation.
Control Panel
(1) ()
(1) The battery indication lamp
• Use the battery indication lamp to check
how much power is left in the battery.
• Battery life varies slightly with ambient tem-
perature and battery characteristics. The
lamp is designed to provide a rough indica-
tion of remaining battery life.


