


9
C)
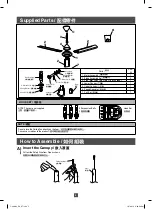
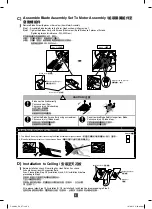
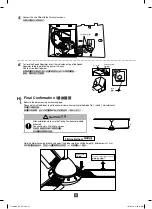
Assemble Blade Assembly Set To Motor Assembly /
組裝扇翼組件至
發動機組件
1
1
Remove Blade Screw (6 pieces, silver colour) from Motor Assembly.
Step 1 : Assemble Blade towards to the Cover Hook as shown in fi gure step 1.
Step 2 : Tighten the Blades fi rmly with Screws (Silver colour). Each Blade use 2 pieces of Screws.
(Tightening torque for reference : 250-300 N•cm)
從發動機組件拆除扇翼螺絲
(6
枚,銀色
)
。
步驟1:如步驟1的圖示,將扇翼裝入罩鉤子。
步驟2:以螺絲(銀色)鎖緊扇翼。每個扇翼使用2枚螺絲。
(
扭緊轉距基準
:
250-300N•cm)
。
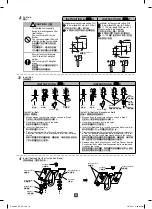
D)
Installation to Ceiling /
安裝至天花板
1
1
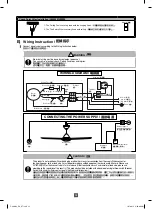
Before installation, check if the ceiling has Hook Set on it as shown.
It should have at least 3 Suspension Bolts.
If yes, Please follow Step D2 (Installation A) and, D3 (Installation A) before
proceeding to Step 5.
安裝前,檢查天花板是否有吊鉤組如圖所示。
它至少有3個懸掛螺栓。
如果有,請按照步驟5,然后再進行步驟D2的安裝(安裝
A
),以及步驟
D3(安裝
A
)。
If No, please follow Step D2 (Installation B), D3 (Installation B) and Step 4 before proceeding to Step 5.
如果沒有,請按照步驟5,然后再進行D2的(安裝B),步驟D3(安裝B)和步驟 4 的安裝。
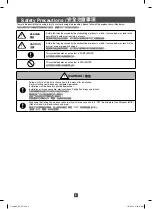
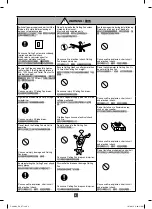
CAUTION /
注意
Blade must be fi xed correctly.
Can cause no air fl ow.
Can cause injury if blades drop.
必須正確上緊扇翼。
這會導致沒有氣流。
若扇翼掉落會導致受傷。
Tighten the Blade Screws fi rmly using a screwdriver.
Can cause injury if Blade drops.
用螺絲起子將扇翼螺絲鎖緊。
若扇翼掉落會導致受傷。
Do not remove Blade Safety Hanger from Blade.
Can cause injury if Blade drops.
不要移動扇翼的扇翼安全懸杆。
若扇翼掉落會導致受傷。
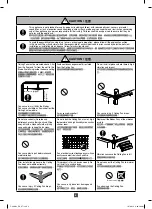
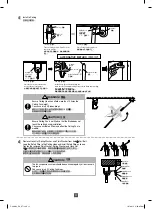
Check Point After Installation /
安裝後的重點檢查
Check /
檢查
1. The Blade Screws (6 pieces) for securing the Blade Assembly are tightly screwed. /
用於固定扇翼組件的扇翼螺絲(6枚)已鎖緊。
2. Blade Safety Hanger must fi x at the position on Blade. /
扇翼安全懸杆必須安裝在扇翼位置上。
Blade Screw (6 pieces) /
扇翼螺絲(6枚)
Blade hole /
扇翼孔
Blade Safety Hanger /
扇翼安全懸杆
Cover Hook /
罩鉤子
Step 1 /
步驟
1
Step 2 /
步驟
2
Suspension Bolt /
懸掛螺栓
Hook Set /
吊鉤組
Suspension Bolt /
懸掛螺栓
F-48MS2_EN_CT.indd 9
F-48MS2_EN_CT.indd 9
1/27/2015 9:05:03 AM
1/27/2015 9:05:03 AM


