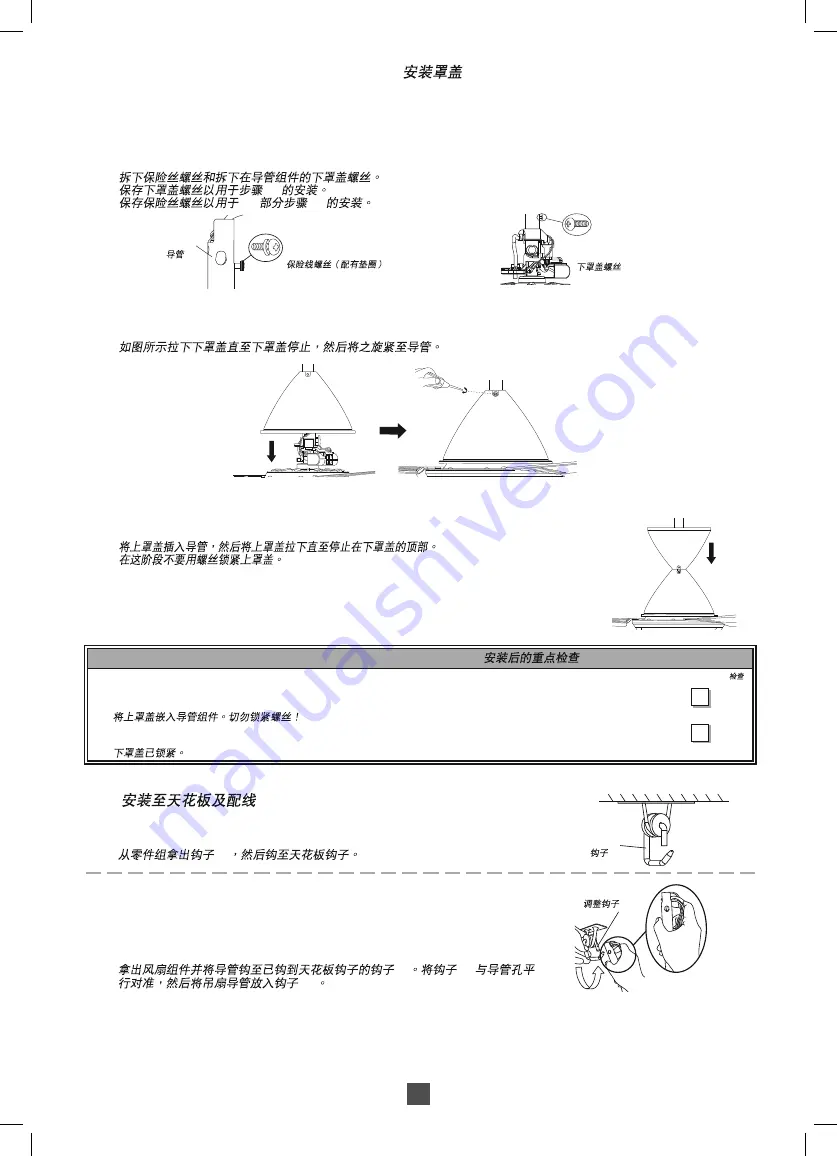
background image

9

C)

Memasang Sengkuap

 / Install Canopy / 

1

Tanggalkan Skru Dawai Keselamatan dan tanggalkan Skru Sengkuap Bawah pada Pemasangan Paip.

Simpan Skru Sengkuap Bawah untuk pemasangan di langkah 2.

Simpan skru dawai Keselamatan untuk pemasangan di Bahagian D langkah 4.

Remove Safety Wire Screw and remove Lower Canopy Screw at Pipe Assembly.
Keep the Lower Canopy Screw for installation at step 2.
Keep the Safety wire screw for installation at Section D step 4.

2

D

4

2

Tarik turun Sengkuap Bawah sehingga ia terhenti dan pasang pada Paip dengan kuat dengan menskrukannya seperti 

yang ditunjukkan.

Pull down Lower Canopy until it stop and fi x to Pipe fi rmly by screwing them as shown. 

3

Masukkan Sengkuap Atas pada paip dan tarik ke bawah sehingga ia terhenti di bahagian atas Sengkuap Bawah.

Jangan ketatkan Sengkuap Atas dengan skru pada peringkat ini. 

Insert the Upper Canopy to the pipe and pull it down until it stop at the top of Lower Canopy.
Do not tighten the Upper Canopy with screw at this stage.

Pemeriksaan Selepas Pemasangan

 / Check Point After Installation / 

Tandakan

 / Check / 

1.

 Mas

ukka

n Sengkuap Atas ke dalam Pemasangan Paip. Jangan ketatkan skru!


Insert the Upper Canopy to Pipe Assembly.  Do not tight the screw!

2.


Sen

gkuap Bawah dipasang Skru dengan selamat.


The Lower Canopy is securely Screwed.

Skru Wayar Keselamatan (dengan sesendal) /


Safety Wire Screw (with washer) / 

Skru Sengkuap Bawah /


Lower Canopy Screw

Paip /


Pipe / 

D)

Pemasangan Pada Siling dan Pendawaian

 / Installation to Ceiling and Wiring / 

1

Keluarkan Cangkuk-C dari “Part Set” dan sangkutkan pada Cangkuk Siling.

Take out the C-Hook assembly from the Part Set and hook to the Ceiling Hook.

C

2

Ambil Set Kipas Siling dan sangkutkan Paip pada Cangkuk-C yang disangkut 

pada Cangkuk Siling. Laraskan Cangkuk-C selari dengan lubang Pemasangan 

Paip dan sangkutkan Cangkuk-C pada Paip Kipas Siling.

Take the Ceiling Fan Set and hook the Pipe to the C-Hook which was hooked 
to the Ceiling Hook. Align the C-Hook parallel with the Pipe’s hole and slot the 
Ceiling Fan Pipe to the C-Hook.

C

Cangkuk-C

 / 

C-Hook /

 C


Laraskan Cangkuk

 / 

Align The Hook / 

Summary of Contents for F-M12A0

Page 1: ...manual for future reference Kandungan Contents Muka surat Page Langkah Langkah Keselamatan Dan Pencegahan Safety Precautions 2 Bahagian Bahagian Yang Dibekalkan Supplied Parts 5 5 Bagaimana Memasang How To Install 6 Pemasangan Pada Sumber Kuasa Connecting The Power Supply 11 Penyelenggaraan Maintenance Spesifikasi Produk Product SRGEKſcation 12 Kipas Elektrik Kipas Siling Electric Fan Ceiling Fan ...

Page 2: ...symbol denotes an action that is COMPULSORY Simbol ini menunjukkan perbuatan yang DILARANG This symbol denotes an action that is PROHIBITED AMARAN WARNING Ikut semua arahan dalam panduan ini untuk pemasangan Follow strictly to all the instructions given in this manual for installation Pendawaian elektrik mesti dilakukan oleh orang yang bertauliah Electrical wiring must be done by competent personn...

Page 3: ...nd Ceiling Fan drops Jangan merenjis air atau basahkan Kipas Siling Do not sprinkle water to the Ceiling Fan or do not wet the Ceiling Fan Boleh menyebabkan kebakaran letupan litar pintas dan kejutan elektrik CP ECWUG ſre explosion short circuit and electrical shock Elakkan pemasangan di tempat yang berminyak Avoid installing at oily places Boleh menyebabkan kebakaran letupan litar pintas dan keju...

Page 4: ...an minyak pelincir gasolin dan petrol atau bahan kimia lain Wipe away dirt with a clean soft cloth ordinary soap and water to keep the fan clean Do not use solvents gasoline and petrol or any other chemicals Boleh menyebabkan kerosakan bahagian plastik dan besi berkarat Can cause plastic part deformation and metal corrosion Jangan pasang Kipas Siling di tempat yang mempunyai gegaran dan hentaman y...

Page 5: ...ng Lebih Baik Guide To Better Maintenance 1 Periksa keadaan kipas sekali setahun Sekiranya timbul masalah berhenti menggunakan kipas Kemudian rujuk kepada kedai servis jualan atau penyelenggaraan Periksa Skru longgar keadaan Wayar Keselamatan kerosakan Aci Motor dan lain lain Check the fan condition annually If a problem occurs stop using the fan Then refer to service sales or maintenance shop Che...

Page 6: ... Pegas d Nat dan e Cemat Baji yang dibekalkan seperti yang ditunjukkan Before installing the Pipe Assembly to the Motor Unit remove the supplied a Ellipse Bolt b Plain Washer c Spring Washer d Hexagon Nut and e Cotter Pin from Pipe Assembly as shown c Masukkan Pemasangan Paip kepada Aci Motor Pastikan Tuil Suis menekan Suis Keselamatan Insert Pipe Assembly to Motor Shaft Ensure Switch Lever press ...

Page 7: ...oleh menyebabkan kecederaan jika Kipas Siling terjatuh Safety Wire must be ſxed correctly Can cause injury if Ceiling Fan drops Pastikan Wayar Keselamatan tidak menyentuh permukaan Motor Ensure the Safety Wire does not touch the Motor surface Wayar Keselamatan mesti sentiasa dipasang Boleh menyebabkan kecederaan jika Kipas Siling terjatuh Safety Wire must be connected at all times Can cause injury...

Page 8: ... Bilah mestilah dipasang dengan betul Boleh menyebabkan tiada aliran udara Boleh menyebabkan keFederaan jika bilah terjatuh Blade must be fixed correctly Can cause no air flow Can cause injury if blades drop Ketatkan Skru Bilah dengan kuat menggunakan pemutar skru Untuk model F M15B0 Jangan tanggalkan Wayar Keselamatan Pastikan Wayar Keselamatan diketatkan bersama dengan Skru Bilah Boleh menyebabkan...

Page 9: ... not tighten the Upper Canopy with screw at this stage Pemeriksaan Selepas Pemasangan Check Point After Installation Tandakan Check 1 Masukkan Sengkuap Atas ke dalam Pemasangan Paip Jangan ketatkan skru Insert the Upper Canopy to Pipe Assembly Do not tight the screw 2 Sengkuap Bawah dipasang Skru dengan selamat The Lower Canopy is securely Screwed Skru Wayar Keselamatan dengan sesendal Safety Wire...

Page 10: ...tan dengan menggunakan Skru Wayar Keselamatan yang ditanggalkan dari Pemasangan Paip di langkah 1 Bahagian C Firmly screw the Safety Wire onto the Pipe Assembly by using the Safety Wire Screw which removed from Pipe Assembly at step 1 Section C 1 C AWAS CAUTION Wayar Keselamatan mesti dipasang dengan betul Boleh menyebabkan kecederaan jika Kipas Siling jatuh Safety Wire must fix correctly Can cause...

Page 11: ...as Install Upper Canopy Laraskan kedudukan Sengkuap Atas dan ketatkan skru pada Paip Adjust the Upper Canopy position and screw the Upper Canopy to the Pipe D Anggaran 5mm dari siling D Approximately 5mm from the ceiling D 5mm D Paip Pipe Sengkuap Atas Upper Canopy Pemasangan Pada Sumber Kuasa Connecting The Power Supply Suis lontaran tunggal dwikutub Suis Pemutus Double pole single throw switch S...

Page 12: ... SEBARAN ANGIN AIR DELIVERY BERAT BERSIH NET WEIGHT RENDAH LOW TINGGI HIGH m min m min m3 min m3 min F M15A0 72 81 118 216 264 165 230 5 1 F M12A0 54 131 177 273 333 169 162 4 6 F M15B0 72 81 118 216 264 165 230 5 3 kg kg M15A08001GM Tapak Base Terminal Terminal Wayar Hidup Live Wire Ke Suis Pengawal Kelajuan To Regulator Switch Lubang Hole Bahagian Unjuran pada Tapak Protruding Part on Base Panda...

Reviews: