5
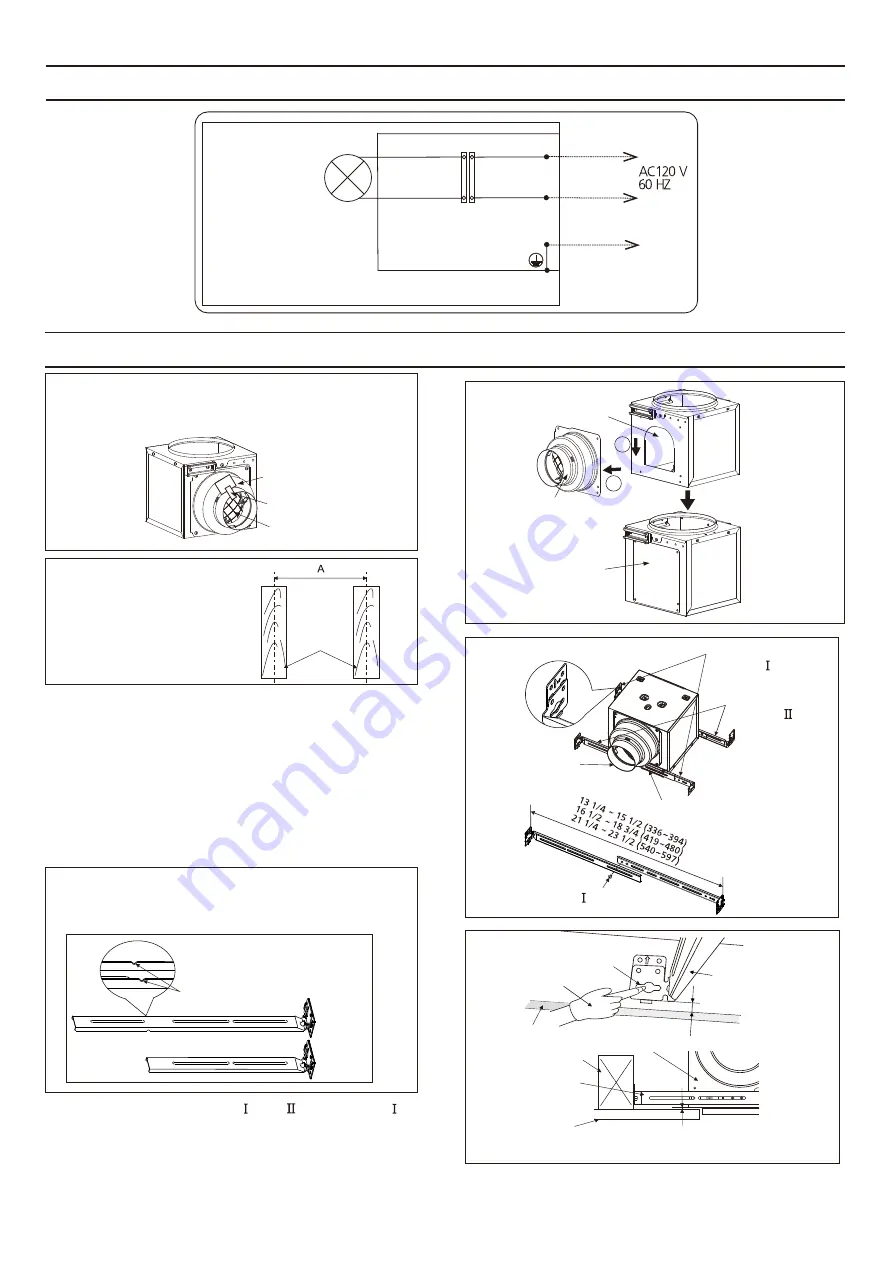
WIRING DIAGRAM
LED lamp
White
White
Black
Black
Neutral
Junction
box
Live
Earth ground
INSTALLATION (BETWEEN JOISTS MOUNTING)
Adaptor
Damper and
adaptor
Hole
Damper
IMPORTANT
Joist situation:
Spacing A is 12 inches
(305mm) to 24 inches
(609mm) on center joists
Joists
Remove the tape from damper and adaptor before
installation. As shown below:
If recessed luminaire only is used for lighting,
please remove the damper and adaptor (first move
them down, then move them forward), then use
the adaptor panel to cover the hole of recessed
luminaire. (Fig. 1)
Tape
Fig. 1
Bracket cover
Adaptor
Suspension
bracket
Suspension
bracket
Fig. 2
(ST4.2X6)
Screw
Unit: inches (mm)
UP
Ceiling
Suspension
bracket
Joist
Joist
Luminaire
body
Fig. 3
Suspension
bracket
>1/8 (3.2)
About 3/8 (9.5)
Long hole
Unit: inches (mm)
Please follow the installation steps as below (based
on the product with damper and adaptor):
1. Insert the suspension brackets into the luminaire
body from each side of the bracket cover. (Fig. 2)
If spacing A between center joists is 12 inches,
cut all suspension brackets along the two “C”
cuts with a hacksaw or other tools.
Before
After
2-“C” cuts
2. Fix suspension brackets and with screws
(ST4.2X6), but remember not to tighten the
screws up yet. (Except that the spacing is 12
inches between joists.) (Fig. 2)
3. Position the luminaire body between joists, and
hold it properly. Mark the long holes of all the
four suspension brackets on joists. (Fig. 3)
Adaptor panel
Gloves
1
2


