background image

2

Addendum

1. The area in which the computer may or may not be taken.

Ÿ

 This computer is intended for use in Non-Hazardous or Hazard-

ous Location classified as EPL Gc, Zone 2 with potential explosive 

Atmosphere Gas Groups IIB or IIC

*1

 only (Refer to IEC 60079-0).

Higher classified zones (e.g. Zone 1 or Zone 0) or EPL (e.g. Ga or 

Gb) shall not be entered with this equipment!

Ÿ

 This computer is specified Temperature class T3 (Refer to 

EN60079-0). The High Frequency-Power is less than 3.5 W for 

the model for Gasgroup IIB and less than 2 W for the model for 

Gasgroup IIC.

Ÿ

 This computer shall not be used in Underground mining or the like.

Ÿ

 This computer shall not be used in potential explosive Dust Atmo

-

sphere of any classification or zone.

Ÿ

 This computer can be used in areas where non-combustible dusts 

and nonconductive dusts can be present.

Ÿ

 The use of this computer is limited. Due to its technical charac

-

teristics it cannot be used with every possible potential explosive. 

Check the possible atmospheric conditions against the tempera

-

ture and the radiation levels emitted by this equipment.

2. The sort of connection and components that may or 

may not be used and what time.

Ÿ

 DO NOT connect or disconnect any equipment (any kind of exter

-

nal or internal device of accessory) unless the area is known to 

be Non-Hazardous. (e.g. not at the USB port, card ports or other 

connection points as well as not connected to any kind of docking 

stations or other devices while you are inside of Hazardous Loca

-

tions classified as Zone 2)

Ÿ

 DO NOT use any equipment (any kind of external or internal 

device of accessory) except for SIM Card while you are inside of 

Hazardous Locations classified as Zone 2.

Ÿ

 DO NOT connect or use any kind of power supply (AC adaptor) 

unless the area is known to be Non-Hazardous.

Ÿ

 DO NOT connect external Display unless the area is known to be 

Non-Hazardous.

Ÿ


Never REMOVE the battery or insert a battery while in Hazardous Location.

Ÿ


If the battery power is running out, leave the classified zone for Charging.

Ÿ

 DO NOT insert or remove any cards unless the area is known to 

be Non-Hazardous.

3. The use of the leather case and the avoidance of 

electrostatic charging.

Ÿ

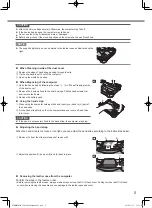
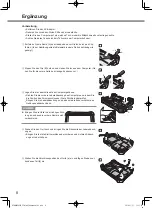
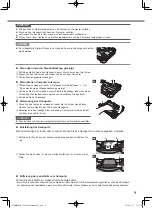
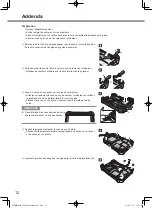
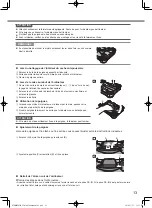
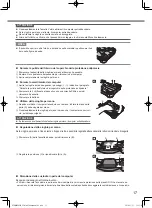
 Cover this computer with bundled leather case to prevent any pos

-

sibilities of sparks when this computer has been dropped on a hard 

surface in Hazardous area.

Ÿ

 To avoid electrostatic charging/discharging;

-  DO NOT rub or abrade on any part of this computer.

-  DO NOT rub LCD screen with sleeve of your clothes.

DO NOT rub this computer with dry and/or synthetic fibre textile fabric.

-  This computer is an insulated equipment concerning electrostatic 

charging.

To avoid the electrostatic charging the person who is carry

-

ing this computer must wear conductive shoes and conductive 

gloves (if gloves are necessary).

-

  DO NOT place this computer near an electrostatically charged 

object or an object capable of carrying a static charge.

-  Cover the surfaces by the specified leather case before use in 

Hazardous area.

-  DO NOT remove the leather case from this computer when in 

Hazardous area.

-  DO NOT use this computer with the protective film removed from 

the LCD screen surface or with an unauthorized film applied on the 

LCD screen surface.

-  No any kinds of plastic cover shall be used with this computer.

Do not injure the surface coating of LCD and do not remove the 

LCD protection film.

-  Do not use in a area with small particles in an air stream, solvent 

vapours, and the like.

4. The checking and maintenance of the computer.

Ÿ

 Substitution of components may impair suitability for Zone 2 with 

potential explosive Gas Atmosphere.

Ÿ

 The user shall not perform repairs or disassemble this computer 

when it is broken.

Ÿ

 Before taking this computer into a Hazardous area, follow the 

inspection procedures described below. If some problem is found, 

DO NOT take this computer into Hazardous area, and send this 

computer for repair to your dealer or Panasonic Technical Support.

Ÿ

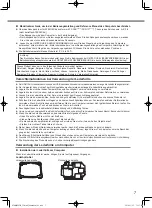
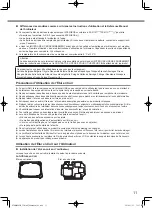
 The enclosure including display shall be checked for damages.

Ÿ

 Make sure that there is no damage, crack, wear and tear in all con

-

nector covers.

Ÿ

 Make sure that there is no damage, cracks, deformation in other 

parts of the computer by physical inspection.

Ÿ

 Make sure there is no screw which is missing.

Ÿ

 Make sure that there are no holes or damage in the leather case.

Ÿ

 Make sure that the caution labels in this computer and leather 

case are not peeled off.

Ÿ

 Turn on this computer and make sure that there is no spark, 

smoke, smell, strange noise.

Ÿ


Make sure that there is no other damage, wear and tear or operation

-

al malfunctioning compared to when this computer was initially used.

Ÿ

 Make sure all connector covers shall be closed.

Ÿ

 Before any use, the display and all the jack and port cover shall be 

checked for damages and shall be closed.

5. The conditions for use and protection of the computer.

Ÿ

 This computer is classified as portable equipment. It shall not be 

permanently installed in classified Zones.

Ÿ

 If this computer is dropped, it should be immediately removed 

from the hazardous area, and check the computer for any damage 

referring to 4 above.

Ÿ


DO NOT place the computer where it can be subjected to shock or vibration.

Ÿ

 The non-metallic parts of the enclosure shall not be exposed to 

long term UV light.

Ÿ

 The non-metallic parts of this computer shall not be exposed to 

frequent temperature changes.

Ÿ


The computer must be protected from mechanical impacts. If damages or 

malfunction occur, the equipment must be removed from the hazardous area.

Ÿ

 Do not change the version of BIOS (Model without LAN: 

V1.00L17M23/Model with LAN: V1.01L17M23).

Ÿ

 Do not change the version of EC (V1.00L11M23).

*1: The Group to which this computer is classified is indicated on the 

computer.

English

Before using this computer, read this Addendum and the relevant portions of the computer’s Operating Instructions carefully.

ATEX/IECEx Information

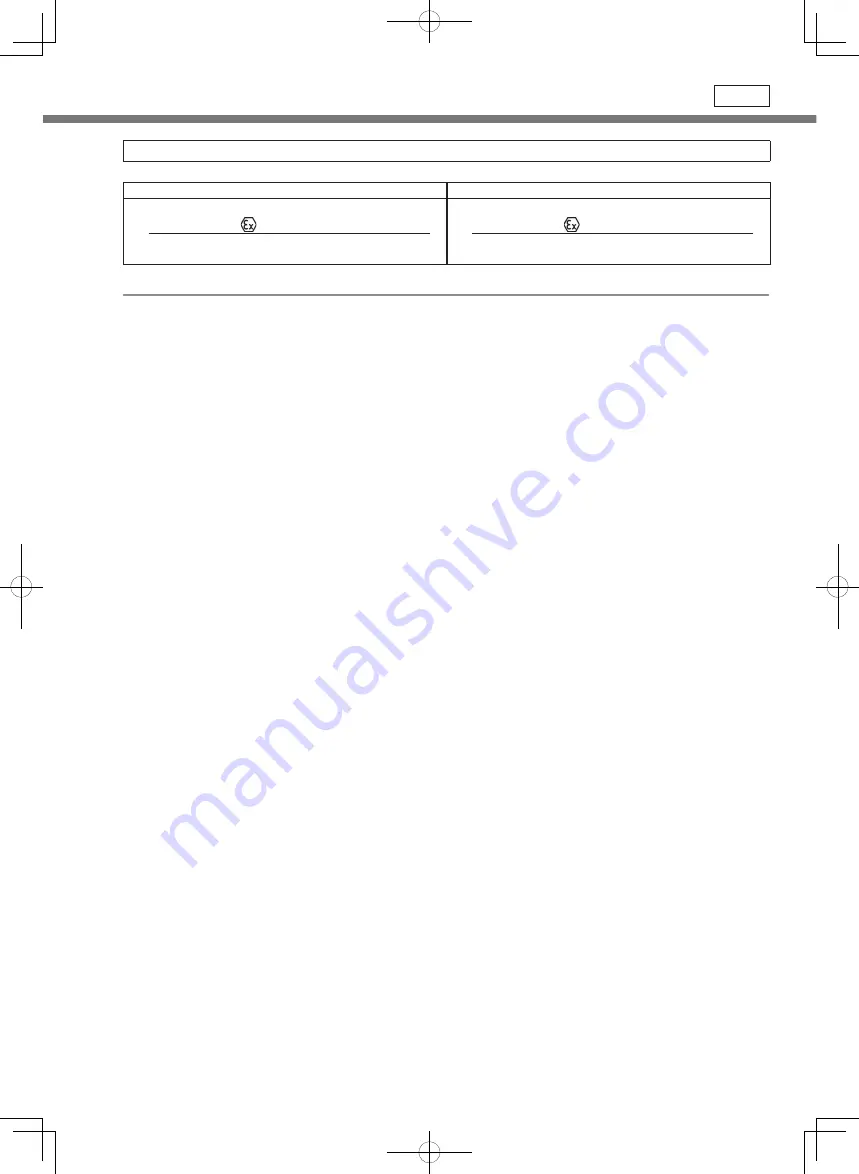
FZ-G1B***** (Model without WWAN)

FZ-G1C***** (Model with WWAN)


TÜV 14 ATEX 7458 X


  II 3 G Ex ic nA IIC T3 Gc 


IECEx TUR 14.0008X


Ex ic nA IIC T3 Gc


TÜV 14 ATEX 7458 X


  II 3 G Ex ic nA IIB T3 Gc


IECEx TUR 14.0008X


Ex ic nA IIB T3 Gc

WARNING: EXPLOSION HAZARD

DFQW5A50ZAT_FZ-G1mk1_Addendum_14L.indb   2

2014/11/27   11:27:16

Summary of Contents for FZ-G1 Series

Page 1: ...e Espa ol 18 Till gg Svenska 22 Aneks Polski 26 Dodatek e tina 30 F ggel k Magyar 34 Addendum Nederlands 38 Till g Dansk 42 Lis ys Suomi 46 Tillegg Norsk 50 Dodatok Slovensky 54 Supplementary Instruct...

Page 2: ...us area DO NOT remove the leather case from this computer when in Hazardous area DO NOT use this computer with the protective film removed from the LCD screen surface or with an unauthorized film appl...

Page 3: ...ures and humidity to prevent mold l Do not store in extremely hot and or dry place to prevent shrinkage and or deformation l Do not leave the leather case in the car exposed to direct sunlight l Store...

Page 4: ...nd strap C Put the front leather cover on the body of the computer Correctly orient the front leather cover to the computer checking the posi tion of the power terminal A as a guideline Attach the lea...

Page 5: ...head screwdriver and remove the board C Remove the battery pack n Using the hand strap A When using the computer holding with hand insert your hand to A part of the hand strap B Fix the hand strap fi...

Page 6: ...e NICHT von diesem Computer sol ange Sie sich in einem gef hrlichen Bereich befinden Verwenden Sie diesen Computer NICHT wenn die Schutzfolie von der Oberfl che des LCD Bildschirms entfernt wurde oder...

Page 7: ...en l Lagern Sie ihn nicht in extrem hei en und oder trockenen Orten um Schrumpfen und oder Deformation zu vermeiden l Lassen Sie die Lederh lle nicht im Auto wo sie direkt dem Sonnenlicht ausgesetzt i...

Page 8: ...s ebenso vor C Legen Sie die Lederh lle auf das Computergeh use Richten Sie die vordere Lederabdeckung des Computers aus indem Sie die Position des Stromanschlusses A als Richtlinie berpr fen Bringen...

Page 9: ...verwenden und entfernen Sie das Brett C Entfernen Sie den Akkupack n Verwendung des Handgurts A Wenn Sie den Computer verwenden indem Sie ihn mit der Hand halten stecken Sie Ihre Hand in den Teil A de...

Page 10: ...zone dangereuse NE PAS retirer l tui en cuir de cet ordinateur lorsque vous tes dans une zone dangereuse NE PAS utiliser cet ordinateur sans le film protecteur sur la surface de l cran LCD ou avec un...

Page 11: ...cher la moisissure l Ne pas entreposer dans des endroits extr mement chaud et ou sec pour emp cher un r tr cissement et ou une d formation l Ne pas laisser l tui en cuir dans la voiture en plein solei...

Page 12: ...inf rieur de la poign e C Posez le cache en cuir avant sur le corps de l ordinateur Orientez correctement le cache en cuir avant sur l ordinateur en v rifiant la position de la borne d alimentation A...

Page 13: ...nlevez les 4 vis fix es la planche l aide d un tournevis cruciforme et enlevez la planche C Enlevez la batterie n Utilisation de la poign e A Lorsque vous utilisez l ordinateur en le tenant par la mai...

Page 14: ...dia in pelle dal computer in aree pericolose NON utilizzare il computer senza la pellicola protettiva dello schermo LCD o con una pellicola non autorizzata applicata sulla superficie dello schermo LCD...

Page 15: ...luoghi con temperature e umidit elevate l Per evitare riduzione e o deformazione non riporre in luoghi estremamente caldi e o asciutti l Non lasciare la custodia in pelle in auto esposta alla luce sol...

Page 16: ...nteriore della custodia in pelle sul corpo del computer Orientare correttamente la parte anteriore della custodia in pelle al com puter verificando la posizione del terminale di alimentazione A come p...

Page 17: ...viti fissate al pannello con un cacciavite Philips quindi rimuovere il pannello C Rimuovere la batteria n Utilizzo della cinghia per mano A Quando si utilizza il computer tenendolo con la mano infilar...

Page 18: ...especificada NO retire la funda de cuero del ordenador cuando se encuentre en una zona peligrosa NO utilice este ordenador sin la pel cula protectora de la superficie de la pantalla LCD o con una pel...

Page 19: ...raturas ni niveles de humedad elevados l Para evitar la contracci n y o la deformaci n no lo guarde en lugares extremadamente calientes y o secos l No deje la funda de cuero dentro de un veh culo expu...

Page 20: ...de la correa de mano C Coloque la cubierta de cuero delantera en el cuerpo del ordenador Oriente correctamente la cubierta de cuero en el ordenador comprobando la posici n del terminal de alimentaci n...

Page 21: ...laca utilizando un destornillador de cabeza Phillips y retire la placa C Retire las bater as n Uso de la correa de mano A Cuando utilice el ordenador sosteni ndolo con una mano introduzca la mano A en...

Page 22: ...tisk laddning T ck datorns utsida med det medf ljande l derfodralet innan den anv nds p en riskplats Ta INTE bort l derfodralet fr n datorn n r du befinner dig p en riskplats Anv nd INTE datorn om sky...

Page 23: ...inte f rvaras i h ga temperaturer och h g fuktighet l F r ej f rvaras p extremt heta och eller torra platser f r att undvika krympning och eller deformering l L mna inte l derfodralet i direkt solljus...

Page 24: ...et samma p handremmens undersida C Placera l derfodralets framsida p datorn Passa in l derfodralets framsida v l p datorn Anv nd str mterminalens A placering som en riktlinje S tt fast l derfodralet s...

Page 25: ...p panelen med en stj rnskruvmejsel och ta bort panelen C Ta bort batteripaketet n Anv nda handremmen A N r du ska h lla datorn i handen f r in handen i del A p handremmen B F st handremmen ordentligt...

Page 26: ...y r d em wy adowa elektrostatycznych lub obiekt w kt re mog akumulowa adunki elektrostatyczne Przed u yciem w strefie okre lanej jako niebezpieczna powierzchni kom putera nale y zakry przeznaczonym do...

Page 27: ...nia si i lub odkszta ceniom l Nie ci ga sk rzanego futera u z urz dzenia znajduj cego si w samochodzie wystawionym na bezpo rednie dzia anie wiat a s onecznego l Przechowywa w ch odnych suchych i dobr...

Page 28: ...cz ci paska na r k C Umie przedni cz sk rzanego futera u na komputerze U prawid owo przedni cz sk rzanego futera u na komputerze sprawdzaj c z po o eniem gniazda zasilania A jak pokazano na ry sunku...

Page 29: ...a krzy akowego odkr ci 4 ruby mocuj ce p yt i zdj j C Wyj bateri n Korzystanie z paska na r k A Korzystaj c z komputera trzymaj c go na r ku w r k do cz ci A paska na r k B Zamocuj starannie pasek na...

Page 30: ...slu n m ko en m krytem Ko en kryt z tohoto po ta e b hem pobytu v prost ed s nebezpe m v buchu NESUND VEJTE Tento po ta NEPOU VEJTE s odstran nou ochrannou f lii z povrchu LCD displeje nebo s neautor...

Page 31: ...ok ch teplot ch a vlhkosti l V r mci prevence zmen en a nebo deformace krytu jej neskladujte na extr mn hork m a nebo such m m st l Nenech vejte ko en kryt v aut vystaven p m mu slune n mu z en l Skla...

Page 32: ...ejn postup aplikujte tak na spodn stranu ru n ho popruhu C Na t lo po ta e nasa te p edn ko en kryt P edn ko en kryt na po ta i spr vn zorientujte s pou it m pozice konektoru nap jen A jako vod tka Ko...

Page 33: ...bov ku Phillips vyjm te 4 rouby ze z klady a tu vyjm te C Vyjm te akumul tor n Pou v n ru n ho popruhu A Pokud po ta pou v te tak e jej dr te v ruce ruku vlo te do sti A popruhu B Popruh pevn upevn te...

Page 34: ...Vesz lyes Ter leten tart zkodik Ne haszn lja ezt a sz m t g pet ha az LCD kijelz felsz n r l elt vol tott k a v d filmr teget illetve ha nem j v hagyott filmr teget alkalmaztak az LCD kijelz felsz n...

Page 35: ...am g a b rtok rajta van l Ne t rolja magas h m rs kleten s p ratartalmon hogy megel zze a pen szed st l Ne t rolja extr m magas h m rs kleten s vagy sz raz helyen hogy megel zze a m retcs kken st s v...

Page 36: ...yanezt a k zp nt als oldal val is C Helyezze a b rtok elej t a sz m t g pre Helyesen igaz tsa a b rtok elej t ellen rizve az A t ptermin l helyzet t mint t mpontot Csatlakoztassa a b rtokot gy hogy el...

Page 37: ...avarh z haszn la t val s t vol tsa el a bor t st C T vol tsa el az akkumul tort n A k zsz j haszn lata A Amikor sz m t g pet k zben tartva haszn lj k helyezze a kez t a k zp nt A r sz be B R gz tse a...

Page 38: ...hoes NIET van de computer terwijl u in de gevaarlijke zone bent Gebruik deze computer NIET met de beschermfolie van het LCD scherm verwijderd of met een niet geautoriseerde film aangebracht op het opp...

Page 39: ...en vochtigheid om schimmel te voorkomen l Niet bewaren in extreem warme en of droge omgevingen om krimp en of vervorming te voorkomen l Laat de lederen hoes niet achter in de auto blootgesteld aan dir...

Page 40: ...lederen hoes over de behuizing van de computer Plaats de voorkant van de lederen hoes in de goede richting op de computer door de positie van de voedingsaansluiting A als referentiepunt te gebruiken B...

Page 41: ...ndraaier van Phillips en verwijder de kaart C Verwijder de accu pack n De handriem gebruiken A Wanneer u de computer in de hand gebruikt steek uw hand A door de opening van de handriem B Trek de handr...

Page 42: ...isk ladning Tild k overfladerne med det s rlige l deretui f r brug i eksplosi onsfarlige omr der Tag IKKE l deretuiet af computeren n r den er i et eksplosions farligt omr de Anvend IKKE denne compute...

Page 43: ...t rre steder for at undg krympning og eller deformation l Opbevar ikke l deretuiet i en bil hvor det kan uds ttes for direkte sollys l Opbevar l deretuiet p et k ligt t rt og godt ventileret sted der...

Page 44: ...me for den nederste del af h ndstroppen C S t frontdelen af l derovertr kket p computeren Juster frontdelen af l derovertr kket til computeren ved at kontrollere str mstikkets position A som en rettes...

Page 45: ...til pladen ved hj lp af en stjerneskrue tr kker og fjern pladen C Fjern batteripakken n Brug af h ndstroppen A For at holde computeren med din h nd skal du s tte h nden under A h ndstroppen B Stram h...

Page 46: ...joka voi kantaa staattista s hk varausta Peit pinnat erityisell nahkakotelolla ennen k ytt vaarallisella alueella L poista tietokonetta nahkakotelosta kun olet vaarallisella alueella L k yt t t tieto...

Page 47: ...sa homeen est miseksi l l s ilyt rimm isen kuumassa ja tai kuivassa paikassa est ksesi kutistumisen ja tai muodonmuutokset l l j t nahkakoteloa autoon jossa se altistuu suoralle auringonvalolle l S il...

Page 48: ...esta Tee samoin k sihihnan alapuolella C Laita nahkainen etukansi tietokoneen rungon p lle Kohdista nahkainen etukansi tietokoneeseen ja tarkista virtaliit nn n A sijainti Kiinnit nahkakansi siten ett...

Page 49: ...uviavaimella ja poista levy C Poista akkuyksikk n K sihihnan k ytt minen A Ty nn k tesi k sihihnan osaan A jos k yt t tietokonetta pit en sit k dess si B Kiinnit k sihihna tukevasti siten et tietokone...

Page 50: ...ading Overflatene skal dekkes med spesifisert l rveske f r bruk inne i farlig omr de IKKE FJERN l rvesken fra denne datamaskinen n r den er inne i farlig omr de IKKE BRUK denne datamaskinen n r beskyt...

Page 51: ...uktet ikke lagres i h y temperatur fuktighet l M ikke lagres i et ekstremt varmt og eller kaldt sted dette for hindre krymping og ELLER DEFORMASJON l L rvesken m ikke ligge i en bil og bli eksponert f...

Page 52: ...en C Plasser fronten av l rdekselet p datamaskinkabinettet Orienter fronten p l rdekselet s nn at det passer sammen med data maskinen mens du kontrollerer plasseringen av str mterminalen A som en refe...

Page 53: ...til brettet ved bruke et Philips stjerne skrutrekket og fjern brettet C Fjern batteripakken n Bruke h ndremmen A N r du h ndholder datamaskinen f r h nden inn i A del h ndremmen B Fest h ndremmen ord...

Page 54: ...vies elektrostatick n boj Pred pou it m v rizikovej z ne zakryte povrchy uveden m ko en m puzdrom K m ste v rizikovej z ne NESKLADAJTE ko en puzdro z tohto po ta a Tento po ta NEPOU VAJTE s odstr nen...

Page 55: ...s vysokou teplotou a vlhkos ou l Aby ste zabr nili zmra ovaniu a alebo deformovaniu neskladujte na ve mi hor com a alebo suchom mieste l Ko en puzdro nenech vajte vystaven inkom priameho slne n ho iar...

Page 56: ...podnej asti popruhu na ruku C Polo te predn as ko en ho puzdra na hlavn as po ta a Spr vne nastavte polohu prednej asti ko en ho puzdra na po ta i ako pomocn iaru pou ite polohu koncovky na nap janie...

Page 57: ...mon tujte dosku C Vyberte akumul tor n Pou vanie popruhu na ruku A Po as pou vania po ta a dr iac ho v ruke zasu te ruku do asti A na popruhu na ruku B Popruh na ruku pevne utiahnite aby sa po ta nevy...

Page 58: ...58 MEMO DFQW5A50ZAT_FZ G1mk1_Addendum_14L indb 58 2014 11 27 11 28 02...

Page 59: ...59 DFQW5A50ZAT_FZ G1mk1_Addendum_14L indb 59 2014 11 27 11 28 02...

Page 60: ...ve Mississauga Ontario L4W 2T3 Importer s name address pursuant to the EU legislation Panasonic System Communications Company Europe Panasonic Marketing Europe GmbH Hagenauer Stra e 43 65203 Wiesbaden...

Reviews: