background image


Operating Instructions

Smart Handheld

EB-3901

Operating Instructions

Basic Guide

Tablet Computer

Model No.

 FZ-N1 

series 

Thank you for purchasing a Panasonic product.

For optimum performance and safety, please read these 
instructions carefully.

For detailed information about this product, refer to the Reference 
Manual, which is available by tapping 

[Online Manual]

 in the 

product’s app list. (Download required.)

Summary of Contents for FZ-N1C

Page 1: ...el No FZ N1 series Thank you for purchasing a Panasonic product For optimum performance and safety please read these instructions carefully For detailed information about this product refer to the Reference Manual which is available by tapping Online Manual in the product s app list Download required ...

Page 2: ...the interface cover 16 Removing and attaching the battery cover 17 Installing an SD card 20 Installing and removing the battery 22 Replacing the battery Battery warm swap 23 Charging the battery 24 Turning the unit on and off 25 Home screen status bar and notifications 26 Navigation and function buttons 27 Factory data reset 28 Troubleshooting 29 Appendix 33 Specifications 33 LIMITED WARRANTY 39 L...

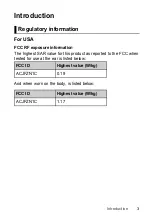
Page 3: ...osure information The highest SAR value for this product as reported to the FCC when tested for use at the ear is listed below And when worn on the body is listed below Regulatory information FCC ID Highest value W kg ACJFZN1C 0 19 FCC ID Highest value W kg ACJFZN1C 1 17 ...

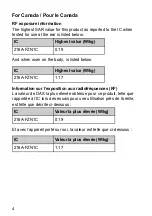
Page 4: ...n aux radiofréquences RF La valeur de DAS la plus élevée obtenue pour ce produit telle que rapportée à l IC lors des essais pour une utilisation près de l oreille est telle que décrite ci dessous Et avec l appareil porté sur soi la valeur est telle que ci dessous IC Highest value W kg 216A FZN1C 0 19 IC Highest value W kg 216A FZN1C 1 17 IC Valeur la plus élevée W kg 216A FZN1C 0 19 IC Valeur la p...

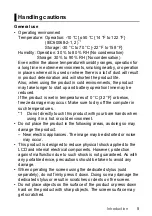
Page 5: ...ay occur Make sure to dry off the computer in such temperatures 1 Do not directly touch this product with your bare hands when using it in a hot or cold environment Do not place the product in the following areas as doing so may damage the product Near electric appliances The image may be distorted or noise may occur This product is designed to reduce physical shock applied to the LCD and internal...

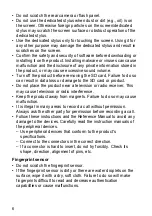
Page 6: ... or product Do not place the product near a television or radio receiver This may cause television or radio interference Keep the product away from magnets Failure to do so may cause malfunction It is illegal in many areas to record a call without permission Always ask the other party for permission before recording a call Follow these instructions and the Reference Manual to avoid any damage to t...

Page 7: ...secure your data Waterproof dustproof The product is waterproof dustproof when the interface cover and headset jack cover are closed and the battery and battery cover are attached Therefore keep water and dust away from product s internal components accessories and optional products To prevent liquids sand dust or any foreign objects from entering the product always keep the battery cover and batt...

Page 8: ...ot clean the product with solvents such as benzene thinner or strong alkaline detergent because they may affect the surface of the product Battery The battery is a consumable item Depending on the usage conditions it may swell as it reaches the end of its life When the typical battery life of approximately one year or about 500 charge cycles is exceeded the battery deteriorates If the battery begi...

Page 9: ...ttery if it is not recognized by the product Make sure that you use the specified battery Terms and illustrations in this document Panasonic Corporation and or its affiliates are referred to collectively as we or Panasonic This product supports microSD microSDHC and microSDXC memory cards In this document the term SD card is used as a generic term for any supported memory card Some illustrations i...

Page 10: ...nal content or any other third party content Under no circumstances will Panasonic be liable in any way for the improper use of additional content or other third party content by this product or its operator This document and any related product documentation may refer to services and applications that are provided by third parties The use of such services or programs may require separate registra...

Page 11: ...arted Confirming the included items If any items are missing please contact your technical support representative Main unit 1 Battery Model number FZ VZSUN110U 1 Operating Instructions Read Me First 1 Confirming the included items ...

Page 12: ...iption of parts Front view A Indicator Orange lit Battery is charging Green lit Battery charging is complete Red lit Battery level is less than 15 of a full charge B Front camera C Earpiece Description of parts ...

Page 13: ... device touch the card device to this area of the unit F Display touch panel Can also be operated while using gloves glove touch mode G Speaker H Application button A1 page 27 I Application button A2 page 27 J Application button A3 page 27 K Headset jack cover page 15 L Headset jack M Power button page 25 N Microphone O Interface cover page 16 P micro USB port Q Side button page 27 R Camera button...

Page 14: ...ear camera C Fingerprint sensor D Battery cover E Battery lock lever F GPS antenna internal G Flash Can be used when taking pictures H Strap attachment hole I Wi Fi Bluetooth antenna internal J Side button page 27 K Volume buttons ...

Page 15: ...eadset jack cover Pull back at the protrusion of the headset jack cover with your fingertip When closing make sure the cover is closed firmly IMPORTANT Observe the following to ensure the waterproof and dustproof performance of the unit Make sure the headset jack cover is securely closed when the headset jack is not being used When closing the headset jack cover make sure there is no debris lodged...

Page 16: ...de in the direction of the arrow at the protrusion circled in the illustration above with your fingertip 2 Pull back the cover and rotate it downward 1 Rotate the cover upward and insert it to its original position 2 Firmly slide in the direction of the arrow until the red area circled in the illustration above of the cover is no longer visible ...

Page 17: ...ly closed and locked when the micro USB port is not being used When closing the interface cover make sure there is no debris lodged in the gasket that seals the cover Removing and attaching the battery cover Removing the battery cover 1 Slide the battery lock lever circled in the illustration in the direction of Removing and attaching the battery cover ...

Page 18: ...tration When removing the battery cover be careful so that you do not drop the battery Attaching the battery cover 1 Place the battery cover on the unit as shown in the illustration If the battery is protruding out of the unit gently push the battery in using the battery cover Top ...

Page 19: ...hear a click 3 Lock the cover by sliding the battery lock lever circled in the illustration toward Firmly slide until the red area is no longer visible IMPORTANT Observe the following to ensure the waterproof and dustproof performance of the unit Always make sure the battery cover is securely closed and locked Top ...

Page 20: ... 2 Slide the microSD card slot in the direction of the arrow A and then open it B 3 Insert the microSD card into the microSD card slot A and then close the slot B Install only microSD cards Hold the microSD card so that the metal terminals are facing you and insert with the notch facing in the same direction of the circled area in the illustration below Installing an SD card ...

Page 21: ...21 Getting Started 4 Slide the microSD card slot in the direction of the arrow until you hear a click To remove a microSD card follow the same procedure and then pull out the microSD card at step 3 ...

Page 22: ...it B and then lower the battery into place C The battery may protrude out of the unit even if you install the battery correctly However this is not a malfunction or defect IMPORTANT Observe the following to ensure the waterproof and dustproof performance of the unit When installing the battery make sure there is no debris lodged in the gasket that seals the unit and in the area around the battery ...

Page 23: ...Page 7 Replacing the battery Battery warm swap You can replace the battery without turning the unit off Replace the battery within 30 seconds If more than 30 seconds has passed apps that are running are forced to close and you may lose unsaved data During warm swapping all wireless functions are turned off temporarily 1 Press and hold power button until the power options dialog is displayed 2 Tap ...

Page 24: ...nd insert into the DC input jack A Plug the power plug into a power outlet 2 Rotate the adaptor downward B and firmly insert the unit until you hear a click C The battery is not charged at the time of purchase Charge the battery before turning on the unit for the first time or after an extended period of storage Charge the battery in environments with an ambient temperature of 10 C to 35 C 50 F to...

Page 25: ... connect the USB connection cable upside down Remove any dust or water droplets from plugs before connecting them Do not use excessive force when inserting plugs or insert them at an angle Confirming the battery level The battery level is displayed in the upper right corner of the screen in the status bar You can also confirm the specific amount of battery level remaining From the home screen tap ...

Page 26: ...een status bar and notifications Using the home screen The home screen is the main screen from which you can launch apps check widgets etc You can customize the home screen to suit your needs by adding moving and removing items as desired You can also view a list of all installed apps by tapping While the screen is on you can display the home screen at any time by tapping or A2 default setting Usi...

Page 27: ...ear at the bottom or side of the touch panel screen depending on the unit s orientation The unit also features physical buttons that can be used to access various functions quickly The default button assignments are described below Some buttons can be customized using the UserButtonManager app see the Reference Manual for more information Navigation and function buttons Returns to the previous scr...

Page 28: ... up important data before performing this procedure 1 From the home screen tap Settings Backup reset 2 Tap Factory data reset RESET TABLET ERASE EVERYTHING The unit restarts when the factory data reset is complete All data in the mnt sdcard folder will be erased Data stored in the SD card will not be erased Factory data reset ...

Page 29: ...ave the unit in an environment of 10 C to 35 C 50 F to 95 F for about an hour and then try again The unit does not wake up from sleep The battery may have become completely discharged while the unit was in sleep mode In this case any data which has not been saved will be lost Charge the battery The unit may be too hot or too cold Leave the unit in an environment of 10 C to 35 C 50 F to 95 F for ab...

Page 30: ... brightness setting of customized silent mode was turned on Turn the setting off 1 From the home screen tap Settings Sound notification Customized silent mode 2 Tap the Customized silent mode switch to turn it off then tap the Minimum limit brightness switch to turn it off 3 Tap the Customized silent mode switch to turn it on There are red green or blue dots on the screen or there is unevenness in...

Page 31: ...tion failed Use a specified battery There may be debris lodged in the battery charge terminals Remove the battery and remove any debris found Charging may have stopped automatically Disconnect the charger and then reconnect it The indicator does not light during charging Battery charging ends quickly or the battery cannot be charged at all The unit is not connected to the charger properly or the U...

Page 32: ...t s operation is slow Ambient temperature may be too low or too high Leave the unit in an environment of 10 C to 35 C 50 F to 95 F for about an hour and then try again The unit does not respond Turn the unit off and then on again page 25 If an app does not work normally follow the instructions below to force quit or uninstall the problematic app or process 1 From the home screen tap Settings Apps ...

Page 33: ...ications and certain options are described below Unit configuration may vary Specifications Model No FZ N1 CPU Qualcomm MSM8974AB 2 3 GHz Quad Core Memory 2 GB 1 Storage 16 GB Display Internal LCD 4 7 in HD 1280 720 dots Aspect ratio 16 9 16 777 216 colors ...

Page 34: ...2 116 118 120 122 124 126 128 132 134 136 140 ch W58 149 151 153 155 157 159 161 165 ch IEEE 802 11b IEEE 802 11g IEEE 802 11n 2 4 GHz 1 ch 11 ch RF frequency band 2 4 GHz Band 2 412 GHz 2 462 GHz 5 GHz Band 5 18 GHz 5 32 GHz 5 5 GHz 5 7 GHz 5 745 GHz 5 825 GHz Data transfer rate IEEE 802 11a up to 54 Mbps IEEE 802 11b up to 11 Mbps IEEE 802 11g up to 54 Mbps IEEE 802 11n HT20 up to 72 2 Mbps HT40...

Page 35: ...aker Microphone 3 microphones noise suppressor Security chip ARM TrustZone built in Camera Front 5 megapixels Video 1920 1080 pixels 30 fps Still 2592 1944 pixels Rear 8 megapixels Video 1920 1080 pixels 30 fps Still 3264 2448 pixels GNSS GPS GLONASS 2 to 4 m Enhanced data security FIPS 140 2 level 1 compliant Sensors Ambient light sensor Digital compass Gyro sensor Acceleration sensor Proximity s...

Page 36: ...lus pen mode Active type Passive type Power supply Battery AC adaptor optional CF AA6373A 7 Input 100 V to 240 V AC 50 Hz 60 Hz Output 16 V DC 3 75 A Battery FZ VZSUN110U Lithium ion 3200 mAh typ 3100 mAh min Rated Voltage 3 8 V Charging time approx 8 2 hours Power consumption 9 Approx 15 W 10 Dimensions 11 W D H Approx 74 mm 156 mm 18 3 mm 2 9 in 6 1 in 0 7 in without protrusions Weight 12 Approx...

Page 37: ... enabled 7 The AC adaptor is designed for use with power sources that supply up to 240 V AC The AC cord supplied with the AC adaptor is designed for use with power sources that supply up to 125 V AC 8 Varies depending on usage conditions 9 When the battery is fully charged or not being charged and the unit is off 10 Rated power consumption 11 Actual size may vary by unit configuration 12 Average w...

Page 38: ...oduct life Avoid continuous use in these types of environments When using the product in cold environments the product may take longer to start up and battery operation time may be reduced Even when using the product within the temperature and humidity ranges listed here using the product continuously in extreme environments will result in product deterioration and will shorten the life of the pro...

Page 39: ...separately are covered under the warranty for one 1 year from the date of purchase A replacement battery furnished under the product warranty is covered for the remaining period of the one year warranty of the original or purchased battery Optional Extended Warranty Program PC If this coverage is purchased the serial numbered unit is entitled to the same warranty coverage as the original warranty ...

Page 40: ...ailures will be repaired in accordance with the warranty terms This warranty is extended solely to the original purchaser on the unit serial number for which it was purchased Complete unit replacement fulfills the full obligation and is at the discretion of Panasonic and is limited to once during the coverage term Refer to the Panasonic web site for full terms and conditions on the above programs ...

Page 41: ...anasonic s Authorized Service Center together with a copy of the purchase receipt within the aforesaid warranty period Section 3 Limited Warranty Exclusions Specifically excluded from the warranty are All consumable items such as screen protection films logo badges labels cleaning cloths carry cases manuals cables straps belts holsters tethers and harnesses and any other options and accessories no...

Page 42: ... TRAFFIC CONTROL EQUIPMENT SYSTEMS OR AIRCRAFT COCKPIT EQUIPMENT SYSTEMS 1 PANASONIC WILL NOT BE RESPONSIBLE FOR ANY LIABILITY RESULTING FROM THE USE OF THIS PRODUCT ARISING OUT OF THE FOREGOING USES 1 AIRCRAFT COCKPIT EQUIPMENT SYSTEMS include class 2 Electronic Flight Bag EFB Systems and Class 1 EFB Systems when used during critical phases of flight e g during take off and landing and or mounted...

Page 43: ...you specific legal rights and you may also have other rights which vary from state to state For technical support or to arrange for service on your Panasonic computer product call our toll free hotline at 1 855 PSC TECH 1 855 772 8324 Web site www panasonic com toughbook For hearing or speech impaired TTY users call 1 877 833 8855 using a TTY device ...

Page 44: ...rs except Battery and AC Adaptor Factory PCI installed options including Wireless WAN GPS Bluetooth Finger print reader Backlit keyboard Memory Card Optical Drives Cameras Smart card Readers Magnetic Card Readers and Barcode Scanners Ultra Mobile PC Tablet PC PDRC LCD and Keyboard Assemblies Port Replicator Cradle Charging Cup Three 3 Years from Date of Original End User Customer Purchase Defectiv...

Page 45: ... the product alteration or servicing by anyone not authorized by PCI or act of God THIS PRODUCT IS NOT INTENDED FOR USE AS OR AS PART OF NUCLEAR EQUIPMENT SYSTEMS AIR TRAFFIC CONTROL EQUIPMENT SYSTEMS OR AIRCRAFT COCKPIT EQUIPMENT SYSTEMS 1 PANASONIC WILL NOT BE RESPONSIBLE FOR ANY LIABILITY RESULTING FROM THE USE OF THIS PRODUCT ARISING OUT OF THE FOREGOING USES 1 AIRCRAFT COCKPIT EQUIPMENT SYSTE...

Page 46: ...or any breach of this software media warranty is limited to replacement of the media only It does not cover any other damages including but not limited to loss of use or profit loss or special indirect or consequential damages or other claims whether or not of similar character No Coverage This limited warranty does not apply if the disk s or other media has been used in other than a Panasonic pro...

Page 47: ...d un revendeur agréé par PCI exempt de défauts de pièces et de fabrication dans les conditions normales d utilisation et ce pendant la période de couverture de la garantie sous réserve des modalités décrites ci dessous Éléments couverts Durée de couverture Type de couverture Ordinateurs blocs notes sauf batteries et adaptateur secteur Options installées en usine par PCI incluant WAN sans fil GPS B...

Page 48: ... La présente garantie limitée ne couvre pas les produits achetés à l extérieur du Canada Elle ne couvre pas non plus les dommages la défaillance ou les défauts attribuables à une manutention inadéquate une mauvaise installation une utilisation anormale ou abusive de la négligence un accident un déversement ou la pénétration d un objet étranger une modification un cas fortuit ou une réparation effe...

Page 49: ...t de fabrication dans des conditions normales d utilisation au Canada et ce pour une période de soixante 60 jours suivant la date de réception indiquée sur la preuve d achat LA PRÉSENTE GARANTIE EST LA SEULE OFFERTE PAR PCI COUVRANT LES SUPPORTS DE LOGICIELS PCI ne garantit pas les logiciels Reportez vous à la garantie écrite du concédant de licence d utilisation du logiciel qui accompagne la copi...

Page 50: ...our toute perte de ou tout dommage à un programme des données ou un support de sauvegarde amovible GÉNÉRALITÉS PCI NE RECONNAÎT AUCUNE AUTRE GARANTIE EXPLICITE OU IMPLICITE Y COMPRIS MAIS NON EXCLUSIVEMENT LES GARANTIES IMPLICITES DE VALEUR COMMERCIALE ET D UTILITÉ À UNE FIN QUELCONQUE À L ÉGARD DU LOGICIEL SUPPORTS DE LOGICIELS PRODUITS INFORMATIQUES PÉRIPHÉRIQUES ET ACCESSOIRES SOUS AUCUNE CIRCO...

Page 51: ...51 Appendix ...

Page 52: ...20170245ZAD C0218 0 Panasonic Mobile Communications Co Ltd 2018 Two Riverfront Plaza Newark NJ 07102 USA 5770 Ambler Drive Mississauga Ontario L4W 2T3 Panasonic Canada Inc ...

Page 53: ...ating environment Do not leave the product in places under direct sunlight or around heating appliances Using this product continuously in a hot environment will shorten the product life Handling cautions Do not drop the product or subject it to impacts Doing so may cause malfunctions or damage If the unit you are using with the product is wet remove the water by wiping off the moisture and thorou...

Page 54: ...trap etc does not get caught between the unit and the product 1 Insert the unit until a click sounds 1 and tighten the screws to the right 2 2 Insert the cable to the docking connector 3 Align the white dot of the cable with the red square of the product as illustrated below Removing the unit 1 Loosen the screws to the left 1 2 While pressing the left and right release levers 2 pull out the unit 3...

Reviews: