background image

24

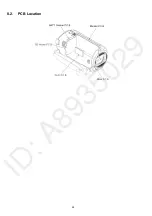
8.2.

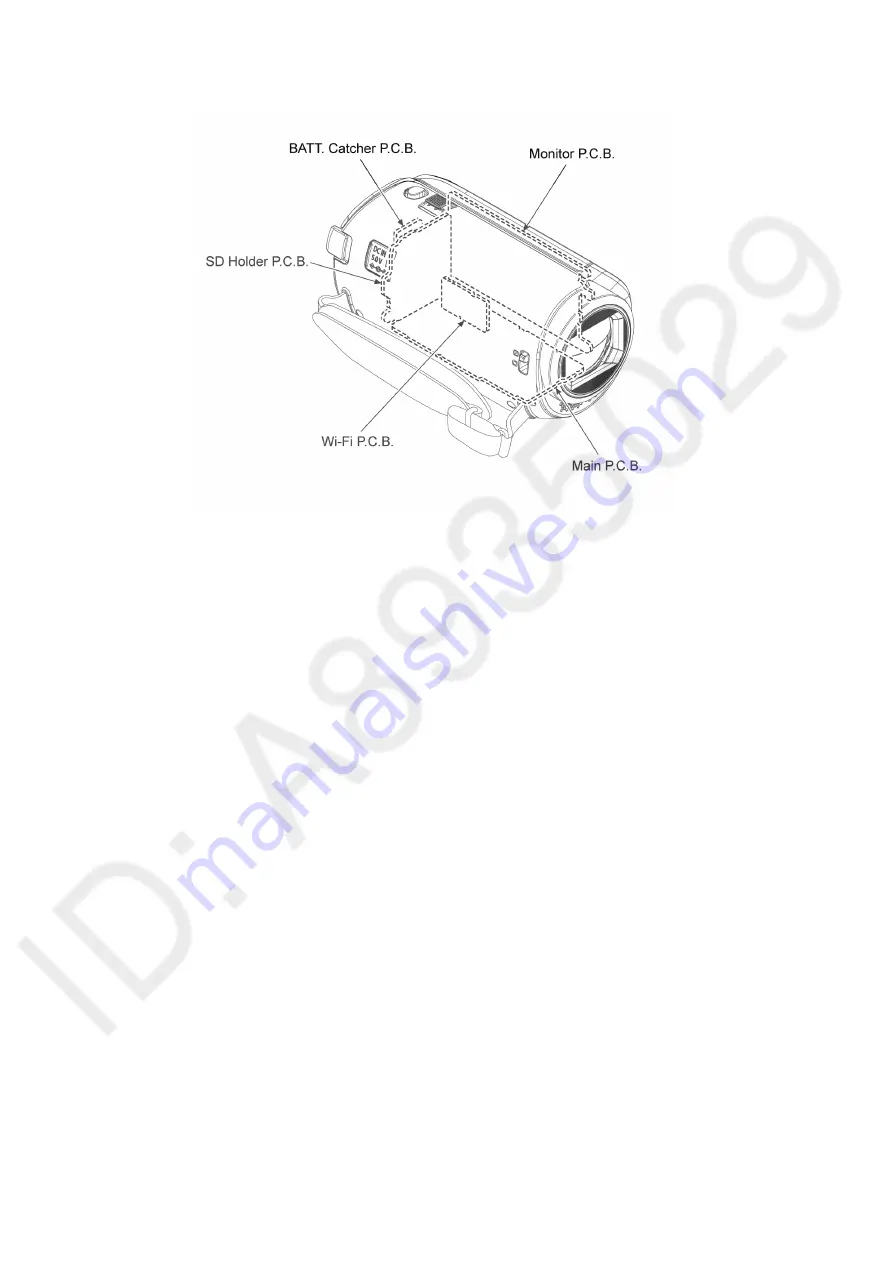
PCB Location

Summary of Contents for HC-V380PP

Page 1: ... ing and distribution is a violation of law ORDER NO VM1602002CE B27 High Definition Video Camera Model No HC V380PP HC V380PU HC V380PR HC V380EB HC V380EE HC V380EF HC V380EG HC V380EP HC V380GC HC V380GK HC V380GN HC V380GW Colour K Black Type ...

Page 2: ...r the Service 19 6 5 Restore the backed up adjustment data 20 6 6 Touch Panel Calibration 21 7 Service Fixture Tools 22 7 1 Service Fixture and Tools 22 7 2 When Replacing the Main P C B 22 7 3 Service Position 22 8 Disassembly and Assembly Instructions 23 8 1 Disassembly Flow Chart for the Unit 23 8 2 PCB Location 24 8 3 Disassembly Procedure for the Unit 25 9 Measurements and Adjustments 43 9 1 ...

Page 3: ...exposed to shock hazards 1 2 Leakage Current Cold Check 1 Unplug the AC cord and connect a jumper between the two prongs on the plug 2 Measure the resistance value with an ohmmeter between the jumpered AC plug and each exposed metal lic cabinet part on the equipment such as screwheads connectors control shafts etc When the exposed metal lic part has a return path to the chassis the reading should ...

Page 4: ...ly a grounded tip soldering iron to solder or unsolder ES devices 4 Use only an antistatic solder removal device Some solder removal devices not classified as antistatic ESD protected can generate electrical charge sufficient to damage ES devices 5 Do not use freon propelled chemicals These can generate electrical charges sufficient to damage ES devices 6 Do not remove a replacement ES device from...

Page 5: ...is Lithium battery is a critical component It must never be subjected to excessive heat or discharge It must therefore only be fitted in requirement designed specifically for its use Replacement batteries must be of same type and manufacture They must be fitted in the same manner and location as the original battery with the correct polarity contacts observed Do not attempt to re charge the old ba...

Page 6: ...n that of the normal solder Distinction of P C B Lead Free Solder being used Service caution for repair work using Lead Free Solder PbF The lead free solder has to be used when repairing the equipment for which the lead free solder is used Definition The letter of PbF is printed on the P C B using the lead free solder To put lead free solder it should be well molten and mixed with the original lea...

Page 7: ... e HC V380GN f HC V380PU PR GC GW What is the difference is that the INITIAL SETTING data which is stored in Flash ROM mounted on Main P C B 3 3 1 Defining methods To define the model suffix to be serviced refer to the rating label and caution label which are putted on the Unit NOTE After replacing the MAIN P C B be sure to achieve adjustment ...

Page 8: ... P C B might sometimes occur by rapid heating In order to improve the success rate of IC replacement for repair it would be required to work out baking of replacement IC and defective P C B before replacing IC Please refer the way of baking as follows Replacement IC and defective P C B must be put in the heater together Baking temperature and time Hour 80 C 24 hour ...

Page 9: ...fications The following specification is for HC W580 W580M V380 EB EP Some specifications may differ depending on model suffix The page number in this chapter does not show the page number of this service manual ...

Page 10: ...10 ...

Page 11: ...11 ...

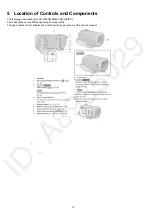
Page 12: ...ontrols and Components The following description is for HC W580 W580M V380 EB EP Some descriptions may differ depending on model suffix The page number in this chapter does not show the page number of this service manual ...

Page 13: ...13 ...

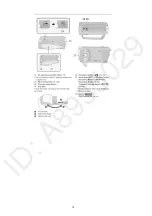
Page 14: ...14 ...

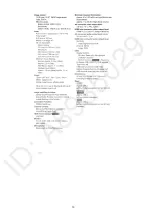
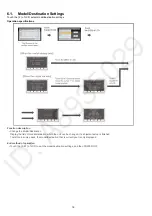
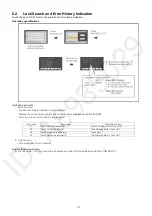
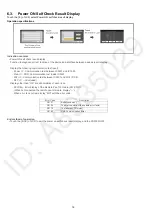
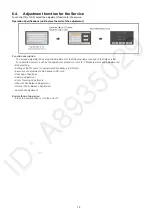
Page 15: ...ation settings Change the Model Destination Selectable models and destinations are displayed 4 Lock search history indication Display the main camera system error code for three histories saved in EEPROM 5 Power ON self check result display Power ON self check function to diagnose correct function of the device and interface between devices result display 14 Adjutment function for the service The ...

Page 16: ...cription Change the Model Destination Display the lists of model distination which the unit can be changed if a shipment setup is finished Therefore in some cases the model destination that is currently set is only displayed End method of operation Touch the SET of LCD to exit the mode destination settings and then POWER OFF ...

Page 17: ...es saved in EEPROM The error code contents which are displayed 2 Sub Camera This model has no sub camera End method of operation Touch the BAK of LCD to exit the lock search and error history indication and then POWER OFF Error code Description Problematic Parts 51 Focus control is abnormal Focus Stepping Motor Lens Unit 52 Zoom control is abnormal 2nd Stepping Motor Lens Unit 53 OIS lens control ...

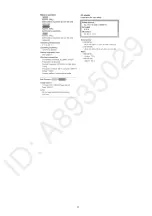
Page 18: ...mmunication test inside IC3401 WiFi IC Communication test between IC3401 and Wi Fi P C B NFC IC Excluded Display other than OK are abnomalities of each lines PanTilter Error display of the Remote Pan Tilt Cradle VW CTR1 When not connected the remote pan tilt cradle display When error is occurred display NG with the error code End method of operation Touch the BAK of LCD to exit the power on self c...

Page 19: ...required in the field service For a detailed content such as the adjustment procedure refer to 9 Measurements and Adjustments Model setting Setting of the file name for adjustment data backup to SD card Execution of adjustment data backup to SD card Checking of Switches Camera adjustment Zoom Tracking adjustments Indoor White Balance Adjustment Outdoor White Balance Adjustment Level shot adjustmen...

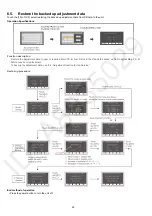
Page 20: ... Specifications Function description Restore the adjustment data to new or repaired Main P C B from SD card that the data backed up from original Main P C B before repairs or replacement To backup the adjustment data use 6 4 Adjustment function for the Service Restoring procedure End method of operation Press the power button to turn the unit off ...

Page 21: ...ation Touch the 16 of LCD select the calibration of touch panel Operation Specifications Function description Calibrate the touch positions of the touch panel End method of operation Press the power button to turn the unit off ...

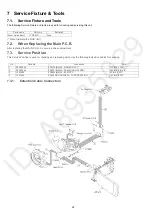
Page 22: ...tment 7 3 Service Position This Service Position is used for checking and replacing parts Use the following Extension cables for servicing 7 3 1 Extention Cable Connection Parts name Parts No Remarks Zoom Guide Shaft VMS8231 2 use No Parts No Connection Form 1 RFKZ0354 FP6010 MAIN MONITOR FPC 37PIN 0 3 FFC 2 RFKZ0444 PP6001 MAIN PS6401 SD HOLDER 50PIN 0 5 B to B 3 VFK1480 FP6003 MAIN ECM FPC 6PIN ...

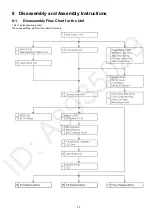
Page 23: ...23 8 Disassembly and Assembly Instructions 8 1 Disassembly Flow Chart for the Unit This is a disassembling chart When assembling perform this chart conversely ...

Page 24: ...24 8 2 PCB Location ...

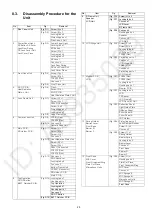
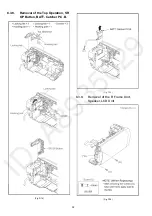
Page 25: ... B Main P C B 8 Top Operation SR OP Button BATT Catcher P C B Fig D14 Locking tab x 1 Hooking part x 1 Top Operation Locking tab x 1 Hooking part x 1 Convex x 3 SR OP Button Fig D15 BATT Catcher P C B 9 R Frame Unit Speaker LCD Unit Fig D16 Screw O x 2 Fig D17 Locking tab x 4 Convex x 1 LCD Lever R Frame Unit Fig D18 Convex x 4 Hooking part x 4 Speaker Convex x 2 LCD Unit 10 LCD Hinge Unit Fig D19...

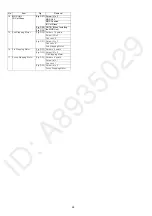
Page 26: ...nd Stepping Motor Fig D30 Solder x 16 points Screw W x 3 Convex x 5 Fig D31 Screw X x 2 Convex x 4 2nd Stepping Motor 16 3rd Stepping Motor Fig D32 Solder x 4 points Fig D33 Screw Z x 2 3rd Stepping Motor 17 Focus Stepping Motor Fig D34 Solder x 8 points Screw a x 1 Convex x 1 Fig D35 Screw b x 2 Focus Stepping Motor No Item Fig Removal ...

Page 27: ...27 8 3 1 Removal of the Side Case L Unit Fig D1 Fig D2 ...

Page 28: ...28 8 3 2 Removal of the Power Panel Light SS Button SS Lever Jack Door Spring DC Jack Cover Unit Jack Cover Piece Fig D3 8 3 3 Removal of the Front Case Unit Fig D4 ...

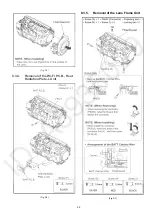
Page 29: ...29 Fig D5 8 3 4 Removal of the Wi Fi P C B Heat Radiation Plate L Unit Fig D6 8 3 5 Removal of the Lens Frame Unit Fig D7 ...

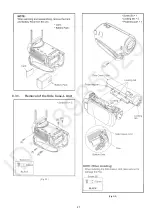
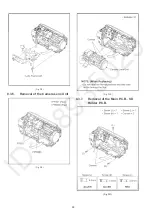
Page 30: ...30 Fig D8 8 3 6 Removal of the Camera Lens Unit Fig D9 Fig D10 8 3 7 Removal of the Main P C B SD Holder P C B Fig D11 ...

Page 31: ...31 Fig D12 Fig D13 ...

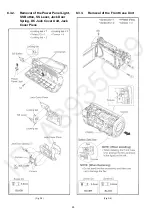
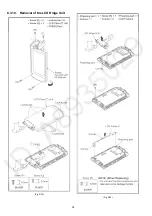
Page 32: ...32 8 3 8 Removal of the Top Operation SR OP Button BATT Catcher P C B Fig D14 Fig D15 8 3 9 Removal of the R Frame Unit Speaker LCD Unit Fig D16 ...

Page 33: ...33 Fig D17 Fig D18 ...

Page 34: ...34 8 3 10 Removal of the LCD Hinge Unit Fig D19 Fig D20 ...

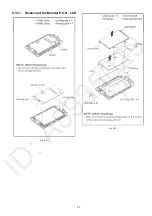
Page 35: ...35 8 3 11 Removal of the Monitor P C B LCD Fig D21 Fig D22 ...

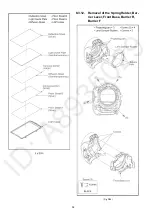
Page 36: ...36 Fig D23 8 3 12 Removal of the Spring Holder Bar rier Lever Front Base Barrier R Barrier F Fig D24 ...

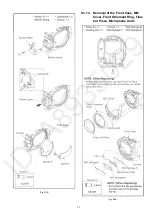
Page 37: ...37 Fig D25 8 3 13 Removal of the Front Case MIC Cover Front Ornament Ring Flare Cut Piece Microphone Units Fig D26 ...

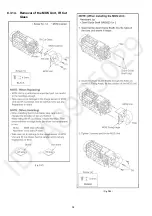
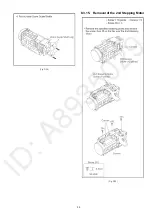
Page 38: ...38 8 3 14 Removal of the MOS Unit IR Cut Glass Fig D27 Fig D28 ...

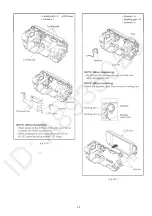
Page 39: ...39 Fig D29 8 3 15 Removal of the 2nd Stepping Motor Fig D30 ...

Page 40: ...40 Fig D31 8 3 16 Removal of the 3rd Stepping Motor Fig D32 ...

Page 41: ...41 Fig D33 8 3 17 Removal of the Focus Stepping Motor Fig D34 ...

Page 42: ...42 Fig D35 ...

Page 43: ... Adjustments 9 1 Electric Adjustment An exclusive jig are necessary for electric adjustment Connection method of the main unit and an exclusive adjustment jig as follows Figure of connection Figure of image when adjustment ...

Page 44: ...mator with focus chart VFK1164TCM02 VFK1164TCM03 Same as DSC CC filter 3100K 5100K VFK1164CC10G Need 2 set For indoor outdoor white balance adjutment C2 Filter 5100K VFK1164LBB2 For outdoor white balance adjustment C8 Filter 5100K VFK1164LBB8 For outdoor white balance adjustment ND Filter 0 1 3100K VFK1164ND01 For indoor white balance adjustment ND Filter 0 6 3100K VFK1164ND06 For indoor white bal...

Page 45: ...45 Level Shot Adjutment Chart ...

Page 46: ...ght Box has no lens connection ring How to remove the Front Hood In order to utilize maximum of the diffusing surface of light box some adjustment items need the distance between diffusing surface of light box and camera body becomes several cent meters Before the adjustments remove the front hood of light box following steps below For VFK1164TDVLB Light Box For RFKZ0523 Light Box ...

Page 47: ...47 9 1 2 Adjustment Items Adjustment item as follows ...

Page 48: ...ce mode menu and Factory Setting is performed using 1 of service mode menu Refer to 6 Service mode and 10 Factory Setting Execute adjustment function for service 1 While the power is turned OFF keep pressing the Power button Zoom Lever to W side and Recording Playback button for more than 3 seconds until the top screen of the Service Mode Menu being displayed 2 Touch the twice then touch the 14 of...

Page 49: ...owing order 1 Model setting 2 Filename setting for backup to SD card 3 Backing up adjustment data to SD card 4 Checking switches 5 Camera adjustment 6 Zoom tracking adjustment 7 Indoor white balance adjustment 8 Outdoor white balance adjustment 9 Level shot adjustment ...

Page 50: ...50 ...

Page 51: ...51 ...

Page 52: ...52 ...

Page 53: ...53 ...

Page 54: ...54 ...

Page 55: ...55 ...

Page 56: ...56 ...

Page 57: ...e Service Mode Menu being displayed 2 Touch the 1 of LCD 3 Touch the YES of LCD 4 After few seconds END is displayed on LCD monitor Cutting of battery connection or AC power supply connection as a completion of the FACTORY SETTINGS 10 2 What Is The Factory Settings The factory settings clean up and or refresh the following settings 1 Setting Values of menu 2 Clear the time and date setting 3 Initi...

Page 58: ...IC6411 DIGITAL ACCELEROMETER IC902 MAGNETIC SENSOR IC901 LCD COLOR DRIVER COLOR LCD PANEL IC3701 AVIO IC3412 GATE IC X2303 32 768kHz IC1503 RTC CHARAGE POWER CONTROL IC1222 RESET IC2301 RESET IC3406 RESET IC3414 RESET IC1002 1003 1261 1291 IC1341 1381 1392 DC DC CONVERTER SYNCRONOUS STEP DOWN CONVERTER LOAD SW REGULATOR IC761 ROLL GYRO AMP USB TERMINAL HDMI mini CONNECTOR IC1001 POWER IC301 703 70...

Page 59: ...o IC701 49 IC3401 U4 S RTC DI S RTC DO S RTC SCK RTC CS M3 M4 M2 L1 S6405 POWER SW D3 SWIN1 CARD LED B D6401 CARD LED PW REG3V QR6402 PW REG3V P1 R4 IC902 MAGNETIC SENSOR 4 3 1 2 VDD OUT GND NC LCD RVS IC3406 RESET RSTB PW REG3V U7 E NRST From QR2389 C 4 3 2 1 OUT VSS VDD CD X3401 48MHz AC27 MCKI AD27 MCKO X301 60MHz RL3401 RL3402 RL3406 RL3405 IS VD B23 XVD CAM GLVD IS HD A23 XHD CAM DO SENS C22 ...

Page 60: ...1 DDR CKEIN G12 PW RTCVREG25 IC3414 RESET PW RTCVREG25 4 3 2 1 OUT VSS VDD CD CLK CLK PW 3 2V DATA2 DATA2 DATA1 DATA1 DATA0 DATA0 HPD SCL SDA CEC 1 8 7 2 FL6001 2 3 3 6 5 4 5 6 1 8 7 2 FL6002 8 9 14 3 6 5 4 11 12 15 16 19 PW 3 2V PW 3 2V JK6003 HDMI MINI CONNECTOR AG24 HDMI TX2P AA23 AC24 HDMI CEC HDMI HPD AG7 SCL AB23 HDMI SCL AG6 HDMI SDA SDA AF24 HDMI TX2M AG23 HDMI TX1P AF23 HDMI TX1M AG22 HDM...

Page 61: ...04 CH903 IC3702 SINGLE CLOCK GENERATOR CLKIN OE FSEL CLKOUT 6 4 5 3 INPUT BUFFER PLL OUTPUT BUFFER PW REG3V VDD 1 VSS 2 CLK24 M C20 RL3705 ACLK B1 B20 RL3704 CLK LR1 G18 RL3708 AODAT0 F16 E AVIO RST G15 S CS AVIO D17 S DO AVIO B15 RL3709 AIDAT0 G16 PLUG IN L C14 IC3701 AVIO 12 BICK 11 LRCK 24 VIN JK6004 AV JACK VOUT 4 PLUGIN L 6 LOUT 5 ROUT 1 21 22 SPN SPP SPK AMP SPEAKER V OUT CLAMP LPF 14 SDTO 1...

Page 62: ...10 CH754 CH711 CH713 CH718 CH719 CH720 CH6401 CH6404 CH6415 CH6403 15 1 80 S LENDAT L2V S DACLD LEN E LENS RST L A16 ZLEVER 49 ZSW U4 A17 N6 CH721 CH722 PWMOUT1 PWMOUT2 GYRO SENSOR PIT YAW 11 MOSI 44 10 MISO 26 8 CSB CL6406 CL6405 CL6411 CL6412 35 9 SCLK 1 VCC 7 VDD 2 GND1 GND 4 GND2 6 GND3 PW GYRO3V IC751 IC6401 GYRO SENSOR ROLL IC761 ROLL GYRO AMP 48 NDHB 54 2 1 3 OUT 6 VREF 4 VCC PW REG3V IC641...

Page 63: ... STB6 SCL SDA STB1234 VOSEL3 VOSEL4 VCC VOSEL2 VREGA GND VO4 INV5 VO3 REGOUT PGND45 HX5 LX5 LX6 LX4 HX4 PGND3 PGND3 LX3 LX3 HX36 LX21 HX36 PGND2 VO2E LX22 HX2 PGND1 SWOUT VO1E LX1 INV6 VDD INV7 LED VO7 42 39 41 38 40 37 36 35 34 33 1 2 3 4 5 6 7 8 9 10 32 31 30 29 28 27 26 25 24 23 22 14 15 16 17 18 19 LX7 20 PGND67 21 11 12 13 IC1001 POWER R1271 PW 5V PW HDM5V PW SPK3 2V PW LENS3 2V PW SD3 2V D90...

Page 64: ...O3V S ACL SCL S ACL SDA D GND D GND SD CMD D GND SD DATA2 SD DATA3 SD DATA0 SD DATA1 D GND SD CLK D GND STANDBY LED POWER LED ZOOMAD PW REG3V CARD LED B 25 24 23 22 21 20 19 18 17 16 15 14 13 12 11 10 9 8 7 6 5 4 3 2 1 26 27 28 29 30 31 32 33 34 35 36 37 38 39 40 41 42 43 44 45 46 47 48 49 50 FP6010 PW REG1R8V PW LIBATT S CS LCD D GND NC D GND NC D GND NC D GND PW LCDBL H PW LCDBL L PW REG3V S AD ...

Page 65: ...it Board Please click the radio button for DiagramsII Parts List on the menu bar in XML Service Manual If you want to print please click the icon button for Print on the icon bar and select the item 15 Exploded View and Replacement Parts List Please click the radio button for DiagramsII Parts List on the menu bar in XML Service Manual If you want to print please click the icon button for Print on ...

Reviews: