background image

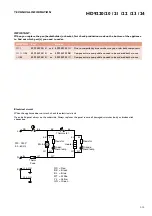
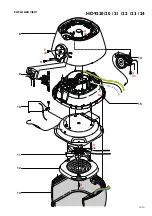
HD9220/20 /21 /22 /23 /24

5-10

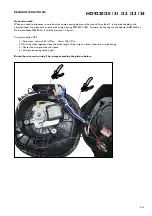
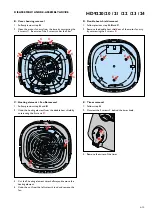
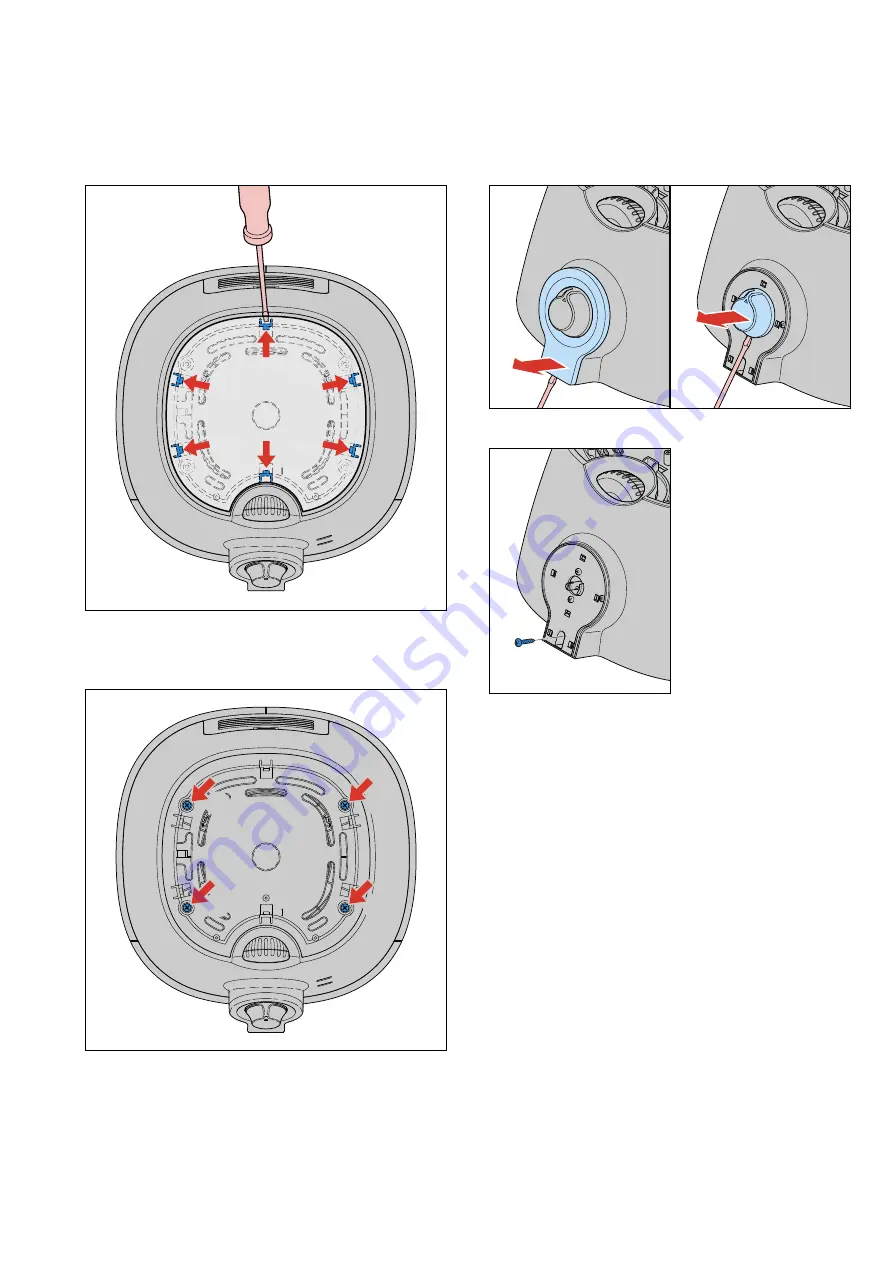
A.  Top cover removal

1.  Open the cover from the top cover by using a fl athead 

screw driver to open the 6 click connections.

2.  Use a crosshead screw driver to unscrew the 4 screws 

A

.

Note:  When you close the top cover, use a screw 

torque off 50 till 80 Nm  (5 to 8 kgf.cm)

A

A

A

A

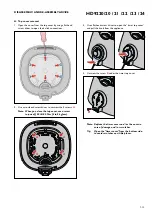
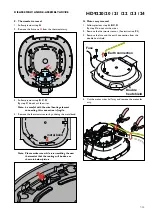
3.  Use a fl athead screw driver to open the “timer top cover” 

and pull the knob from the appliance.

4.  Unscrew the screw 

B

 under the timer top cover. 

B

Note:  Replace the timer cover and / or the cover in 

case of damage and / or scratches.

Tip: 

Open the “timer cover” from the bottom side, 
to avoid scratches on visible places.

DISASSEMBLY- AND  RE-ASSEMBLY ADVICE

Summary of Contents for HD9220/20

Page 1: ... SAP coding HD9220 20 HD9220 21 HD9220 22 HD9220 23 HD9220 24 OPTIONAL accessories Baking dish 4222 459 52761 TECHNICAL INFORMATION Product dimensions W x H x D 287 x 315 x 384 mm Cord length 0 8 meter Materials Outer skin Plastic PP Pan Aluminized steel Basket Aluminized steel Basket mesh Stainless steel Coating PTFE coating Capacity 2 2 liter till max indicator Weight 7 0 kg Coloursetting Black ...

Page 2: ...need to be ordered both at once 1136 4222 459 54131 or 4222 459 54111 Components are compatible no need to be ordered both at once TECHNICAL INFORMATION Electrical circuit When the appliance does not work check the electrical circuit Open de lid panel always on the underside Always replaces this panel in case of damaged scratches body or broken click connection L Thermostat N E Resistor Orange Neo...

Page 3: ...n and orange light are off Check the timer and fuse with a multimeter Timer Fuse The orange light does not switch off after reaching approx 80 C Thermostat is defective Thermostat Motor fan assy Set the timer and listen if the motor is running Motor is not running The fan is scraping the housing turning it by hand Switch off the power when you do this test Motor fan assy The fan is not scraping th...

Page 4: ... housing 4222 459 51851 To crimp the housing use the Lobster AK25 No2 or Muromoto Tekko MR30A Nr 2 with Air pressure 6 kg cm Crimp instruction CE2 1 Strip wires 16mm 0 63 in Max 13mm 0 51 Min 2 Twist the wires together along the entire length of the strip and insert them into crimp housing 3 Center the crimp tool on the sleeve 4 Crimp the housing with 6 kg cm Route the wire route using 5 tie wraps...

Page 5: ...lose the top cover use a screw torque off 50 till 80 Nm 5 to 8 kgf cm A A A A 3 Use a flathead screw driver to open the timer top cover and pull the knob from the appliance 4 Unscrew the screw B under the timer top cover B Note Replace the timer cover and or the cover in case of damage and or scratches Tip Open the timer cover from the bottom side to avoid scratches on visible places DISASSEMBLY A...

Page 6: ...the double heat shield by unscrewing the 3 screws D D D D 3 Cut the 2 heating element wires halfway and remove the heating element 4 Undo the nut from the left screw thread and remove the fan D Double heat shield removal 1 Follow previous step A B and C 2 Remove the double heat shield out of the motor fan assy by unscrewing the 3 screws E E E E E Timer removal 1 Follow step A 2 Unscrew the 2 screw...

Page 7: ...nsor by undoing the metal band metal band Note Please make sure while re assembling the new thermostat that the routing will be done as shown in below picture DISASSEMBLY AND RE ASSEMBLY ADVICE G Motor assy removal 1 Follow previous step A B C D By step C do not cut the wires 2 Remove the thermostat sensor See instruction F 4 3 Remove the fuse and the earth connection from the double heat shield E...

Page 8: ...HV 60 Hz WK1146 WK1147 WK1146 12 13 13 13 13 4222 459 55341 4222 459 49101 4222 459 54891 4222 459 54911 4222 459 54941 Heating element k c a l B e s a B k c a l B e s a B k c a l B e s a B k c a l B e s a B HV 60 Hz EU plug EU plug UK MEA plug Swiss plug WK1147 WK1146 WK1147 WK1147 WK1147 13 13 13 13 13 4222 459 54971 4222 459 54951 4222 459 55451 4222 459 55461 4222 459 55561 k c a l B e s a B k...

Page 9: ...HD9220 20 21 22 23 24 9 10 EXPLODEDVIEW 2 6 5 4 3 1 7 4x 16 ...

Page 10: ...HD9220 20 21 22 23 24 10 10 EXPLODEDVIEW 8 9 14 15 11 12 13 A 4x C 6x F 2x B D 3x E 3x G 3x 10 ...

Reviews: