background image

Summary of Contents for HDC-HS60P

Page 1: ...55P PC HDC TM60P PC HDC HS60P PC Before connecting operating or adjusting this product please read the instructions completely Spanish Quick Use Guide is included Guia para rapida consulta en espaSol esta incluida AVCHD TM m DOLBY _ _ _ DIG TAL _C STEREO CREATOR H N I V rAL ir_k TM VQT2M51 ...

Page 2: ...hanges from I_1_ to _ Normal playback is restored when you touch D lll With the playback paused continue touching 1_ _1 is for slow rewind playback Playback is slow while touching Normal playback is restored when you touch _ H When slow motion pictures are played back in reverse they will be shown continuously at approximately 2 3 rd the speed of normal playback intervals of 0 5 seconds With the p...

Page 3: ...ration icon A single frame from the recorded motion picture can be saved as a still picture Picture size of the still picture to be recorded is _ 1920x 1080 1 Pause at the scene you want to save as a still picture during playback It is convenient to use slow motion playback and frame by frame playback 2 Press the I_ button fully Date the motion picture was recorded will be registered as date of th...

Page 4: ... the motion picture in which faces were recognized will Q Scene selection be displayed A portion judged to be clearly recorded will be detected and displayed in thumbnail if you select HIGHLIGHT 3 Only when MINUTES is selected Touch _ _ to set the time It can be set up to a maximum of 60 minutes Touch ENTER 4 Touch the thumbnail to be played back Next previous thumbnail can be displayed by touchin...

Page 5: ...om in on during still picture playback The still picture is zoomed in on centering on the part you touched With each touch you zoom in further xl _ x2_ x4 2 Move your position on the zoomed still picture by touching A I _I I_ The location of the zoom displays for about 1 second when zooming in zooming out or moving the displayed location The more picture is enlarged the more its quality deteriorat...

Page 6: ... turned off or the mode is changed Even if scenes are recorded on the same day they are grouped separately in the following cases 1 2 is added after the recording date displayed on the screen When the number of scenes exceeds 99 When the media is repaired Even if still pictures are recorded on the same day they are grouped separately in the following cases When the number of still pictures exceeds...

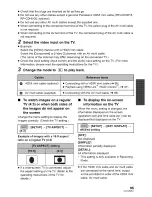
Page 7: ...era shake or focus error I Touch the desired item When FACE HIGHLIGHT HIGHLIGHT is selected PRIORITy SETUP Select the person registered for face recognition to be played back 84 PLAYBACK r ME Select the time to play back 85 MUSIC SELECT Select the music to be played on playback 85 This appears only when FACE HIGHLIGHT is selected When INTEL SCENE is selected DATE SETUP select the date t0 be p aYed...

Page 8: ...yed Touch the scene again to cancel the operation When SELECT DATE is selected Touch the date to be played back A maximum of 7 days can be selected When touched the date is selected and surrounded by red Touch the date again to cancel the operation 3 Touch Enter ENTER Priority setting 1 Touch SELECTED FACE Touch NONE to play back all the faces detected with face recognition 2 When SELECTED FACE is...

Page 9: ...te setting Touch the playback date Music setting 1 Touch your favorite music When NO MUSIC is selected the audio recorded at the time of shooting is played back To adjust the volume of music during playback or audio testing operate the volume lever or the adjust zoom buttons _ 42 2 Touch ENTER To test the music audio Touch START Touch the other music option to change the music to be tested When yo...

Page 10: ...nds LONG Approx 15 seconds When MUSIC SELECT is selected Touch the desired sound To adjust the volume of music during playback of the slide show or audio testing operate the volume lever or the adjust zoom buttons _ 42 Touch ENTER To test the music audio Touch START and start the audio testing Touch the other music option to change the music to be tested When you touch STOP the music playback stop...

Page 11: ...ase of playing back scenes or still pictures by date all the scenes or still pictures on the selected date will be deleted Protected scenes still pictures cannot be deleted 3 Only when SELECT is selected in step 2 Touch the scene still picture to be deleted When touched the scene still picture is selected and the _ indication appears on the thumbnail Touch the scene still picture again to cancel t...

Page 12: ... to DCF standard with this unit all the data related to the scenes still pictures may be deleted When still pictures recorded on an SD card by other products are deleted a still picture other than JPEG that cannot be played back on this unit may be erased To delete an unnecessary portion of a scene first divide the scene and then delete the unnecessary portion Change the mode to and touch the Play...

Page 13: ... the mode to _ 1 Select the menu VIDEO SETUP _ DELETE PERSONAL INFO 2 Touch the desired scenes with personal information to be deleted _ appears at scenes for which faces were recognized Touch one of the scenes where _ appears _ will change to _ red when touched Touch the _ red again to cancel the operation Up to 99 scenes can be selected in succession 3 Touch Delete To continuously delete other p...

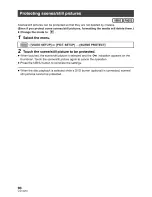
Page 14: ...VIDEO SETUP or PICT SETUP _ SCENE PROTECT 2 Touch the scene still picture to be protected When touched the scene still picture is selected and the O_ indication appears on the thumbnail Touch the scene still picture again to cancel the operation Press the MENU button to complete the settings When the disc playback is selected while a DVD burner optional is connected scenes still pictures cannot be...

Page 15: ...Please note Not all commercial printing services support this feature at this time 1 Select the menu PICT SETUP _ DPOF SET _ SET 2 Touch the still picture to be set 3 Touch _ _ to set the number of prints Up to 999 prints can be selected Prints for set number can be printed with a printer that supports DPOF To cancel the setting set the number of prints to 0 4 Touch ENTER To continuously set other...

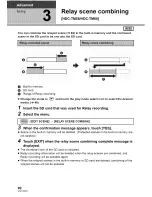
Page 16: ...Select the menu EDIT SCENE _ RELAY SCENE COMBINE 3 When the confirmation message appears touch YES Scene in the built in memory will be deleted Protected scenes in the built in memory are not deleted 4 Touch EXIT when the relay scene combining complete message is displayed The thumbnail view of the SD card is indicated Relay recording information will be deleted when the relay scenes are combined ...

Page 17: ...ss than the volume of the relayed scene in the built in memory It is recommended to combine the relay scene using a DVD burner or the HD Writer AE 2 0 When the disc playback is selected while a DVD burner optional is connected you cannot combine relay scenes or cancel relay information The personal information of the relayed scene in the built in memory or SD card is deleted the personal informati...

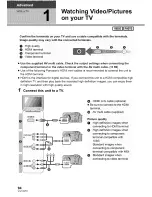
Page 18: ...unit to a HDMI compatible high definition TV and then play back the recorded high definition images you can enjoy them in high resolution with high quality sound 1 Connect this unit to a TV Q O HDMIIN O HDMt mini cable optionar_ Be sure to connect to the HDMI terminal Q AV multi cable supplied Picture quality O High definition images when connecting to HDMI terminal High definition nageswhen conne...

Page 19: ... iiiii O HDMI mini cable optional Connecting with a HDMI mini cable _ 96 Playback using VIERA Link TM HDAVI Contro TM _ 97 Q AV multi cable supplied Connecting with the AV multi cable _ 96 To watch images on a regular TV 4 3 or when both sides of the images do not appear on the screen Change the menu setting to display the images correctly Check the TV setting SETUP _ TV ASPECT 4 3 Example of imag...

Page 20: ...e TV when the setting is AUTO switch to the method 1080i or 480p which enables the images to be displayed on your TV Please read the operating instructions for the TV I AV multi connector output setting can be changed SETUP _ AV MULTI _ desired setting I COMPONENT When connecting to the component terminal AV OUT When connecting to the video terminal Changing the component output setting SETUP _ CO...

Page 21: ...patible with VIERA Link refer to the operating instructions for the respective devices This unit is compatible with VIERA Link Ver 5 VIERA Link Ver 5 is the newest Panasonic version and is also compatible with existing Panasonic VIERA Link devices As of Dec 2009 _ Change the mode to 1 Select the menu SETUP _ VIERA Link _ ON If you are not using VlERA Link set to OFF 2 Connect this unit to a Panaso...

Page 22: ...the power the power on this unit also turns off Automatic input switching If you connect with a HDMI mini cable and then turn on the power on this unit the input channel on the TV automatically switches to this unit s screen If the TV s power is in standby status it will turn on automatically if Set has been selected for the TV s Power on link setting Depending on the HDMI terminal on the TV the i...

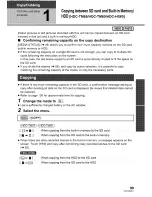
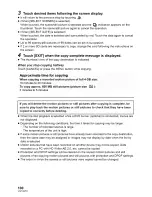
Page 23: ...8 and copy by scene selection it is possible to copy matching the remaining capacity of the media or only the necessary parts If there is not much remaining capacity in the SD card a confirmation message asking to copy after deleting all data on the SD card is displayed Be aware that deleted data cannot be restored Refer to page 100 for approximate time for copying 1 Change the mode to Use a suffi...

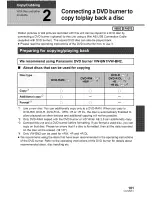
Page 24: ...ure size r5_ 3 minutes to 5 minutes If you will delete the motion pictures or still pictures after copying is complete be sure to play back the motion pictures or still pictures to check that they have been copied to correctly before deleting When the disc playback is selected while a DVD burner optional is connected menus are not displayed Depending on the following conditions the time it takes f...

Page 25: ... a DVD RAM When you copy to DVD RW DVD R DVD R DL RW R or R DL the disc is automatically finalized to allow playback on other devices and additional copying will not be possible 2 Only DVD RAM copied with the DVD burner or HD Writer AE 2 0 can additionally copy 3 Connect this unit and a DVD burner before formatting If you format a used disc you can copy on that disc Please be aware that if a disc ...

Page 26: ...i AB USB Connection Cable supplied with DVD burner Q DVD burner optional Insert the plugs as far as they will go 4 Insert the disc in the DVD burner Insert the DVD disc with the recording side down when using the DVD burner 5 Touch the desired item BURN DISC Refer to page 103 for how to copy discs PLAY DISC Refer to page 106 for how to play back the copied discs To terminate the connection with th...

Page 27: ...ed and surrounded by red Touch the date again to cancel the operation Up to 99 scenes 99 dates can be selected in succession 3 Touch START When 2 or more discs are necessary for copying follow the on screen instructions to switch discs You may need more discs than displayed number of discs when you are copying additionally to a used DVD RAM Eject the disc after copying is completed When the copied...

Page 28: ...s that do not support the AVCHD format In some cases the disc may get stuck in the device The disc will not play back on devices that do not support the AVCHD format When inserting a disc containing recorded motion still pictures into other devices a message prompting you to format the disc may be displayed Do not format the disc since deleted data cannot be restored later 104 VQT2M51 ...

Page 29: ...ber of recorded scene s is large When the temperature of the DVD burner has become high The disc that was copied to can be played back by connecting this unit and a DVD burner _ 106 Do not turn off this unit or the DVD burner or disconnect the Mini AB USB Connection Cable while copying Also do not shake this unit or the DVD burner It is impossible to stop copying halfway The order in which the sce...

Page 30: ...cture to be played back and then play it back The playback operation is performed the same as when playing back motion pictures or still pictures 40 78 It will return to Step 5 on page 102 when RETURN is selected in the thumbnail screen It is also possible to switch the media to play back by touching the play mode select icon It is possible to select VIDEO DISC or PICTURE DISC when the DVD burner ...

Page 31: ...quality or DVD RW disc when copying motion pictures or still pictures in high definition picture quality to the disc 1 Select the menu DISC SETUP _ AUTO PROTECT _ ON If a disc that you copied to is inserted in another device without protecting it a message may be displayed prompting you to format the disc We recommend setting AUTO PROTECT to ON in order to prevent accidental deletion 2 Copy to the...

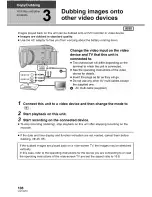
Page 32: ...Do not use any other AV multi cables except the supplied one O AV multi cable supplied 1 Connect this unit to a video device and then change the mode to _ 2 start playback on this unit 3 start recording on the connected device To stop recording dubbing stop playback on this unit after stopping recording on the recorder If the date and time display and function indication are not wanted cancel them...

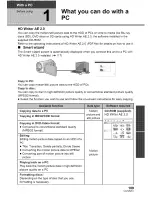
Page 33: ...ition picture quality or conventional standard picture quality MPEG2 format Select the function you wish to use and follow the on screen instructions for easy copying i Copying data to a PC CD ROM supplied Copying in BD AVCHD format HD Writer AE 2 0 Copying in DVD Video format Converted to conventional standard quality M PEG2 format Editing Editing motion picture data copied on an HDD of a PC Titl...

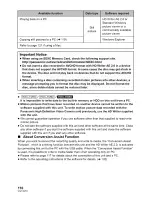
Page 34: ...have been recorded on another device cannot be written to the software supplied with this unit To write motion picture data recorded with the Panasonic High Definition Video Camera sold previously use the liD Writer supplied with the unit We cannot guarantee operation if you use software other than that supplied to read write motion picture Do not start the software supplied with this unit and oth...

Page 35: ...nder law orregulation ofthe country where Licensee resides Panasonic and its distributors will not be responsible for any defects inthe Software ordamage to Licensee caused by Licensee s reverse engineering decompiling ordisassembly of the Software Article 6 Indemnification The Software isprovided AS IS without warranty ofany kind either expressed or implied including but not limited to warranties...

Page 36: ...ndows XP Home Edition Service Pack 2 Service Pack 3 Microsoft Windows XP Professional Service Pack 2 Service Pack 3 Microsoft Windows Vista Home Basic Service Pack l Service Pack 2 Microsoft Windows Vista Home Premium Service Pack I Service Pack 2 Microsoft Windows Vista Business Service Pack l Service Pack 2 Microsoft Windows Vista Ultimate Service Pack l Service Pack 2 Microsoft Windows 7 Starte...

Page 37: ...nterprise Windows XP Media Center Edition Tablet PC Edition and Windows 7 Enterprise Operation is not guaranteed on 64 bit editions of Windows XP and Windows Vista This software is not compatible with a multi boot environment This software is not compatible with a multi monitor environment If using Windows XP an administrative account user only can use this software If using Windows Vista Windows ...

Page 38: ...rprise Service Pack I Service Pack 2 Microsoft Windows 7 Starter Microsoft Windows 7 Home Basic Microsoft Windows 7 Home Premium Microsoft Windows 7 Professional Microsoft Windows 7 Ultimate Windows Vista Windows 7 32 bit x86 Intel Pentium I 1 0 GHz or higher processor Windows XP Intel Pentium I 450 MHz or higher or Intel Celeron 400 MHz or higher Windows 7 1 GB or higher Windows Vista Home Basic ...

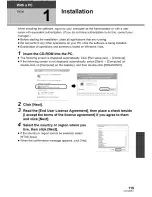
Page 39: ...and screens is based on Windows Vista 1 Insert the CD ROM into the PC The following screen is displayed automatically Click Run setup exe _ Continue If the following screen is not displayed automatically select Start _ Computer or double click on Computer on the desktop and then double click PANASONIC 2 3 5_ Cr p Click Next Read the End User License Agreement then place a check beside I accept the...

Page 40: ...e contents then close the window 8 Select Yes I want to restart my computer now then click Finish The PC must be rebooted for the application to work Uninstalling HD Writer AE 2 0 Follow the steps below to uninstall any software applications that you no longer require 1 Select Start _ Control Panel _ Uninstall a Program 2 Select HD Writer AE 2 0 then click Uninstall Proceed with the uninstallation...

Page 41: ... PC Do not use any other USB cables except the supplied one Operation is not guaranteed with any other USB cables When using the battery the LCD monitor turns off after about 5 seconds Touch the screen to turn the LCD monitor on The Smart wizard screen is automatically displayed when HD Writer AE 2 0 is installed This unit is automatically recognized as an external drive of the PC _ 119 When HD Wr...

Page 42: ...C TM60 SD USB Device or MATSHITA HDC TM60 MEM USB Device is selected and click OK Verify MATSHITA HDC HS60 SD USB Device or MATSHITA HDC HS60 HDD USB Device is selected and click OK Charging the battery by connecting it to different devices When using the battery if you turn off the unit and connect it to a PC Panasonic Blu ray disc recorder or Panasonic DVD recorder the battery will charge When c...

Page 43: ... the HDC TM55 HDC TM60 and CAM_HDD is displayed when using the The following data will be recorded 0 Up to 999 still pictures in JPEG format 1000001 JPG etc JPEG format still pictures recorded in Hi speed Burst Shooting Mode _l JPEG format still pictures created from the motion picture O The DPOF setting files _ The motion picture thumbnails Q AVCHD format motion picture files 00000 MTS etc Files ...

Page 44: ...e equally authorized or with the user name for a standard user account If you log on with a user name for a guest user account the software cannot be used On the PC Select Start _ All Programs _ Panasonic _ HD Writer AE 2 0 _ HD Writer AE For details on how to use the software applications read the PDF operating instructions of the software You will need Adobe Acrobat Reader 5 0 or later or Adobe ...

Page 45: ...d USB cable The USB function selection screen will appear 2 Touch PC 3 Double click CAM_SD displayed on the desktop For users who have I HDC TM55 HDC TM60 CAM_SD and CAM_MEM are displayed on the desktop and for users who have _ CAM_SD and CAM_HDD are displayed on the desktop Files are stored in 100CDPFQ or 101CDPFR folder etc in the DClM folder 4 Using a drag and drop operation move the pictures y...

Page 46: ...picture recording _ 35 0h00m00s Elapsed recording time 35 NOV 15 2010 Date indication 31 12 34PM Time indication _ 31 World time setting 44 Motion picture recording mode 61 Built in memory recording possible status 1 HDD recording possible status 2 White Card recording possible status Green Recognizing the card Q I I Red Recording I I Green Recording pause IPRE RECI PRE REC _ 56 Manual Mode 74 Int...

Page 47: ...te Fade Black B _ 56 Color Night Rec Function _ 59 _ Intelligent Contrast Control _ 56 i _ Intelligent Exposure _ 58 O White O Green _ _ _ _A _ Focus indication 36 _ 10 _ 2 Self Timer Recording _ 58 I _AI _ Flash _ 57 _ _ Flash Level _ 57 _ Red Eye Reduction _ 58 _ _ Picture Quality _ 71 Number of recording pixels for still pictures _ 37 70 72 79 The icture size is not displayed for still pictures...

Page 48: ...ted motion pictures still pictures 90 d_ Relay Recorded Scene q7 62 1 Still picture recorded using Smile Shot 57 Indication of connection to other devices Accessing the card 118 _ Accessing the built in memory 118 1 _ Accessing the HDD 118 2 Confirmatory indications Time The built in battery is low display 31 Warning for recording yourself 30 Confirmatory indications when a DVD burner is connected...

Page 49: ...EMPERATURE 2 The internal temperature of this unit is extremely low so it cannot be operated If Please Wait appears after this message wait a while without turning the unit off It may take time until the unit can be used CHECK CARD This card is not compatible or it cannot be recognized by the unit If this message appears even though motion pictures and still pictures are recorded on an SD card the...

Page 50: ...isplayed in thumbnail To perform the repair touch the scene with in the thumbnail and start the playback Please be aware that if the repair fails scenes with FT will be deleted Use a sufficiently charged battery or the AC adaptor Depending on the condition of the data it may not be possible to completely repair the data When data recorded on another device is recovered it may not be possible to pl...

Page 51: ...e power of the unit turns off when you turn off the power to the TV using the TV remote control the VIERA Link is at work If you are not using the VIERA Link set VIERA Link to OFF 97 When this unit is connected to a DVD burner to copy or play back images a disc is being accessed the power turns off automatically if the Mini AB USB Connection Cable is removed This is the sound of the lens moving an...

Page 52: ...153 Calibrate the touch screen 49 DISPLAY of the SETUP is OFF 441 Use an SD card that can be used for motion picture recording 26 The recordable time may have shortened due to the deterioration of the data writing speed or repeated recording and deletion Using the unit format the SD card built in memory or HDD 48 If AGS is ON record in the normal horizontal position or set lAGS to OFF 66 If the un...

Page 53: ... of your TV and select the channel that matches the input used for the connection _ Change the TVASPECT setting to match the aspect ratio of the TV 95 Change the setting of the unit depending on the cable connecting to the TV 96 Release the protect setting _ 90 Any scenes still pictures where the thumbnails are displayed as E_ cannot be deleted If the scenes still pictures are unnecessary format t...

Page 54: ... this will not affect the recorded image Object seems to be warped slightly when the object moves across the image very fast but this is because the unit is using MOS for the image sensor This is not a malfunction If you take a picture with the flash in a dark place or indoors white round spots may appear on the picture caused by the flash reflecting of particles of dust in the air This is not a m...

Page 55: ... 112 Connect the supplied USB cable again after restarting the PC and turning on this unit again _hen the USB cable is_ _ To disconnect the USB cable safely double click the sconnected an error I _ icon in the task tray and follow the instructions essage will appear on the screen n the PC J iThe power of the DVD When the unit is connected to the DVD burner use burner cannot be _ _b _ the respectiv...

Page 56: ...ata that exceeds 4 GB may momentarily stop at every 4 GB of data when played back with another device It may not play back smoothly when the editing of scenes was done with the HD Writer AE 2 0 but it will play back smoothly if you set the seamless settings in the HD Writer AE 2 0 Refer to the operating instructions for the HD Writer AE 2 0 When the scenes were recorded on different dates When sce...

Page 57: ...nes the recorded pictures and sound may be adversely affected Make sure to use the supplied cords and cables If you use optional accessories use the cords and the cables supplied with them Do not extend the cords and the cables Do not spray insecticides or volatile chemicals onto the unit If the unit is sprayed with such chemicals its body may be marred and the surface finish may peel off Do not l...

Page 58: ...data can be recovered using commercially available software or the like We recommend that you physically format the built in memory or HDD before disposing of or giving away this unit HDC TM55 1 HDC TM60 J To physically format the built in memory connect the unit via the AC adaptor select FORMAT MEDIA _ Built inMemory from the menu and then press and hold the delete button on the screen below for ...

Page 59: ...ssible Recommended temperature 15 C to 25 C 59 F to 77 F Recommended humidity 40 to 60 Extremely high temperatures or low temperatures will shorten the life of the battery If the battery is kept in high temperature high humidity or oily smoky places the terminals may rust and cause malfunctions To store the battery for a long period of time we recommend you charge it once every year and store it a...

Page 60: ...ttery clean About charging errors When the status indicator is flashing at a particularly fast or slow rate the following should be considered Flashing with approx 4 second period off for approx 2 seconds on for approx 2 seconds The battery may be over discharged or the battery temperature may be high or low The battery will charge but it may take several hours for normal charging to begin Flashin...

Page 61: ... screen appears select YES and then follow the on screen instructions When the LCD monitor gets dirty wipe it with a soft cloth such as eye glass cleaner Do not touch the LCD monitor with your finger nails or rub or press with strong force It may become hard to see or hard to recognize the touch when the LCD protection sheet is affixed In a place with drastic temperature changes condensation may f...

Page 62: ...ay not work properly Make every effort to ensure that condensation does not form If it does form take the actions described below Causes of condensation Condensation takes place when the ambient temperature or humidity is changed as follows When this unit is brought inside from the cold e g a ski slope to a warm room When this unit is moved from an air conditioned car to outside When a cold room h...

Page 63: ...creen shot s reprinted with permission from Microsoft Corporation IBM and PC AT are registered trademarks of International Business Machines Corporation of the U S TM Intel Core Pentlum andCeleron are the registered trademarks or trademarks of the Intel Corporation in the United States and other countries AMD Athlon TM is a trademark of the Advanced Micro Devices Inc iMovie and Mac are trademarks ...

Page 64: ... h40 rain 4h 10min 6 h40min memory 120 GB 15 h 50 rain 20 h 30 min 31 h 20 rain 51 h HDD O Favors image quality Q Favors recording time The default setting is HG mode Maximum continuously recordable time for one scene 12 hours The recording is paused once when the recording time for one scene exceeds 12 hours and the recording will automatically resume after a few seconds if a recording with a lot...

Page 65: ...0 64 GB 24000 38000 64000 101000 492000 829000 3000 4700 7900 12000 60500 102000 Built in memory 6000 9500 15900 25000 122000 205000 Built in memory 120 GB 45000 71000 119000 188000 899100 899100 HDD iil i i iii_ iiiiiii i_ iii i _ 512 MB 180 290 490 1GB 380 600 1000 2 GB 790 1200 2000 4 GB 1500 2400 4000 8 GB 3100 4900 8000 16 GB 6300 10000 16000 24 GB 9300 14500 24000 32 GB 12000 20000 33000 i 4...

Page 66: ...numbers shown in the table are approximations The number of recordable pictures depends on whether and _ are used together and on the subject being recorded Maximum number of recordable pictures that can be displayed is 99999 If the number of recordable pictures exceeds 99999 the number will not change when the picture is taken until the number of recordable pictures gets less than 99999 The memor...

Page 67: ... 16 9 Still picture 2320 K 4 3 2280 K 3 2 2110 K 16 9 Auto Iris F1 8 to F3 3 Focal length 3 02 mm to 75 5 mm Macro Full range AF 35 mm equivalent Motion picture 35 7 mm to 893 mm 16 9 Still picture 36 mm to 900 mm 4 3 35 7 mm to 893 mm 3 2 35 7 mm to 893 mm 16 9 Minimum focus distance Normal approx 4 cm 1 6 Wide approx 1 5 m 4 9 feet Tele Tele macro approx 70 cm 28 Tele Intelligent auto Macro appr...

Page 68: ...tem Component video output level Y 1 0 Vp p 75 _2 Pb 0 7 Vp p 75 _2 Pr 0 7 Vp p 75 _2 HDMI TM x v Color TM 1080i 480p 316 mY 600 _2 2 ch Dolby Digital Linear PCM Read Write No copyright protection support HDC TM55 Read only Read only Hi Speed USB USB 2 0 USB terminal Type Mini AB USB host function for DVD burner Available range Approx 1 0 m to 2 5 m 3 3 feet to 8 2 feet _1 51 5 mm W x65 5 mm H x11...

Page 69: ...Battery operation time Approx 299 g Approx 0 66 Ibs with battery supplied and an SD card optional Approx 300 g Approx 0 66 Ibs with battery supplied Approx 369 g Approx 0 81 Ibs with battery supplied 0 C to 40 C 32 F to 104 F 10 to 80 See page 24 145 VQT2M51 ...

Page 70: ... the recordable time Picture size HA HG HX HE 1920x 1080 60i Audio compression Dolby Digital Still pictures Recording SD card Built in memory HDD SD Memory Card FAT12 and FAT16 system compliant SDHC Memory Card FAT32 system compliant SDXC Memory Card exFAT system compliant Refer to page 26 for details on SD cards usable in this unit 8GB 16GB 120 GB JPEG Design rule for Camera File system based on ...

Page 71: ...AC adaptor Information for your safety Dimensions 46mm W x25 mm H x75 5 mm D 1 8 W x 1 0 H x3 0 D Mass Weight Approx 115 g Approx 0 25 Ibs Specifications may change without prior notice 147 VQT2M51 ...

Page 72: ...chargeable Lithium Ion Battery Pack VW VBK360 1 Rechargeable Lithium Ion Battery Pack RP CDHM15 HDMI mini cable RP CDHM30 VW LDC103PP 2 Video DC Light VZ LL10PP Light bulb for video DC light VW SK12PP _ _ Shoe adaptor _J VW ACK180PP _ j_ Accessory kit 148 VQT2M51 ...

Page 73: ...GB SDXC Memory Card Class 1048GB SDXC Memory Card Class 1032 GB SDHC Memory Card Class 1016 GB SDHC Memory Card Class 108GB SDHC Memory Card Class 104GB SDHC Memory Card Class 62GB SD Memory Card DVD burner 1 Please refer topage 24 concerning the battery charging time and available recording time 2 The shoe adaptor VW SK12PP optional isnecessary NOTE Accessories and or model numbers may vary by co...

Page 74: ...ONIC ACCESSORIES Please do not send cash 4 Shipping information UPS delivery requires complete street address Ship To Mr Mrs Ms First Last Street Address City State Zip Phone Day Night TO OBTAIN ANY OF OUR ACCESSORIES YOU CAN DO ANY OF THE FOLLOWING VISIT YOUR LOCAL PANASONIC DEALER OR CALL PANASONIC S ACCESSORY ORDER LINE AT 1 800_332 5368 6 AM 6 PM M E PACIFIC TIME OR MAIL THIS ORDER TO PANASQNI...

Page 75: ...A 7262 When shipping the unit carefully pack include all accessories and send it prepaid adequately insured and preferably in the original carton If Lithium Ion batteries are shipped by air the package must be labeled Contains Lithium Ion Battery No lithium metal Damaged batteries are prohibited from shipment by US Mail Batteries must be securely packed in a manner to prevent short circuiting and ...

Page 76: ... handled to your satisfaction then write to the warrantor s Consumer AfFairs Department at the addresses listed for the warrantor PARTS AND SERVICE WHCH ARE NOT COVERED BY THINS LmMmTEDWARRANTY ARE YOUR RESPONSmBmMTY Obtain Product Information and Operating Assistance locate your nearest Dealer or Service Center purchase Parts and Accessories or make Customer Service and Literature requests by vis...

Page 77: ...ols improper maintenance improper batteries power line surge lightning damage modification introduction of sand humidity or liquids commercial use such as hotel office restaurant or other business or rental use of the product or service by anyone other than a Authorized Servicer or damage that is attributable to acts of God Dry cell batteries are also excluded from coverage under this warranty Rec...

Page 78: ... Date and time display 45 Date and time setting 31 Delete 87 Demo mode 50 Digital cinema color 66 Digital zoom 61 Disc status 107 Display 44 Divide 88 Dividing a scene to partially delete 88 DPOF setting 91 Dubbing 108 DVD burner 101 liE Economy 45 Extra optical zoom 51 liF Face highlight playback 83 Face recognition 62 Fade 56 Fade color 56 Flash 57 Flash level 57 Focus 36 77 Format disc 107 Form...

Page 79: ...d eye reduction 58 Relay information canceling 93 Relay recording 62 Remaining number ofstill pictures 37 Remaining time left for recording 35 Repeat playback 80 Resume playback 81 liS Scene mode 60 Scene protect 90 SD Memory Card 26 SD Speed Class Rating 26 SDHC Memory Card 26 SDXC Memory Card 26 Self recording 30 Self timer recording 58 Shooting guide 67 Shutter sound 73 Shutter speed 76 Simulta...

Page 80: ...estado parpadeara de color rojo en un intervalo de 2 segundos indicando que comenzo la carga L_mpara de acceso ACCESS O Cuando la unidad accede a la tarjeta SD o a a memoria integrada se enciende a lampara de acceso 1 Abra la pantalla LCD 2 Abra la tapa de la tarjeta SD e introduzca retire la tarjeta SD en de la ranura correspondiente Q Coloque el lado de la etiqueta _ en la direccion mostrada en ...

Page 81: ...se ilumina Para apagar la unidad Seleccion del modo Utilice el selector de modo para cambiar el modoa _ 0 o I _ Modo de grabaci6n de peliculas 34 Modo de grabaci6n de fotografias 36 Modo de reproduccibn _ 40 78 Como usar la pantalla tactil Puede actuar directamente tocando el monitor LCD pantalla t ctil con el dedo Es m s sencillo utilizar el I piz electronico suministrado para operaciones detalla...

Page 82: ...A para grabar en la memoria integrada Toque ViDEO DISCO DURO o IMAGEN DISCO DURO para grabar en el disco duro El medio se selecciona de forma separada para las peliculas o fotografias y se resalta en amarillo 4 Toque ENTRAR Grabacion de peliculas 1 Cambie el modo a _ 2 Abra el monitor LCD 3 Pulse el boton de iniciolparada de grabacion para iniciar la grabacion O Cuando comienza a grabar I cambia a...

Page 83: ...6n Pausa 1 Rebobinado durante la reproducci6n I_1_ Avance r_pido durante la reproducci6n I1 Detener la reproducci6n y visualizar las miniaturas I_ Visualiza la barra de reproducci6n directa _ 79 Reproducci6n de fotografias I_ I I Iniciar o hacer una pausa en la presentaci6n de diapositivas reproducci6n de las fotografias que contiene en orden num6rico 411 Reproducci6n de la imagen anterior II1_ Re...

Page 84: ...cs Company Division of Panasonic Corporation of North America One Panasonic Way Secaucus NJ 07094 Panasonic Canada Inc 5770 Ambler Drive Mississauga Ontario L4W 2T3 VQT2M51 FO110MLO 24000 _ Iilllll llllillllllllllllllOPanason Japa ...

Reviews: