background image


VQT3N87 

87

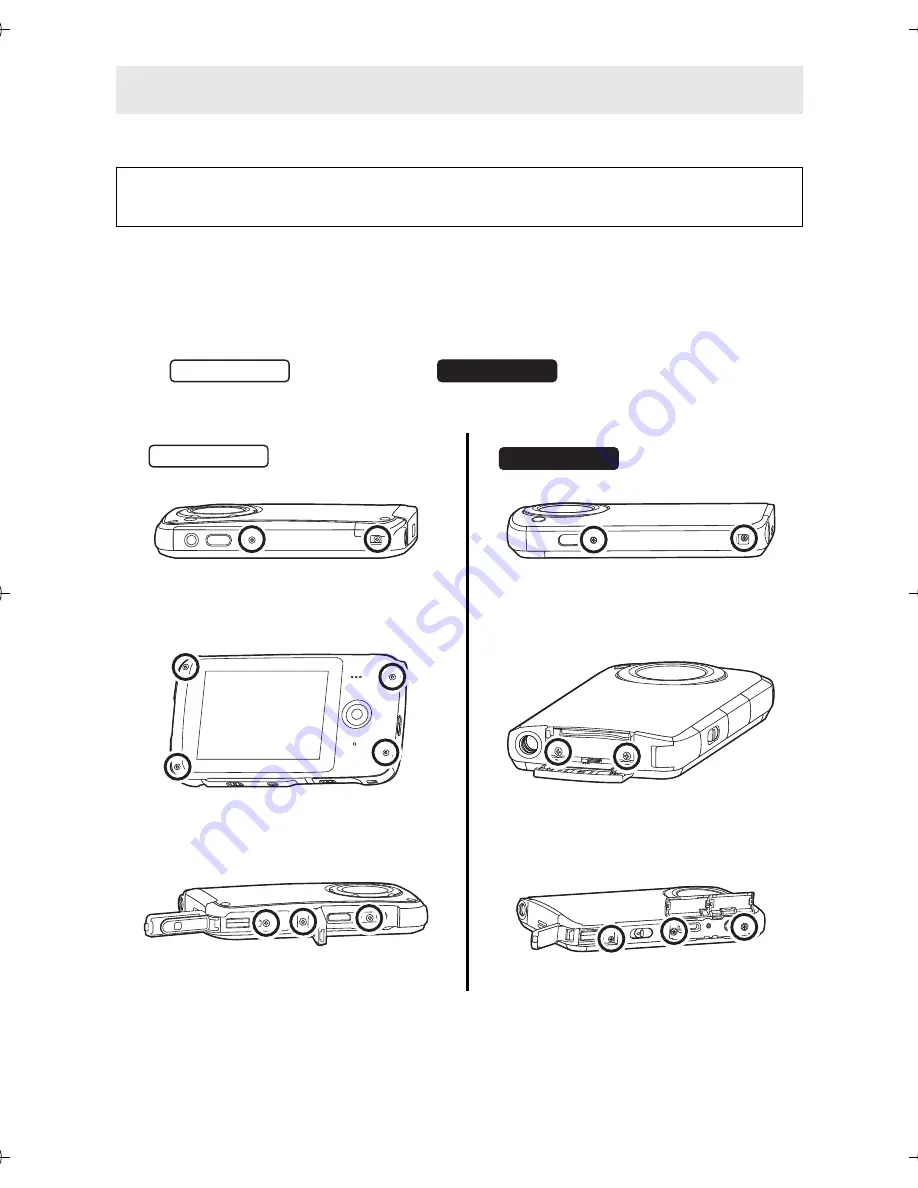
Disassemble after the battery runs out.

Using a driver (optional), disassemble in the following sequence.

If it cannot be removed smoothly, contact Panasonic’s Service Center.

Keep disassembled parts out of reach of children.

1

Remove all screws shown in the figure.
(

: 9 screws, 

: 7 screws)

Use a Phillips screwdriver (optional) to remove screws.

How to remove the battery

This figure describes the disposal of the unit, it is not instruction 
for repair. If disassembled, repair is not possible.

HM-TA20

HM-TA2

HM-TA20

HM-TA2

HM-TA20&TA2_P&PC-VQT3N87_mst.book  87 ページ  2011年4月22日 金曜日 午後12時11分

Summary of Contents for HM-TA2

Page 1: ...da consulta en español está incluida Owner s Manual High Definition Mobile Camera Model No HM TA20 HM TA2 VQT3N87 1AG6P1P6253 S For USA and Puerto Rico assistance please call 1 800 211 PANA 7262 or contact us via the web at http www panasonic com contactinfo For Canadian assistance please call 1 800 561 5505 or visit us at www panasonic ca P PC ...

Page 2: ...the SD card door of your camera Be sure to retain this manual as your convenient camera information source Safety Precautions WARNING TO REDUCE THE RISK OF FIRE ELECTRIC SHOCK OR PRODUCT DAMAGE Do not let water or other liquids drip or splash inside the unit Do not expose accessories to rain moisture dripping or splashing Do not place objects filled with liquids such as vases on accessories Use on...

Page 3: ...ILT IN CABINET OR IN ANOTHER CONFINED SPACE ENSURE THE UNIT IS WELL VENTILATED TO PREVENT RISK OF ELECTRIC SHOCK OR FIRE HAZARD DUE TO OVERHEATING ENSURE THAT CURTAINS AND ANY OTHER MATERIALS DO NOT OBSTRUCT THE VENTILATION VENTS AC adaptor optional This AC adaptor operates on AC between 100 V and 240 V But In the U S A and Canada the AC adaptor must be connected to a 120 V AC power supply only Wh...

Page 4: ...eparation between the equipment and receiver Connect the equipment into an outlet on a circuit different from that to which the receiver is connected Consult the dealer or an experienced radio TV technician for help FCC Caution To assure continued compliance follow the attached installation instructions and use only shielded interface cables with ferrite core when connecting to computer or periphe...

Page 5: ...mble this unit There are no user serviceable parts inside Unplug your camera from the power supply before cleaning AS WITH ANY SMALL OBJECT SD CARDS CAN BE SWALLOWED BY YOUNG CHILDREN DO NOT ALLOW CHILDREN TO HANDLE THE SD CARD Product Identification Marking is located on the bottom of unit For USA California only This product contains a CR Coin Cell Lithium Battery which contains Perchlorate Mate...

Page 6: ...contains a sensitive pick up device which could be damaged by improper handling or storage CARE TO CLEAN YOUR CAMERA Do not use strong or abrasive detergents when cleaning your camera body TO PROTECT THE LENS Do not touch the surface of the lens with your hand Use a commercial camera lens solution and lens paper when cleaning the lens Improper cleaning can scratch the lens coating TO PROTECT THE F...

Page 7: ...ory Card SDHC Memory Card and SDXC Memory Card 4 GB or more Memory Cards that do not have the SDHC logo or 48 GB or more Memory Cards that do not have the SDXC logo are not based on SD Memory Card Specifications Refer to page 27 for more details on SD cards For the purposes of this owner s manual SD Memory Card SDHC Memory Card and SDXC Memory Card are referred to as the SD card Pages for referenc...

Page 8: ...motion pictures 35 Recording still pictures 36 Recording voices 37 Intelligent Auto Mode 38 Digital zoom in out function 39 Recording with the LED light 39 Night View mode 40 Effect function applying special effects 40 For underwater recording HM TA20 41 Playback 42 Playing back the slide show continuous playback 46 Zooming in on a still picture during playback Playback zoom 47 Deleting scenes sti...

Page 9: ...sages Troubleshooting 77 Cautions for use 81 Requests when disposing of this unit 86 About copyright 89 Recording modes approximate recordable time motion pictures 90 Approximate number of recordable pictures 91 Recording modes approximate recordable time voices 91 Specifications 92 Optional accessories 98 Accessory Order Form For USA and Puerto Rico Customers 99 Limited Warranty ONLY FOR U S A AN...

Page 10: ... devices Panasonic s test method is based on the above MIL STD 810F Method 516 5 Shock However the drop height was changed from 122 cm 4 0 feet to 150 cm 5 0 feet dropping onto 3 cm 0 10 feet thick plyboard This drop test was passed Disregarding appearance change such as loss of paint or distortion of the part where drop impact is applied Waterproof Dustproof Performance This unit s waterproof dus...

Page 11: ...roof Do not handle with a wet hand Also do not insert wet card into this unit Do not leave this unit for a long period of time in places where temperature is very low at ski resorts or at high altitude etc or very high above 35 oC 95 F inside a car under strong sunlight close to a heater on the beach etc Waterproof performance may be degraded Foreign objects may adhere to the inner side of the doo...

Page 12: ...perature or in high humidity such as the following When this unit is used underwater suddenly after being on a hot beach etc When this unit is moved to a warm area from a cold area such as at a ski resort or at high altitude When the door cover is opened in a high humidity environment 1 Check that there are no foreign objects on the inner side of the door cover If there is any foreign object such ...

Page 13: ...e each year Please contact Panasonic s Service Center for related costs and other information 3 Close the door cover securely Lock the LOCK lever securely until the red part is no longer visible To prevent water seeping into this unit be careful not to trap foreign objects such as liquids sand hair or dust etc USB terminal cover HDMI Headphone cover SD card door A LOCK lever B Open close lever C R...

Page 14: ... and there is a chance of water leak Do not dive into water holding this unit Do not use this unit in a location where water will splash strongly such as near rapids or waterfalls Strong water pressure may be applied and it may cause malfunction This unit will sink in the water Take care not to drop this unit and lose it underwater by securely placing the strap around your wrist or similar measure...

Page 15: ... this unit with water Make sure to clean this unit after using it Thoroughly wipe off any water droplets sand and saline matter on your hands body hair etc It is recommended to clean this unit indoors avoiding places where water spray or sand may fall Do not leave this unit uncared for more than 60 minutes after using it underwater Leaving this unit with foreign objects or saline matter on it may ...

Page 16: ... not dry this unit with hot air from dryer or similar Waterproof performance will deteriorate due to deformation Do not use chemicals such as benzine thinner alcohol or cleanser or soap or detergents 4 Confirm that there are no water droplets open the door cover and wipe off any water droplets or sand left inside using a soft dry cloth Water droplets may adhere to the card when the door cover is o...

Page 17: ...2011 These may be subject to change The unit comes with built in HD Writer PE 2 0 video editing software Supplied accessories are not waterproof Hand strap with stylus pen VFC4708 The stylus pen is used for operations that are hard to operate with your fingers or performing detailed operations with the touch screen operation l 32 USB extension cord VFA0545 Tripod VFC4709 ...

Page 18: ...gth using the stylus pen 5 Recording button l 35 6 Status indicator l 22 29 31 58 7 LCD monitor Touch screen l 32 8 Screen lock button l 41 Due to limitations in LCD production technology there may be some tiny bright or dark spots on the LCD monitor screen However this is not a malfunction and does not affect the recorded picture HM TA20 HM TA2 1 8 2 3 4 6 7 5 1 2 3 4 6 7 5 HM TA20 ...

Page 19: ...VQT3N87 19 9 Tripod receptacle If you attach a tripod with a 5 5 mm 0 22 q screw or larger it may damage this unit 10 LED light l 39 11 Lens 12 USB Latch l 22 HM TA20 HM TA2 9 10 11 9 10 12 11 HM TA2 ...

Page 20: ...adphone terminal Ë Use the earphone headphone with a A part width 11 mm 0 43 q or smaller 16 Reset button RESET l 80 17 HDMI mini connector l 58 18 HDMI Headphone cover RESET 13 14 15 16 17 18 19 20 21 HM TA20 RESET 13 14 15 16 17 20 21 22 23 HM TA2 HM TA20 ...

Page 21: ... USB terminal cover HDMI Headphone cover and SD card door Each door cover is equipped with a LOCK lever to lock the open close lever When opening and closing the door cover slide the LOCK lever and then slide the open close lever USB terminal cover HDMI Headphone cover SD card door A LOCK lever B Open close lever HM TA20 HM TA2 HM TA2 HM TA20 ...

Page 22: ...e the LOCK lever for the USB terminal cover A to release the lock on the open close lever for the USB terminal cover B 2 Open the USB terminal cover while sliding the open close lever for the USB terminal cover B in the direction indicated by the arrow 3 Press the USB Latch C until the USB terminal comes out 1 Slide the USB Latch A until the USB terminal cover opens 2 Slide the USB Latch A again u...

Page 23: ...al Do not use any other USB extension cords except the supplied one Operation is not guaranteed with any other USB extension cords Insert the USB extension cord securely all the way Insert to line C It will not operate properly if it is not inserted all the way Always use a genuine Panasonic AC adaptor VSK0750 optional The status indicator will flash red at an interval of 2 seconds indicating that...

Page 24: ... A to lock the open close lever for the USB terminal cover B 1 Slide the USB Latch A 2 While the USB Latch A is slid press the USB terminal with your finger Release your finger from the USB Latch A and push in the USB terminal until it is locked 3 Close the USB terminal cover Please refer to page 82 if the status indicator flashes quickly Do not heat or expose to flame Do not leave unit in an auto...

Page 25: ...cordable time when repeatedly starting stopping recording turning the unit on off adjusting the zoom etc This unit becomes warm after use or charging This is not a malfunction Recording conditions by CIPA standard CIPA is an abbreviation of Camera Imaging Products Association Using a Panasonic SD Memory Card 2 GB Charging and motion pictures recording time Charging time Recording mode Maximum cont...

Page 26: ...ly Charging time and recordable time vary depending on the usage conditions such as high low temperature This unit becomes warm after use or charging This is not a malfunction Charging and voices recording time Charging time Recording mode Maximum continuous recordable time 4 h 20 min 4 h 30 min 4 h 30 min 4 h 30 min Battery capacity indication The display changes as the battery capacity reduces I...

Page 27: ...n use with this unit This unit an SDXC compatible device is compatible with SD Memory Cards SDHC Memory Cards and SDXC Memory Cards When using an SDHC memory card SDXC memory card with other equipment check the equipment is compatible with these memory cards Card type Capacity Motion picture Voice recording Still picture recording SD Memory Card 8 MB 16 MB 32 MB 64 MB 128 MB 256 MB Cannot be guara...

Page 28: ...emory Cards that do not have the SDXC logo are not based on SD Memory Card Specifications When the write protect switch A on SD card is locked no recording deletion or editing will be possible on the card Keep the Memory Card out of reach of children to prevent swallowing About Built in Memory Recordable Memory size Approx 10 MB You cannot copy the recorded pictures to a card The built in memory c...

Page 29: ...rd door after releasing the lock with the LOCK lever for the SD card door 2 Securely close the SD card door Inserting removing an SD card When using an SD card not from Panasonic or one previously used on other equipment for the first time on this unit format the SD card l 57 When the SD card is formatted all of the recorded data is deleted Once the data is deleted it cannot be restored HM TA2 Sta...

Page 30: ...unit to vibrations or shock Performing the above while the status indicator is on may result in damage to data SD card or this unit Do not expose the terminals of the SD card to water dirt or dust Do not place SD cards in the following areas jIn direct sunlight jIn very dusty or humid areas jNear a heater jLocations susceptible to significant difference in temperature condensation can occur jWhere...

Page 31: ...or Recording button About the high temperature warning icon When the high temperature warning icon is displayed the temperature of the unit is high It is possible to continue recording playback when is displayed but it is recommended to stop operations and turn off the unit as soon as possible If the temperature rises further the unit will be turned off automatically after flashes You will not be ...

Page 32: ...tion or if it is hard to operate with your fingers Touch Touch and release the touch screen to select icon or picture Touch the center of the icon Touching the touch screen will not operate while you are touching another part of the touch screen Slide while touching Move your finger while pressing on the touch screen Do not touch on the LCD monitor with hard pointed tips such as ball point pens ...

Page 33: ... and time will appear The date and time function is driven by a built in lithium battery If the built in lithium battery needs to be charged the message Set date and time appears To recharge the built in lithium battery connect USB terminal of this unit to a booted PC Leave the unit as it is for approx 24 hours and the battery will maintain the date and time for approx 3 months The battery is stil...

Page 34: ...bilizer will not function when recording still pictures or during operation of digital zoom Record with this unit vertically 1 Touch MODE If MODE is not displayed press the Recording button 2 Touch the icon Selecting a mode Motion Picture Recording Mode l 35 appears on the screen Still Picture Recording Mode l 36 White appears on the screen Voice Recording Mode l 37 White appears on the screen ...

Page 35: ...dable time for a single scene Maximum number of recordable scenes on a single SD card is 899100 Operation sound may be recorded when you perform touch operation while recording About the screen display when recording motion pictures Recording mode Recording motion picture Recording pause 01h30m Remaining time for motion picture recording 00m00s Elapsed recording time h is an abbreviation for hour ...

Page 36: ...osition reset the focus by getting closer to the subject or moving the unit etc Using a tripod is recommended when recording still pictures in dark places because the shutter speed becomes slow The screen will turn black for an instant when pressing the Recording button About the screen display when recording still pictures Still picture operation indicator Number of recording pixels for still pic...

Page 37: ...h to record a still picture To prevent battery consumption it will turn off the screen after approx 2 minutes of no operation during voice recording To display it again touch the screen Operation sound may be recorded when you perform touch operation while recording About the screen display when recording voices Recording mode Recording voice 01h30m Remaining time for voice recording 01h30m59s Ela...

Page 38: ... Up to 3 frames are indicated when a face is detected When recording still pictures during voice recording the Intelligent Auto Mode icon does not display on the screen But the Intelligent Auto Mode will work Using a tripod is recommended in Night Portrait and Night Scenery Mode Faces may not be detected depending on the recording conditions such as when faces are of certain sizes or at certain ti...

Page 39: ...Touch Each time is touched the LED light is turned on or off The setting will be canceled when you turn off the unit or touch PLAY When the LED light is in use the recordable time when using the battery is shortened The subject should be within approx 80 cm 2 6 feet of the unit Turn off the LED light at places where using a light is prohibited Do not look directly at the LED light when it is on jT...

Page 40: ...off by touching You cannot turn the Night View mode on off while recording When the Night View mode is on Intelligent Auto Mode does not work You can record with effects such as changing the color tone or making the skin tone smooth 1 Touch MENU while the recording is paused 2 Touch 3 Touch the desired effect icon to be set Selected effect icon will be displayed in yellow and the effect will be re...

Page 41: ...not be set to the screen lock mode To release the screen lock mode press and hold the screen lock button again 2 Press the Recording button To switch between Motion Picture Recording Mode and Still Picture Recording Mode Press the screen lock button When you use the screen lock mode you have the following limitations jThe effect function will be released jThe zoom magnification will be k1 To use t...

Page 42: ...ure is displayed Touch on the still picture or slide the screen display from right to left from left to right while touching it to playback next previous still picture Playback will end and it will go into pause mode for recording when the Recording button is pressed 2 Hold this unit horizontally The screen display automatically switches to horizontal To display the operation icon touch the screen...

Page 43: ...olume adjustment Touch or during playback Increases the volume Decreases the volume All Fast forward rewind playback Touch fast forward playback or rewind playback during playback or pause Scenes Voices Playback Touch during pause Playing back the slide show continuous playback l 46 All Skip playback to the start of a scene voice To the next previous still pictures Touch or during playback or paus...

Page 44: ...to be played back is displayed for scene and is displayed for still picture To display the next previous page jTouch jSlide the thumbnail display upward downward while touching it Icon Playback operation Operating steps Playback data Direct playback Touch the Direct playback bar or slide it while touching The playback pauses temporarily and skips to the position touched or slid to while touching P...

Page 45: ... can display the thumbnail is while paused l 51 l 50 l 52 and l 44 icons will be displayed only when playing back horizontally About the screen display during playback 00m00s Playback time Motion Picture Playback Mode only 00h00m00s is displayed during the Voice Playback Mode 100 0001 File number NOV 15 2011 Date indication Scene Still picture Voice 29m59s 29m59s 12m30s 01h30m59s 01h30m59s 01h30m5...

Page 46: ... even if the products support MP4 Still picture compatibility This unit is compliant with the unified standard DCF Design rule for Camera File system established by JEITA Japan Electronics and Information Technology Industries Association and with Exif Exchangeable Image File Format Files which do not comply with the DCF standard cannot be played back Voice compatibility This unit is compliant wit...

Page 47: ...ck of the voice it is possible to display the next previous still picture by sliding the screen display from right to left from left to right while touching it Still pictures will not change automatically by the voice that is being played back You can zoom in by touching a still picture during playback 1 Touch and then touch the screen display during still picture playback The still picture is zoo...

Page 48: ...ontally or during playback when using vertically 1 Only playing back horizontally Touch during thumbnail display Only playing back vertically Touch 2 Touch the item Deleting scenes still pictures or voices Deleted scenes still pictures or voices cannot be restored so perform appropriate confirmation of the contents before proceeding with deletion SELECT Only playing back horizontally Touch the sce...

Page 49: ...her products or still pictures conforming to DCF standard with this unit all the data related to the scenes still pictures may be deleted When still pictures recorded on an SD card by other products are deleted a still picture other than JPEG that cannot be played back on this unit may be erased ALL When scenes or still pictures are selected all the scenes or still pictures on the SD card built in...

Page 50: ...ill picture during playback It is convenient to use frame by frame playback 4 Touch Quality will be different from the normal still picture Picture size Size of the still pictures will differ depending on the Video Rec Mode of the recorded scenes Creating still picture from motion picture Recording mode Size of still pictures 2 M 1920k1080 0 9 M 1280k720 0 3 M 640k480 0 5 M 960k540 ...

Page 51: ...reen 4 To check the scene excluding C Touch Playback operation during preview can be performed by touching playback bar It will return to the previous screen when is pressed 5 Touch ENTER 6 Touch ENTER Touch CANCEL to return to the previous screen 7 Touch the item To delete unwanted parts of a motion picture SAVE AS NEW It will store separately from the original scene OVERWRITE Overwrites the orig...

Page 52: ...ed Touch the scene to be uploaded When touched the scene is selected and the indication appears on the thumbnail Up to 20 scenes can be selected Touch the scene again to cancel the operation Touch ENTER 3 Touch the upload destination When touched the icon is selected and the indication appears Touch the icon again to cancel the operation Touch ENTER The share setting will be automatically canceled...

Page 53: ...cture quality of the motion pictures to be recorded 1 Recording will have higher quality in the order of and 2 iFrame is a format suitable for Mac iMovie 11 It is recommended when using a Mac Please refer to page 25 for details about charging and motion pictures recording time This function s default setting is Menu list Video Rec Mode MENU Video Rec Mode desired setting 1920k1080 30fps 1280k720 3...

Page 54: ... for details about the number of recordable pictures Select the recording quality Voice recording modes are in order of high to low audio quality It is recommended that you use mode when interviewing This function s default setting is Please refer to page 91 for details about approximate recordable time PICTURE SIZE MENU PICTURE SIZE desired setting 3264k2448 1920k1080 16 9 1600k1200 640k480 Voice...

Page 55: ...nother operation is performed during countdown of the self timer the countdown will stop Setting the Self timer to Ø2 is a good way to prevent image shake when the Recording button is pressed or is touched In Voice Recording Mode only while using a tripod etc Please refer to page 33 It is possible to change the date format SELF TIMER MENU SELF TIMER desired setting OFF Cancel the setting 2sec Reco...

Page 56: ...on information from the recorded scene If the images are not output on the TV when the setting is AUTO switch to the method 1080i or 576p 480p which enables the images to be displayed on your TV Please read the operating instructions for the TV Output settings can be changed to match the environment in use when playing back connected to a TV ALERT SOUND MENU ALERT SOUND ON HDMI resolution MENU HDM...

Page 57: ...t off or remove the SD card while formatting Do not expose the unit to vibrations or shock When formatting the built in memory start the formatting after removing the SD card You can select the language on the screen display and the menu screen FORMAT MEDIA MENU FORMAT MEDIA Use this unit to format media Do not format an SD card using any other equipment such as a PC The card may not be used on th...

Page 58: ...are inserted as far as they go Always use a genuine Panasonic HDMI mini cable RP CDHM15 RP CDHM30 optional 2 Select the video input on the TV Example Select the HDMI channel with a HDMI mini cable The name of the channel may differ depending on the connected TV Check the input setting input switch and the audio input setting on the TV For more information please read the operating instructions for...

Page 59: ...ayback on this unit Perform playback operations by touching the icons During playback pause During thumbnail display A Playback operations l 43 B Switching the modes l 45 C Thumbnail display l 44 D Up down left right Enter ...

Page 60: ...re scenes set to online sharing the upload screen will be displayed The unit comes with built in HD Writer PE 2 0 video editing software See page 65 for how to install HD Writer PE 2 0 on your PC Available function using HD Writer PE 2 0 Data type Copying data to a PC Motion picture and still picture Playing back on a PC Online sharing You can upload motion pictures on the Internet and share them ...

Page 61: ...page 70 if using a Mac Motion pictures that have been recorded on another device cannot be written to HD Writer PE 2 0 We cannot guarantee operation if you use software other than HD Writer PE 2 0 to read write motion picture Do not start HD Writer PE 2 0 and other software at the same time Close any other software if you start HD Writer PE 2 0 and close HD Writer PE 2 0 if you start any other sof...

Page 62: ... Windows 95 Windows 98 Windows 98SE Windows Me Windows NT and Windows 2000 Operating environment for HD Writer PE 2 0 PC IBM PC AT compatible PC OS Windows 7 32 bit 64 bit Starter Home Basic Home Premium Ultimate Professional or SP1 Windows Vista 32 bit Home Basic Home Premium Business Ultimate SP1 SP2 Windows XP 32 bit SP3 CPU Intel Pentium 4 2 8 GHz or higher Intel Core 2 Duo 2 16 GHz or higher ...

Page 63: ... or memory is not fulfilling the requirements of the operating environment Always use the most current driver for the video card Always make sure there is enough capacity on the HDD in the PC It may become inoperable or the operation may stop suddenly if the capacity gets low Display High Color 16 bit or more 32 bit or more recommended Desktop resolution of 1024k768 pixels or more 1920k1080 pixels...

Page 64: ...t SP3 CPU Windows 7 Windows Vista 1 0 GHz or higher 32 bit x86 or 64 bit x64 processor Windows XP Intel Pentium III 450 MHz or higher or Intel Celeron 400 MHz or higher RAM Windows 7 1 GB or more 32 bit 2 GB or more 64 bit Windows Vista Home Basic 512 MB or more Windows Vista Home Premium Business Ultimate Enterprise 1 GB or more Windows XP 128 MB or more 256 MB or more recommended Interface USB p...

Page 65: ...nit to a PC with a USB extension cord Do not use any other USB extension cords except the supplied one Operation is not guaranteed with any other USB extension cords 2 Touch PC on the screen of this unit The following screen is displayed automatically Click HD Writer PE 2 0 Yes If using Windows 7 is in use or if the following screen is not displayed automatically select Start Computer or double cl...

Page 66: ...estart my computer now then click Finish Uninstalling HD Writer PE 2 0 Follow the steps below to uninstall any software applications that you no longer require 1 Select Start Control Panel Uninstall a program 2 Select HD Writer PE 2 0 then click Uninstall Proceed with the uninstallation by following the on screen instructions After uninstalling the software be sure to reboot the PC The PC must be ...

Page 67: ...ard screen is automatically displayed when HD Writer PE 2 0 is installed When there are scenes set to online sharing the upload screen will be displayed This unit is automatically recognized as an external drive of the PC l 68 Do not disconnect the USB terminal of this unit while the status indicator is on When performing reading writing between a PC and an SD card be aware that some SD card slots...

Page 68: ...pictures recorded with this unit can be copied to the PC with Explorer or other programs 1 Double click the folder that contains the still pictures DCIM 100CDPFP etc 2 Drag and drop the still pictures onto the destination folder on the PC s HDD Do not delete the SD card s folders Doing so may make the SD card unusable in this unit When data not supported by this unit has been recorded on a PC it w...

Page 69: ... On the PC Select Start All Programs Panasonic HD Writer PE 2 0 HD Writer PE For details on how to use the software applications read the PDF operating instructions of the software You will need Adobe Acrobat Reader 5 0 or later or Adobe Reader 7 0 or later to read the PDF operating instructions Select Start All Programs Panasonic HD Writer PE 2 0 Operating Instructions Reading the operating instr...

Page 70: ...ord Do not use any other USB extension cords except the supplied one Operation is not guaranteed with any other USB extension cords 2 Touch PC on the screen of this unit 3 Double click CAM_SD or CAM_MEM displayed on the desktop Files are stored in 100CDPFP folder etc in the DCIM folder 4 Using a drag and drop operation move the pictures you want to acquire or the folder storing those pictures to a...

Page 71: ...ing an Internet connection Skype must first be installed before use For downloading or details regarding Skype refer to the Skype Website For information on how to use Skype refer to the Skype help file Depending on the PC or Internet environment used you may not be able to use Skype images may be disrupted cut off the resolution may be low or the audio may be cut off A higher performance CPU is r...

Page 72: ...pe 5 1 for Windows Skype 5 0 for Mac OS X OS Windows 7 32 bit 64 bit or SP1 Windows Vista 32 bit SP1 SP2 Windows XP 32 bit SP3 Mac OS X 10 6 6 CPU Intel Core 2 Duo 1 8 GHz or higher 32 bit x86 or 64 bit x64 processor Intel Core 2 Duo 1 8 GHz or higher RAM Windows 7 1 GB or more 32 bit 2 GB or more 64 bit Windows Vista Home Basic 512 MB or more Windows Vista Home Premium Business Ultimate Enterpris...

Page 73: ...rt the USB extension cord securely all the way Insert to line B It will not operate properly if it is not inserted all the way 2 Touch WEB CAMERA on the screen of this unit 3 On a PC Start Skype Check this unit is selected with the Skype settings The image quality will automatically vary among 640k480 320k240 and 160k120 depending on the Internet environment When disconnecting the USB terminal of ...

Page 74: ...apsed recording time for motion pictures l 35 00h00m00s Elapsed recording time for voices l 37 h is an abbreviation for hour m for minute and s for second 15s Countdown until recording stops l 31 35 LED light l 39 High temperature warning l 31 Remaining battery power l 26 White Recording pause still picture Red Recording still picture White Recording pause voice Red Recording voice Number of recor...

Page 75: ... l 40 Recording still pictures during voice recording l 37 Motion pictures Still pictures Voices Motion picture icon l 42 Still picture icon l 42 Voice icon l 42 Motion picture set for online sharing l 52 Display during playback l 43 Playing back the slide show continuous playback l 46 PCM 256 AAC 128 AAC 128Low AAC 00m00s 01h30m45s NOV 15 2011 12 34PM 100 0001 NOV 15 2011 12 34PM 100 0001 NOV 15 ...

Page 76: ...d motion pictures still pictures voices l 49 00m00s Playback time for motion pictures l 45 00h00m00s Playback time for voices l 45 100 0001 File number l 45 NOV 15 2011 12 34PM Date Time indication l 33 SD card is not inserted or is incompatible ...

Page 77: ... long enough Battery runs down quickly Charge the battery again to ensure it is sufficiently charged l 22 In cold places the battery life becomes shorter The battery has a limited life If the operating time is still too short even after the battery is fully charged the battery has worn out and needs to be replaced Contact Panasonic s Service Center This unit cannot be operated though it is turned ...

Page 78: ...instructions of your TV and select the channel that matches the input used for the connection Check the setting of HDMI resolution l 56 Scenes still pictures or voices cannot be deleted Any scenes still pictures or voices where the thumbnails are displayed as cannot be deleted If the scenes still pictures or voices are unnecessary format the SD card to erase the data l 57 Please be aware that if a...

Page 79: ...rs indoors Color or brightness of the image may change or you may see horizontal bars in the image when the object is recorded under fluorescent light mercury light or sodium light etc but this is not a malfunction Error occurred Please turn unit off then turn on again is displayed The unit has automatically detected an error Restart the unit by turning off and on Press the RESET button with the s...

Page 80: ...ng environment l 62 70 71 Connect the USB terminal of this unit again after restarting the PC and turning on this unit again Cannot see the PDF operating instructions for HD Writer PE 2 0 You will need Adobe Acrobat Reader 5 0 or later or Adobe Reader 7 0 or later to read the PDF operating instructions for HD Writer PE 2 0 When using Skype the image audio is cut off Reconnect the USB terminal of t...

Page 81: ... and or sound Recorded data may be damaged or pictures may be distorted by strong magnetic fields created by speakers or large motors Electromagnetic wave radiation generated by microprocessors may adversely affect this unit disturbing the pictures and or sound If this unit is adversely affected by electromagnetic equipment and stops functioning properly turn this unit off and press the RESET butt...

Page 82: ...ot intended for continuous use or for any industrial or commercial application resulting in prolonged use Perform a formatting of the built in memory when this unit is to be disposed transferred l 57 When the status indicator is flashing at a particularly fast rate the following should be considered Flashing with approx 2 second period off for approx 1 second on for approx 1 second The battery is ...

Page 83: ...heet is affixed In a place with drastic temperature changes condensation may form on the LCD monitor Wipe it with a soft cloth such as eye glass cleaner When the unit has become very cold for example due to storage in a cold area its LCD monitor will be slightly darker than usual immediately after the unit is turned on The normal brightness will be restored when the unit s internal temperature ris...

Page 84: ...he effect increases the more the temperature rises or falls If the operating time is very short even after the battery has been recharged the battery has worn out Contact consumer support l 101 102 The memory capacity indicated on the label of an SD card is the total of the capacity for copyright protection and management and the capacity which can be used on the unit a PC etc Do not leave the SD ...

Page 85: ...F to 77 F Recommended humidity 40 RH to 60 RH Always remove the SD card from the unit When storing this unit for a long period of time we recommend charging it once a year The battery will self discharge little by little even when this unit is not used The battery may get exhausted when you do not use it for a long period of time When storing the unit in a cupboard or cabinet it is recommended tha...

Page 86: ...cklaces or hairpins etc Do not heat in microwaves or ovens etc Do not charge use or leave in hot places such as next to fires or in extremely hot weather Do not put into water This may cause leaking overheating fire or rupture If a leak should occur by no means touch the liquid with bare hands If the liquid gets on the body or clothes wash well with water If the liquid gets into your eyes there is...

Page 87: ...asonic s Service Center Keep disassembled parts out of reach of children 1 Remove all screws shown in the figure 9 screws 7 screws Use a Phillips screwdriver optional to remove screws How to remove the battery This figure describes the disposal of the unit it is not instruction for repair If disassembled repair is not possible HM TA20 HM TA2 HM TA20 HM TA2 ...

Page 88: ...2 Open this unit as shown in the figure below and remove the battery with a driver Regarding the handling of used batteries Insulate the terminals with cellophane tape or similar Do not disassemble HM TA20 HM TA2 ...

Page 89: ...ntium and Celeron are the registered trademarks or trademarks of Intel Corporation in the United States and other countries AMD Athlon is a trademark of Advanced Micro Devices Inc iMovie and Mac are trademarks of Apple Inc registered in the U S and other countries YouTube is a trademark of Google Inc Facebook is a trademark of Facebook Inc Other names of systems and products mentioned in these ins...

Page 90: ...us recordable time for one scene jIf Video Rec Mode is set to 29 min 59 sec jIf Video Rec Mode is set to Approx 20 min up to 4 GB recording capacity If a recording with a lot of action is recorded the recording time is reduced The recordable time may be reduced if recording of short scene is repeated C Recording mode Picture size 1920k1080 1280k720 640k480 960k540 SD card 4 GB 40 min 50 min 2 h 20...

Page 91: ...us recordable time for one voice Approx 5 h up to 4 GB recording capacity The recordable time may be reduced if short recording is repeated Aspect ratio 4 3 16 9 Picture size 3264k2448 1600k1200 640k480 1920k1080 SD card 4 GB 1400 5400 23900 5200 16 GB 5800 22100 97600 21200 64 GB 23500 82300 247100 82300 Built in memory Approx 10 MB 4 16 71 15 Recording mode File format L PCM 256 kbps AAC 128 kbp...

Page 92: ...ive pixels Motion picture 2930 K 16 9 2190 K 4 3 Still picture 2930 K 16 9 5080 K 4 3 Lens F2 8 Focal length 4 1 mm 35 mm equivalent Motion picture 49 mm 16 9 59 mm 4 3 Still picture 49 mm 16 9 39 mm 4 3 Minimum focus distance Motion pictures Approx 30 cm 11 8 q Still pictures Approx 10 cm 3 9 q Zoom 1k Optical Zoom 4k Digital Zoom Power source DC 5 0 V When using USB DC 3 7 V When using battery P...

Page 93: ... Approx 9 lx 1 30 HDMI mini connector video output level HDMI 1080i 576p 480p HDMI mini connector audio output level Linear PCM Headphone output 10 mWr10 mW 16 h Stereo mini jack USB Card reader writer function No copyright protection support Hi Speed USB USB 2 0 USB terminal Type A Battery charging function charge via USB terminal with the unit turned off WEB camera Compression Motion JPEG Pictur...

Page 94: ... card optional Approx 144 g Approx 0 317 lbs with an SD card optional Mass Weight Approx 153 g Approx 0 337 lbs without an SD card optional Approx 142 g Approx 0 313 lbs without an SD card optional Operating temperature 0 C to 35 C 32 F to 95 F Operating humidity 10 RH to 80 RH Battery operation time See page 25 Waterproof performance Equivalent to IEC 60529 IPX8 Usable for 60 minutes in 3 m 10 fe...

Page 95: ...test within a total of 5 devices Panasonic s test method is based on the above MIL STD 810F Method 516 5 Shock However the drop height was changed from 122 cm 4 0 feet to 150 cm 5 0 feet dropping onto 3 cm 0 10 feet thick plyboard This drop test was passed Disregarding appearance change such as loss of paint or distortion of the part where drop impact is applied There is no guarantee of not breaki...

Page 96: ...ures Recording media SD Memory Card FAT12 and FAT16 system compliant SDHC Memory Card FAT32 system compliant SDXC Memory Card exFAT system compliant Refer to page 27 for details on SD cards usable in this unit Built in memory Approx 10 MB Compression JPEG Design rule for Camera File system based on Exif 2 2 standard Picture size Picture aspect 4 3 3264k2448 1600k1200 640k480 Picture aspect 16 9 19...

Page 97: ...nd FAT16 system compliant SDHC Memory Card FAT32 system compliant SDXC Memory Card exFAT system compliant Refer to page 27 for details on SD cards usable in this unit Built in memory Approx 10 MB Compression AAC Specifications may change without prior notice ...

Page 98: ... RP CDHM30 HDMI mini cable RP SDN16GU1A RP SDN08GU1A RP SDN04GU1A RP SDN02GU1A Class 4 16 GB SDHC Memory Card Class 4 8 GB SDHC Memory Card Class 4 4 GB SDHC Memory Card Class 4 2 GB SD Memory Card RP SDW64GU1K RP SDW48GU1K RP SDW32GU1K RP SDW16GU1K RP SDW08GU1K RP SDW04GU1K Class 10 64 GB SDXC Memory Card Class 10 48 GB SDXC Memory Card Class 10 32 GB SDHC Memory Card Class 10 16 GB SDHC Memory C...

Page 99: ...FFICE 20421 84th Avenue South Kent WA 98032 Ship To Mr Mrs Ms First Last Street Address City State Zip Phone Day Night 4 Shipping information UPS delivery requires complete street address Please photocopy this form when placing an order 3 Method of payment check one Check of Money Order enclosed NO C O D SHIPMENTS VISA MasterCard Make Check or Money Order Payable to PANASONIC ACCESSORIES Please do...

Page 100: ...ice To find a service center please visit http www panasonic com help or call 1 800 211 PANA 7262 When shipping the unit carefully pack include all accessories and send it prepaid adequately insured and preferably in the original carton Web Site at Include can be reached A valid registered receipt is required under the Limited Warranty IF REPAIR IS NEEDED DURING THE WARRANTY PERIOD THE PURCHASER W...

Page 101: ...rrantor s Consumer Affairs Department at the addresses listed for the warrantor PARTS AND SERVICE WHICH ARE NOT COVERED BY THIS LIMITED WARRANTY ARE YOUR RESPONSIBILITY Customer Services Directory United States and Puerto Rico Obtain Product Information and Operating Assistance locate your nearest Dealer or Service Center purchase Parts and Accessories or make Customer Service and Literature reque...

Page 102: ... misadjustment of consumer controls improper maintenance improper batteries power line surge lightning damage modification introduction of sand humidity or liquids commercial use such as hotel office restaurant or other business or rental use of the product or service by anyone other than an Authorized Servicer or damage that is attributable to acts of God Dry cell batteries are also excluded from...

Page 103: ...ed Warranty USA and Puerto Rico 100 M Motion picture compatibility 46 N Night view mode 40 P Picture size 54 Playback zoom 47 Power button 31 R Recordable time motion pictures 25 90 Recordable time voices 26 91 Remaining number of recordable pictures 36 Remaining time for motion picture recording 35 Remaining time for voice recording 37 Reset button 80 S Screen lock button 41 SD Memory Card 27 SD ...

Page 104: ... USB A a fin de liberar el bloqueo en la palanca para abrir cerrar para la tapa del terminal USB B 2 Abra la tapa del terminal USB mientras desliza la palanca para abrir cerrar de la tapa del terminal USB B en la dirección indicada por la flecha 3 Presione el pestillo USB C hasta que salga el terminal USB 1 Deslice el pestillo USB A hasta que se abra la tapa del terminal USB 2 Deslice el pestillo ...

Page 105: ... e introduzca retire la tarjeta SD en de la ranura correspondiente B Oriente el lado de la etiqueta C en la dirección mostrada en la ilustración e introdúzcalo hasta el fondo Presione el centro de la tarjeta SD y luego retírela completamente Abra la puerta de la tarjeta SD luego de liberar el bloqueo con la palanca LOCK para la puerta de la tarjeta SD 2 Cierre de forma segura la tapa de la tarjeta...

Page 106: ...ación 2 Toque el icono Selección del idioma 1 Toque MENU luego toque LANGUAGE 2 Toque el idioma deseado Grabar películas Pulse el botón de grabación para comenzar a grabar Cuando comienza a grabar cambia a Grabar fotografías Pulse el botón de grabación rojo aparece en la pantalla Toque Deslice mientras toca Toque y suelte la pantalla táctil para seleccionar un icono o una imagen Mueva el dedo mien...

Page 107: ...or fotografía La reproducción finalizará y entrará en modo de pausa para grabar cuando se pulse el botón de grabación 2 Sostenga esta unidad de forma horizontal La visualización de la pantalla cambia automáticamente a horizontal Para visualizar el icono de operación toque la pantalla Desaparecerá cuando no haya operación durante algunos segundos 3 Seleccione la operación de reproducción utilizando...

Page 108: ... Panasonic Consumer Electronics Company Division of Panasonic Corporation of North America Panasonic Canada Inc 5770 Ambler Drive Mississauga Ontario L4W 2T3 Panasonic Corporation 2011 Printed in Indonesia VQT3N87 F0411KK0 1AG6P1P6253 S ...

Reviews: