background image

En-20

English

Care of Your Oven

Technical Specifications

Power Source:

230 V, 50 Hz

Power Consumption:

Maximum;

2430 W

Microwave;

1300 W

Grill;

1350 W

Convection;

1350 W

Output:

Microwave;

1000 W (IEC-60705)

Grill Heater;

1300 W

Convection Heater;

1300 W

Outside Dimensions:

510 (W) x 390 (D) x 305 (H) mm

Oven Cavity Dimensions:

359 (W) x 352 (D) x 217 (H) mm

Uncrated Weight:

13 kg

Specifications subject to change without notice.

This product is an equipment that fulfills the European standard for EMC disturbances (EMC = Electromagnetic
Compatibility) EN 55011. According to this standard this product is an equipment of group 2, class B and is
within required limits. Group 2 means that  radio-frequency energy is intentionally generated in the form of
electromagnetic radiation for warming and cooking of food. Class B means that this product may be used in
normal household areas.

Simply wipe the bottom surface of the oven
with mild detergent and hot water then dry
with a clean cloth. The roller ring may be
washed in mild soapy water. Cooking
vapours collect during repeated use but in
no way affects the bottom surface or roller
ring wheels. After removing the roller ring
from the cavity floor for cleaning, be sure to
replace it in the proper position.

8.

When using the GRILL, CONVECTION or 
COMBINATION mode, some foods may
inevitably splatter grease on to the oven
walls. If the oven is not cleaned
occasionally, it may start to “smoke” during
use.

9.

A steam cleaner must not be used for
cleaning.

10. This oven should only be serviced by

qualified personnel. For maintenance and
repair of the oven contact the nearest
authorized dealer.

11. Failure to maintain the oven in a clean

condition could lead to deterioration of
surfaces that could affect the life of the
appliance and possibly result in a
hazardous situation.

12. Keep air vents clear at all times.  Check

that no dust or other material is blocking
any of the air vents on the top, bottom or
rear of the oven. If air vents become
blocked this could cause overheating which
would affect the operation of the oven.

1. Turn the oven off before cleaning.
2. Keep the inside of the oven, door seals and

door seal areas clean. When food splatters
or spilled liquids adhere to the oven walls,
door seals and door seal areas wipe off with
a damp cloth. Mild detergent may be used if
they get very dirty. The use of harsh
detergent or abrasive is not recommended.
DO NOT USE COMMERCIAL OVEN
CLEANERS.

3. The outside oven surface should be cleaned

with a damp cloth. To prevent damage to the
operating parts inside the oven, water should
not be allowed to seep into the ventilation
openings.

4. If the Control Panel becomes dirty, clean it

with a soft, dry cloth. Do not use harsh
detergents or abrasives on the Control
Panel. When cleaning the Control Panel,
leave the oven door open to prevent the
oven from accidentally turning on. After
cleaning touch STOP/CANCEL Button to
clear the display window.

5. If steam accumulates inside or around the

outside of the oven door, wipe with a soft
cloth. This may occur when the microwave
oven is operated under high humidity
conditions and in no way indicates a
malfunction of the unit.

6.

It is occasionally necessary to remove the
glass tray for cleaning. Wash the tray in
warm soapy water or in a dishwasher. 

7.

The roller ring and oven cavity floor should
be cleaned regularly to avoid excessive
noise.  

Summary of Contents for Inverter NN-L564

Page 1: ...ave Grill Convection Oven Mikrowellenger t mit Grill Hei luft De Panasonic Microgolf Warme Lucht Oven Panasonic Four micro ondes Multifonctions Forno a microonde e Convezione Horno Microondas Convecci...

Page 2: ...IONS DE S RET IMPORTANTES Avant d utiliser le four micro ondes lisez attentivement les recommandations d utilisation et conservez les soigneusement ISTRUZIONI IMPORTANTI PER LA SICUREZZA Leggere atten...

Page 3: ...h the outside of the oven Keep the cord away from hot surfaces Do not let the cord hang over the edge of a table or work top Do not immerse the cord plug or oven in water 9 Do not block the air vents...

Page 4: ...urfaces of the oven as these will be very hot N B After cooking by these modes the oven accessories will be very hot 4 The accessible parts may become hot when the grill is in use Children should be k...

Page 5: ...d beverages in your microwave oven overheating the liquid beyond boiling point can occur without evidence of bubbling This could result in a sudden boil over of the hot liquid To prevent this possibil...

Page 6: ...made settings The cooking is resumed as soon as the door is closed and Start Button pressed The oven lamp lights as soon as the oven door is opened 2 Oven Window 3 Door Safety Lock System 4 Oven Air...

Page 7: ...ess temporarily stops the cooking program Another press cancels all your instructions and the time of day will appear in the display 14 Start Button Press to start operating the oven If during cooking...

Page 8: ...ve YES NO NO YES Grill YES YES YES YES Convection YES YES YES YES Combination YES YES YES YES Cooking Modes The diagrams shown below are examples of the accessories It may vary depending on recipe dis...

Page 9: ...English Controls and Operation Procedure These models have a unique function Word Prompting which guides you through the operation of your microwave After plugging in the oven press the Start Button...

Page 10: ...eps 2 The time of day is displayed unless the power supply is interrupted 3 This clock has a 24 hour display Child Safety Lock Using this system will make the oven controls inoperable however the door...

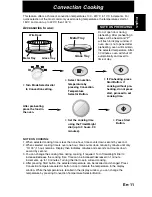
Page 11: ...will also be displayed Press Start Button NOTE 1 You can change the cooking time during cooking if required Turn Time Weight Dial to increase or decrease the cooking time Time can be increased decreas...

Page 12: ...be displayed Press Start Button NOTE 1 The Grill will only operate with the oven door closed 2 The Grill cannot be preheated 3 You can change the cooking time during cooking if required Turn Time Wei...

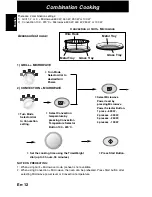
Page 13: ...recalled and changed Press Convection temperature selector button once to indicate the temperature in the display window While the temperature is recalled in the display window you can change the tem...

Page 14: ...e Power level by pressing Microwave Power Selector Button 1 press 600 W 2 presses 440 W 3 presses 250 W 4 presses 100 W Set the cooking time using the Time Weight dial up to 9 hours 90 minutes Press S...

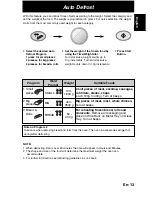
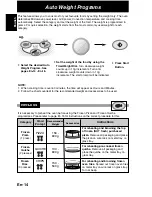
Page 15: ...am Weight Suitable Foods 100 1600 g Small pieces of meat escallop sausages fish fillets steaks chops each 100g to 400g Turn at beeps 2 Big pieces 400 2500 g Word Prompt SMALL BIG Big pieces of meat ro...

Page 16: ...weight counts up in 10g increments Turn anti clockwise weight counts down in 10g increments The start prompt will be indicated Press Start Button NN L554 130 600 g For reheating pre cooked frozen qui...

Page 17: ...ately WHOLE Cook Baked Potato 2 presses 200 1500 g For cooking baked potatoes with a crisp dry skin Choose medium sized potatoes 180 300g for best results Wash and dry potatoes and prick with a fork s...

Page 18: ...all packaging and place in the pizza pan PIZZA PIZZA PASTRY Frozen Quiche 3 presses 120 500 g For reheating crisping the pastry base and browning the top of frozen purchased quiche Remove all packagi...

Page 19: ...pan is dishwasher safe NOTES 1 Do not pre heat the pan more than 8 minutes 2 Always place the pan in the centre of the glass tray and ensure it does not touch the wall of the oven cavity Failure to d...

Page 20: ...nt of time by using the Time Weight Dial up to 9 hours 90 minutes Press Start Button NOTE 1 If the set delay time exceeds one hour the time will count down in units of minutes If less than one hour th...

Page 21: ...imilar to the interference caused by small appliances such as mixers vacuums blow dryers etc It does not indicate a problem with your oven A The oven is designed not to accept an incorrect program For...

Page 22: ...ntact the nearest authorized dealer 11 Failure to maintain the oven in a clean condition could lead to deterioration of surfaces that could affect the life of the appliance and possibly result in a ha...

Page 23: ...E00036R30EP M0704 0 Printed in the UK Matsushita Electric UK Ltd Wyncliffe Road Pentwyn Industrial Estate Cardiff CF23 7XB UK...

Reviews: