background image

1

IMPORTANT SAFETY INSTRUCTIONS

—To reduce the risk of burns, electric 

shock, fire, injury to persons, or exposure to excessive microwave energy:

1. Read all instructions before using this appliance.
2. Read and follow the specific “PRECAUTIONS TO AVOID POSSIBLE EXPO-

SURE TO EXCESSIVE MICROWAVE ENERGY,” found on the inside front 
cover. 

3. This appliance must be grounded. Connect only to a properly grounded outlet. 

See “GROUNDING INSTRUCTIONS” found on page 4.

4. As with any cooking appliance, 

DO NOT

leave oven unattended while in use.

5. Install or locate this appliance only in accordance with the installation instruc-

tions found on page 3.

6.

DO NOT

cover or block any openings on this appliance. 

7.

DO NOT

store this appliance outdoors. 

DO NOT

use this product near water—

for example, near a kitchen sink, in a wet basement, or near a swimming pool 
or similar locations.

8. Use this appliance only for its intended use as described in this manual. 

DO 

NOT

use corrosive chemicals, vapors, or non-food products in this appliance. 

This type of oven is specifically designed to heat, or cook food. It is not 
designed for industrial or laboratory use. The use of corrosive chemicals in 
heating or cleaning will damage the appliance and may result in radiation 
leaks.

9. When cleaning surfaces of the door and oven that come together on closing  

the door, use only mild, non-abrasive soaps or detergents applied with a  
sponge or soft cloth. 

10.

DO NOT

allow children to use this appliance, unless closely supervised by an 

adult. 

DO NOT

assume that because a child has mastered one cooking skill 

he/she can cook everything.

11.

DO NOT

operate this appliance if it has a damaged cord or plug, if it is not 

working properly, or if it has been damaged or dropped.

12.

DO NOT

immerse cord or plug in water. 

13. Keep cord away from heated surfaces.
14. 

DO NOT

let cord hang over edge of a table or counter.

15. This appliance should be serviced only by qualified service personnel. Contact 

the nearest authorized service center for examination, repair or adjustment. 

16. Some products such as whole eggs with or without shell, narrow neck bottles 

and sealed containers—for example, closed glass jars—may explode and 
should not be heated in this oven. 

17. To reduce the risk of fire in the oven cavity:

(a) 

DO NOT

overcook food. Carefully attend appliance when paper, plastic, or  

other combustible materials are placed inside the oven to facilitate cooking.

(b) Remove wire twist-ties from paper or plastic bags before placing bag in 

oven. 

(c) 

If material inside the oven ignites, keep oven door closed, turn oven   

off,  and disconnect the power cord, or shut off power at the fuse or   
circuit breaker panel. 

(d) 

DO NOT

use the cavity for storage purposes. 

DO NOT leave paper

products, cooking utensils or food in the cavity when not in use.

Your microwave oven is a cooking appliance and you should use as much care
as you use with a stove or any other cooking appliance. When using this electric
appliance, basic safety precautions should be followed, including the following:

Thank you for purchasing a Panasonic Microwave Oven.

WARNING

IP5066_38N06AP_00_141114  2014.11.17  10:00 AM  Page 3

Summary of Contents for Inverter NN-SD797

Page 1: ...Feature 13 Inverter Turbo Defrost Feature 14 Defrosting Tips Techniques 14 15 Sensor Reheat Feature 16 Sensor Cook Feature 16 Sensor Cook Chart 17 18 Maintenance Care and Cleaning of Your Microwave Ov...

Page 2: ...and latches broken or loosened 3 door seals and sealing surfaces d The oven should not be adjusted or repaired by anyone except properly qualified service personnel All safety messages will tell you...

Page 3: ...unless closely supervised by an adult DO NOT assume that because a child has mastered one cooking skill he she can cook everything 11 DO NOT operate this appliance if it has a damaged cord or plug if...

Page 4: ...lock Switches or any other part of oven microwave leakage may result TO AVOID THE RISK OF FIRE 1 DO NOT operate the microwave oven empty or use metal contain ers When using the microwave oven without...

Page 5: ...e the oven for any dam age such as dents broken door latches or cracks in the door Notify dealer immediately if oven is damaged DO NOT install if oven is damaged Placement of Oven 1 The oven must be p...

Page 6: ...e pulled on by children or tripped over accidentally Wiring Requirements The oven must be operated on a SEPARATE CIRCUIT No other appliance should share the circuit with the microwave oven If it does...

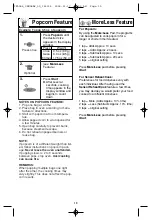
Page 7: ...of your microwave oven CAUTION When using pre packaged microwave popcorn you can follow recommended package instructions or use the popcorn pad refer to page 13 Otherwise the popcorn may not pop adequ...

Page 8: ...d for microwave cooking only Always fol low instructions provided by the manufacturer DO NOT preheat browning dish more than 6 minutes If an oven cooking bag is used for microwave cooking prepare acco...

Page 9: ...hot dogs Paper Towels Napkins Yes Use to warm rolls and sandwiches only if labeled safe for microwave use Recycled Paper Towels No Recycled paper products may contain impurities which may Napkins cau...

Page 10: ...nel f f Identification Plate g g Glass Tray h h Roller Ring i i Heat Vapor Barrier Film do not remove j j Waveguide Cover do not remove k k Door Release Button l l Warning Label m m Function Label n n...

Page 11: ...page 12 More Less Pad page 13 Timer Clock Pad page 20 10 Quick Min Pad page 12 Stop Reset Pad Sensor Reheat Pad page 16 Display Window Step by step instructions scroll for easy operation Inverter Turb...

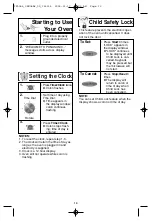
Page 12: ...lectrical outlet 2 WELCOME TO PANASONIC message scrolls across display window Starting to Use Your Oven Child Safety Lock This feature prevents the electronic oper ation of the oven until cancelled It...

Page 13: ...in g kg Metric LB Weight can be set in oz lb Imperial MENU ACTION ON OFF can be selected when colon or clock appears in the display window MENU ACTION SCREEN helps you to program your oven by prompti...

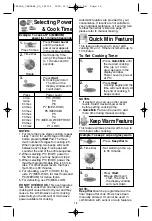
Page 14: ...twice 3 times 4 times 5 times 6 times 7 times 8 times 9 times 10 times Power Level P10 HIGH P9 P8 P7 MED HIGH P6 MEDIUM P5 P4 P3 MED LOW DEFROST P2 P1 LOW Quick Min Feature This feature allows you to...

Page 15: ...indow 2 see More Less Feature 3 Press Start After several seconds cooking time appears in the display window and begins to count down Optional Press once twice 3 times Weight 3 5 oz 99 g 3 0 oz 85 g 1...

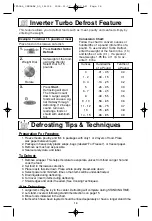
Page 16: ...8 0 9 Preparation For Freezing 1 Freeze meats poultry and fish in packages with only 1 or 2 layers of food Place wax paper between layers 2 Package in heavy duty plastic wraps bags labeled For Freezer...

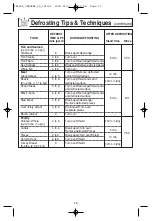
Page 17: ...1 2 4 lbs 1 1 1 8 kg defrosted surface Chops Steak 6 to 8 Turn over Rearrange Shield ends and defrosted surface Ribs T bone 6 to 8 Turn over Rearrange Shield ends and defrosted surface 5 min NO Stew M...

Page 18: ...to steam can mislead the sensor 4 Cover food with lid or with vented plastic wrap Never use tightly sealed plastic containers they can prevent steam from escaping and cause food to overcook DURING Reh...

Page 19: ...preparation For NN SD787 SD797 Add more time of cook ing if needed Follow manufacturer s directions for preparation Pierce each potato with a fork 6 times spacing around surface Place potato or potat...

Page 20: ...g covers Do not use frozen foods pack aged in foil trays Place pasta with hot tap water in a microwave safe casserole dish Cover with lid or vented plastic wrap Pour contents from can into microwave s...

Page 21: ...1 teaspoon paprika In a 2 Qt casserole melt the butter for 40 seconds at P10 Add onion and garlic and cook for 1 minute at P10 Stir in flour mustard salt and pepper and gradually add the milk Cook for...

Page 22: ...a delay start To Use as a Kitchen Timer Example To count down 5 minutes 1 Press Timer Clock 2 Set time using Time Select Dial to 5 minutes 3 Press Start Time will count down without oven operating To...

Page 23: ...il completely melted Note Chocolate 1 2 cup 125 ml chips holds its shape even when softened To toast Coconut P10 HIGH 1 Place in a microwave safe dish 1 2 cup 125 ml Stir every 30 seconds To soften Cr...

Page 24: ...ml 21 2 3 Do not heat liquids in microwave oven without stirring before heating Cup of liquid To warm Beverage P7 MED HIGH 1 cup 8 oz 250 ml 11 2 2 2 cups 16 oz 500 ml 21 2 3 To roast Nuts P10 HIGH 3...

Page 25: ...thick pieces toward the edge Size Thin pieces cook more quickly than thick pieces Starting Temperature Foods that are at room temperature take less time to cook than if they are chilled refrigerated...

Page 26: ...urger patties or pork chops Rearrange pieces from the edge to the center and pieces from the center to the edge of the dish Turning It is not possible to stir some foods to dis tribute the heat evenly...

Page 27: ...an the bottom surface of the oven with mild detergent water or window cleaner and dry Roller Ring may be washed in mild soapy water or dish washer These areas should be kept clean to avoid excessive n...

Page 28: ...n door securely completely Start Pad was not pressed Press Start Pad after programming Another program is already Press Stop Reset Pad to cancel entered into the oven the previous program and enter ne...

Page 29: ...27 IP5066_38N06AP_00_141114 2014 11 17 10 00 AM Page 29...

Page 30: ...To reheat using Sensor Reheat page 16 Press once Optional Press To cook using Popcorn page 13 Press to select weight Optional Press To cook using Quick Min page 12 up to 10 min Press To use Keep Warm...

Page 31: ...lbs 14 3 kg Approx 37 lbs 16 7 kg Model Number Outside Dimension W x H Cabinet Opening W x D x H NN TK729SF NN TK739SF stainless stainless 27 x 16 1 2 30 x 16 1 2 685 mm x 419 mm 762 mm x 419 mm 24 7...

Page 32: ...the space provided and retain this book as a permanent record of your purchase for future reference Model No __________________ Serial No __________________ Date of Purchase ____________ Panasonic Cor...

Page 33: ...mantener caliente 12 Funci n de Palomitas de Ma z 13 Funci n de M s menos 13 Funci n de Descongelaci n Turbo Inverter 14 Consejos y T cnicas de Descongelaci n 14 15 Funci n de Recalentamiento por Sens...

Page 34: ...eber ser ajustado o reparado por ninguna persona excepto el personal de servicio debidamente calificado Todos los mensajes de seguridad le indicaran cu l es el peligro potencial el c mo reducir la pos...

Page 35: ...para cocinar el ella puede cocinar todo sin supervisi n 11 No use este aparato si tiene da ado el cord n o la clavija si no est trabajando adecuadamente o si ha sido da ado o se ha dejado caer 12 No...

Page 36: ...SGO DE INCENDIO 1 NO opere el horno de microondas vac o ni utilice recipientes de metal Si se utiliza el horno de microondas sin agua o comida dentro del mismo la energ a de microondas no puede ser ab...

Page 37: ...empaque y examine que su horno no tenga ning n da o tal como abolladuras seguros de la puerta rotos o resquebrajaduras en la puerta Notifique inmediatamente a su distribuidor si el horno est da ado Ub...

Page 38: ...circuito separado Ning n otro aparato debe compartir el circuito con el horno Si lo hace el fusible del circuito puede estallar el bloqueador del circuito trabarse o la comida cocinarse m s lento que...

Page 39: ...marca adecuada para la potencia de su horno de microondas Nunca deje desatendido el horno cuando prepare palomitas de ma z PRECAUCI N Cuando use palomitas de ma z para microondas previamente empacadas...

Page 40: ...iones dadas por el fabricante No precaliente la bandeja doradora m s de 6 minutos Si se utiliza una bolsa para cocinar en Microondas prepare de acuerdo a las instrucciones del paquete No use sujetador...

Page 41: ...cinar alimentos que requieren corto tiempo de cocci n como los Hot dogs Toallas y servilletas Si Utilice para calentar rollos y sandwiches solo si esta de papel etiquetado para uso seguro de microonda...

Page 42: ...l f f Placa de ldentificaci n g g Bandeja de Cristal h h Aro de Rodillo i i Pel cula de Barrera contra el Calor Vapor no extraer j j Cubierta del gu a de ondas no remover k k Bot n para abrir la puert...

Page 43: ...utom tico p gina 12 Tecla para Pausa Cancelar Tecla de Recalentamiento con Sensor p gina 16 Pantalla indicadora Ventana de Visualizaci n Instrucciones paso a paso para una f cil utilizaci n Tecla de D...

Page 44: ...egura la puerta Para activar Presione Encender 3 veces LOCK aparecer en la ventana de visualizaci n LOCK se mantendr hasta que el seguro de ni os sea cancelado Las teclas del panel de control podr n s...

Page 45: ...ede ajustar en onzas libras Sistema Ingl s ACCI N DE MEN puede seleccionarse cuando los dos puntos o el reloj se muestran en la pantalla La ventana de acci n del men le ayuda a programar su horno indi...

Page 46: ...de Potencia P10 ALTO P9 P8 P7 MEDIO ALTO P6 MEDIO P5 P4 P3 MEDIO BAJO DESC P2 P1 BAJO Ejemplo Para mantener 2 tazas de salsa calientes 1 Presione la tecla de Mantener Caliente 2 Selecciones el tiempo...

Page 47: ...nci n de M s Menos 3 Presione ENCENDER Tras varios segundos se muestra el tiempo de preparaci n en la ventana de visualizaci n y comienza a transcurrir el tiempo Presionar 1 vez 2 veces 3 veces Peso 9...

Page 48: ...raci n para Congelar 1 Congelar carnes carne de ave y pescado en paquetes con s lo 1 capa o 2 capas de alimentos Colocar papel encerado entre las capas 2 Empacar en envolturas de pl stico resistentes...

Page 49: ...4 lb superficie descongelada en frigor fico Chuletas Bistec 6 a 8 Dar la vuelta Volver a ordenar Proteger extremos y superficie descongelada Costillas T bone 6 a 8 Dar la vuelta Volver a ordenar Prot...

Page 50: ...l vapor escape y causa que los alimentos se sobrecocinen DURANTE el calentamiento cocci n NO abrir la puerta del horno hasta que suenen 2 bips y el tiempo aparezca en la Pantalla de Visualizaci n porq...

Page 51: ...NN SD787 SD797 Agregue m s tiempo de cocinado si es necesario Siga las instrucciones del fabricante para su preparaci n Perfore cada papa con un tenedor 6 veces alrededor de toda la superficie Coloqu...

Page 52: ...o con papel de aluminio Coloque la pasta con una capa de agua caliente dentro un plato especial para Microondas Cubra sin cerrar con la tapa o una envoltura de pl stico perforada Vac e los contenidos...

Page 53: ...1 cucharada peque a de pimiento dulce En una cacerola 2 cuartos derretir la mantequilla por 40 segundos a potencia P10 Agregue cebolla y ajo y cocine por 1 minuto a Potencia P10 Revuelva en harina mos...

Page 54: ...or de selecci n de tiempo para 5 minutos 3 Presione Encender El Temporizador realizar la cuenta regresiva No se realizar ning n tipo de cocci n Para fijar un tiempo de espera o tiempo de reposo Ejempl...

Page 55: ...suaviza 125 ml Coco Pan Tostado P10 ALTO 1 min Col quelos en un molde de tarta o en taz n 1 2 taza 125 ml Remueva cada 30 segundos Queso Crema Suavizado P3 1 min a Quite la envoltura y col quelo en u...

Page 56: ...n su horno de 2 taza 500 ml P10 ALTO 2 min 30 s microondas sin removerlos primero a 3 min Taza de leche 1 taza 250 ml P7 1 min 30 s MEDIO ALTO a 2 min 2 taza 500 ml P7 2 min 30 s MEDIO ALTO a 3 min Pa...

Page 57: ...ue un final carnoso Para compensar las formas irregulares coloque las partes delgadas hacia el centro del plato y las piezas gruesas hacia la orilla Tama o Piezas delgadas se cocinan m s r pido que pi...

Page 58: ...eque as tales como partes de pollo camarones hamburguesas o cortes de puerco Reacomode las piezas de las orillas al centro y piezas del centro a las orillas del plato Voltear No es posible mezclar alg...

Page 59: ...rapo blando cuando el vapor se acumule en el interior o alrededor del exterior de la puerta del horno Durante la cocci n especialmente bajo condiciones de mucha humedad los alimentos expelen vapor Par...

Page 60: ...puerta del horno completamente La tecla Encender Presione Encender no ha sido presionada Ya se hab a introducido Presione Pausa Cancelar para otro programa en el horno anular el programa anterior e in...

Page 61: ...27 IP5066_38N06AP_00_141114 2014 11 17 10 00 AM Page 61...

Page 62: ...peso Presione Para Usar como temporizador de cocina p gina 20 Presione 1 vez Introducir hora Presione Para Establecer el Tiempo de Reposo p gina 20 Presione 1 vez Introducir hora Presione Presione Pa...

Page 63: ...xt rieures Ancho x Alto Abertura del Gabinete Ancho x Fondo x Alto NN TK729SF NN TK739SF inoxydable inoxydable 685 mm x 419 mm 762 mm x 419 mm 27 x 16 1 2 30 x 16 1 2 632 mm x 533 4 mm x 389 mm 24 7 8...

Page 64: ...no en el espacio indicado y guardar este libro como un registro permanente de su compra para futuras referencias N mero de modelo _________ N mero de serie ___________ Fecha de Compra __________ Panas...

Reviews: