background image

15

NOTES ON POPCORN FEATURE:

1. Pop one bag at a time.
2. Place bag in oven according to manu-

facturers’ directions.

3. Start with popcorn at room tempera-

ture.

4. Allow popped corn to sit unopened for

a few minutes.

5. Open bag carefully to prevent burns,

because steam will escape.

6. Do not reheat unpopped kernels or

reuse bag.

NOTE:

If popcorn is of a different weight than list-
ed, follow instructions on popcorn pack-
age. 

Never leave the oven unattended.

If popping slows to 2 to 3 seconds
between pops, stop oven. 

Overcooking

can cause fire.

REMARKS:

When popping multiple bags one right
after the other, the cooking times may
vary slightly. This does not affect the pop-
corn results.

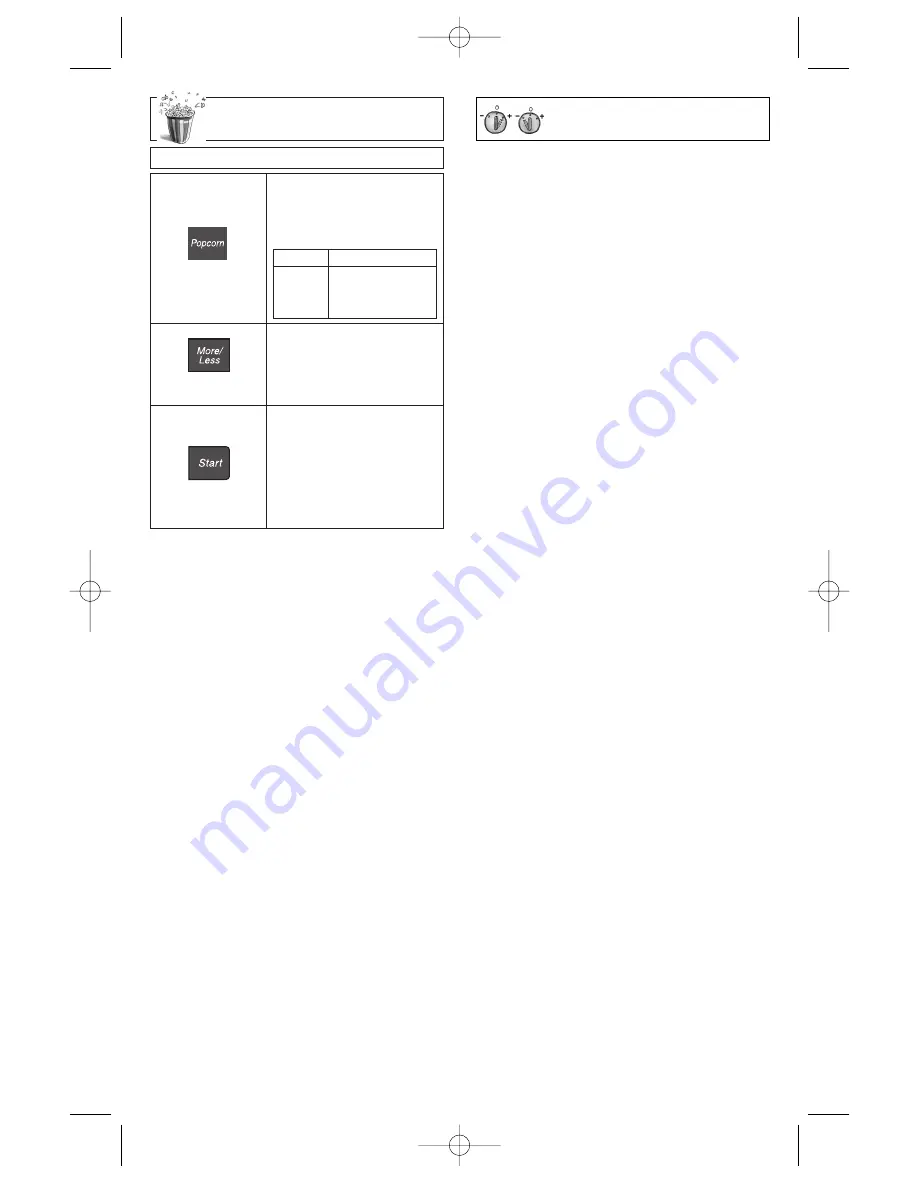
Example: To pop 3.5 oz. (99 g) of popcorn  

1.

• Press 

Popcorn

until

the desired size
appears in the display
window.

2.

(see 

More/Less

Feature.)

3.

• Press 

Start

.

After several 
seconds, cooking 
time appears in the 
display window and 
begins to count 
down.

Press

once

twice

3 times

Weight

3.5 oz (99 g)
3.0 oz (85 g)

1.75 oz (50 g)

For Popcorn:

By using the 

More/Less

Pad, the programs

can be adjusted to cook popcorn for a
longer or shorter time if desired.

1 tap = Adds approx. 10 secs.
2 taps = Adds approx. 20 secs.
3 taps = Subtracts approx. 10 secs.
4 taps = Subtracts approx. 20 secs.
5 taps = Original setting

Press 

More/Less

pad before pressing 

Start

.

For Sensor Reheat/Cook:

Preferences for food doneness vary with
each individual. After having used the

Sensor Reheat/Cook

feature a few times,

you may decide you would prefer your food
cooked to a different doneness. 

1 tap = More (Adds approx. 10% time)
2 taps = Less (Subtracts approx. 10% time)
3 taps = Original setting

Press 

More/Less

pad before pressing 

Start

.

Popcorn Feature

More/Less Feature

Optional

F00037D00CP  2005.03.03  14:54  Page 17

Summary of Contents for INVERTER NN-T695

Page 1: ...UCTIONS CAREFULLY BEFORE USING THE OVEN Inverser le manuel pour lire les instructions en français F00037D00CP FLE0305 0 Printed in China Panasonic Canada Inc 5770 Ambler Drive Mississauga Ontario L4W 2T3 Tel 905 624 5010 www panasonic ca 1200W F00037D00CP 2005 03 03 14 54 Page 1 ...

Page 2: ...e Less Feature 15 Inverter Turbo Defrost Feature 16 Defrosting Tips Techniques 16 17 Sensor Reheat Feature 18 Sensor Cook Feature 18 Sensor Cook Chart 19 Microwave Recipes 20 Timer Feature Kitchen Timer Stand Time Delay Start 21 Microwave Shortcuts 22 23 Food Characteristics 24 Cooking Techniques 24 25 Quick Guide to Operation 28 Maintenance Care and Cleaning of Your Microwave Oven 9 Before Reques...

Page 3: ... 1 door bent 2 hinges and latches broken or loosened 3 door seals and sealing surfaces d The oven should not be adjusted or repaired by anyone except properly qualified service personnel All safety messages will tell you what the potential hazard is tell you how to reduce the chance of injury and tell you what can happen if the instructions are not followed This is the safety alert symbol It is us...

Page 4: ...ss closely supervised by an adult DO NOT assume that because a child has mastered one cooking skill he she can cook everything 11 DO NOT operate this appliance if it has a damaged cord or plug if it is not working properly or if it has been damaged or dropped 12 DO NOT immerse cord or plug in water 13 Keep cord away from heated surfaces 14 DO NOT let cord hang over edge of a table or counter 15 Th...

Page 5: ...or repairs to Door Control Panel Frame Safety Interlock Switches or any other part of oven Microwave leakage may result TO AVOID THE RISK OF FIRE 1 DO NOT operate the oven empty The microwave energy will reflect continuously throughout the oven causing overheating and damage if food or water is not present to absorb energy 2 DO NOT store flammable materials next to on top of or in the oven 3 DO NO...

Page 6: ...and examine the oven for any dam age such as dents broken door latches or cracks in the door Notify dealer immediately if oven is damaged DO NOT install if oven is damaged Placement of Oven 1 The oven must be placed on a flat stable surface Place the front surface of the door 7 6cm 3 inches or more from the counter top edge to avoid acci dental tipping of the microwave oven during normal use For p...

Page 7: ... should be at least as great as the electrical rating of the appliance The extension cord must be a grounding type 3 wire cord The longer cord should be arranged so that it will not drape over the counter top or tabletop where it can be pulled on by children or tripped over accidentally Wiring Requirements 1 The oven must be operated on a SEPARATE CIRCUIT No other appli ance should share the circu...

Page 8: ...ng power of your microwave oven CAUTION When using pre packaged microwave popcorn you can follow recommended package instructions or use the popcorn pad refer to page 15 Otherwise the popcorn may not pop adequately or may ignite and cause a fire Never leave oven unattended when popping popcorn Allow the popcorn bag to cool before opening always open the bag facing away from your face and body to p...

Page 9: ...igned for microwave cooking only Always fol low instructions provided by the manufacturer DO NOT preheat browning dish for longer than 6 minutes If an oven cooking bag is used for microwave cooking prepare according to package directions DO NOT use a wire twist tie to close bag instead use plastic ties cotton string or a strip cut from the open end of the bag 8 THERMOMETERS DO NOT use a convention...

Page 10: ...s such as hot dogs Paper Towels Napkins Yes Use to warm rolls and sandwiches only if labeled safe for microwave use Recycled Paper Towels No Recycled paper products may contain impurities which may Napkins cause sparks Parchment Paper Yes Use as a cover to prevent spattering Safe for use in microwave microwave convection and conventional ovens Plastic Should be labeled Suitable for Microwave Heati...

Page 11: ...ide oven surfaces Clean with a damp cloth To prevent damage to the operating parts inside the oven water should not be allowed to seep into ventila tion openings Do not remove waveguide cover It is important to keep cover clean in the same manner as the inside of the oven Control Panel Covered with a removable protective film to prevent scratches during shipping Small bub bles may appear under thi...

Page 12: ...Vent e e Control Panel f f Identification Plate g g Glass Tray h h Roller Ring i i Heat Vapor Barrier Film do not remove j j Waveguide Cover do not remove k k Door Release Button l l Menu Label m m Function Label n n Time Weight and Sensor Menu Dial i d g l j a b e n d m f k h c F00037D00CP 2005 03 03 14 54 Page 12 ...

Page 13: ...ensor Reheat Pad page 18 Display Window Step by step instructions scroll for easy operation Inverter Turbo Defrost Pad page 16 Clock Pad page 12 Keep Warm Pad page 14 Start Pad Sensor Cook Pad page 18 Time Weight and Sensor Menu Dial page 13 Before cooking One tap clears memory During cooking One tap temporarily stops the cooking process Another tap cancels all your instructions and time of day or...

Page 14: ...ear in English If you wish to use Spanish or French use the More Less pad lan guage option When French is select ed BIENVENUE A PANASONIC LIRE LE MANUEL D UTILISA TION AVANT USAGE scrolls across the dis play window If you wish to use metric measurements use the Start pad weight option see page 13 Child Safety Lock This feature prevents the electronic oper ation of the oven until cancelled It does ...

Page 15: ... store display In this mode the oven s functions can be demonstrated without powering the oven OFF ON TIME CHOICE Push then rotate the dial Rotate the dial clockwise to increase the cooking time and rotate the dial counter clockwise to decrease the cooking time WEIGHT CHOICE Push then rotate the dial Rotate the dial clockwise to increase the weight and rotate the dial counter clockwise to decrease...

Page 16: ... can use other power levels Select desired power level before setting cooking time 2 After setting the time by Quick Min Pad you cannot use Number Pads 3 Quick Min Pad can be used to add more time during manual cooking 1 Press Quick Min until the desired cooking time up to 10 min utes appears in the display window Power Level is pre set at P10 2 Press Start Cooking begins and the time will count d...

Page 17: ... in the display window 2 see More Less Feature 3 Press Start After several seconds cooking time appears in the display window and begins to count down Press once twice 3 times Weight 3 5 oz 99 g 3 0 oz 85 g 1 75 oz 50 g For Popcorn By using the More Less Pad the programs can be adjusted to cook popcorn for a longer or shorter time if desired 1 tap Adds approx 10 secs 2 taps Adds approx 20 secs 3 t...

Page 18: ... securely date and label To Defrost 1 Remove wrapper This helps moisture to evaporate Juices from food can get hot and cook the food 2 Set food in microwave safe dish 3 Place roasts fat side down Place whole poultry breast side down 4 Select power and minimum time so that items will be under defrosted 5 Drain liquids during defrosting 6 Turn over invert items during defrosting 7 Shield edges and e...

Page 19: ...face Chops Steak 12 to 16 6 to 8 Turn over Rearrange Shield ends and defrosted surface Ribs T bone 12 to 16 6 to 8 Turn over Rearrange Shield ends and defrosted surface 5 min NO Stew Meat 8 to 16 4 to 8 Break apart Rearrange Remove defrosted pieces Liver thinly sliced 8 to 12 4 to 6 Drain liquid Turn over Separate pieces Bacon sliced 8 4 Turn over Poultry Chicken Whole 8 to 12 4 to 6 Turn over Shi...

Page 20: ...ntainers and the inside of the microwave oven are dry before placing food in the oven Residual beads of mois ture turning into steam can mislead the sensor 4 Cover food with lid or with vented plastic wrap Never use tightly sealed plastic containers they can prevent steam from escaping and cause food to overcook DURING Reheating Cooking DO NOT open the oven door until 2 beeps sound and cooking tim...

Page 21: ...when removing the film cover after cooking Remove facing away from you to avoid steam burns If additional time is needed continue to cook manually 8 Frozen Dinners 300 450 g Follow manufacturers directions for covering or removing 11 16 oz covers Do not use frozen foods packaged in foil trays 9 Oatmeal 40 80 g Place inside a microwave safe serving bowl with no cover 1 2 1 cup Follow manufacturers ...

Page 22: ...ained 1 3 cup bread crumbs 1 teaspoon paprika In a 2 Qt casserole dish melt the butter for 40 seconds at P10 Add onion and garlic and cook for 1 minute at P10 Stir in flour mustard salt and pepper and gradually add the milk Cook for 3 4 minutes at P10 until sauce thickens stirring once Add the cheddar cheese stirring thoroughly Pour and stir the sauce into the macaroni in a 3 Qt casserole Top with...

Page 23: ... completed and or to program a delay start To Use as a Kitchen Timer Example To count down 5 minutes 1 Press Timer 2 Set time using Time Dial to 5 minutes 3 Press Start Time will count down without oven operating To Set Stand Time Example To cook at P6 power for 3 minutes with stand time of 5 minutes 1 Enter the desired Power Level see page 14 for direc tions Set cooking time using Time Dial to 3 ...

Page 24: ... Chocolate 1 2 cup 125 ml chips holds its shape even when softened To toast Coconut P10 High 1 Place in a microwave safe dish 1 2 cup 125 ml Stir every 30 seconds To soften Cream Cheese P3 MED LOW 1 2 Remove wrapper and place in a 225 g 8 oz microwave safe bowl To brown Ground Beef P10 High 4 5 Crumble into a microwave safe colander 450 g 1 pound set into another dish Cover with plastic wrap Stir ...

Page 25: ...2 Heated liquids can erupt if not stirred 2 cups 500 ml 16 oz 21 2 3 Do not heat liquids in microwave oven without stirring before heating Cup of liquid To warm Beverage P7 MED HIGH 1 cup 250 ml 8 oz 11 2 2 2 cups 500 ml 16 oz 21 2 3 To roast Nuts P10 High 3 4 Spread nuts into a 23 cm 9 inch 11 2 cups 375 ml microwave safe pie plate Stir occasionally To toast Sesame Seeds P10 High 2 21 2 Place in ...

Page 26: ...dish and thick pieces toward the edge Size Thin pieces cook more quickly than thick pieces Starting Temperature Foods that are at room temperature take less time to cook than if they are chilled refrigerated or frozen Piercing Foods with skins or mem branes must be pierced scored or have a strip of skin peeled before cook ing to allow steam to escape Pierce clams oysters chicken livers whole potat...

Page 27: ... pieces shrimp hamburger patties or pork chops Rearrange pieces from the edge to the centre and pieces from the centre to the edge of the dish Turning It is not possible to stir some foods to dis tribute the heat evenly At times microwave energy will concentrate in one area of the food To help ensure even cooking these foods need to be turned Turn over large foods such as roasts or turkeys halfway...

Page 28: ...another appliance into the outlet outlet to check if it is working The door is not closed Close the oven door securely completely Start Pad was not pressed Press Start Pad after programming Another program is already Press Stop Reset Pad to cancel entered into the oven the previous program and enter new program The program is not correct Program again according to the Operating Instructions Stop R...

Page 29: ...SS LIMITED WARRANTY IS IN LIEU OF ALL OTHER WARRANTIES EXPRESS OR IMPLIED INCLUDING ANY IMPLIED WARRANTIES OF MER CHANTABILITY AND FITNESS FOR A PARTICULAR PURPOSE IN NO EVENT WILL PANASONIC CANADA INC BE LIABLE FOR ANY SPECIAL INDIRECT OR CONSEQUENTIAL DAMAGES In certain instances some jurisdictions do not allow the exclusion or limitation of inciden tal or consequential damages or the exclusion ...

Page 30: ...e Press Press To reheat using Sensor Reheat page 18 Press once Optional Press To cook using Popcorn page 15 Select weight Optional Press To cook using Quick Min page 14 up to 10 min Press To use Keep Warm page 14 Press once To set keep warm time up to 30 min Press To cook using Sensor Cook page 18 Press To select category Optional Press Input up to 4 stage cooking programs To set Delay Start page ...

Page 31: ...z 12 7 Amps 1 480 W 12 7 Amps 1 460 W 1 200 W 301 mm x 518 mm x 404 mm 304 mm x 555 mm x 493 mm 356 mm x 606 mm x 493 mm 11 7 8 x 20 3 8 x 15 15 16 11 15 16 x 21 7 8 x 19 7 16 14 x 23 7 8 x 19 7 16 225 mm x 375 mm x 386 mm 228 mm x 418 mm x 470 mm 278 mm x 469 mm x 470 mm 8 7 8 x 14 3 4 x 15 3 16 9 x 16 7 16 x 18 1 2 10 15 16 x 18 7 16 x 18 1 2 2 450 MHz Approx 11 2 kg 25 lbs Approx 14 3 kg 32 lbs...

Page 32: ...30 Notes F00037D00CP 2005 03 03 14 54 Page 32 ...

Page 33: ... For English Instructions turn over F00037D00CP FLE0305 0 Imprimé en Chine Panasonic Canada Inc 5770 Ambler Drive Mississauga Ontario L4W 2T3 Tél 905 624 5010 www panasonic ca 1200W Manuel d utilisation Four micro ondes Modèles NN T695 T795 T995 F00037D00CP 2005 03 03 14 54 Page 33 ...

Page 34: ...us Moins 15 Turbo décongélation avec système Inverter 16 Conseils et techniques de décongélation 16 17 Réchauffage par senseur 18 Cuisson par senseur 18 Tableau de cuisson par senseur 19 Recettes par micro ondes 20 Minuterie minuterie auxiliaire temps de repos temps d attente 21 Conseils pratiques 22 23 Caractéristiques des aliments 24 Techniques de cuisson 24 25 Guide sommaire 28 Entretien et ser...

Page 35: ...rrous brisés ou desserrés 3 Joints de la porte et surfaces d étanchéité d Confier toute réparation ou réglage à un personnel qualifié Tous les messages de sécurité avertissent l utilisateur du risque potentiel comment diminuer la possibilité de blessure et indiquent ce qui peut arriver si les instructions ne sont pas suivies Ce symbole représente un avertissement de sécurité Il sert à avertir l ut...

Page 36: ...est recommandée si l appareil doit être utilisé par un enfant Ne pas prendre pour acquis le fait qu un enfant peut maîtriser la cuisson parce qu il sait comment utiliser une fonction 11 Ne pas faire fonctionner l appareil si sa fiche ou son fil d alimentation sont endommagés s il a été échappé endommagé ou s il semble y avoir une anomalie 12 Ne pas plonger la fiche ou le fil d alimentation dans l ...

Page 37: ...ce qualifié POUR PRÉVENIR TOUT RISQUE D EXPOSITION AUX MICRO ONDES Ne pas altérer modifier les réglages ou réparer la porte le cadre du panneau des commandes ou toute autre partie du four afin de prévenir les fuites de micro ondes POUR PRÉVENIR TOUT RISQUE D INCENDIE 1 Ne pas utiliser le four lorsqu il est vide En l absence d aliment ou d eau pour l absorber l énergie des micro ondes se réfléchira...

Page 38: ...diatement le détaillant si l appareil est endommagé Ne pas installer un four endommagé Emplacement 1 Ce four Panasonic doit être déposé sur une surface plane et stable Placer la surface avant de la porte à 7 6 cm 3 po ou plus du bord du comptoir pour empêcher le four de basculer accidentellement durant une utilisation normale Assurer une ventilation adéquate Conserver un espace libre de 7 6 cm 3 p...

Page 39: ...ranches avec retour à la terre Il faut disposer le long cordon de manière qu il ne pende pas en dehors du comptoir ou de la table d où il pourrait être tiré par un enfant ou le faire trébucher Circuit 1 Pour un rendement optimal brancher ce four sur un circuit électrique séparé Aucun autre appareil ne doit être utilisé simultanément sur le même circuit électrique Sinon le fusible risque de griller...

Page 40: ...a puissance du four ATTENTION Le maïs éclaté pré emballé pour four micro ondes doit être pré paré selon les instructions sur l emballage ou à l aide de la touche de maïs éclaté voir page 15 Sinon le maïs peut ne pas éclater correctement ou s en flammer et déclencher un incendie Ne jamais laisser le four sans surveillance lors de la cuisson Laisser le sac refroidir avant de l ouvrir Afin d éviter t...

Page 41: ...illes à brunir ont été conçus pour la cuisson micro ondes seulement Procéder selon les instructions du fabricant Ne jamais préchauffer un plat à brunir pendant plus de 6 minutes Lors de l utilisation de sacs de cuisson procéder selon les directives du fabri cant Éviter les attaches en métal Fermer à l aide de l attache en nylon incluse d une bande découpée du sac ou d une ficelle 8 THERMOMÈTRES Ne...

Page 42: ... surgelés Non Le métal peut produire des étincelles et endommager le four en métal Plateau de repas surgelés Oui Chauffer un seul plateau à la fois dans le four allant au four micro ondes Récipient en métal Non Le métal peut produire des étincelles et endommager le four Récipient en verre et Idéal pour la cuisson micro ondes Suivre les étapes en bas de céramique résistant à la Oui page pour tester...

Page 43: ...umide Afin de prévenir tout risque d endommager les pièces internes veiller à ce qu aucun liquide ne s infiltre par les orifices de ventilation Ne pas retirer le couvercle du guide d ondes Il est important de conserver pro pre le couvercle tout comme l in térieur du four Panneau des commandes Le panneau est recouvert d une pellicule protectrice amovible pour prévenir les rayures Il est possible qu...

Page 44: ...es commandes f f Plaque signalétique g g Plateau en verre h h Anneau à galets i i Pellicule antivapeur antichaleur ne pas retirer j j Couvercle du guide d ondes ne pas retirer k k Levier d ouverture de la porte l l Aide mémoire m m Étiquette des fonctions n n Sélecteur de durée poids et de menu senseur i d g l j a b e n d m f k h c F00037D00CP 2005 03 03 14 55 Page 44 ...

Page 45: ...che de cuisson rapide par minute page 14 Touche d arrêt réenclenchement Touche de réchauffage par senseur page 18 Écran d affichage Instructions pas à pas pour faciliter le fonctionnement du four Touche de turbo décongélation avec système Inverter page 16 Touche de réglage de l horloge page 12 Touche de maintien au chaud page 14 Touche de mise en marche Touche de cuisson par senseur page 18 Sélect...

Page 46: ...ou en espagnol utiliser l option du choix de la langue au moyen de la touche Plus Moins Lorsque le français est sélectionné BIENVENUE A PANASONIC LIRE LE MANUEL D UTILISATION AVANT USAGE défile à l af fichage Pour utiliser les mesures métriques utiliser l option du choix de l unité de mesure au moyen de la touche Marche voir à la page 13 Système de verrouillage Tant qu il est activé ce système emp...

Page 47: ...st simulé sans émission de micro ondes NON OUI SÉLECTION DE LA DURÉE Appuyer puis tourner le sélecteur Tourner le sélecteur dans le sens horaire pour augmenter la durée de cuisson et le tourner dans le sens antihoraire pour diminuer la durée de cuisson SÉLECTION DU POIDS Appuyer puis tourner le sélecteur Tourner le sélecteur dans le sens horaire pour augmenter le poids et le tourner dans le sens a...

Page 48: ...t neuf dix Niveau de puissance P10 ÉLEVÉE P9 P8 P7 MOY ÉLEVÉE P6 MOYENNE P5 P4 P3 MOY FAIBLE DÉC P2 P1 FAIBLE Cuisson rapide par minute Cette fonction permet de régler ou d a jouter du temps de cuisson par incré ments de 1 minute jusqu à 10 minutes Réglage de la durée de cuisson NOTA 1 Au besoin il est possible d utiliser un autre niveau de puissance Sélectionner le niveau désiré avant de régler l...

Page 49: ...ïs éclaté jusqu à ce que le poids désiré soit affiché 2 Voir la fonction Plus Moins 3 Appuyer sur Marche Après quelques se condes le temps de cuisson s affiche et le compte à rebours s amorce Optionnel Nombre de pressions une deux trois Poids 99 g 3 5 oz 85 g 3 0 oz 50 g 1 75 oz Fonction Plus Moins Pour le maïs éclaté En utilisant la touche Plus Moins les programmes peuvent être ajustés pour régle...

Page 50: ...de congeler 1 La viande la volaille et le poisson doivent être congelés sur 1 ou 2 couches seulement Mettre du papier ciré entre les couches 2 Emballer avec de la pellicule plastique très résistante des sacs ou papier pour congélateur 3 Retirer le plus d air possible pour créer un emballage sous vide 4 Fermer en s assurant d une bonne étanchéité Inscrire la date et la description sur une étiquette...

Page 51: ... au 1 1 1 8 kg 21 2 4 lb et les parties décongelées réfrigérateur Côtelettes Steak 12 à 16 6 à 8 Retourner Réarranger Protéger les extrémités et les parties décongelées Côtes T bone 12 à 16 6 à 8 Retourner Réarranger Protéger les extrémités et les parties décongelées 5 min NON Ragoût 8 à 16 4 à 8 Séparer Réarranger Retirer les morceaux décongelés Foie tranches minces 8 à 12 4 à 6 Égoutter Retourne...

Page 52: ...aliments avec un couvercle ou une pellicule plastique perforée Ne jamais utiliser un contenant étanche en plastique cela peut empêcher la vapeur de s échapper et trop cuire l aliment PENDANT le réchauffage ou la cuisson NE PAS ouvrir la porte du four avant l émis sion des 2 bips et l affichage du compte à rebours Autrement la fuite de vapeur entraînera un réglage imprécis de la durée de cuisson Un...

Page 53: ...uisson retirer la pellicule avec soin afin d éviter toute brûlure avec la vapeur Si la cuisson doit être prolongée utiliser la cuisson manuelle 8 Repas surgelés 300 à 450 g Suivre les instructions pour savoir quand couvrir et 11 à 16 oz découvrir Ne pas utiliser de plats congelés dans des contenants en aluminium 9 Gruau 40 à 80 g Placer dans un bol pour four micro ondes sans couvercle 1 2 à 1 tass...

Page 54: ...8 oz 225 g de macaroni poids sec 1 2 lb cuit et égoutté Dans un faitout de 8 tasses 2 L faire fondre le beurre à P10 40 secondes Incorporer l oignon et l ail et cuire à P10 1 minute Ajouter la farine la moutarde le sel et le poivre puis le lait graduelle ment Poursuivre la cuisson à P10 3 à 4 minutes ou jusqu à ce que la sauce épaississe Remuer une fois durant la cuisson Incorporer le fromage ched...

Page 55: ...iliaire Exemple Pour un compte à rebours de 5 minutes 1 Appuyer sur Minuterie 2 Régler une durée de 5 minutes au moyen du sélecteur de durée 3 Appuyer sur Marche Le compte à rebours s amorce sans que le four fonctionne Réglage du temps de repos Exemple Pour une cuisson à P6 pendant 3 minutes avec un temps de repos de 5 minutes 1 Entrer le niveau de puissance désiré voir les instructions à la page ...

Page 56: ...re Moyenne P6 1 à 11 2 jusqu à complètement fondu Nota Le 125 ml 1 2 tasse chocolat garde sa forme quand il est ramolli Crème glacée à ramollir Moyenne faible 1 à 11 2 Vérifier souvent pour ne pas fondre 2 L 8 tasses P3 Fromage à la crème à ramollir Moyenne faible 1 à 2 Déballer et placer dans un bol pour four 225 g 8 oz P3 micro ondes Graines de sésame à griller Élevée P10 2 à 21 2 Placer dans un...

Page 57: ...mes de terre au four Percer la surface de chaque pomme de 170 à 225 g terre six fois avec une fourchette Placer la 6 à 8 oz chacune ou les pommes de terre sur un essuie tout autour du plateau rotatif en verre à au 1 P8 31 2 4 moins 2 5 cm 1 po de distance Ne pas couvrir Laisser reposer 5 minutes pour 2 P8 6 7 compléter la cuisson Pour enlever les odeurs Élevée P10 5 Mélanger de 250 à 375 ml 1 à 11...

Page 58: ...s vers l extérieur Dimensions Les petites portions et les parties minces cuisent plus rapidement que les grosses Température de départ Les aliments à la température de la pièce prennent moins de temps à cuire que ceux qui sortent du réfrigérateur ou du congélateur Perçage La peau la pelure ou la membrane de certains ali ments doit être percée ou fendue avant la cuisson pour permettre à la vapeur d...

Page 59: ...te du centre vers l extérieur du plat Réarrangement Réarranger les petits aliments tels les morceaux de poulet les crevettes les galettes de hamburger et les côtelettes de porc Réarranger les extrémités vers le centre et vice versa Retournement Il est impossible de remuer certains aliments pour redistribuer la chaleur Quelquefois l énergie des micro ondes se concentre dans une partie de l aliment ...

Page 60: ...ppareil sur la défectueuse prise secteur La porte n est pas Fermer la porte complètement fermée La touche Marche n a Appuyer sur la touche Marche pas été appuyée après la programmation Un autre programme est Appuyer sur la touche Arrêt déjà en mémoire Réenclenchement pour annuler la programmation en mémoire et reprogrammer le four La programmation est Recommencer la programmation erronée selon les...

Page 61: ...AUTRE GARANTIE EXPRESSE OU IMPLICITE INCLUANT LES GARANTIES IMPLICITES DU CARACTÈRE ADÉQUAT POUR LA COMMERCIALISATION ET UN USAGE PARTICULIER PANASONIC N AURA D OBLIGATION EN AUCUNE CIRCONSTANCE POUR TOUT DOM MAGE DIRECT INDIRECT OU CONSÉCUTIF Certaines juridictions ne reconnaissent pas les exclusions ou limitations de dommages indi rects ou consécutifs ou les exclusions de garanties implicites Da...

Page 62: ...ystème Inverter p 16 Appuyer une fois Entrer le poids Appuyer Utilisation comme minuterie p 21 Appuyer une fois Régler la durée Appuyer Pour régler un temps de repos p 21 Appuyer une fois Entrer la durée Appuyer Appuyer Pour le maintien au chaud p 14 Appuyer une fois Régler la durée du maintien au chaud jusqu à 30 min Appuyer Pour la cuisson avec la touche de cuisson avec senseur p 18 Appuyer Séle...

Page 63: ... 404 mm 304 mm x 555 mm x 493 mm 356 mm x 606 mm x 493 mm 11 7 8 po x 20 3 8 po x 15 15 16 po 11 15 16 po x 21 7 8 po x 19 7 16 po 14 po x 23 7 8 po x 19 7 16 po 225 mm x 375 mm x 386 mm 228 mm x 418 mm x 470 mm 278 mm x 469 mm x 470 mm 8 7 8 po x 14 3 4 po x 15 3 16 po 9 po x 16 7 16 po x 18 1 2 po 10 15 16 po x 18 7 16 po x 18 1 2 po 2 450 MHz Environ 11 2 kg 25 lb Environ 14 3 kg 32 lb Environ ...

Page 64: ...30 Nota F00037D00CP 2005 03 03 14 55 Page 64 ...

Reviews: