background image

Cleaning the Scanning glass, Reference area, and Double feed
detectors

Notice

Do not use the roller cleaning paper for cleaning the scanning glass, reference area, or double
feed detectors.

1.

Press and hold the power button for one second or more to turn off the unit’s power.

2.

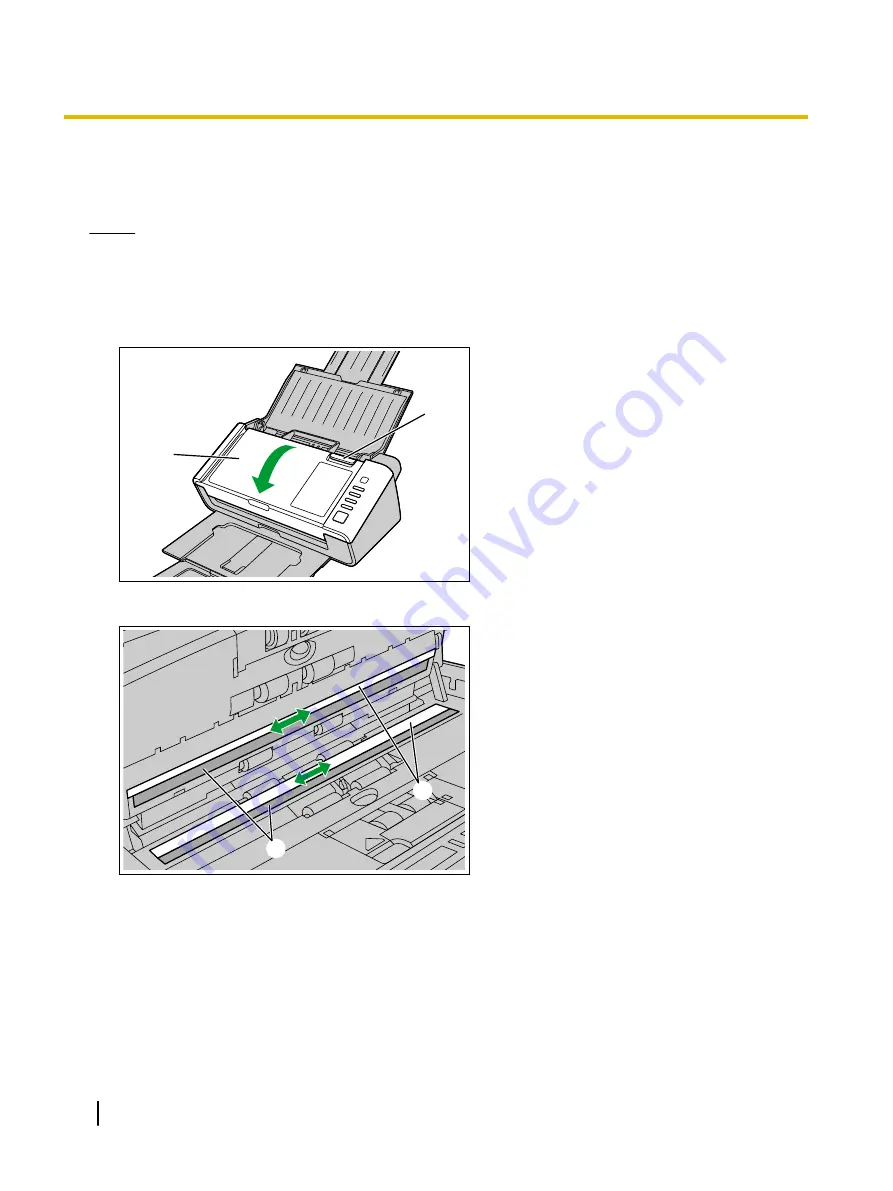
Press the door open button (

A

), and open the ADF door (

B

).

1

2

3.

Clean the scanning glass area (

A

) and reference area (

B

) using a soft and dry cloth.

1

2

50

Operating Manual

Care and Maintenance

Summary of Contents for KV-S1026C

Page 1: ...ease read the Safety Guide and the Quick Reference Guide enclosed with this unit Please carefully read these instructions and the enclosed Safety Guide and Quick Reference Guide Keep all documentation...

Page 2: ...only Utilities User Utility Scan Button Setting Tool Documents 5 Operating Manual Separation Sheet 6 1 Image Capture Plus is a Panasonic original application for configuring advanced scanning settings...

Page 3: ...a USB hub it is not guaranteed to work Abbreviations Windows refers to the Microsoft Windows operating system hereafter Windows Windows XP refers to the Microsoft Windows XP operating system hereafte...

Page 4: ...o PageManager and Presto BizCard are either registered trademarks or trademarks of NewSoft Technology Corporation in the United States and or other countries All other trademarks identified herein are...

Page 5: ...out Interference available from FCC local regional offices helpful FCC Warning To assure continued FCC emission limit compliance the user must use the recommended shielded interfacing cable when conne...

Page 6: ...30 Acceptable Cards 30 Unacceptable Documents 31 Scanning Documents 33 Mixed Batch Card Guide 37 Removing the Mixed Batch Card Guide 37 Installing the Mixed Batch Card Guide 38 Using the Mixed Batch...

Page 7: ...Index 65 Operating Manual 7 Table of Contents...

Page 8: ...ing the unit or plug may emit smoke or become hot to the touch When you operate this product the power outlet should be near the product and easily accessible Connect the AC adaptor firmly to the powe...

Page 9: ...n damage it and cause fire or electric shock Operating Safeguards If metallic materials or water gets into the unit turn the unit off and unplug the unit immediately Contact your dealer for service Op...

Page 10: ...rolonged exposure to these adverse conditions may cause fire or electric shock When moving the unit be sure to unplug the power cord from the AC outlet If the unit is moved with the power cord attache...

Page 11: ...UT OFF AND DISPOSED OF SAFELY THERE IS A DANGER OF SEVERE ELECTRICAL SHOCK IF THE CUT OFF PLUG IS INSERTED INTO ANY 13 AMP SOCKET How to replace the fuse Open the fuse compartment with a screwdriver a...

Page 12: ...the power cord into an outlet from which you can easily unplug it Illegal Duplication It is unlawful to make duplication of certain documents Duplicating certain documents may be illegal in your count...

Page 13: ...ure you have the same number of pages for important documents both before and after scanning and take care not to leave any pages in the scanner Periodically back up important data When having your co...

Page 14: ...r of Quick Reference Guide may vary depending on the country area Please use whichever is appropriate for the country area Guidance sticker The number of guidance sticker may vary depending on the cou...

Page 15: ...xtension tray 2 Exit support Used if paper curls and cannot be fed properly when scanning thin paper page 35 Control Panel For details see Control Panel and LED Indicators page 17 LED Red LED Green Sh...

Page 16: ...Rear 3 1 2 Power connector Security slot Use a commercially available security cable USB connector 16 Operating Manual Installation...

Page 17: ...ton allowing you to open an application and scan a document For details about registering applications see Single Touch Scan Settings page 27 Start Stop button If you set Wait Key for Manual Feed Mode...

Page 18: ...uble feed detected error ON OFF Error Blink Slow ON Caution 1 If the automatic power off function in User Utility is enabled the unit s power will automatically turn off if no operations are performed...

Page 19: ...s high or immediately after moving it from a cold location to a warm one It may cause dew In order to ensure proper operation install the unit maintaining the proper distances from surrounding objects...

Page 20: ...rd into the AC outlet 1 2 3 AC adaptor Power cord To AC outlet Notice Use only with the power cord and the AC adaptor enclosed with the unit When the unit is not used over an extended period of time t...

Page 21: ...n the feed tray b Pull out the feed extension tray Note If the length of the document is short e g a card or a business card you may be able to scan the document without opening the feed tray Operatin...

Page 22: ...4 Set the exit tray a Pull out the exit tray b Open the exit extension tray 1 c Open the exit extension tray 2 22 Operating Manual Installation...

Page 23: ...as an administrator to install the software 1 Check that the unit has been turned off Press the power button for more than one second to turn the unit off 2 Insert the Software Manual DVD ROM into th...

Page 24: ...7 If you selected Custom continue to step 6 6 If you selected Custom for the installation type in step 5 select the item that you want to install 7 Follow the instructions on the screen 8 Connect the...

Page 25: ...Windows XP after installing the device driver follow the hardware wizard s on screen instructions to complete installation Note Continue with the installation even if a window appears with the messag...

Page 26: ...Help For User Utility 1 On the Start menu point to All Programs Panasonic Scanner Tools and then select User Utility Help For Presto PageManager 9 1 On the Start menu point to All Programs NewSoft Pre...

Page 27: ...ected from Presto PageManager 9 and Image Capture Plus If you are using the KV S1026C The application can be selected from Image Capture Plus The set application is enabled for both Touch Free Scannin...

Page 28: ...XP Start Control Panel Scanners and Cameras right click the scanner icon and display the Properties screen 2 Click the Events tab 3 Check that Scan Button Setting Tool is selected for Send to this ap...

Page 29: ...anasonic Document Scanner Device Driver X XX 1 TWAIN KV S1026C KV S1015C TWAIN Driver ISIS KV S1026C KV S1015C ISIS Driver Image Capture Plus Image Capture Plus Presto PageManager 9 Presto PageManager...

Page 30: ...Single paper feeding is recommended for papers exceeding the legal size length Recommended paper Plain paper Acceptable Cards ISO format card Size 85 6 x 54 mm 3 4 x 2 1 in Thickness 0 76 mm 0 03 in...

Page 31: ...tags Coated paper Extremely smooth shiny paper or paper that is highly textured Carbonless copy paper Transparent or partially transparent documents such as OHP sheet and tracing paper Photographs 1 1...

Page 32: ...the feed tray Scan one sheet at a time Notes about double feed detection This unit uses an ultra sonic sensor to detect double feeding where two or more sheets of a document are fed at the same time...

Page 33: ...een scanned Unsupported thin paper types may not exit at the exit slot correctly The height of all the documents on the feed tray should be as follows With the mixed batch card guide removed max 5 mm...

Page 34: ...es A slightly larger than the actual size of the documents 1 3 Carefully align the documents The documents feed better when the leading edges are aligned slantwise as shown in the illustration 1 2 34...

Page 35: ...tration The document guides have a mark showing the approximate upper limit 5 mm 0 2 in for stacking documents to be scanned When the paper is thin it may not be fed properly due to curls in the paper...

Page 36: ...ication and scan the documents For details about the application refer to the help of each application You can also start up applications automatically to scan documents Single Touch Scan For details...

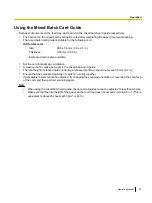
Page 37: ...per documents and a card simultaneously The mixed batch card guide is attached to the unit during shipping If you remove the mixed batch card guide keep it in a safe place Removing the Mixed Batch Car...

Page 38: ...de Insert the tabs on the mixed batch card guide into the holes near the paper slot A 1 Note If the guide is difficult to insert into the holes slightly spread both sides of the guide and try insertin...

Page 39: ...3 cards can be set in the mixed batch card guide The total height of stacked cards including embossed portions should not exceed 5 mm 0 2 in Ensure that the embossed portions of cards to not stick tog...

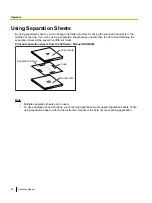
Page 40: ...eet will be saved in a different folder Print out separation sheets from the Software Manual DVD ROM F i l e S e p a r a t i o n Documents Separation Sheet Code Documents B A Note Multiple separation...

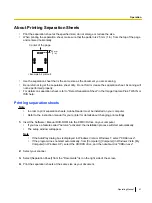
Page 41: ...s Note In order to print separation sheets Adobe Reader must be installed on your computer Refer to the instruction manual for your printer for details about changing print settings 1 Insert the Softw...

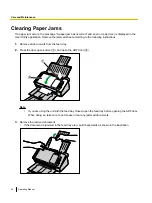
Page 42: ...feed tray 2 Press the door open button A and open the ADF door B 1 2 Note If you are using the unit with the feed tray closed open the feed tray before opening the ADF door When doing so take care to...

Page 43: ...ent is jammed in the exit tray area pull it forward as shown in the illustration 4 Close the ADF door Push both sides of the ADF door down slowly until it clicks into place Operating Manual 43 Care an...

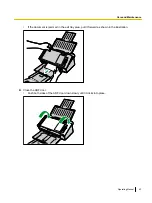
Page 44: ...abrasives or surfactants for cleaning the outside of the unit It can cause warping or discoloration Clean the unit at least once a month 1 Press and hold the power button for one second or more to tu...

Page 45: ...d take out the roller cleaning paper A Notice Keep the roller cleaning paper out of reach of small children Do not store the roller cleaning paper in direct sunlight or in a place with temperature ove...

Page 46: ...Press and hold the power button for one second or more to turn off the unit s power 2 Press the door open button A and open the ADF door B 1 2 3 Open the paper feed roller cover A 1 46 Operating Manua...

Page 47: ...e roller surface hold the roller to prevent it from rotating Wipe the roller from one end to the other in the direction indicated by the arrow all the way around 5 Close the paper feed roller cover fi...

Page 48: ...ection of the arrow all the way around them as shown in the illustration 7 Use the roller cleaning paper to clean the surface of the conveyor rollers A and exit rollers B Wipe the rollers from one end...

Page 49: ...llustration 1 9 Close the ADF door Push both sides of the ADF door down slowly until it clicks into place 10 Reset the roller cleaning counter in User Utility to 0 Turn ON the unit s power Start User...

Page 50: ...e scanning glass reference area or double feed detectors 1 Press and hold the power button for one second or more to turn off the unit s power 2 Press the door open button A and open the ADF door B 1...

Page 51: ...4 Remove dust on the double feed detectors A with a cotton swab 1 5 Close the ADF door Push both sides of the ADF door down slowly until it clicks into place Operating Manual 51 Care and Maintenance...

Page 52: ...ber Notes Replacement Parts Roller exchange kit Paper feed roller 1 piece Double feed prevention roller 1 piece KV SS058 For KV S1026C KV SS059 For KV S1015C Optional Units Roller cleaning paper KV SS...

Page 53: ...nge kit and replace the paper feed roller and double feed prevention roller Replacing the Rollers 1 Press and hold the power button for one second or more to turn off the unit s power 2 Press the door...

Page 54: ...out the new double feed prevention roller in the roller exchange kit 6 Install the new double feed prevention roller into the metal holder with the longer groove facing to the right side rear view 54...

Page 55: ...prevention roller cover A firmly 1 Notice Be sure to close the double feed prevention roller cover until it clicks into place 8 Open the paper feed roller cover A 1 Operating Manual 55 Replacement Pa...

Page 56: ...paper feed roller A 1 10 Take out the new paper feed roller in the roller exchange kit 11 Install the new paper feed roller with the gear on the left side 56 Operating Manual Replacement Parts and Op...

Page 57: ...e in the feeding direction 13 Close the ADF door Push both sides of the ADF door down slowly until it clicks into place 14 Reset the roller replacing counter in User Utility to 0 Turn ON the unit s po...

Page 58: ...and the USB hub is not functioning properly Do not connect via the USB hub Connect the unit to the computer directly There is a problem with the USB cable Use the included USB cable or a certified Hi...

Page 59: ...s under the limit mark on the document guides A double feed is detected when scanning cards The cards are set in portrait orientation Either disable the double feed detection function or set the cards...

Page 60: ...the computer monitor settings Dark spots or noise appear on the scanned documents The scanning glass is dirty Clean the scanning glass page 50 There is noise or wave patterns moire pattern on the scan...

Page 61: ...in a service charge to repair the unit The unit should be handled in the correct horizontal position Required Materials Original unit carton and packing materials Shipping tape and scissors 1 Press an...

Page 62: ...h the AC adaptor power cord USB cable DVD ROM Safety Guide and Quick Reference Guide 3 4 5 2 1 AC adaptor USB cable Safety Guide and Quick Reference Guide Software Manual DVD ROM Power cord 62 Operati...

Page 63: ...ges min Duplex Letter 40 images min A4 40 images min Resolution 100 600 dpi 1 dpi step Optical 300 dpi 600 dpi Automatic switch Scanning mode Binary 256 levels grayscale 24 bit color MultiStream Binar...

Page 64: ...W or less Power OFF 0 3 W or less While the AC adaptor is connected to the AC outlet Operating Environment Temperature 10 35 C 50 95 F Humidity 20 80 RH Storage Environment Temperature 0 40 C 32 104...

Page 65: ...ance sticker 15 L LED Green 15 17 18 LED Red 15 17 18 Life 64 M Maintenance 64 Mixed batch card guide 14 15 37 O Operating Environment 64 P Paper jams 32 42 Power button 17 25 Power connector 16 Power...

Page 66: ...T Troubleshooting 58 U USB cable 14 24 USB connector 16 User Utility 2 18 42 49 57 W Weight 64 66 Operating Manual Index...

Page 67: ...equipment please contact your dealer or supplier for further information Information on Disposal in other Countries outside the European Union This symbol is only valid in the European Union If you wi...

Reviews: