background image

CD-ROM

Do not write or stick paper on the front and/or back of CD-ROM.

Do not touch the data side of the CD-ROM. When handling the CD-ROM, be careful not to leave
fingerprints or otherwise damage the CD-ROM.

Do not leave the CD-ROM where it is directly exposed to sunlight or near a heater for extended periods.

Do not throw or bend the CD-ROM.

Roller Cleaning Paper

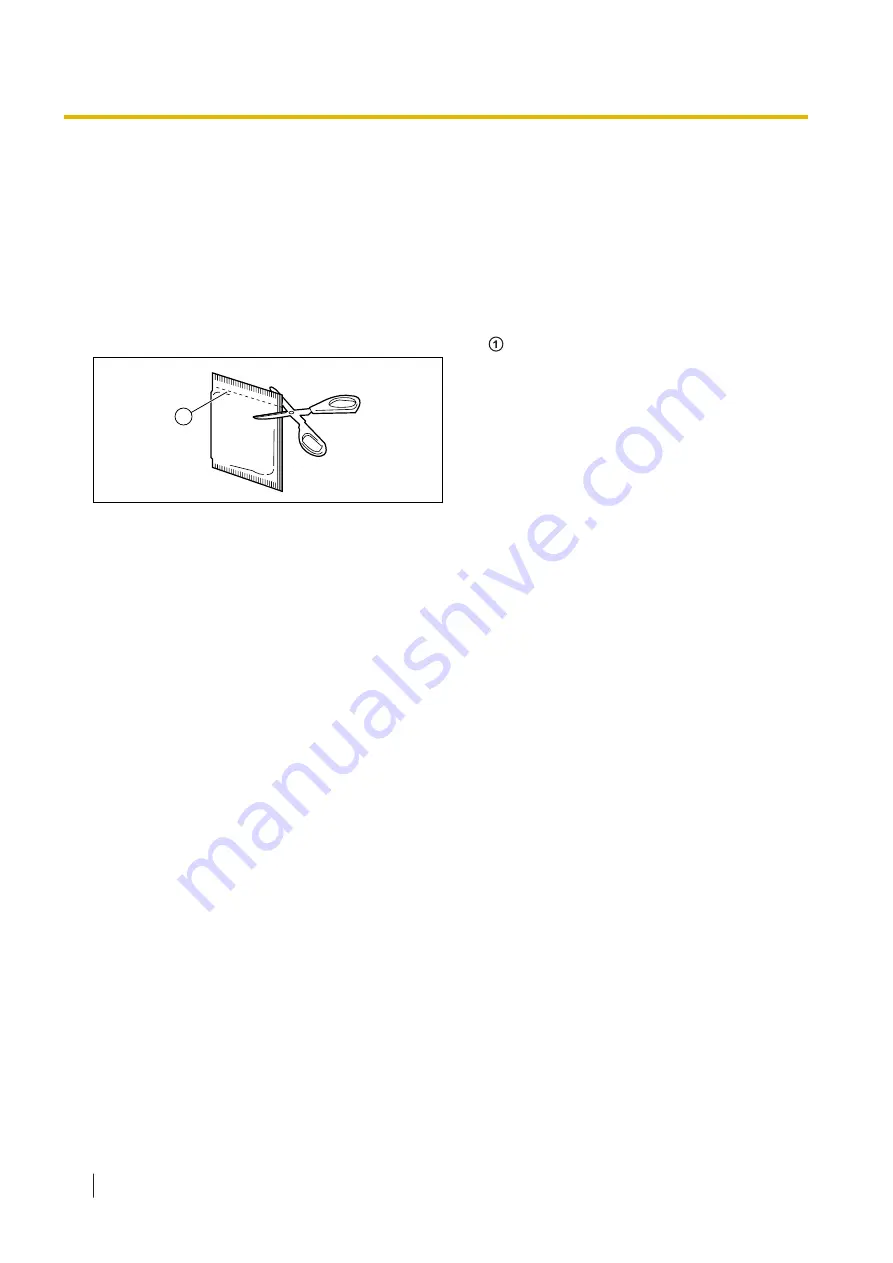
Using a pair of scissors, open the bag along the dotted line ( ), and take out the roller cleaning paper.

1

Keep the roller cleaning paper out of reach of small children.

Do not store the roller cleaning paper in direct sunlight or in a place with a temperature over 40 

(104 

).

Only use the roller cleaning paper to clean the rollers.

For details about the roller cleaning paper, please refer to the Safety Data Sheet (SDS). Please ask your
Panasonic sales company about obtaining the Safety Data Sheet.

If the bag is left opened for a long period of time before using it, the alcohol will evaporate. Please use the
roller cleaning paper immediately after opening the bag.

To purchase the roller cleaning paper (KV-SS03), please contact your dealer, or call our Supplies and
Accessories department at 1-800-726-2797 (U.S.A. only).

 
KEEP AWAY FROM FIRE.

Security Notice

The management of documents and scanned data is the responsibility of the user. In particular, pay
attention to the following points.

Make sure you have the same number of pages for important documents both before and after scanning,
and take care not to leave any pages in the scanner.

Periodically back up important data.

When having your computer or hard disk serviced, or when disposing of your computer or hard disk,
completely erase any stored image data.

Others

Make sure to remove paper clips and staples from documents before scanning. Failing to do so can
damage the unit, document, or both.

Do not use thinner, benzine, or cleaners containing abrasives or surfactants, for cleaning the outside of
scanner.

In usage scenarios that require accuracy or reproducibility in scanned images, there may be cases where
the desired image cannot be obtained, such as half-tone images or markings from fluorescent pens.

2.1 Precautions

8

Summary of Contents for KV-S1037

Page 1: ...read the Quick Installation Guide enclosed with this unit Keep all documentation in a safe place for future reference KV S1026C J2 KV S1026C M2 only The scanner may be displayed on your computer as the KV S1026C MK2 When you download the driver from web site download the driver for KV S1026C MK2 Current model availability depends on your country area Please contact your dealer ...

Page 2: ...s manual may differ from the screens displayed on your computer Letter size This is the standard paper size of 8 5 in 11 in used in the United States and or other countries A4 size This is a standard paper size of 210 mm 297 mm dpi dots per inch This is the number of dots per inch This unit is used for scanning and printing resolution The higher the dpi value is the higher the resolution becomes l...

Page 3: ...ew documents correctly install Adobe Reader 3 For details about the control sheet see 6 3 3 Using Control Sheets page 35 System Requirements Computer IBM PC AT or compatible machine with a CD ROM drive CPU Intel Core 2 Duo 1 8 GHz or higher Interface USB 2 0 USB 3 0 USB 3 1 Gen1 Note For details about the system requirements refer to Read me first in the Software Manual CD ROM The scanning speed d...

Page 4: ...Closing the ADF door 21 6 2 Preparing Documents 22 6 2 1 About documents 22 6 2 1 1 Compatible Paper 22 6 2 1 2 Compatible Card 23 6 2 1 3 Compatible Passport 24 6 2 1 4 Carrier sheet KV SS077 24 6 2 1 5 Incompatible Documents 25 6 2 1 6 Notes about Documents for Scanning 26 6 2 1 7 Notes about Double Feed Detection 26 6 2 2 Loading documents 27 6 2 2 1 When using the carrier sheet 30 6 3 Scanning...

Page 5: ...sses and reference area 41 8 2 2 Cleaning the Double Feed Detectors 41 8 2 3 Cleaning the Rollers 42 8 2 4 Cleaning Mode 44 8 3 Replacing the Rollers 45 9 Appendix 50 9 1 Troubleshooting 50 9 2 Checking the event settings for push scan 53 9 3 Shading Adjustment 54 9 4 Uninstalling the Software 55 9 5 Repacking Instructions 56 9 6 Specifications 58 Table of Contents 5 ...

Page 6: ...u register the scanning conditions for a job in advance you can start scanning without operating the computer Card Scanning A maximum of 3 cards can be loaded on the feed tray Mixed Batch Card Guide A mixed batch card guide is available for scanning mixed media cards and papers at the same time Manual Feed Selector Bound documents can be scanned by setting the manual feed selector to manual feedin...

Page 7: ...to prevent illegal duplication from being made Installation Do not place the unit in direct sunlight in a cold draft or near heating apparatus Do not place the unit near apparatus which generate electronic or magnetic noise Protect the unit from static electricity Do not move the unit immediately from a cold place to a warm place It may cause condensation which may damage the unit Using the unit i...

Page 8: ...roller cleaning paper immediately after opening the bag To purchase the roller cleaning paper KV SS03 please contact your dealer or call our Supplies and Accessories department at 1 800 726 2797 U S A only KEEP AWAY FROM FIRE Security Notice The management of documents and scanned data is the responsibility of the user In particular pay attention to the following points Make sure you have the same...

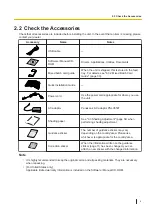
Page 9: ...it AC adaptor Panasonic AC adaptor PNLV6507 Shading paper See 9 3 Shading Adjustment page 54 when performing shading adjustment Guidance sticker The number of guidance sticker may vary depending on the country area Please use whichever is appropriate for the country area Correction sticker When the information written on the guidance sticker page 11 has been changed you can attach a new sticker wi...

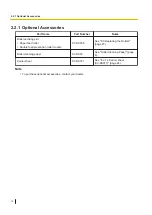
Page 10: ...ble feed prevention roller module KV SS058 See 8 3 Replacing the Rollers page 45 Roller cleaning paper KV SS03 See Roller Cleaning Paper page 8 Carrier sheet KV SS077 See 6 2 1 4 Carrier sheet KV SS077 page 24 Note To purchase optional accessories contact your dealer 2 2 1 Optional Accessories 10 ...

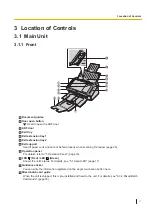
Page 11: ... properly when scanning thin paper page 28 Operation panel For details refer to 5 Operation Panel page 16 LED Red LED Green Shows the unit s status For details see 5 1 About LED page 17 Guidance sticker You can write the information registered on the single touch scan button here Mixed batch card guide When the unit is shipped this is pre installed and fixed to the unit For details see 6 3 2 Mixed...

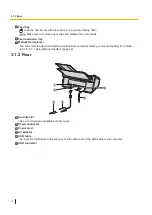
Page 12: ...an select the document feeding method from automatic feeding or manual feeding For details refer to 6 3 1 Using Manual feeding page 32 3 1 2 Rear 6 1 4 3 5 2 Security slot Use a commercially available security cable Power connector Power cord AC adaptor USB cable Connect the USB cable to the scanner and the other end of the USB cable to the computer USB connector 3 1 2 Rear 12 ...

Page 13: ...otice Do not move the unit immediately from a cold place to a warm place It may cause condensation which may damage the unit Using the unit immediately will cause the document scanning to be imperfect To avoid this clean the inside rollers with a dry and soft cloth leave the unit in a warm place for 1 or 2 hours and then use the unit after you make sure that the inside of the unit has dried Do not...

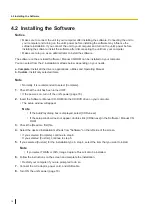
Page 14: ...ended to select Complete 1 Check that the unit has been turned OFF If the power is on turn off the unit s power page 18 2 Insert the Software Manual CD ROM into the CD DVD drive on your computer The setup window will appear Note If the AutoPlay dialog box is displayed select CDRun exe If the setup window does not appear double click CDRun exe in the Software Manual CD ROM 3 Check the Read me first...

Page 15: ...nasonic Document Scanner section on the Apps screen 4 3 2 To view the help For Image Capture Plus 1 Select All Programs Panasonic Image Capture Plus Image Capture Plus Help For User Utility or Scan Button Setting Tool 1 Select All Programs Panasonic Scanner Tools 2 Select that item s help Note In Windows 8 and Windows 10 select the Panasonic Document Scanner section on the Apps screen For TWAIN or...

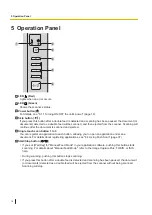
Page 16: ... 3 You can register an application to each button allowing you to open an application and scan a document For details about registering applications see 6 4 Using Push Scan page 37 Start Stop button If you set Wait Key for Manual Feed Mode in your application software pushing this button starts scanning For details about Manual Feed Mode refer to the Image Capture Plus TWAIN or ISIS help During sc...

Page 17: ...wer off feature in sleep mode is enabled and if no operation is performed for a certain period of time the scanner will be turn off automatically Press the power button of the scanner to turn it on You can enable disable the power off feature and change the time until the scanner turns off in User Utility 2 If no operation is performed for 15 minutes or longer the scanner will enter sleep mode aut...

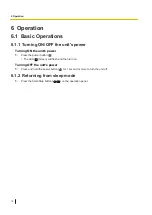
Page 18: ...e unit s power 1 Press the power button The LED Green will flash and then turn on Turning OFF the unit s power 1 Press and hold the power button for 1 second or more to turn the unit off 6 1 2 Returning from sleep mode 1 Press the Start Stop button on the operation panel 6 Operation 18 ...

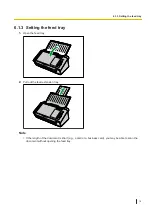
Page 19: ... 1 Open the feed tray 2 Pull out the feed extension tray Note If the length of the document is short e g a card or a business card you may be able to scan the document without opening the feed tray 6 1 3 Setting the feed tray 19 ...

Page 20: ...6 1 4 Setting the exit tray Set the exit tray depending on the documents 1 Pull out the exit tray 2 Open the exit extension tray 1 3 Open the exit extension tray 2 6 1 4 Setting the exit tray 20 ...

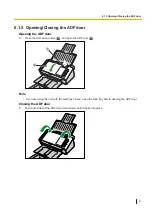
Page 21: ... open button and open the ADF door 1 2 Note If you are using the unit with the feed tray closed open the feed tray before opening the ADF door Closing the ADF door 1 Push both sides of the ADF door down slowly until it clicks into place 6 1 5 Opening Closing the ADF door 21 ...

Page 22: ...n feeding multiple sheets 54 mm 356 mm 2 1 in 14 in 1 Using Long Paper you can scan long documents by splitting them into smaller parts For details about Long Paper refer to the Image Capture Plus TWAIN or ISIS help Paper thickness 0 04 mm 0 5 mm 1 6 in 19 7 mils Note 1 mil 0 001 in Paper weight 20 g m 413 g m 5 lb 110 lb Paper capacity for the feed tray 50 sheets 80 g m 21 lb High quality woodfre...

Page 23: ...ut Length Control refer to the Image Capture Plus TWAIN or ISIS help 6 2 1 2 Compatible Card The compatible card types for this unit are as follows ISO format card Size 85 6 mm 54 mm 3 4 in 2 1 in Thickness 0 76 mm 0 03 in Embossed card up to 1 24 mm 0 049 in Embossed cards are also compatible When scanning embossed cards it is recommended to place them in landscape orientation with the side to be...

Page 24: ...3 Compatible Passport page 24 How to insert the passport into the carrier sheet Insert the passport so that the thinner part photo page in the bottom of the carrier sheet as shown in the illustration Make sure the passport do not protrude from the carrier sheet Note When using a carrier sheet please refer to 6 2 2 1 When using the carrier sheet page 30 Depending on the following conditions the ima...

Page 25: ...aper or photographs are susceptible to damage such as scratching Scanning the following kinds of documents may contaminate the inside of the scanner or adversely influence the lifetime of the rollers When scanning the following kinds of documents clean the inside of the scanner frequently Documents with toner or graphite pencil powder Documents treated chemically or containing impurities Do not sc...

Page 26: ... the scan settings refer to the Image Capture Plus TWAIN or ISIS help When scanning important documents confirm that the number of scanned images matches the number of pages in the feed tray Also check the condition of the scanned documents 6 2 1 7 Notes about Double Feed Detection This unit uses an ultrasonic sensor to detect double feeding where two or more sheets of a document are fed at the sa...

Page 27: ... a file folder will need to be separated Fan the stack of documents to separate all the edges Hold both ends and bend the documents as shown in the illustration To flatten the documents hold firmly and pull them apart as shown in the illustration 1 2 3 Repeat these steps as necessary 4 Carefully align the documents The documents feed better when the leading edges are aligned slantwise as shown in ...

Page 28: ...not exceed the limit mark on the document guide Exceeding the limit mark may cause a paper jam or skewing When the paper is thin it may not be fed properly due to curls in the paper In that case press the front part of the exit support to use the exit support 1 Notice Be sure to use the exit support in the position as shown in the illustration It may detach from the unit if you try to pull it up m...

Page 29: ...6 Adjust the document guides to the size of the documents to be scanned 1 6 2 2 Loading documents 29 ...

Page 30: ...to manual feeding i Open the ADF door page 21 ii Pull the manual feed selector in the direction indicated by the arrow iii Close the ADF door page 21 2 Set the feed tray page 19 and exit tray page 20 3 Place the carrier sheet on the feed tray with the surface to be scanned facing UP as shown in the illustration Adjust the document guides to the size of the carrier sheet to be scanned 2 1 6 2 2 Loa...

Page 31: ...4 Insert the carrier sheet until it stops as shown in the illustration 1 Note Make sure to insert the carrier sheet until it comes into contact with the paper feed roller 6 2 2 Loading documents 31 ...

Page 32: ...on the scanned image clean the scanning glasses and the carrier sheet Vertical streaks may be caused by scratches on the carrier sheet If vertical streaks appear after cleaning the scanning glasses and the carrier sheet replace the carrier sheet and then scan the passport 6 3 1 Using Manual feeding You can select Manual feeding with the Manual Feed Selector When using manual feeding the documents ...

Page 33: ... a safe place 6 3 2 1 Removing the mixed batch card guide With your fingers slightly open the fins on both sides of the mixed batch card guide and then keeping it open remove the guide 6 3 2 2 Installing the mixed batch card guide Insert the tabs on the mixed batch card guide into the holes near the paper slot Note If the guide is difficult to insert into the holes slightly spread both sides of th...

Page 34: ...049 in Set the card in landscape orientation A maximum of 3 cards can be set in the mixed batch card guide Ensure that the embossed portions of cards do not stick together If acceptable results cannot be obtained try changing the scanning orientation or reversing the scan face of the card and then perform scanning again Note When using the mixed batch card guide the document guides cannot be adjus...

Page 35: ...t For details about control sheets refer to Detect Control Sheet in the Image Capture Plus TWAIN or ISIS help For details about separation sheets refer to Detect Separation Sheet in the Image Capture Plus TWAIN or ISIS help 6 3 3 1 About Printing Control Sheets Print the control sheet at the specified size do not enlarge or reduce the size When printing the control sheet make sure that the pattern...

Page 36: ...r printer for details about changing print settings 1 Insert the included CD ROM into the CD DVD drive on your computer The setup window will appear Note If the AutoPlay dialog box is displayed select CDRun exe If the setup window does not appear double click CDRun exe in the Software Manual CD ROM 2 Select Control Sheet from Documents on the right side of the screen 3 Print the control sheets at ...

Page 37: ...ing screen When Single Touch Scan Button 1 3 is selected Press a button for more than 2 seconds to open the setting screen of each application If the unit is in sleep mode return to ready mode first page 18 When Touch Free Scanning is selected Open the setting screen of each application manually 2 Set the scanning conditions For details about the setting screen of each application refer to the man...

Page 38: ... door page 21 3 Remove the jammed document If the document is jammed in the feed tray area pull it backwards as shown in the illustration If the document is jammed in the exit area pull it forward as shown in the illustration 4 Close the ADF door page 21 Notice Close the ADF door after confirming that no documents remain inside the unit 7 Clearing Paper Jams 38 ...

Page 39: ...ommercially available cleaners detergent thinner or benzine Doing so may cause deformation discoloration or damage Clean the scanner at least once a month 1 Turn OFF the unit s power page 18 2 Clean the outside of the scanner with a soft slightly damp cloth 8 Care and Maintenance 39 ...

Page 40: ...ing or double feeding occurs frequently If double feed detection does not function properly clean the double feed detectors Clean the scanning glasses and reference area when black or white lines appear on the scanned images Be careful not to damage any parts of the unit Do not use flammable aerosol cleaners 1 Turn OFF the unit s power page 18 2 Open the ADF door page 21 3 Clean the scanning glass...

Page 41: ... off any dirt on the scanning glass area and reference area If the dirt does not come off use a soft slightly damp cloth 1 2 8 2 2 Cleaning the Double Feed Detectors 1 Remove dust from the double feed detectors with a cotton swab 1 8 2 1 Cleaning the scanning glasses and reference area 41 ...

Page 42: ...ller cleaning paper to clean the paper feed roller When wiping off dirt from the roller surface hold the roller to prevent it from rotating Wipe the rollers from one end to the other in the direction of the arrow all the way around them as shown in the illustration 3 Close the paper feed roller cover firmly Make sure to close both sides of the paper feed roller cover until they click into place 8 ...

Page 43: ...the way around them as shown in the illustration 5 Clean the conveyor rollers and exit rollers For details see 8 2 4 Cleaning Mode page 44 6 Use the roller cleaning paper to clean the surface of the free rollers Wipe the rollers from one end to the other in the direction of the arrow all the way around them as shown in the illustration 1 8 2 3 Cleaning the Rollers 43 ...

Page 44: ...nd exit rollers 1 Close the ADF door page 21 2 Plug in the power cord and connect the USB cable 3 Turn ON the unit s power page 18 4 Start the User Utility 5 Select Cleaning Mode in User Utility 6 Open the ADF door page 21 7 Enter Cleaning Mode in User Utility 8 Clean the conveyor rollers and exit rollers i Use the Roller Cleaning Paper page 8 to wipe the rollers from one end to the other in the d...

Page 45: ...llers may be shorter In User Utility you can check the number of sheets that have been scanned Notice Be careful not to damage any parts of the unit 1 Turn OFF the unit s power page 18 2 Open the ADF door page 21 3 Push the manual feed selector in to automatic feeding 4 Remove the double feed prevention roller cover To prevent double feed prevention roller cover from falling hold lower side when p...

Page 46: ... 1 6 Take out the new double feed prevention roller in the optional roller exchange kit 7 Install the new double feed prevention roller into the metal holder with the longer groove facing to the right side rear view 8 3 Replacing the Rollers 46 ...

Page 47: ...ll the double feed prevention roller cover firmly 1 Notice Be sure to close the double feed prevention roller cover until it clicks into place 9 Open the paper feed roller cover 1 8 3 Replacing the Rollers 47 ...

Page 48: ...0 Remove the paper feed roller 1 11 Take out the new paper feed roller in the optional roller exchange kit 12 Install the new paper feed roller with the gear on the left side 8 3 Replacing the Rollers 48 ...

Page 49: ...t the paper feed roller can rotate in the feeding direction 14 Close the ADF door page 21 15 Reset the After Replace Roller Counter in User Utility to 0 For details refer to the User Utility help Note If misfeeding or double feeding occurs after cleaning or replacing the rollers the rollers may not be installed properly Confirm the installation conditions again 8 3 Replacing the Rollers 49 ...

Page 50: ...B cable correctly The software is not installed correctly Uninstall the software from the computer page 55 and then install the software again page 14 The scanner is connected via USB hub Do not connect via USB hub There is a problem with the USB cable Make sure to use the included USB cable The unit s power was turned off because no operations were performed for a certain period of time Turn on t...

Page 51: ...ray Remove sheets until the sheets on the feed tray are under the limit mark on the document guide The double feed detectors are not adjusted properly Remove the documents and then turn off on the unit s power page 18 The documents are not fed one at a time but in bunches The scanning method is set to manual Select automatic scanning using the manual feed selector page 11 A double feed is detected...

Page 52: ...the scanned document is extremely different from the original document The settings of the computer monitor do not accurately reflect the color of the document Adjust the computer monitor settings Depending on the documents scanned the color of documents may not be scanned properly For example the color of a highlighter pen may be scanned lighter than it appears Setting the value for Chroma higher...

Page 53: ...ndows 7 Control Panel View devices and printers right click the scanner icon and display the Scan properties screen If you are using Windows Vista Control Panel Scanners and Cameras select the scanner icon and then click the properties button 2 Click the Events tab 3 Check that Scan Button Setting Tool is selected as the program to start for each event If an application other than Scan Button Sett...

Page 54: ...rs page 42 If you perform shading adjustment while these parts are dirty lines will appear on scanned images Shading adjustment procedure 1 Start User Utility 2 Click User Shading on the main menu and operate as the image display dictates Note For further details refer to section User Shading in the help for User Utility Notice If the shading adjustment has not been performed properly then lines m...

Page 55: ... a program 2 Uninstall the following software programs Image Capture Plus Scan Button Setting Tool IDREngine Panasonic Scanner Manuals Panasonic Document Scanner Device Driver MCD KV S1037 KV S1038 KV S1026C MK2 ISIS Driver Panasonic Document Scanner TWAIN Driver Panasonic Scanner User Utility OCREngine 3 Follow the instructions on the screen 9 4 Uninstalling the Software 55 ...

Page 56: ...lease use the original carton and all of the original packing materials The scanner should be handled in the correct horizontal position Required Materials Original scanner carton and packing materials Shipping tape and scissors 1 Turn the unit OFF page 18 2 Unplug the power cord from the outlet and remove the AC adaptor and USB cable from the unit 3 Close the feed tray and exit tray If the mixed ...

Page 57: ...4 Pack the scanner 3 4 6 2 1 5 AC adaptor USB cable Quick Installation Guide Shading paper Software Manual CD ROM Mixed batch card guide Power cord 9 5 Repacking Instructions 57 ...

Page 58: ...d capacity 3 cards on the feed tray or on the mixed batch card guide Passport 6 Width 130 mm 5 1 in or less Length 188 mm 7 4 in or less Thickness 3 0 mm 0 1 in or less including carrier sheet Feed capacity 50 sheets 80 g m 21 lb High quality woodfree paper 7 Roller replacement 8 100 000 sheets 1 The scanning speed differs depending on the host computer the operating system the application the mea...

Page 59: ...t may not feed the documents properly When paper weight is more than 209 g m 55 lb 5 sheets A4 High quality woodfree paper When installed the mixed batch card guide 20 sheets 80 g m 21 lb High quality woodfree paper 8 For details see 8 3 Replacing the Rollers page 45 9 6 Specifications 59 ...

Page 60: ... 1 6 W or less Power OFF 0 3 W or less Operating environment Temperature 5 35 41 95 Humidity 20 80 RH Storage environment Temperature 10 50 14 122 Humidity 8 75 RH Interface USB 3 1 Gen 1 backward compatible 1 The power requirements differ depending on the country area Do not use a power source that does not meet the power source specifications marked on the unit The power source specifications of...

Page 61: ... Panasonic Corporation 2017 PNQX8564ZA PD0717KU0 ...

Reviews: