background image

4.

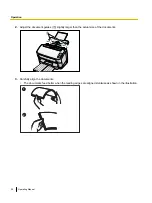
Place the documents on the feed tray with the side to be scanned facing down.

Set the leading edge of documents as shown in the illustration (

A

).

1

Note

Place the documents as shown in the illustration.

The height of all the documents on the tray should be less than 7.5 mm (0.3 in.).
Exceeding this height might cause paper jams or skewing.

5.

Adjust the document guides (

A

) to the size of the documents to be scanned.

1

6.

Open your scanning application

*1

 and scan the documents.

*1

The software RTIV and QuickScan Pro demo, included with the scanner, can be used for scanning the documents.

Operating Manual

21

Operation

Summary of Contents for KV-S1045C

Page 1: ...g these instructions please read the installation manual enclosed with this unit Please carefully read these instructions and the enclosed installation manual Keep all documentation in a safe place for future reference Model No KV S1045C Operating Manual High Speed Color Scanner ...

Page 2: ...onic Image Enhancement Technology features using the ISIS and TWAIN drivers RTIV Reference Manual Explains the features and settings for RTIV Reliable Throughput Imaging Viewer You can view this manual by clicking the help button on RTIV User Utility Reference Manual Explains how to use the User Utility which is used for scanner maintenance You can view this manual by clicking the help button on U...

Page 3: ...operty of their respective owners International ENERGY STAR Program As an ENERGY STAR Partner Panasonic has determined that this product meets the ENERGY STAR guidelines for energy efficiency System Requirements Computer IBM PC AT or compatible machine with a CD ROM drive CPU Pentium III 1 GHz or higher Operating System Windows 2000 Windows XP Windows Vista Interface USB 2 0 Memory 256 MB or highe...

Page 4: ...d radio TV technician for help The user may find the booklet Something About Interference available from FCC local regional offices helpful FCC Warning To assure continued FCC emission limit compliance the user must use the recommended shielded interfacing cable when connecting to a host computer Also any unauthorized changes or modifications to this equipment would void the user s authority to op...

Page 5: ...Clearing Paper Jams 22 Removing paper jams from the feeding section 22 Mixed Batch Card Guide 25 Installing the mixed batch card guide 25 Using the mixed batch card guide 25 Using Control Sheets 26 About Printing Control Sheets 27 Cleaning the Scanner 28 Outside of the Scanner 28 Inside of the Scanner 29 Cleaning the Rollers 30 Cleaning the Scanning glass Reference area and Double feed detectors 3...

Page 6: ...h the proper voltage If you use a cord with an unspecified current rating the unit or plug may emit smoke or become hot to the touch When you operate this product the power outlet should be near the product and easily accessible Connect the AC adaptor firmly to the power cord and plug the power cord firmly into an AC outlet Otherwise it can cause fire or electric shock Do not pull bend rest object...

Page 7: ...d including isopropyl alcohol The roller cleaning paper may be harmful to sensitive skin Please use protective gloves Do not use the roller cleaning paper near a heater or open flame CAUTION Power The unit should be used only with the power cord and AC adaptor enclosed with the unit When the unit is not used over an extended period of time switch it off and unplug it If an unused unit is left conn...

Page 8: ...ry hot and can cause burns Safety Information For United Kingdom only This appliance is supplied with a moulded three pin mains plug for your safety and convenience A 5 amp fuse is fitted in this plug Should the fuse need to be replaced please ensure that the replacement fuse has a rating of 5 amps and that it is approved by ASTA or BSI to BS1362 Check for the ASTA mark ASA or the BSI mark on the ...

Page 9: ...bend the CD ROM Roller Cleaning Paper Keep the roller cleaning paper out of reach of small children Do not store the roller cleaning paper in direct sunlight or in a place with a temperature over 40 C 104 F Only use the roller cleaning paper to clean the rollers and scanning glass For details about the roller cleaning paper please refer to the Material Safety Data Sheet MSDS Please ask your Panaso...

Page 10: ...ither its completeness or accuracy In case of doubt contact your legal counsel Notice Install your machine near a supervised area to prevent illegal duplication from being made Security Notice The management of documents and scanned data is the responsibility of the user In particular pay attention to the following points Make sure you have the same number of pages for important documents both bef...

Page 11: ...is key starts scanning During scanning pushing this key stops scanning Security slot for security cable LED Red Shows the scanner s status For details see About LED page 13 LED Green Shows the scanner s status For details see About LED page 13 Feed tray Feed extension tray 1 For details on Manual Feed Mode refer to the RTIV Reference Manual or PIE Reference Manual Operating Manual 11 L o c a t i o...

Page 12: ...r 6 5 4 7 1 2 3 Mixed batch card guide Power connector Power switch AC adaptor Power cord Plugs may vary in shape depending on country area USB cable USB connector 12 Operating Manual Location of Controls ...

Page 13: ...own in the table below Ready Error Start Stop A B A LED Green B LED Red Status ON OFF Ready ON Blink Slow Caution Blink Fast OFF Warming up 1 Blink Slow OFF Sleep Blink Slow Blink Slow Caution Sleep OFF ON Error 1 It will take about 30 seconds to initialize the scanner under the following conditions Just after turning the power on After about 2 hours on sleep mode Over about 5 seconds with the ADF...

Page 14: ...erty dialog box by right clicking on the scanner icon In Windows Vista and Windows 2000 select your scanner in the Scanners and Cameras Properties and then display the scanner property dialog box by clicking Properties button 3 Click the Events tab 4 Select an event in the Scanner events list The selected event activates a scanner application The following events can be selected Feeder Loaded An e...

Page 15: ...ations are selected in the Send to this application list the Choose Application dialog box will display prompting you to select an application in the Registered Applications list After an application has been selected it starts If only one application is selected that application will be launched automatically In Windows 2000 the Event on device KV S1045C dialog box will display instead of the Cho...

Page 16: ...he legal size length Recommended paper Plain paper Acceptable cards ISO format card Size 85 6 x 54 mm 3 4 x 2 1 in Thickness 0 76 mm 0 03 in Embossed card is also acceptable A maximum of 3 cards can be loaded on the feed tray The height of the total cards the total thickness including the embossing on each card should be less than 5 mm 0 2 in Additionally the embossing on each card must not get en...

Page 17: ... tags Coated paper Torn or frayed documents Extremely smooth shiny paper or paper that is highly textured Carbonless paper Light penetrating documents such as OHP sheet and tracing paper Do not scan the following types of paper Damaged or notched document card Documents out of specified size thickness and weight Documents containing hard attachments such as metal or plastic ex clips or staples Bou...

Page 18: ...e feeding occurs try scanning again after doing the following Clean the rollers and sensors Reduce the number of sheets of paper loaded on the feed tray Change the scanning resolution Notes about double feed detection This scanner is equipped with an ultrasonic sensor to detect double feeding The width of documents that can be detected is A5 or larger 148 mm 5 8 in 18 Operating Manual Operation ...

Page 19: ...f scanned images matches the number of pages in the document Remove documents from the exit tray after they have been scanned 1 Fan the documents Documents that have been stapled together or stacked together as in a file folder will need to be separated Fan the stack of documents to separate all the edges Hold both ends and bend the documents as shown in the illustration To flatten the documents h...

Page 20: ...des A slightly larger than the actual size of the documents 1 3 Carefully align the documents The documents feed better when the leading edges are aligned slantwise as shown in the illustration 1 2 20 Operating Manual Operation ...

Page 21: ...e height of all the documents on the tray should be less than 7 5 mm 0 3 in Exceeding this height might cause paper jams or skewing 5 Adjust the document guides A to the size of the documents to be scanned 1 6 Open your scanning application 1 and scan the documents 1 The software RTIV and QuickScan Pro demo included with the scanner can be used for scanning the documents Operating Manual 21 Operat...

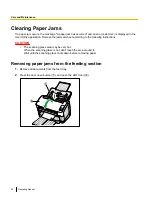
Page 22: ...uctions CAUTION The scanning glass area may be very hot When the scanning glass is hot don t touch the area around it Wait until the scanning glass cools down before removing paper Removing paper jams from the feeding section 1 Remove all documents from the feed tray 2 Press the door open button A and open the ADF door B 1 2 22 Operating Manual C a r e a n d M a i n t e n a n c e Care and Maintena...

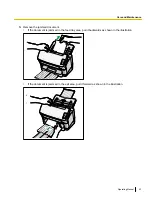
Page 23: ...ent If the document is jammed in the feed tray area pull it backwards as shown in the illustration If the document is jammed in the exit area pull it forward as shown in the illustration Operating Manual 23 Care and Maintenance ...

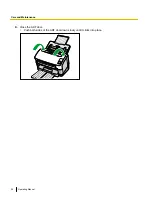
Page 24: ...4 Close the ADF door Push both sides of the ADF door down slowly until it clicks into place 24 Operating Manual Care and Maintenance ...

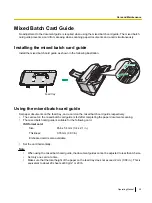
Page 25: ... batch card guide respectively The card set on the mixed batch card guide is fed after completing the paper document scanning The mixed batch card guide is suitable for the following card ISO format card Size 85 6 x 54 mm 3 4 x 2 1 in Thickness 0 76 mm 0 03 in Embossed card is also available Set the card horizontally Note When using the mixed batch card guide the document guides cannot be adjusted...

Page 26: ... from the provided CD ROM B S i m p l e x A Documents Control sheet Code Documents Control sheet functions Simplex Duplex Binary 256 level gray Color Dynamic Threshold Dither Error diffusion Function 1 9 Separation Sheet Note Multiple control sheets can be used To use control sheet functions your scanning application must support control sheets When using control sheets refer to the instruction ma...

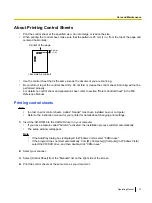
Page 27: ...nting control sheets Note In order to print control sheets Adobe Reader must been installed on your computer Refer to the instruction manual for your printer for details about changing print settings 1 Insert the CD ROM into the CD DVD driver on your computer If you have a feature called Autorun activated the installation process will start automatically The setup window will appear Note If the Au...

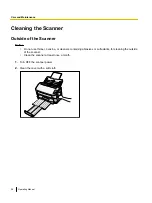
Page 28: ...ot use thinner benzine or cleaners containing abrasives or surfactants for cleaning the outside of the scanner Clean the scanner at least once a month 1 Turn OFF the scanner power 2 Clean the cover with a soft cloth 28 Operating Manual Care and Maintenance ...

Page 29: ...cleaning paper A Notice Keep the roller cleaning paper out of reach of small children Do not store the roller cleaning paper in direct sunlight or in a place with temperature over 40 C 104 F Only use the roller cleaning paper to clean the rollers and scanning glass For details about the roller cleaning paper please refer to the Material Safety Data Sheet MSDS Please ask your Panasonic sales compan...

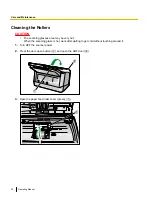
Page 30: ... hot When the scanning glass is hot work after waiting to get cold without touching around it 1 Turn OFF the scanner power 2 Press the door open button A and open the ADF door B 2 1 3 Open the paper feed roller cover green A 1 30 Operating Manual Care and Maintenance ...

Page 31: ...oller to prevent it from rotating Wipe the roller from one end to the other in the direction indicated by the arrow all the way around as shown in the illustration 5 Close the paper feed roller cover green firmly Make sure to close both sides of the paper feed roller cover green until they click into place Operating Manual 31 Care and Maintenance ...

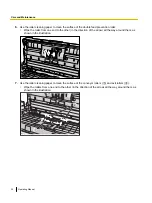
Page 32: ...rection of the arrow all the way around them as shown in the illustration 7 Use the roller cleaning paper to clean the surface of the conveyor rollers A and exit rollers B Wipe the rollers from one end to the other in the direction of the arrow all the way around them as shown in the illustration 1 2 32 Operating Manual Care and Maintenance ...

Page 33: ...ration 1 9 Close the ADF door Push both sides of the ADF door down slowly until it clicks into place 10 Reset the roller cleaning counter in User Utility to 0 Turn ON the scanner power Start User Utility and in the window click the Clear Counter button for After Clean Roller to reset to counter to 0 For details refer to the User Utility Reference Manual Operating Manual 33 Care and Maintenance ...

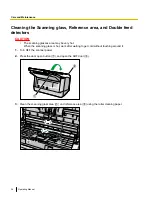
Page 34: ...y hot When the scanning glass is hot work after waiting to get cold without touching around it 1 Turn OFF the scanner power 2 Press the door open button A and open the ADF door B 2 1 3 Clean the scanning glass area A and reference area B using the roller cleaning paper 1 2 34 Operating Manual Care and Maintenance ...

Page 35: ...4 Remove dust on the double feed detectors A with a cotton swab 1 5 Close the ADF door Push both sides of the ADF door down slowly until it clicks into place Operating Manual 35 Care and Maintenance ...

Page 36: ... replacement parts please contact your dealer The double feed prevention roller and the paper feed roller are consumables Please purchase the Roller exchange kit KV SS035 and replace each roller periodically The usable life of each roller is as follows Paper feed roller Double feed prevention roller 100 000 sheets The scanner counter can be confirmed by using the User Utility 36 Operating Manual R...

Page 37: ...e feed prevention roller and paper feed roller CAUTION The scanning glasses area may be very hot When the scanning glass is hot work after waiting to get cold without touching around it Replacing the Rollers 1 Turn OFF the scanner power 2 Press the door open button A and open the ADF door B 2 1 3 Open the double feed prevention roller cover green A 1 Operating Manual 37 Replacement Parts ...

Page 38: ...e out the new double feed prevention roller in the optional Roller exchange kit KV SS035 6 Install the new double feed prevention roller into the metal holder with the longer groove facing to the right side rear view 38 Operating Manual Replacement Parts ...

Page 39: ... feed prevention roller cover green A firmly 1 Notice Be sure to close the double feed prevention roller cover until it clicks into place 8 Open the paper feed roller cover green A 1 Operating Manual 39 Replacement Parts ...

Page 40: ...e paper feed roller A 1 10 Take out the new paper feed roller in the optional Roller exchange kit KV SS035 11 Install the new paper feed roller with the gear on the left side 40 Operating Manual Replacement Parts ...

Page 41: ... can rotate in the feeding direction 13 Close the ADF door Push both sides of the ADF door down slowly until it clicks into place 14 Reset the roller replacing counter in User Utility to 0 Turn ON the scanner power Start User Utility and in the window click the Clear Counter button for After Replace Roller to reset the counter to 0 For details refer to the User Utility Reference Manual Operating M...

Page 42: ...nstall the software again Refer to Installing the Software in the Installation Manual The USB interface of the computer is not installed correctly Check the computer whether the USB interface of your computer is installed correctly using the device manager s property The scanner is connected to the computer via a USB hub and the USB hub is not functioning well Do not connect via the USB hub Connec...

Page 43: ... the limit mark on the document guides Paper jams occur frequently The document is wrinkled Smooth out the document The rollers are dirty Clean the rollers page 30 The document is not aligned correctly Realign the document page 19 The document set on the feed tray has too many pages Remove pages from the document until it is under the limit mark on the document guides Scanned image is skewed The d...

Page 44: ...re wrong Adjust the computer monitor settings Dark spots or noise appear on the scanned documents The scanning glass is dirty Clean the scanning glass page 34 If you still experience problems after following these suggestions please contact our Technical Support Department at 1 800 726 2797 for further assistance U S A only 44 Operating Manual Appendix ...

Page 45: ...acking materials The scanner should be handled in the correct horizontal position Required Materials Original scanner carton and packing materials Shipping tape and scissors 1 Turn OFF the scanner power 2 Unplug the power cord from the outlet and remove the AC adaptor and USB cable from the scanner 3 Remove the feed tray from the scanner Lift up the feed tray to unlock and then pull the left A and...

Page 46: ...5 Pack the scanner 3 1 2 4 5 7 6 1 Installation Manual 2 AC adaptor 3 USB cable 4 Drivers Utilities Manuals CD ROM 5 Feed tray 6 Power cord 7 Mixed batch card guide 46 Operating Manual Appendix ...

Page 47: ...er 80 images min A4 80 images min Resolution 100 600 dpi 1 dpi step Optical 600 dpi Tonal gradation Binary Grayscale Color MultiStream Binary Grayscale Binary Color Image control Image emphasis Dynamic threshold Automatic separation Invert White level from paper Compression JPEG color grayscale Paper Size 48 70 mm 1 9 2 8 in to 216 2540 mm 8 5 100 in 2 Thickness 0 05 0 2 mm 2 0 7 9 mils Note 1 mil...

Page 48: ...OFF 0 3 W or less While the AC adaptor is connected to the AC outlet Operating Environment Temperature 15 30 C 59 86 F Humidity 20 80 RH Storage Environment Temperature 0 40 C 32 104 F Humidity 10 80 RH 1 The scanning speed differs depending on the host computer operating system application measuring method the data quantity of the image and paper type The scanning speed was measured using a propr...

Page 49: ...nstallation Manual 46 Interface 3 L LED Green 11 13 LED Red 11 13 Life 48 M Maintenance 48 Memory 3 Mixed batch card guide 12 46 O Operating Environment 48 Operating system 3 P Paper 47 Paper jams 22 Power connector 12 Power consumption 48 Power cord 12 46 Power requirements 48 Power switch 12 13 R Repacking 45 Replacement parts 36 Replacing parts 37 Resolution 47 Roller cleaning paper 7 29 36 Rol...

Page 50: ...W Weight 48 50 Operating Manual Index ...

Page 51: ...PJQXC0285YA KK0409YR1010 Panasonic System Networks Co Ltd 2009 Web Site http www panasonic net ...

Reviews: