background image

3.

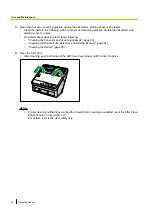
Clean the conveyor, scanning glasses, double feed detectors, starting sensors and rollers.

Clean the parts in the following order: conveyor and scanning glasses, double feed detectors and
starting sensors, rollers.

For details about cleaning, refer to the following:

"Cleaning the Conveyor and Scanning Glasses" (page 53)

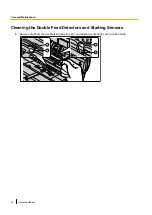
"Cleaning the Double Feed Detectors and Starting Sensors" (page 54)

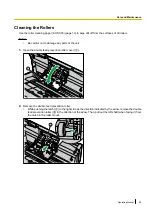
"Cleaning the Rollers" (page 55)

4.

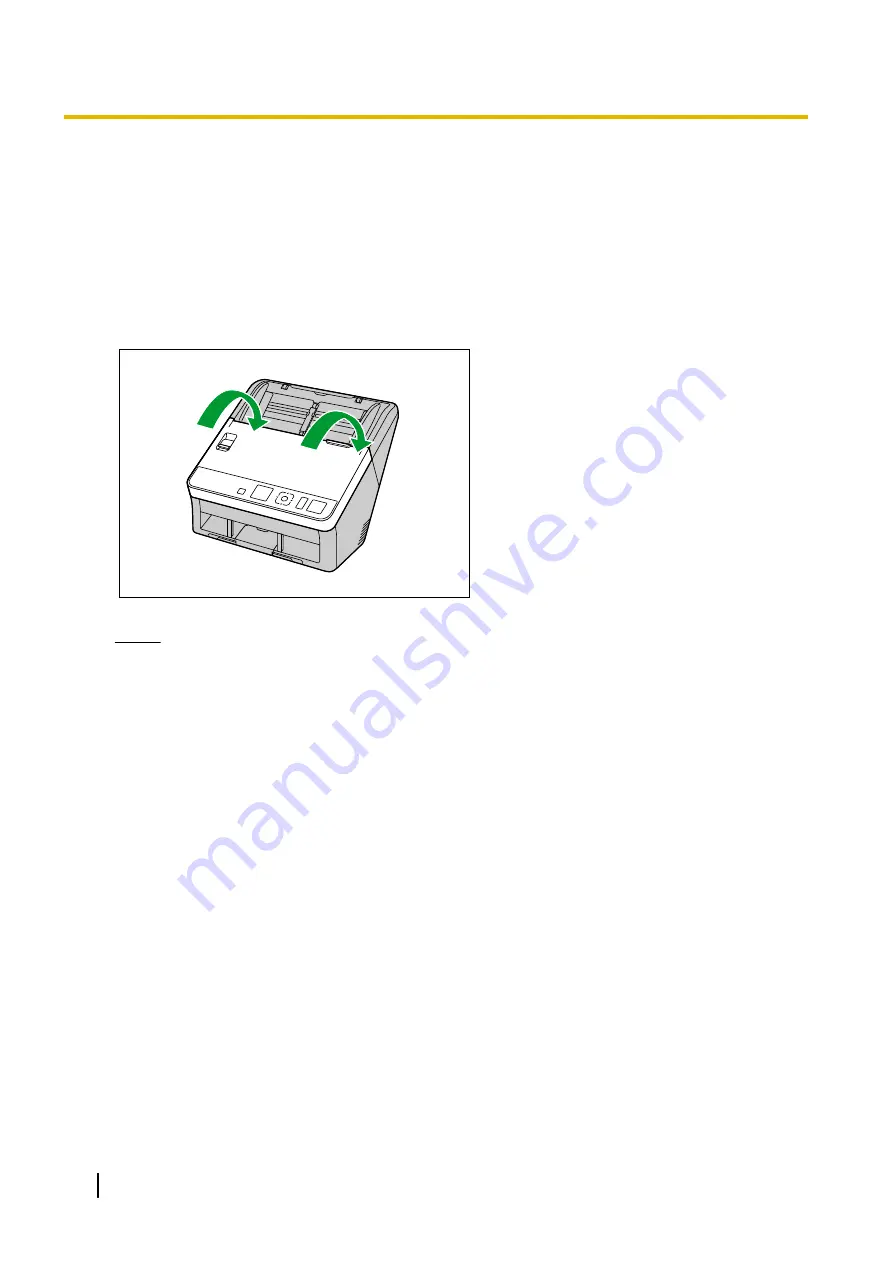
Close the ADF door.

After cleaning, push both sides of the ADF door down slowly until it clicks into place.

Notice

If roller cleaning notifications via the After Clean Roller Counter are enabled, reset the After Clean
Roller Counter in User Utility to 0.
For details, refer to the User Utility help.

52

Operating Manual

Care and Maintenance

Summary of Contents for KV-S1057C

Page 1: ...ner These instructions contain information on operating the scanner Before reading these instructions please read the Quick Installation Guide enclosed with this unit Keep all documentation in a safe...

Page 2: ...detection function Yes Yes Yes Yes Yes Yes Yes Double Feed Skip DFS function Yes Yes Yes Yes Yes Yes Yes Card scanning Yes Yes Yes Yes Yes Yes Yes Mixed batch card guide Yes Yes Yes Yes Yes Yes Yes M...

Page 3: ...nner has a push scan function for starting scanning without operation through a computer Scanning is started by selecting from settings that have been registered in advance with the cursor button and...

Page 4: ...ft Windows Windows Vista and Internet Explorer are either registered trademarks or trademarks of Microsoft Corporation in the United States and or other countries ISIS is a registered trademark or tra...

Page 5: ...rmation and outlines brief installation procedures of the unit and software About the Software Help Each software contains help files For details about viewing the help files see To view the help page...

Page 6: ...used Due to the slower speed of USB 1 1 it is recommended to use a USB 2 0 USB 3 0 interface If you connect the unit to a USB hub it is not guaranteed to work Optional Accessories Part Name Part Numb...

Page 7: ...mages 31 Continuous Scanning Auto and Manual Scanning Manual 32 Mixed Batch Card Guide 33 Installing the mixed batch card guide 33 Removing the mixed batch card guide 35 Using the Mixed Batch Card Gui...

Page 8: ...Index 74 8 Operating Manual Table of Contents...

Page 9: ...e Installation Do not place the unit in direct sunlight in a cold draft or near heating apparatus Do not place the unit near apparatus which generate electronic or magnetic noise Protect the unit from...

Page 10: ...the roller cleaning paper KV SS03 please contact your dealer or call our Supplies and Accessories department at 1 800 726 2797 U S A only KEEP AWAY FROM FIRE Security Notice The management of document...

Page 11: ...ROM Drivers Applications Utilities Documents Mixed batch card guide When the unit is shipped this is stored in the feed tray Quick Installation Guide Power cord Two power cords may be included Use the...

Page 12: ...ous scanning Auto and manual scanning Manual Operation panel For details refer to Operation Panel and LED Indicators page 14 Exit tray Exit extension tray 1 Exit extension tray 2 Exit stopper Exit gui...

Page 13: ...slot Use a commercially available security cable USB connector USB cable Connect the USB cable to the scanner and the other end of the USB cable to the computer Power cord AC inlet Operating Manual 1...

Page 14: ...status C Power button Press the power button for more than one second to turn the unit off D Cursor button E Skip button If you press this button after a double feed is detected and scanning has been...

Page 15: ...Scanning will stop n KV S1057C and KV S1027C only G LCD H OK button If you are using the scanner with Image Capture Plus you can perform a push scan using the LCD Registered jobs are displayed on the...

Page 16: ...of time the scanner will be turned off automatically Press the power button of the scanner to turn it on You can enable disable the power off feature and change the time until the scanner turns off i...

Page 17: ...surrounding objects as shown in the following illustration 272 mm 10 7 in 300 mm 11 8 in 500 mm 20 in 750 mm 30 in 238 mm 9 4 in 400 mm 16 in Notice Do not move the unit immediately from a cold place...

Page 18: ...s applications utilities and Operating Manual b Custom Install one of the software or Operating Manual Note Normally it is recommended to select Complete 1 Check that the unit has been turned off If t...

Page 19: ...ct the item that you want to install Note If you select TWAIN or ISIS Image Capture Plus will also be installed 6 Follow the instructions on the screen and complete the installation Restart your compu...

Page 20: ...t 1 Remove all packing tape and cushioning 2 Pull out the feed extension tray in the direction of the arrow shown in the illustration below 3 Set the exit tray a Raise the exit stopper 20 Operating Ma...

Page 21: ...tray or the exit extension trays Doing so may damage them 4 Plug in the power cord and connect the USB cable 5 Press the power button to turn ON the unit s power The LED Green will flash and then turn...

Page 22: ...indows 8 select the Panasonic Document Scanner section on the Apps screen To view the help Note We recommend that you view the help using Internet Explorer 6 0 or later for Windows For Image Capture P...

Page 23: ...matches the number of pages in the feed tray Also check the condition of the scanned documents Remove documents from the exit tray after they have been scanned Compatible Paper Types Paper size Width...

Page 24: ...L 14 in 8 mm 0 31 in 80 64 g m 17 lb High quality woodfree paper 80 75 g m 20 lb High quality woodfree paper 80 80 g m 21 lb High quality woodfree paper Recommended paper types High quality woodfree...

Page 25: ...andscape orientation with the side to be scanned facing up A maximum of 3 cards can be loaded on the feed tray When loading ensure that the embossed portions of cards do not stick together Use the lan...

Page 26: ...use an optional carrier sheet KV SS076 to scan passports using manual scanning Passport size The passport sizes compatible with this unit are as follows Width 140 mm 5 5 in or less Length 190 mm 7 5...

Page 27: ...carrier sheet B first as shown in the illustration The corner of the thinner part of the passport should be inserted into the corner of the carrier sheet 1 2 3 Place the carrier sheet A on the feed tr...

Page 28: ...ned image will be stretched or distorted In such cases clean the rollers If vertical streaks appear on the scanned image clean the scanning glasses and the carrier sheet Vertical streaks that appear m...

Page 29: ...photographs that are susceptible to damage such as scratching Scanning the following kinds of documents may contaminate the inside of the scanner or adversely influence the lifetime of the rollers Wh...

Page 30: ...gs set Feeding Speed to Slow 1 Scan the documents using manual scanning 1 For details about configuring the scan settings refer to the Image Capture Plus TWAIN or ISIS help Notes about Double Feed Det...

Page 31: ...round Color of Scanned Images Using the software you can switch the background color of scanned images between white and black For details refer to the Image Capture Plus TWAIN or ISIS help Operating...

Page 32: ...canned by setting the manual feed selector to manual scanning Manual Continuous scanning Auto This setting is for feeding documents one page at a time automatically Manual scanning Manual This setting...

Page 33: ...ard simultaneously Installing the mixed batch card guide The mixed batch card guide is stored inside the feed tray Install the mixed batch card guide as shown in the following illustration 1 Remove th...

Page 34: ...3 Attach the feed tray A to the unit 1 4 Attach the mixed batch card guide A to the unit 1 34 Operating Manual Operation...

Page 35: ...tch card guide as shown in the following illustration 1 Remove the mixed batch card guide A from the unit 1 2 Remove the feed tray A from the unit Remove the left side of the feed tray B first as show...

Page 36: ...3 Attach the mixed batch card guide B to the feed tray A 1 2 4 Attach the feed tray A to the unit 1 36 Operating Manual Operation...

Page 37: ...the card in landscape orientation A maximum of 3 cards can be set in the mixed batch card guide Ensure that the embossed portions of cards do not stick together If acceptable results cannot be obtain...

Page 38: ...Scanning Documents 1 Adjust the document guides A slightly larger than the actual size of the documents 1 38 Operating Manual Operation...

Page 39: ...l the edges Hold both ends and bend the documents as shown in the illustration To flatten the documents hold firmly and pull them apart as shown in the illustration 1 2 3 Repeat these steps as necessa...

Page 40: ...in the illustration A Insert the documents slowly until they stop 1 Note The height of the documents should not exceed the limit mark on the document guide Exceeding the limit mark may cause a paper...

Page 41: ...curs fold up the exit guides C and then resume scanning 3 7 Open your scanning application and scan the documents For details about the application refer to the help of each application You can also s...

Page 42: ...n 2 Select Touch Free Scanning for the condition to automatically start up the application 3 Select the application to start up Note For details about the Scan Button Setting Tool refer to the Scan Bu...

Page 43: ...Register jobs in advance For details about registering jobs refer to the Image Capture Plus help The group name is displayed on the first line and the job name is displayed on the second line of the L...

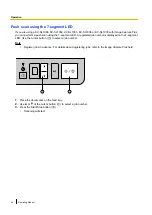
Page 44: ...registered job number is displayed on the 7 segment LED Use the cursor button A to select a job number Note Register jobs in advance For details about registering jobs refer to the Image Capture Plus...

Page 45: ...Panel Scanners and Cameras select the scanner icon and then click the Properties button If you are using Windows XP Control Panel Scanners and Cameras right click the scanner icon and display the Pro...

Page 46: ...trol sheets from the included CD ROM B S i m p l e x A Documents Control sheet Code Documents Control sheet functions Simplex Duplex Binary 256 level gray Color Dynamic Threshold Dither Error diffusio...

Page 47: ...n the Image Capture Plus TWAIN or ISIS help Printing control sheets Note In order to print control sheets Adobe Reader must be installed on your computer Refer to the instruction manual for your print...

Page 48: ...sheet according to the following procedure 1 Remove all documents from the feed tray 2 Press the ADF door release A and open the ADF door B 2 1 3 Remove the jammed document If the document is jammed...

Page 49: ...forward as shown in the illustration 4 Close the ADF door Push both sides of the ADF door down slowly until it clicks into place Notice Close the ADF door after confirming that no documents remain ins...

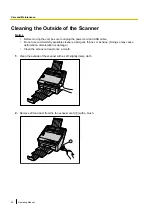
Page 50: ...e cleaners detergent thinner or benzine Doing so may cause deformation discoloration or damage Clean the scanner at least once a month 1 Clean the outside of the scanner with a soft slightly damp clot...

Page 51: ...Be careful not to damage any parts of the unit 1 Prepare the following cleaning supplies Soft and dry cloth Used to clean the conveyor and scanning glasses Thin cotton swab Used to clean the double f...

Page 52: ...he Conveyor and Scanning Glasses page 53 Cleaning the Double Feed Detectors and Starting Sensors page 54 Cleaning the Rollers page 55 4 Close the ADF door After cleaning push both sides of the ADF doo...

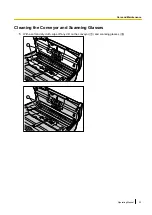
Page 53: ...Cleaning the Conveyor and Scanning Glasses 1 With a soft and dry cloth wipe off any dirt on the conveyor A and scanning glasses B 1 2 Operating Manual 53 Care and Maintenance...

Page 54: ...Cleaning the Double Feed Detectors and Starting Sensors 1 Remove dust from the double feed detectors A and starting sensors B with a cotton swab 2 1 1 2 54 Operating Manual Care and Maintenance...

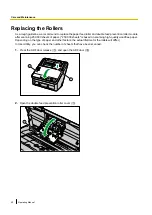
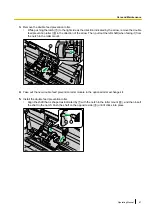
Page 55: ...Open the double feed prevention roller cover A 1 2 Remove the double feed prevention roller While pushing the latch A to the right side as the direction indicated by the arrow remove the double feed p...

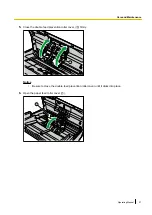
Page 56: ...surface of both rollers 4 Install the double feed prevention roller Align the shaft that is shaped as indicated by A with the notch in the roller mount B and then insert the shaft in the notch Push t...

Page 57: ...ble feed prevention roller cover A firmly 1 Notice Be sure to close the double feed prevention roller cover until it clicks into place 6 Open the paper feed roller cover A 1 Operating Manual 57 Care a...

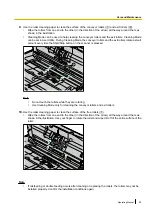
Page 58: ...rom one end to the other in the direction of the arrow all the way around them as shown in the illustration 8 Close the paper feed roller cover firmly Make sure to close both sides of the paper feed r...

Page 59: ...on on the scanner is pressed 1 2 Note Do not touch the rollers while they are rotating Use Cleaning Mode only for cleaning the conveyor rollers and exit rollers 10 Use the roller cleaning paper to cle...

Page 60: ...sheets is based on scanning high quality woodfree paper Depending on the type of paper and other factors the actual lifetime for the rollers will differ In User Utility you can check the number of she...

Page 61: ...when facing it from the notch in the roller mount 2 1 4 Take out the new double feed prevention roller module in the optional roller exchange kit 5 Install the double feed prevention roller Align the...

Page 62: ...ble feed prevention roller cover A firmly 1 Notice Be sure to close the double feed prevention roller cover until it clicks into place 7 Open the paper feed roller cover A 1 62 Operating Manual Care a...

Page 63: ...en remove the paper feed roller 1 9 Remove the rubber rollers from the paper feed roller shaft Push the tab A to remove the rubber roller B from the paper feed roller shaft Remove the other rubber rol...

Page 64: ...ert the rubber rollers onto the paper feed roller shaft until they click into place 1 1 Notice Inserting a rubber roller with the tab facing inwards may damage the roller 12 Install the paper feed rol...

Page 65: ...the feeding direction 14 Close the ADF door Push both sides of the ADF door down slowly until it clicks into place 15 Reset the After Replace Roller Counter in User Utility to 0 For details refer to...

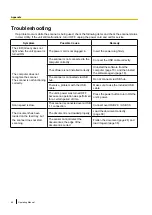
Page 66: ...he software from the computer page 70 and then install the software again page 18 The scanner is connected via USB hub Do not connect via USB hub There is a problem with the USB cable Make sure to use...

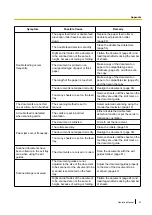
Page 67: ...g method is set to manual Select automatic scanning using the manual feed selector page 12 A double feed is detected when scanning cards The cards are set in portrait orientation Either disable the do...

Page 68: ...ter than it appears Setting the value for Chroma higher in the scanning conditions may solve this problem Dark spots or noise appear on the scanned documents The scanning glasses are dirty Clean the s...

Page 69: ...a Open the ADF door and remove the paper The sensors are dirty Clean the sensors U16 The paper has jammed in the exit tray area Open the ADF door and remove the paper The sensors are dirty Clean the s...

Page 70: ...IDR Engine Panasonic System Networks Co Ltd Panasonic Scanner Manuals Panasonic System Networks Co Ltd Panasonic Document Scanner Device Driver Panasonic System Networks Co Ltd MCD Panasonic System Ne...

Page 71: ...e charge to repair the scanner Please use the original carton and all of the original packing materials The scanner should be handled in the correct horizontal position Required Materials Original sca...

Page 72: ...y should be less than 10 mm 0 4 in 130 sheets 64 g m 17 lb High quality woodfree paper 100 sheets 75 g m 20 lb High quality woodfree paper 100 sheets 80 g m 21 lb High quality woodfree paper Card 4 Fo...

Page 73: ...models Scanning 40 W or less 35 W or less 35 W or less 35 W or less 35 W or less Ready 8 W or less 8 W or less 8 W or less 8 W or less 8 W or less Sleep 3 0 W or less For KV S1057C and KV S1027C 2 9...

Page 74: ...st vent 12 Feed extension tray 12 Feed tray 12 I Incompatible Documents 29 L LCD 2 15 43 LED Green 14 16 LED Red 14 16 M Manual feed selector 2 3 12 32 Mixed batch card guide 2 3 11 12 33 O OK button...

Page 75: ...PNQX6995ZA DD0914HS0 Panasonic System Networks Co Ltd 2014...

Reviews: