background image

54

Replacing Consumable Roller Modules

6

Open the optional “Roller Exchange
Kit (KV-SS044)”, and take out the
paper feed roller module and
separation roller module. 
For supplies and accessories: 
Call 1-800-346-4768 (U.S.A. only) or
your dealer.

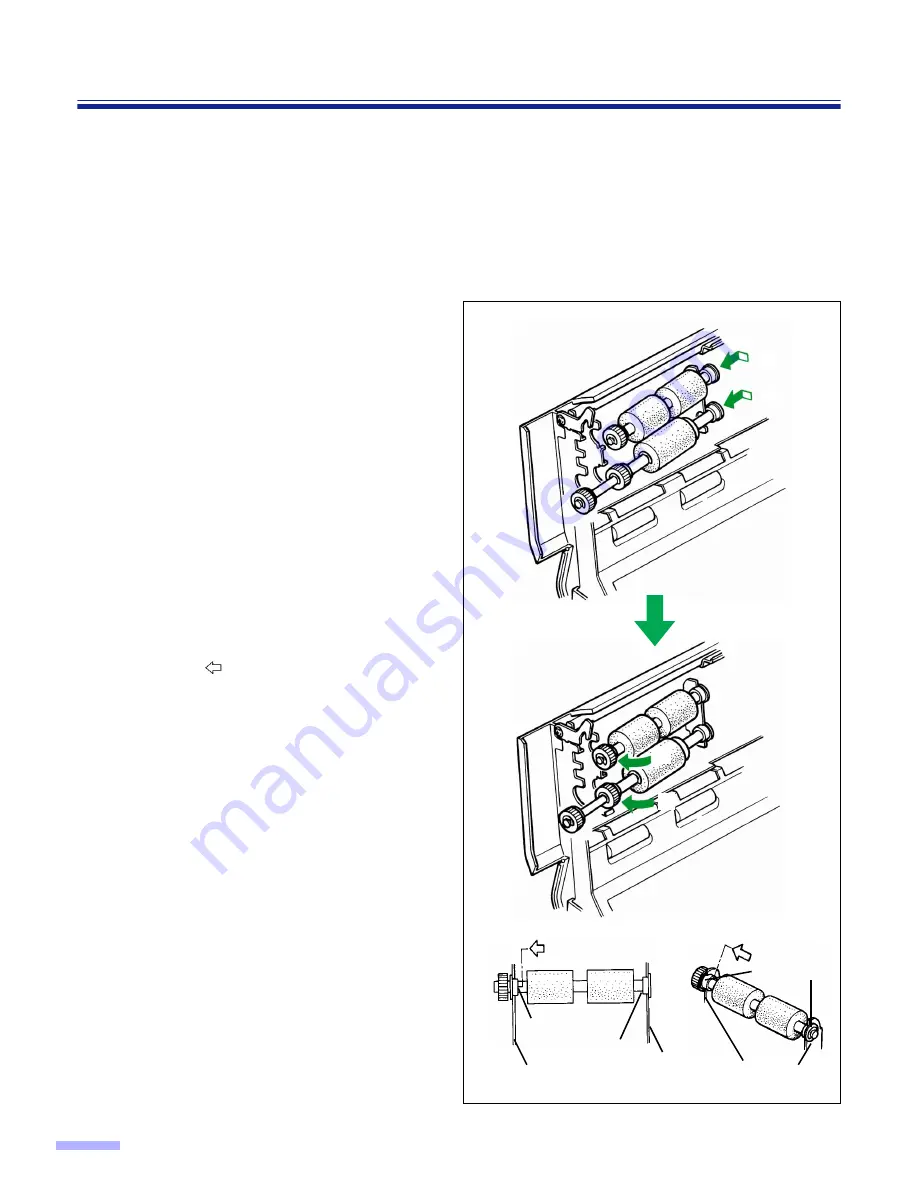
7

Install the new paper feed roller
module and separation roller module
with the gears on the left side and the
post-gear side bearing slide into the
right side guide grooves of the chassis
in the scanner. (

1

Then push up the gear side bearings
and install into the left side guide
grooves of the chassis in the scanner.
When installing the second one, it
clicks into place. (

2

Match the paper feed roller module and
separation roller module with the
bearings and guide grooves, and then
attach them.
When attaching the paper feed roller
module and separation roller module,
push each bearing in the direction of the
arrow and 

attach.

When attaching the paper feed roller
module and separation roller module to
the chassis, do not damage the rollers.

1

1

2

2

Chassis

Bearing

Bearing

Chassis

Chassises

Bearings

Summary of Contents for KV-S6050W

Page 1: ...rough the installation manual enclosed with this unit Please carefully read these instructions the enclosed installation manual and maintenance manual Keep these documentation in a safe place for future reference Keep the CD ROM in the protective case Do not expose the CD ROM to direct sunlight or extreme heat and do not scratch or smudge the surface of the CD ROM ...

Page 2: ... mark Windows 95 is Microsoft Windows 95 operating system Windows 98 is Microsoft Windows 98 operating system Windows NT is Microsoft Windows NT operating system Windows 2000 is Microsoft Windows 2000 operating system Microsoft Windows and Windows NT are either registered trademarks or trademarks of Microsoft Corporation in the United States and or other countries Pentium is a registered trademark...

Page 3: ...ms 42 Removing paper jams from the feed part 42 Removing paper jams from the exit path 43 Cleaning the Unit 44 Outside of the scanner 44 Inside the scanner 44 Cleaning the rollers 44 Cleaning the scanning section glass CIS glass sensor plate sensor roller document sensors double feed detection sensors and paper detection sensor 47 Document glass and cover sheet 51 Roller cleaning paper 51 Replacin...

Page 4: ...CC compliance the user must use only shielded interface cable and the provided power supply cord Also any unauthorized changes or modifications to this equipment would void the user s authority to operate this device English WARNING TO PREVENT FIRE OR SHOCK HAZARD DO NOT EXPOSE THIS PRODUCT TO RAIN OR ANY TYPE OF MOISTURE THE SOCKET OUTLET MUST BE NEAR THIS EQUIPMENT AND MUST BE EASILY ACCESSIBLE ...

Page 5: ...tice Español AVISO PARA EVITAR LLAMAS O DESCARGAS ELÉCTRICAS NO EXPONGA ESTE APARATO A LA LLUVIA NI A LA HUMEDAD LA TOMA DE CORRIENTE DEBERÁ ESTAR CERCA DE ESTE EQUIPO Y EN UN LUGAR DE FÁCIL ACCESO Svenska ...

Page 6: ...vere electrical shock if the cut off plug is inserted into any 13 amp socket If a new plug is to be fitted please observe the wiring code as shown below If in any doubt please consult a qualified electrician WARNING This appliance must be earthed IMPORTANT The wires in this mains lead are coloured in accordance with the following code Green and Yellow Earth Blue Neutral Brown Live As the colours o...

Page 7: ...rançais Le produit ne devra être utilisé qu avec le cordon d alimentation fourni par le fabricant Deutsch Dieses Gerät darf nur mit dem vom Hersteller gelieferten Netzkabel verwendet werden Español Este producto deberá utilizarse solamente con el cable de alimentación suministrado por el fabricante Svenska ...

Page 8: ...leaux à proximité d un feu ou d une flamme vive Ne pas ranger le papier de nettoyage de rouleaux en plein soleil ni à une température dépassant 40 oC 104 oF Utiliser le papier de nettoyage de rouleaux exclusivement pour le nettoyage des rouleaux et de la surface de balayage Pour tout renseignement complémentaire sur le papier de nettoyage de rouleaux voir la feuille de données sur la sécurité du m...

Page 9: ...a de una calefacción o una llama No guarde el papel de limpieza de rodillos expuesto a la luz solar directa ni en un lugar donde la temperatura sea superior a 40 C Utilice solamente papel de limpieza de rodillos para limpiar los rodillos y el área de escaneado Si necesita más información acerca del papel de limpieza de rodillos consulte la hoja de datos de seguridad del material MSDS Pregunte a la...

Page 10: ... extended period Do not place the unit on an uneven or unstable surface Do not disassemble the unit This will void your warranty It is recommended that if the scanner has to be moved at least two people carry it For safety reason do not look directly at the light You may damage your eyes EX Document Do not place books paper or other items on the unit Do not place any liquids near the unit Accident...

Page 11: ...not operate or place the unit in a vertical position Do not place the unit near a heating appliance or an air conditioning vent Do not place the unit in a room with extremely high or low humidity Do not place the unit near other appliances which generate large electrical noise Do not place the unit on a carpet Static electricity can cause the unit to malfunction Do not drink or inhale the included...

Page 12: ...surface of the disc Do not leave the disc out of the protective case Do not leave the disc in direct sunlight or near heat sources Do not place heavy objects on the disc case or drop the case To clean the disc hold the disc by its edges and wipe it from the center to the edges with a dry soft cloth ...

Page 13: ...r When the power is turned on the green indicator lights When an error occurs the indicator will change to red and light steadily or flash Front door release Inside the front door Exit document stopper Document cover AC inlet Fan exhaust vent Imprinter door Top door Used for attaching the imprinter unit and ink Power switch on position off position Hopper extension tray Connectors Used to connect ...

Page 14: ...Component Identification 14 Component Identification Standard mark Document glass Cover sheet black sheet CIS glass For KV S6055W series only Scanning section glass ...

Page 15: ...enu 3 Press to advance to the next mode in the selected menu Press to enter others setting menu 4 Press to return to the previous mode in the selected menu Press to exit from the setting section and return to the ready status Also this function can change the display language 1 Press to advance to the next value in the selected mode Press to start or stop scanning a document or batch of documents ...

Page 16: ... default language 1 Turn the power on while pressing the HOME key When High Speed Scanner or other words appear on the LCD release the HOME key 2 Use the 2 key or the 1 key to select English Letter English A4 Deutsch A4 or A4 3 Press the HOME key The display will change to the selected language then the scanner will be ready This setting will remain until it is changed to another setting S e t L a...

Page 17: ... series only B Emphasis Selection for emphasis when scanning the back side of a document 08 Back side contrast For KV S6055W series only B Contrast Selection for contrast when scanning the back side of a document 09 Back side halftone For KV S6055W series only B Halftone Selection for gradation when scanning the back side of a document 24 10 Noise reduction Noise Reduct Selection for noise reducti...

Page 18: ... includes documents placed in the ADF and documents placed on the flatbed glass document glass 26 19 Save scanning settings Select memory Save Setting Selects the memory where the conditions are saved into Save scanning settings Execution Save Setting Saves the scanning conditions into the memory 2 memory settings 20 Load scanning setting Load Setting Loads the memory where the scanning conditions...

Page 19: ... the user counter extender User Counter Selection for an increase in the default number Clear the user counter User Counter Clears the counter which was set by the user 03 System Count System Count Displays the total amount of scanned documents up to now No Item LCD Content Page 01 Setting the imprinter data Pre Imprint Allows for the selection of the printing content using an imprinter The imprin...

Page 20: ... SCSI interface Lower the synchronous transfer rate to 10 Mbytes sec if the computer has failed to recognize the scanner or the scanner fails to operate properly 06 Checking the roller cleaning warning Clean Roller The alarm tells you it is time to check roller If it is near 100 clean the roller See Cleaning the Unit on page 44 31 Clearing the roller cleaning warning Clean Roller Clear the Clean R...

Page 21: ...isplay on the right is an example of a setting for the back side contrast 4 Press the HOME key to return to the Ready display or another menu key to go to another menu In steps 2 or 3 you can change to the desired menu by pressing the desired menu key See pages 22 to 33 for details For changing the display language see page 16 SCAN COUNTER IMPRINT OTHERS READY ERROR STOP START MODE SELECT HOME 1 4...

Page 22: ...ssing the 1 key or the 2 key will change the display to Norm D means dark L means light 02 Front side image emphasis When Host is displayed pressing the 1 key or the 2 key will change the display to Medium 03 Front side contrast When Host is displayed pressing the 1 key or the 2 key will change the display to Norm H means high L means low 0 1 F B r i g h t n e s s D s s s s r s s s s L H o s t D4 ...

Page 23: ...ans light 07 Back side image emphasis KV S6055W series only When Host is displayed pressing the 1 key or the 2 key will change the display to Medium 08 Back side contrast KV S6055W series only When Host is displayed pressing the 1 key or the 2 key will change the display to Norm H means high L means low 0 4 F H a l H o s t f t o n e Binary Host Bayer dither 64 Bayer dither 16 Dynamic Th Halftone d...

Page 24: ... Some of the data on the edges of the page may be lost 13 Double feed detection If set to Detect the scanner will sound a buzzer and the power indicator will flash red when double feeding is detected Even if this buzzer is set to OFF in Setting the buzzer see page 30 it will still ring When scanning very important documents confirm if the number of scanned pages displayed on the LCD matches the nu...

Page 25: ...ity The double feed detector s sensitivity will be low Set this when there is an error for no double feeding High sensitivity The double feed detector s sensitivity will be high Set this when there is no error for double feeding 16 Feed speed Fast The scanner scans approximately 1 3 times faster than when Normal is set at a resolution ranging from 200dpi to 400dpi For example when the resolution i...

Page 26: ...saved in the memory selected in the Save Scanning Settings Select memory Completed will be displayed after saving 20 Load scanning setting If you use the 1 key or the 2 key to select Memory 1 or Memory 2 the saved scanning items will become valid by the Save Scanning Settings Execution If other scanning items have been saved in another memory during scanning you can change the scanning items easil...

Page 27: ...e the user counter by one Pressing the 2 key once will decrease the user counter by one Pressing the 1 key or the 2 key continuously will change the user counter value by increments of 10 02 Setting the User Counter Extender Pressing the 1 key once will increase the user counter extender by one Pressing the 2 key once will decrease the user counter extender by one 02 Clear the User Counter When pr...

Page 28: ...ere printing starts from the top of the document If 0 character is set printing starts from 10 0 mm The millimeter value displayed is an approximation The length per character varies depending on the 04 orientation setting 90 or 270 2 40mm per character 0 or 180 3 46mm per character Character 0 72 In this example printing starts at 12 4 mm approx 1 2 in from the top of the paper The number 12 4 ca...

Page 29: ...rinter is installed 0 4 P r e R H o s t o t a t e Host 0o 90o 180o 270o A B A B AB AB Transfer direction Prints portrait orientation Rotates character string 90 degrees and prints Prints portrait orientation from the end of the character string Rotates character string 270 degrees and prints 0x 90x 180x 270x ...

Page 30: ...he scanner is located to terminal position on SCSI bus set to Enable Setting the terminator will be activated after turning the power off and turning it on again The internal terminator works only when the units power has been turned on If the PC is to be used while the unit s power is off be absolutely sure to install an external terminator which is available on the market 05 Setting the transfer...

Page 31: ...isplayed 07 Checking the roller modules replacement warning 0 This is displayed when Replace Roll Warning displayed is cleared 100 This is displayed when the roller modules need to be replaced 07 Clearing the roller modules replacement warning When pressing the 1 key and the 2 key simultaneously Replace Roll Warning will be cleared Then Completed will be displayed 0 6 C l e a n W a r n i n g R o l...

Page 32: ...this scanner is provided with a programmable power save feature The scanner is factory set with the power save feature sleep mode turned on to comply with ENERGY STAR requirement If sleep mode is enabled the scanner enters the sleep mode when the scanner is idle for 15 minutes 1min T 60min To return from the sleep mode press any key on the scanner or issue the scan instruction from the application...

Page 33: ... displayed when the STOP key is pressed and the scanner stops Even if the document remains in the scanner JAM will not be displayed If the document remains in the scanner open the ADF door and the front door then remove it Then Ready will be displayed This will be displayed after setting scanning to start with a host computer If the document is set and the START key is pressed scanning will start ...

Page 34: ...nd them as shown to the right 3 To separate the document apart grasp them firmly and pull them so that the center part waves as shown to the right Repeat the steps above as necessary 2 Carefully align the top left ends of the documents 3 Adjust the document guide slightly larger than the actual size of the document Document guide 1 2 3 Align the top of the documents Align the left side of the docu...

Page 35: ...the diagrams at the right The amount of documents should not exceed the limit mark on the document guide This may cause a paper jam or skew For different sized documents place them with the top left ends facing the left side of the hopper 5 Adjust the document guide to the size of the document to be scanned Adjust the exit document stopper to the size of the document to be output Portrait Fill ind...

Page 36: ...by the ADF after straightening the document set the feed speed to Slow When scanning thick documents 64 g m2 17 lbs or more be sure to use less than 200 sheets When scanning copying paper such as carbon or carbonless paper use the flatbed When setting the document be sure that it does not exceed the fill indicator limit mark Be sure to remove the document from the document cover after it is scanne...

Page 37: ... cover 2 Place the scanning side of the document face down on top of the document glass If the document is bent or folded straighten it 3 Match the shorter side of the document with the left edge of the document glass 4 Match the longer side of the document with the standard mark If the document is slanted it will not be scanned properly Document cover Document Standard mark Longer side Shorter si...

Page 38: ...n the document cover and remove the document When scanning with the flatbed repeatedly The ADF is heavy so when scanning with the flatbed repeatedly separate the ADF and document cover 1 Pull the exit document stopper towards you pull the front door release under the hopper separate the ADF and document cover and lift up the ADF to open 2 Perform operation steps 1 through 5 for scanning with the f...

Page 39: ...k please note the following items The operation methods when scanning thick document such as a book with the flatbed one time and repeatedly are the same Do not close the document cover forcibly You may scan with the document cover open In this case do not look directly at the light Please note that areas of the document which are not touching the document glass will not be scanned properly If the...

Page 40: ... MANUAL The hopper will then be raised to the proper level for manual feeding 2 Match the document guide with the size of the document 3 Insert the document into the paper slot one page at a time Cautions Please remove any staples from the document before scanning Glued or curled documents may cause a paper jam or damage the unit so please scan using the flatbed Paper slot Manual feed selector Doc...

Page 41: ...red depends on the control sheet Print out control sheets from the provided CD ROM Caution Use the same size control sheet as the scanning document When printing the control sheet if the pattern falls in the area from the top side of the document to 25 mm adjust the printer Also copy the control sheet so that the pattern lies in the center of the copy Be careful not to get the control sheet dirty ...

Page 42: ...hand hold down the ADF door release towards you Open the ADF door and pull the jammed document towards the feed part and then close the ADF door Push both sides of the ADF door down gently until it clicks into place Since the roller are located on the left side of the ADF door there is more weight on the left side Therefore it is important to note that the door needs to have tension evenly divided...

Page 43: ...rds you open the front door and pull the document forward then close the front door Push both sides of the front door down gently until it clicks into place Do not close the front door holding the hopper extension tray Front door release Inside the front door Exit document stopper Front door Front door Front door release Hopper extension tray ...

Page 44: ...he scanning section glass CIS glass sensor plate and sensor roller when black or white lines appear on the scanned images NOTE There is no CIS glass and no sensor roller for the KV S6050W KV S6050WU If the documents that will be scanned are dirty then the scanner parts may become dirty as well To maintain proper scanning clean the scanner parts frequently When scanning with the flatbed and black d...

Page 45: ...e sure to wipe in the directions of the arrows shown on the diagram to the right Clean the retard roller only in the directions of the arrow shown on the diagram to the right If cleaned in the wrong direction the roller may slip out of the proper position Other roller except retard roller The rollers to be cleaned are shaded Wipe in the direction of the arrows Retard roller Retard roller Conveyor ...

Page 46: ...ing Wipe the rollers completely from one end to the other Be sure to wipe in the directions of the arrows shown on the diagram to the right 6 Close the front door Push both sides of the front door down gently until it clicks into place Do not close the front door holding the hopper extension tray Front door release Inside the front door Front door release Front door Front door Exit document stoppe...

Page 47: ...it is important to note that the door needs to have tension evenly divided to close it properly Cleaning the scanning section glass CIS glass sensor plate sensor roller document sensors double feed detection sensors and paper detection sensor 1 Turn the power off 2 Using your hand pull the ADF door release towards you then open the ADF door completely ADF door release ADF door release Inside the A...

Page 48: ...ble feed detection sensor or paper detection sensor How to clean the document sensor double feed detection sensor or paper detection sensor Remove the brush and blow off the dirt through the document sensor hole double feed detection sensor hole or paper detection sensor hole Double feed detection sensor Document sensors Double feed detection sensor Paper detection sensor ...

Page 49: ... using the included blower If the sensor roller is removed while cleaning re attach it after cleaning Refer to page 50 for re attachmant There is no CIS glass and no sensor roller for the KV S6050W KV S6050WU Front door release Inside the front door Front door release Front door Front door Exit document stopper Blower Document sensor Document sensors CIS glass Sensor plate Scanning section glass S...

Page 50: ...rly After cleaning clear the Clean Roller Warning display See page 31 Re attachment of the sensor roller When the sensor roller is removed while cleaning the inside of the scanner re attach it as shown below Lower sensor roller Attach the roller by placing the no gear side to the left side of the scanner and inserting both side s bearings into the guide grooves Match the flat side of the bearing w...

Page 51: ...aper Open the bag on the dotted line and take out the roller cleaning paper If the roller cleaning paper bag is left open for a long period of time before using it the alcohol will evaporate Please use the roller cleaning paper immediately after opening the bag The roller cleaning paper Model No KV SS03 is available from the dealer where you purchased your scanner For supplies and accessories Call...

Page 52: ...d If the power is turned off with the manual feed selector set to MANUAL the retard roller module cannot be removed 2 Using your hand pull the ADF door release towards you then open the ADF door completely 3 Using your fingers hold the paper feed conveyor and pull it towards you to open it When the paper feed conveyor is pulled towards you the click stop mechanism will be released ADF door release...

Page 53: ...ape 5 Hold the paper feed roller module gear and pull the gear side in the direction of arrow 1 Now slide the gear side in the direction of arrow 2 Next hold the separation roller module gear and pull the gear side in the direction of arrow 1 and then slide it in the direction of arrow 2 to remove it Paper feed roller module Separation roller module Separation roller module Paper feed roller modul...

Page 54: ... chassis in the scanner 1 Then push up the gear side bearings and install into the left side guide grooves of the chassis in the scanner When installing the second one it clicks into place 2 Match the paper feed roller module and separation roller module with the bearings and guide grooves and then attach them When attaching the paper feed roller module and separation roller module push each beari...

Page 55: ...hing the paper feed roller module and separation roller module To continue replace the retard roller module according to the following procedure The retard roller module is located in the conveyor 10 Using your fingers hold the conveyor and pull it towards you to open it When the conveyor is pulled towards you the click stop mechanism will be released Hook Pin Please attach the left side hook in t...

Page 56: ...er 13 Pull the right side of the shaft in the direction of arrow 1 and hold it there Attach the new retard roller module as shown in the direction of arrow 2 Return the right side of the shaft as shown in the direction of arrow 3 Confirm if pin A and pin B are inserted in their notches correctly Attach the retard roller module so that the notch A is on the left side 1 2 Retard roller module Shaft ...

Page 57: ...oth sides of the ADF door down gently until it clicks into place Since the roller are located on the left side of the ADF door there is more weight on the left side Therefore it is important to note that the door needs to have tension evenly divided to close it properly After replacing roller modules clear the Replace Roll Warning display Refer to page 31 Conveyor Before closing the ADF door confi...

Page 58: ...the unit The scanner should be handled in the correct horizontal position Materials Required Original Scanner Carton Packing Materials Shipping Tape and Scissors 1 Disconnect your scanner from the electrical outlet and the interface cable 2 Fix the optical unit of the flatbed and attach the protective sheets with tapes Please refer to the installation manual enclosed with the unit Turn the power o...

Page 59: ...ion mode Image control Image emphasis Dynamic threshold DIMM required Automatic threshold Automatic separation Monochrome reversing Automatic back control Paper Size for Flatbed T 298a432mm 11 7 a17 in Size for ADF Scanning size 70a169mm 2 8a6 7 in and 106a148mm 4 2a5 8 in to 298a432mm 11 7a17 in Feeding size 70 a169mm 2 8a6 7 in and 106a148mm 4 2a5 8 in to 305 a432mm 12a17 in Thickness for ADF Si...

Page 60: ...dation error diffusion mode Image control Image emphasis Dynamic threshold DIMM required Automatic threshold Automatic separation Monochrome reversing Automatic back control Paper Size for Flatbed T 298a432mm Size for ADF Scanning size 70a169mm and 106a148mm to 298a432mm Feeding size 70 a169mm and 106a148mm to 305 a432mm Thickness for ADF Single paper feeding 0 05 to 0 15mm Continuous paper feedin...

Page 61: ... 64 The document is not fed smoothly into the ADF during scanning The rollers are dirty Clean all of the rollers See pages 44 through 47 Paper feed rollers separation roller and retard roller are the end of their life Replace paper feed roller module separation roller module and retard roller module See pages 52 through 57 The scanned document is blank The document to be scanned was loaded face do...

Page 62: ...n the double feed detection sensor with the included blower See page 48 The double feed detector sensitivity setting does not match the scanning document Change the double feed detector sensitivity setting See page 25 Black dots or white patches occur when scanning with flatbed The document glass and cover sheet are dirty Clean the document glass and cover sheet See page 51 ...

Page 63: ...nt has been feeded obliquely Open the front or ADF door and remove the jammed paper See pages 42 and 43 A document remains in the scanner Open the front or ADF door and remove all of the remaining documents Dust adheres to the document sensors Clean a dust using the included blower See pages 48 and 49 A document has been feeded obliquely Open the ADF door and remove the paper Multiple sheets were ...

Page 64: ...ent cover is open Close the document cover A user non servicable error has occurred Please consult with a service representative Call technical service support An interface board has not been installed Reinstall scanner s interface board U 3 0 F r o n t D o o r U 3 1 A D F D o o r U 3 4 T o p D o o r U 3 5 D o c C o v e r H C a l l S e r v i c e F C a l l S e r v i c e U 5 0 N o I F B o a r d ...

Page 65: ...learing the roller modules replacement warning 20 31 Connector 13 Control sheet 41 Conveyor 55 COUNTER 15 19 Counter 19 Counter setting menu 19 Cover sheet 14 51 page D Default 18 Detect 18 Display panel 13 15 Document glass 14 51 Document guide 13 35 Document sensor 44 47 Double feed detection 17 24 E Error diffusion 23 24 Exit document stopper 13 35 F Fan exhaust vent 13 44 Fill indicator 35 36 ...

Page 66: ...ut speed 59 60 Retard roller module 56 Roller cleaning paper 46 51 page S Save Scanning Settings 18 26 SCAN 15 Scanning face 59 60 Scanning method 18 26 Scanning section glass 14 47 Select the counter displayed on the LCD 19 27 Sensor plate 44 47 Sensor roller 44 47 Separation roller module 53 Setting the Buzzer 20 30 Setting the Product ID 20 32 Setting the Terminator 20 30 Setting the User Count...

Page 67: ...ess Unit of Matsushita Electric Corporation of America Two Panasonic Way Secaucus New Jersey 07094 Panasonic Canada Inc 5770 Ambler Drive Mississauga Ontario L4W 2T3 Matsushita Electric Industrial Co Ltd Web Site http www panasonic co jp global E 0529 ...

Reviews: