background image

Initial Programming

31

For fax advantage assistance, call 1-800-435-7329.

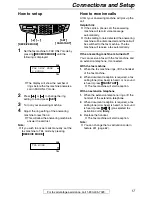
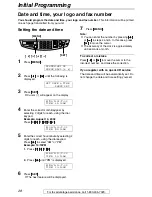
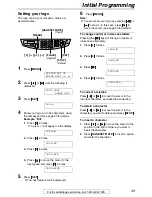
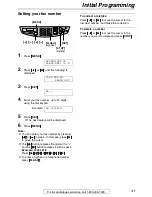
Setting your fax number 

1

Press 

{{{{

MENU

}}}}

.

SYSTEM SET UP
PRESS NAVI.[

(


)

]

2

Press 

{{{{<

<

<

<}}}}

 or 

{{{{>

>

>

>}}}}

 until the following is 

displayed.

YOUR FAX NO.

PRESS SET

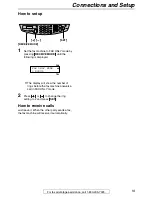
3

Press 

{{{{

SET

}}}}

.

NO.=

4

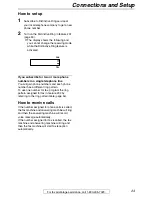
Enter your fax number, up to 20 digits, 
using the dial keypad.

Example:

NO.=1234567

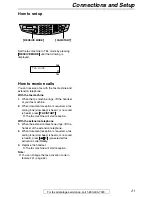
5

Press 

{{{{

SET

}}}}

.

L

The next feature will be displayed.

6

Press 

{{{{

MENU

}}}}

.

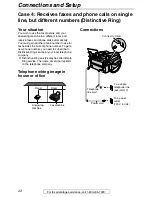
Note:

L

You can enter your fax number by pressing 

{{{{+

+

+

+}}}}

 or 

{{{{-

-

-

-}}}}

 in step 4. In this case, press 

{{{{>

>

>

>}}}}


to move the cursor.

L

The 

{{{{*

*

*

*}}}}

 button replaces the digit with a “

+

” 

and the 

{{{{#

#

#

#}}}}

 button replaces it with a space.

Example: +234 5678

Press 

{{{{*

*

*

*}}}}{{{{

2

}}}}{{{{

3

}}}}{{{{

4

}}}}{{{{#

#

#

#}}}}{{{{

5

}}}}{{{{

6

}}}}{{{{

7

}}}}{{{{

8

}}}}

.

L

To enter a hyphen in a telephone number, 
press 

{{{{

FLASH

}}}}

.

To correct a mistake

Press 

{{{{<

<

<

<}}}}

 or 

{{{{>

>

>

>}}}}

 to move the cursor to the 

incorrect number, and make the correction.

To delete a number

Press 

{{{{<

<

<

<}}}}

 or 

{{{{>

>

>

>}}}}

 to move the cursor to the 

number you want to delete and press 

{{{{

STOP

}}}}

.

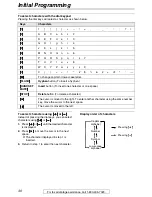
{

FLASH

}

{

STOP

}

{

MENU

}

{

SET

}

{<}


{>}


{+}


{-}

(Hyphen)

(Delete)

Summary of Contents for KX-FB421

Page 1: ...tructions before using the unit and save for future reference This model is designed to be used only in the U S A FOR FAX ADVANTAGE ASSISTANCE CALL 1 800 HELP FAX 1 800 435 7329 E MAIL TO consumerproducts panasonic com for customers in the U S A or Puerto Rico REFER TO www panasonic com for customers in the U S A or Puerto Rico ...

Page 2: ...d ink film L Do not rub or use an eraser on the printed side of recording paper as the print may smear Energy Star L As an ENERGY STAR Partner Panasonic has determined that this product meets the ENERGY STAR guidelines for energy efficiency ENERGY STAR is a U S registered mark Trademarks L Hammermill is a registered trademark of INTERNATIONAL PAPER in the United States and or other countries L ope...

Page 3: ...n authorized service center when service is required Opening or removing covers may expose you to dangerous voltages or other risks Incorrect reassembly can cause electric shock when the unit is subsequently used 13 Unplug this unit from the wall outlet and refer servicing to an authorized service center when the following conditions occur A When the power supply cord or plug is damaged or frayed ...

Page 4: ...numbers Distinctive Ring 24 Help Button Help function 26 Volume Adjusting volume 27 Initial Programming Date and time your logo and fax number 28 Telephone Automatic Dialing Storing names and telephone numbers into one touch dial 32 Storing names and telephone numbers into navigator directory 33 Editing a stored entry 34 Erasing a stored entry 35 Making a phone call using one touch dial and naviga...

Page 5: ...er jam 70 Document jams sending 73 Cleaning White plate and scanner glass 74 Document feeder rollers 75 Thermal head and roller shaft 76 General Information Printed Reports Reference lists and reports 79 Caller IQ Feature openLCR service for the Caller IQ feature 80 Specifications Technical data about this product 83 FCC Information List of FCC requirements and information 85 Limited Warranty Pana...

Page 6: ... film again L To place an order L If you have any questions about internet orders please contact us at Power cord 1 Part No PFJA1030Z Telephone line cord 1 Part No PQJA10075Z Handset 1 Part No PFJXE0805Z Handset cord 1 Part No PQJA10126Z Paper stacker 1 Part No PFKS1078Z1 Paper tray 1 Part No PFKS1072Z1 A4 paper guide 1 Part No PFKS1074Z1 Ink film 1 Operating instructions 1 Part No PFQX1699Z Model...

Page 7: ... E E Paper stacker The paper stacker may not be shown in all illustrations F F F F Recording paper entrance G G G G Paper tray H H H H Tension plate I I I I Document entrance J J J J Document cover K K K K Printer cover L L L L Printer cover open button Rear view A A A A Power inlet B B B B Telephone line jack C C C C External telephone jack D D D D ADF Auto Document Feeder cable E E E E Speaker L...

Page 8: ...IQ feature page 80 J J J J RECEIVE MODE L To change the receiving mode K K K K NAVIGATOR VOLUME L To adjust volume page 27 L To search for a stored name page 36 45 L To select the features or feature settings during programming page 59 L To navigate to the next operation L L L L TONE L To change from pulse to tone temporarily during dialing when your line has rotary pulse services M M M M FLASH L ...

Page 9: ... the document cover 1 Gently insert the two tabs on the document cover into the slots on the unit 1 then close the document cover 2 2 Connect the ADF cable to the jack on the back of the unit L The arrow _ on the ADF cable must be facing up 1 2 Document cover Slots Tabs ADF cable Arrow _ ...

Page 10: ...er cover open button 1 Open the printer cover 2 2 Slide down the shipping lock to unlock position L L L L The label for unlocking the shipping lock is attached to the unit Remove and read it 3 Close the printer cover by pushing down on both sides until locked Caution L L L L Whenever transporting the unit be sure to slide up the shipping lock to lock it Printer cover Printer cover open button 1 2 ...

Page 11: ...jected paper is stacked on the paper stacker remove it 2 Press down the printer cover open button 1 Open the printer cover 2 L For first time installation of the supplied ink film skip to step 5 3 For replacement only Pull out the blue gear and remove the used ink film Remove the used core 4 For replacement only Remove the stoppers and tags from the new ink film Paper stacker Ejected paper Printer...

Page 12: ... Make sure that the ink film is wrapped around the blue core at least once 7 Close the printer cover by pushing down on both sides until locked Note L The ink film is safe to touch and will not rub off on your hands like carbon paper Rear ink film roll Gear of blue core Left slot Front ink film roll 1 2 Gear of blue core Ink film Tight 1 turn Slack Reverse Correct Blue core The ink film is not wra...

Page 13: ...nsert the paper tray into the slot on the back of the unit Note L Do not place the unit in an area where the paper tray may be obstructed i e by a wall etc L Recording paper will be ejected from the front of the unit Do not place anything in front of the unit To use A4 size paper Insert the bottom tab on the A4 paper guide into the lower slot Press the guide into the upper slot L Change the record...

Page 14: ...paper to prevent a paper jam 2 Pull the tension plate forward and hold open while inserting the paper L The paper should not be over the tab L If the paper is not inserted correctly readjust the paper or the paper may jam To add paper 1 Pull the tension plate forward and hold open while removing all of the installed paper 2 Add paper to the stack of paper you removed and straighten 3 Fan the stack...

Page 15: ... but different numbers Distinctive Ring page 24 General information for connections Note L The warranty does not cover damage due to power line surges or lightning For additional equipment protection we recommend the use of a surge protector The following types are available TELESPIKE BLOK MODEL TSB TRIPPE MFG CO SPIKE BLOK MODEL SK6 0 TRIPPE MFG CO SUPER MAX PANAMAX or MP1 ITW LINX L To avoid mal...

Page 16: ...line one phone number Your situation You wish to use the fax machine and your answering machine in the same room Telephone wiring image in house or office Connections Fax machine Answering machine Answering machine Not included Telephone line cord To a single telephone line jack RJ11C To a power outlet 120 V 60 Hz Power cord Remove the stopper ...

Page 17: ...f a fax calling tone is detected the answering machine will be disconnected and the call will be switched to the fax machine The fax machine will receive a fax automatically If the answering machine is turned off You can receive a fax with the fax machine and an extension telephone if connected With the fax machine 1 When the fax machine rings lift the handset of the fax machine 2 When document re...

Page 18: ...line used for fax only Your situation You wish to use the fax machine only for fax reception transmission Telephone wiring image in house or office Connections Fax machine Telephone line cord To a single telephone line jack RJ11C To a power outlet 120 V 60 Hz Power cord Connect to LINE ...

Page 19: ...E until the following is displayed L The display will show the number of rings before the fax machine answers a call in FAX ONLY mode 2 Press or to change the ring setting to 2 and press SET How to receive calls Just leave it When the other party sends a fax the fax machine will receive it automatically SET RECEIVE MODE FAX TEL FAX ONLY MODE 3 RINGS ...

Page 20: ...ion You wish to use the fax machine and an extension telephone in a different room Most calls are phone calls and the fax machine is mostly used to send documents Telephone wiring image in house or office Connections Room Extension telephone Fax machine Room Telephone line cord To a single telephone line jack RJ11C To a power outlet 120 V 60 Hz Power cord Connect to LINE ...

Page 21: ...ument reception is required a fax calling tone slow beep is heard or no sound is heard press FAX START L The fax machine will start reception With the extension telephone 1 When the extension telephone rings lift the handset of the extension telephone 2 When document reception is required a fax calling tone slow beep is heard or no sound is heard press 9 pre selected fax activation code firmly 3 R...

Page 22: ...u must gain another phone number to use for fax besides the current phone number To get a new phone number you need to subscribe to Distinctive Ring service at your local telephone company L Distinctive Ring service may be called Identa Ring service The name of service depends on the telephone company Telephone wiring image in house or office Connections Room Fax machine Answering machine Room Tel...

Page 23: ...hone numbers in a single telephone line You will gain phone numbers and each phone number has a different ring pattern To use one number for fax program the ring pattern assigned for fax in feature 32 by referring to the ring pattern table page 54 How to receive calls If the number assigned for phone calls is called the fax machine and answering machine will ring and then the answering machine wil...

Page 24: ... phone number to use for fax besides the current phone number To get a new phone number you need to subscribe to a Distinctive Ring service at your local telephone company L Distinctive Ring service may be called Identa Ring service The name of service depends on the telephone company Telephone wiring image in house or office Connections Room Extension telephone Fax machine Room Telephone line cor...

Page 25: ...e Distinctive Ring is activated If you subscribe for two or more phone numbers in a single telephone line You will gain phone numbers and each phone number has a different ring pattern To use one number for fax program the ring pattern assigned for fax in feature 32 by referring to the ring pattern table page 54 How to receive calls If the number assigned for phone calls is called the voice messag...

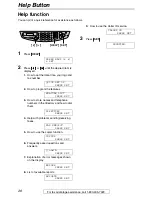
Page 26: ...m the features FEATURE LIST PRESS SET 3 How to store names and telephone numbers in the directory and how to dial them DIRECTORY PRESS SET 4 Help with problems sending receiving faxes FAX SND RCV PRESS SET 5 How to use the copier function COPIER PRESS SET 6 Frequently asked questions and answers Q and A PRESS SET 7 Explanation of error messages shown on the display ERRORS PRESS SET 8 List of avail...

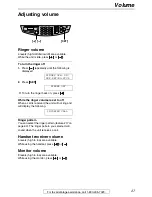
Page 27: ...ER OFF L To turn the ringer back on press While the ringer volume is set to off When a call is received the unit will not ring and will display the following INCOMING CALL Ringer pattern You can select the ringer pattern feature 17 on page 60 The ringer pattern you selected will sound when the unit receives a call Handset receiver volume 5 levels high to low are available While using the handset p...

Page 28: ...Example August 10 2002 Press 0 8 1 0 0 2 M 08 D 10 Y 02 TIME 12 00AM 5 Enter the correct hour minute by selecting 2 digits for each using the dial keypad Press to select AM or PM Example 10 15PM 1 Press 1 0 1 5 M 08 D 10 Y 02 TIME 10 15AM 2 Press until PM is displayed M 08 D 10 Y 02 TIME 10 15PM 6 Press SET L The next feature will be displayed 7 Press MENU Note L You can enter the number by pressi...

Page 29: ...l be displayed 6 Press MENU Note L You can enter your logo by pressing or in step 4 In this case press to move the cursor see page 30 for details To change capital or lower case letters Pressing the key will change to capital or lower case alternately 1 Press 2 2 times LOGO B 2 Press 4 3 times LOGO B I 3 Press LOGO B i 4 Press 5 3 times LOGO Bi l To correct a mistake Press or to move the cursor to...

Page 30: ...to step 1 to enter the next character Display order of characters Keys Characters 1 1 _ 2 A B C a b c 2 3 D E F d e f 3 4 G H I g h i 4 5 J K L j k l 5 6 M N O m n o 6 7 P Q R S p q r s 7 8 T U V t u v 8 9 W X Y Z w x y z 9 0 0 To change capital or lower case letter FLASH Hyphen button To insert a hyphen HANDSET MUTE Insert button To insert one character or one space STOP Delete button To delete a...

Page 31: ... will be displayed 6 Press MENU Note L You can enter your fax number by pressing or in step 4 In this case press to move the cursor L The button replaces the digit with a and the button replaces it with a space Example 234 5678 Press 2 3 4 5 6 7 8 L To enter a hyphen in a telephone number press FLASH To correct a mistake Press or to move the cursor to the incorrect number and make the correction T...

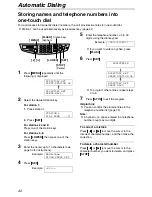
Page 32: ... 30 for instructions Example NAME John STORE PRESS SET 4 Press SET Example S01 5 Enter the telephone number up to 30 digits using the dial keypad Example S01 1114497 L If you want to enter a hyphen press FLASH 6 Press SET REGISTERED u DIRECTORY SET PRESS STATION OR b DIRECTORY SET PRESS NAVI L To program other entries repeat steps 2 to 6 7 Press STOP to exit the program Helpful hint L You can conf...

Page 33: ...ress MENU to exit the program Helpful hint L For your convenience HELP FAX 1 800 435 7329 has been pre programmed If you cannot solve a problem call using this entry page 36 If unnecessary you can erase it page 35 L You can confirm the stored entries in the telephone number list page 79 Note L When the following is displayed in step 6 you can store only 5 more entries REGISTERED SPACE 5 DIRS L If ...

Page 34: ...MENU Example NAME Mary EDIT DELETE 4 Press Example NAME Mary STORE PRESS SET L If you do not need to edit the name skip to step 6 5 Edit the name see page 30 and page 33 for instructions 6 Press SET Example NO 0123456 L If you do not need to edit the telephone number skip to step 8 7 Edit the telephone number For further details see page 33 8 Press SET REGISTERED SET MENU ...

Page 35: ...until the desired entry is displayed Example Peter 9876543 b SEND PRESS SET EDIT PRESS MENU 3 Press MENU Example NAME Peter EDIT DELETE 4 Press DELETE OK YES SET NO STOP L To cancel erasing press STOP 5 Press SET DELETED L The stored name and number are erased STOP SET MENU ...

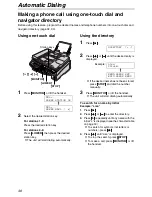
Page 36: ...lly Using the directory 1 Press DIRECTORY 2 Press or until the desired entry is displayed Example Lisa 2233445 b SEND PRESS SET EDIT PRESS MENU L If the desired name has not been stored press STOP and dial the number manually 3 Press MONITOR or lift the handset L The unit will start dialing automatically To search for a name by initial Example Lisa 1 Press 2 Press or to enter the directory 3 Press...

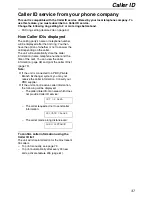
Page 37: ... name telephone number and the time of the call You can view the caller information page 38 and print the caller ID list page 79 Note L If the unit is connected to a PBX Private Branch Exchange system you may not receive the caller information Consult your PBX supplier L If the unit cannot receive caller information the following will be displayed The caller dialed from an area which does not prov...

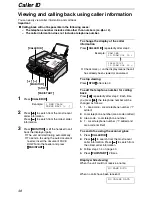
Page 38: ...ation Press CALLER ID repeatedly after step 2 Example SAM LEE 11 20AM Jul 20 b 1345678901 11 20AM Jul 20 L Check mark on the display means the call has already been viewed or answered To stop viewing Press STOP after step 2 To edit the telephone number for calling back Press repeatedly after step 2 Each time you press the telephone number will be changed as follows 1 1 Area code Local telephone nu...

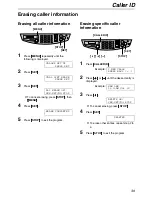
Page 39: ...asing press STOP then MENU 4 Press SET ERASE COMPLETED 5 Press STOP to exit the program Erasing specific caller information 1 Press CALLER ID Example 2 NEW CALLS PRESS NAVI 2 Press or until the desired entry is displayed Example SAM LEE 12 10AM Jul 20 3 Press DELETE OK YES SET NO STOP L To cancel erasing press STOP 4 Press SET DELETED L To erase other entries repeat step 2 to 4 5 Press STOP to exi...

Page 40: ...directory For station 1 1 Press station 1 STATION 1 DIAL MODE 2 Press SET Example NAME SAM LEE STORE PRESS SET 3 Press SET Example S01 134567 For stations 2 and 3 1 Press the desired station key 2 Press SET For stations 4 6 1 Press LOWER then press the desired station key 2 Press SET For navigator directory 1 Press or Example NAME SAM LEE STORE PRESS SET 2 Press SET Example NO 134567 5 Press SET R...

Page 41: ...op of the document guides Note L Do not open the document cover when sending a fax with the auto document feeder To select the resolution Select the desired resolution according to the type of document STANDARD For printed or typewritten originals with normal sized characters FINE For originals with small printing SUPER FINE For originals with very small printing This setting only works with other...

Page 42: ...x number 3 Press FAX START L The document will be fed into the unit and scanned into memory The unit will then transmit the data If the document exceeds the memory capacity sending will be canceled and this feature will be turned off automatically Transmit the entire document manually To stop transmission Press STOP Sending report for confirmation This report will provide you with a printed record...

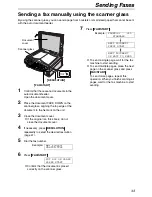
Page 43: ...ument cover 4 If necessary press RESOLUTION repeatedly to select the desired resolution page 41 5 Dial the fax number Example TEL 5678901 6 Press FAX START PUT DOC ON GLASS PRESS START L Confirm that the document is placed correctly on the scanner glass 7 Press FAX START Example PAGES 01 01 STANDARD u NEXT DOCUMENT PRESS START b NEXT DOCUMENT OR WAIT TO SEND L To send a single page wait for the fa...

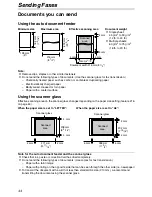
Page 44: ...t send the following types of documents Use copies for fax transmission Paper with a faint image Paper with printing on the opposite side that can be seen through the other side i e newspaper L To transmit the document with a width of less than standard A4 size 210 mm we recommend transmitting the document using the scanner glass Minimum size Maximum size Effective scanning area Document weight L ...

Page 45: ...d the unit grasps the document STANDARD 3 If necessary press RESOLUTION repeatedly to select the desired resolution page 41 4 Enter the fax number Using stations 1 3 Press the desired station key Using stations 4 6 Press LOWER then press the desired station key Using navigator directory Press or then press or to display the desired entry and press SET L If the desired name has not been stored in n...

Page 46: ...nning all pages wait for the fax machine to start sending Fax auto redial If the line is busy or if there is no answer the unit will automatically redial the number up to 2 times L This feature is also available for delayed transmission feature 25 on page 61 L During redial the following will be displayed WAITING REDIAL L To cancel redialing press STOP If your unit does not send a fax L Confirm th...

Page 47: ...TATION 1 DIAL MODE 3 Press or until the following is displayed STATION 1 BROADCAST 4 Press SET DIR 00 NAVI SET 5 Program entries Using stations 2 and 3 Press the desired station key Example DIR ANN 01 STORE PRESS SET Using stations 4 6 Press LOWER then press the desired station key Using navigator directory Press or until the desired entry is displayed and press SET 6 Press SET after programming a...

Page 48: ... To add other entries repeat steps 5 and 6 up to 20 entries 7 Press STOP to exit the program Erasing a stored entry in the broadcast memory 1 Press DIRECTORY 2 Press or until the following is displayed BROADCAST b SEND PRESS SET EDIT PRESS MENU 3 Press MENU BROADCAST ADD DELETE 4 Press 5 Press or until the desired entry you want to erase is displayed L Navigator Example Dick 13281432968 L To cance...

Page 49: ...with the auto document feeder L If you select FINE SUPER FINE or PHOTO resolution the number of pages that the unit can transmit will decrease L If the document exceeds the memory capacity sending will be canceled L If one of the entries is busy or does not answer it will be skipped All skipped entries will be redialed up to 2 times after all of the other entries have been called To send the same ...

Page 50: ...e document is placed on the scanner glass 4 Press FAX START Example PAGES 01 01 STANDARD u NEXT DOCUMENT PRESS START b NEXT DOCUMENT OR WAIT TO SEND L To send a single page wait for the fax machine to start sending L To send multiple pages place the next page on the scanner glass and press FAX START To send more pages repeat this operation When you finish scanning all pages wait for the fax machin...

Page 51: ... handset to answer the call 2 When document reception is required a fax calling tone slow beep is heard or no sound is heard press FAX START CONNECTING 3 Replace the handset L The unit will start fax reception Note L If you do not answer the call within 10 rings the unit will temporarily switch to fax reception The other party can then send a fax To stop receiving Press STOP STOP FAX START RECEIVE...

Page 52: ...following is displayed L The display will show the number of rings before the unit answers a call in FAX ONLY mode 2 Press or to change the ring setting to 2 and press SET How to receive calls Just leave it When receiving calls the unit will automatically answer all calls and only receive fax documents RECEIVE MODE SET FAX TEL FAX ONLY MODE 3 RINGS ...

Page 53: ...r a fax the fax machine will automatically start fax reception This service is convenient if you wish to have a different number for fax in a single telephone line To use this service you must subscribe to the Distinctive Ring service of your local telephone company Activating the Distinctive Ring feature 1 Press MENU SYSTEM SET UP PRESS NAVI 2 Press then 3 1 DISTINCTIVE RING MODE OFF 3 Press or t...

Page 54: ...MENU SYSTEM SET UP PRESS NAVI 2 Press then 3 2 FAX RING PATTERN RING B D 3 Press or to select the ring pattern assigned for fax A Standard ring one long ring B Double ring two short rings C Triple ring short long short rings D Other triple ring short short long rings B D default setting For the ring pattern of B C and D 4 Press SET 5 Press MENU Telephone number Ring pattern Use 012 1234 Standard r...

Page 55: ...with the auto document feeder To select the resolution Select the desired resolution according to the type of document FINE For printed or typewritten originals with small printing SUPER FINE For originals with very small printing PHOTO For originals containing photographs shaded drawings etc L If you select STANDARD copying will be done using FINE mode Quick scan feature This feature is helpful w...

Page 56: ...thick book do not close the document cover 3 If necessary press RESOLUTION repeatedly to select the desired resolution 4 Press COPY NUMBER 1 COPY PRESS START b NUMBER 1 OR PRESS NAVI L If necessary enter the number of copies up to 99 5 Press START L The unit will start copying Note L To make a clear copy from transparencies place a blank sheet of paper on the top of the transparency and leave the ...

Page 57: ...or 72 then press START L See the following table for the recommended reduction rates Letter 216 mm 279 mm 81 2 11 Legal 216 mm 356 mm 81 2 14 A4 210 mm 297 mm 81 4 1111 16 L Legal sized document is available only when using the auto document feeder Example 72 reduced copy Note L If the appropriate reduction rate is not selected the document may be divided and the top of the second sheet will be de...

Page 58: ...S 01 01 FINE u NEXT DOCUMENT PRESS START b NEXT DOCUMENT OR WAIT TO COPY L To copy a single page wait for the fax machine to start copying L To copy multiple pages place the next page on the scanner glass and press START To copy more pages repeat this operation When you finish scanning all pages wait for the fax machine to start copying Example Making 2 copies of a 4 page original document Note L ...

Page 59: ...SET 3 Press or until the desired feature is displayed L The current setting of the feature will be displayed 3 Press or until the desired setting is displayed L This step may be slightly different depending on the feature 4 Press SET L The setting you selected is set and the next feature will be displayed 5 To exit programming press MENU Programming by entering the program code number directly You...

Page 60: ...t 4 and 5 EXT TAM If you are using the unit with an answering machine set to 5 EXT TAM Code 12 Securing the remote operation for the answering machine REMOTE TAM ACT MODE OFF If you are using the unit with an answering machine activate this feature and program the remote activation ID to secure the remote operation for the answering machine 1 Follow steps 1 and 2 on page 59 2 Press or to select ON...

Page 61: ...set up to 24 hours in advance of the desired time To send a document 1 Insert the document into the auto document feeder 2 Follow steps 1 and 2 on page 59 3 Press or to select ON 4 Press SET 5 Enter the fax number 6 Press SET 7 Enter the transmission start time L Press to select AM or PM 8 Press SET 9 Press MENU L To cancel after programming press STOP then SET Code 26 Setting the Caller ID list t...

Page 62: ...If you use an extension telephone and wish to use it to receive a fax activate this feature and program the activation code 1 Follow steps 1 and 2 on page 59 2 Press or to select ON 3 Press SET 4 Enter your code from 2 to 4 digits using 0 9 and L The default code is 9 L Do not enter 0000 5 Press SET 6 Press MENU Code 44 Setting the memory reception alert RECEIVE ALERT MODE ON To alert you with a b...

Page 63: ...L If the ring back tone continues the other party s machine may not be a facsimile or may have run out of paper Check with the other party L The connecting tone volume cannot be adjusted ON default You will hear connecting tones OFF Deactivates this feature Code 80 Resetting advanced features to their default settings SET DEFAULT RESET NO To reset the advanced features 1 Press MENU 2 Press then 8 ...

Page 64: ...d document page 73 ERROR NOT YOUR UNIT Code 54 59 70 L A transmission or reception error occurred because of a problem with the other party s fax machine Check with the other party MEMORY FULL L The document was not received as a result of the memory being full NO DOCUMENT L The document was not fed into the unit properly Reinsert the document and try again OTHER FAX NOT RESPONDING L The other par...

Page 65: ...d or the unit has run out of paper Install paper and press SET to clear the message L The recording paper was not fed into the unit properly page 72 Reinstall paper page 14 and press SET to clear the message L The recording paper has jammed near the recording paper entrance Clear the jammed paper page 70 and press SET to clear the message Do not install folded or heavily curled paper CLOSE ADF COV...

Page 66: ...ilm with a new one page 11 L The ink film is not installed Install it page 11 L The ink film is slack Tighten it page 12 L The fax machine is positioned near appliances such as TVs or speakers which generate an intense magnetic field PAPER JAMMED L A recording paper jam occurred Clear the jammed paper page 70 PLEASE WAIT L The unit is checking that there is no slack on the ink film Wait for a mome...

Page 67: ...3 The REDIAL PAUSE button does not function properly L If this button is pressed during dialing a pause will be inserted If pressed immediately after a dial tone is obtained the last number dialed will be redialed During programming I cannot enter the code or ID number L All or part of the numbers are the same Change the number of features 12 page 60 and 41 page 62 The ink film runs out quickly L ...

Page 68: ... white line or a smudge appears on your recording paper L The thermal head is dirty Clean it page 76 The printing quality is poor Note Please do not reuse the ink film Replace with Model No KX FA94 replacement film Refer to page 6 for further details L The other party sent a faint document Ask them to send a clearer copy of the document L The thermal head is dirty Clean it page 76 L Some paper has...

Page 69: ...rrectly Program the same code that is programmed on the answering machine on the fax machine with feature 12 page 60 I pressed the remote access code to access the answering machine remotely but the line was disconnected L The code may include which is used for certain features provided by telephone companies Change the code on the answering machine to another number which does not include Also ch...

Page 70: ...2 Press down the printer cover open button 1 Open the printer cover 2 3 Remove the jammed paper carefully by pulling it toward you When the recording paper has jammed under the roller When the recording paper has jammed and wrapped around the roller When the recording paper has jammed near the exit guide Paper stacker Ejected paper Printer cover Printer cover open button 1 2 Jammed paper Roller Ja...

Page 71: ...e blue core at least once 5 Close the printer cover by pushing down on both sides until locked 6 Remove the recording paper and straighten Pull the tension plate forward and hold open while inserting the paper Gear of blue core Ink film Slack Reverse The ink film is not wrapped around the blue core Incorrect Tight 1 turn Correct Blue core Printer cover Tension plate ...

Page 72: ...n the recording paper was not fed into the unit properly The display will show the following CHECK PAPER Remove the recording paper and straighten Pull the tension plate forward and hold open while inserting paper Press SET to clear the message Tension plate SET ...

Page 73: ...emove the jammed document carefully L Do not pull out the jammed document forcibly before lifting the ADF cover L If you cannot remove the jammed document open the document cover remove the document then close the document cover 2 Close the ADF cover Jammed document ADF cover Document cover Jammed document ADF cover ...

Page 74: ...r glass 1 Open the document cover Clean the white plate and scanner glass with a soft and dry cloth 2 Close the document cover Attaching the white sheet to the document cover If the white sheet is detached from the document cover when cleaning place the white sheet on the scanner glass with fastener facing up aligning the top edge of the white sheet to the t mark on the unit and close the document...

Page 75: ...ument feeder rollers If misfeeding of your original occurs frequently clean the document feeder rollers 1 Lift and hold open the ADF cover 2 Clean the document feeder rollers with a soft and dry cloth 3 Close the ADF cover ADF cover Document feeder rollers ADF cover ...

Page 76: ...and the telephone line cord 3 Press down the printer cover open button 1 Open the printer cover 2 4 Remove the ink film and clean the thermal head with a cloth moistened with isopropyl rubbing alcohol and let it dry thoroughly Replace the ink film Caution L L L L To prevent a malfunction due to static electricity do not use a dry cloth and do not touch the thermal head directly 5 Turn the gear of ...

Page 77: ... 1 lower the exit guide to unlock the two locks 2 and open the exit guide 3 7 Clean the roller shaft with a cloth moistened with isopropyl rubbing alcohol and let it dry thoroughly Slack Reverse The ink film is not wrapped around the blue core Incorrect Tight 1 turn Correct Blue core 2 1 2 2 1 1 3 Exit guide Lock Exit guide Lock Exit guide Roller shaft ...

Page 78: ...assistance call 1 800 435 7329 8 Close the exit guide 9 Close the printer cover by pushing down on both sides until locked 10Connect the power cord and the telephone line cord Exit guide Printer cover Power cord Telephone line cord ...

Page 79: ...r unit If the test print has a smudge or blurred points or lines clean the thermal head page 76 Broadcast programming list provides you with entries which are stored in the broadcast feature page 47 Caller ID list keeps records of the last 30 callers after subscribing to a Caller ID service This report will be printed automatically after every 30 callers feature 26 on page 61 1 Press MENU repeated...

Page 80: ...TION OF ANY KIND ON BEHALF OF OPENLCR L If you subscribe to openLCR service the unit will start the first download of the rate table to your fax machine and the Caller IQ feature will be automatically turned on The CALLER IQ indicator will stay on No special dialing or button pressing is necessary to place a long distance call with the Caller IQ feature If you do not wish to use the Caller IQ feat...

Page 81: ...ng may be a long distance call and will take about 1 2 minutes You will be charged for the cost of the call L When the download is completed the CALLER IQ indicator will stop flashing but will remain lit up and the display will show the following DOWNLOAD OK L If the display shows the following the unit was unable to download from openLCR DOWNLOAD ERROR TRY AGAIN Try downloading manually again L I...

Page 82: ...wnloading from web If you access openLCR web site at www openLCR com and program the system setup and telephone directory you will need to download this data to the fax machine 1 Press CALLER IQ CALLER IQ PRESS NAVI 2 Press or until the following is displayed or press 3 DATA FROM WEB PRESS SET 3 Press SET DOWNLOAD IN PROCESS u DOWNLOAD OK CALLER IQ SET ...

Page 83: ...lution 7 7 lines mm 196 lines inch in fine photo resolution 15 4 lines mm 392 lines inch in super fine resolution Photo resolution 64 level Scanner type Contact Image Sensor Printer type Thermal Transfer on plain paper Data compression system Modified Huffman MH Modified READ MR Modem speed 9 600 7 200 4 800 2 400 bps Automatic Fallback Operating environment 5 C 35 C 41 F 95 F 20 80 RH Relative Hu...

Page 84: ...ide of the paper if you are not happy with the print quality or if misfeeding occurs L For proper feeding and best print quality we recommend using long grained paper L Do not use paper of different types or thickness at the same time This may cause a paper jam L Avoid double sided printing L Do not use paper printed from this unit for double sided printing with other copiers or printers This may ...

Page 85: ...to maintain uninterrupted service CAUTION Any changes or modifications not expressly approved by the party responsible for compliance could void the user s authority to operate this device When programming emergency numbers and or making test calls to emergency numbers 1 Remain on the line and briefly explain to the dispatcher the reason for the call before hanging up 2 Perform such activities in ...

Page 86: ...ed for warranty service Carry In or Mail In Service For Carry In or Mail In Service in the United States call 1 800 HELP FAX 1 800 435 7329 For assistance in Puerto Rico call Panasonic Sales Company 787 750 4300 or fax 787 768 2910 Limited Warranty Limits And Exclusions This warranty ONLY COVERS failures due to defects in materials or workmanship and DOES NOT COVER normal wear and tear or cosmetic...

Page 87: ...PARTS AND SERVICE WHICH ARE NOT COVERED BY THIS LIMITED WARRANTY ARE YOUR RESPONSIBILITY For product service Call toll free 1 800 HELP FAX 1 800 435 7329 for the location of an authorized servicenter For out of warranty technical support After the warranty has expired please contact our Continued Services Technical Support Line at 1 900 555 PANA 1 900 555 7262 for support on a fee basis When you s...

Page 88: ...ed please contact 1 900 555 PANA 1 900 555 7262 for support on a fee basis Web Site www panasonic com for customers in the USA or Puerto Rico ONLY You can purchase parts accessories or locate your nearest servicenter by visiting our Web Site Service in Puerto Rico Matsushita Electric of Puerto Rico Inc Panasonic Sales Company Factory Servicenter Ave 65 de Infantería Km 9 5 San Gabriel Industrial P...

Page 89: ...ize 60 17 Ringer pattern 27 60 Advanced features 22 Journal report 42 61 23 Overseas mode 61 25 Delayed transmission 61 26 Caller ID list 61 31 Distinctive Ring 53 32 Ring pattern 54 34 Quick scan 61 36 Receiving reduction 62 39 Display contrast 62 40 Silent detection 62 41 Remote fax activation code 62 44 Fax receiving alert 62 46 Friendly reception 62 76 Connecting tone 63 80 Reset advanced feat...

Page 90: ...messages 64 65 F Fax activation code Feature 41 62 Fax auto redial 46 Fax number Feature 03 31 60 Fax receiving 51 Friendly reception Feature 46 62 H Help 26 I Ink film 11 J Jams Document 73 Paper 70 72 Journal report Feature 22 42 61 L Logo Feature 02 29 60 N Navigator directory Making a phone call 36 Selecting characters 30 Sending faxes 45 Storing 33 O One touch dial Sending faxes 45 Storing 32...

Page 91: ...49 From memory 42 Manually 41 Navigator directory 45 One touch dial 45 Sending report Feature 04 42 60 Set default Feature 80 63 Shipping lock 10 Silent detection Feature 40 62 Storing Broadcast 47 Navigator directory 33 One touch dial 32 V Volume 27 ...

Page 92: ...ed product Any unit that is replaced by Panasonic and not shipped with proper proof of purchase by you will be subject to a minimum 100 00 charge The original unit must be properly packaged in the same manner as the replacement unit utilizing the packing materials provided Damage due to improper or inadequate packing will be charged to you as an out of warranty cost If our 1 800 HELP FAX technicia...

Reviews: