background image

4. Telephone

18

4 Telephone

Making and Answering Calls

4.1 Making phone calls

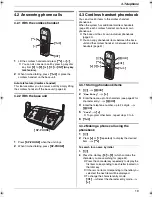
4.1.1 With the cordless handset

1

Lift the cordless handset and press 

{C}

.

L

To make hands-free phone calls, press 

{s}

.

2

Dial the telephone number.

3

To hang up, press 

{ih}

 or place the cordless 

handset on the base unit.

Note:

L

While talking using 

{C}

, you can switch to a hands-

free phone conversation by pressing 

{s}

. To switch 

back, press 

{C}

.

To mute your conversation

When the call is muted, you will be able to hear the other 
party but the other party will not be able to hear you.

Press 

{

C/

T

}

.

L

To release the mute, press 

{

C/

T

}

.

To redial the last number dialled from the cordless 
handset

Press 

{C}

 or 

{s}

i


{R}

To redial using the redial list (Memory redial)

The last 10 phone numbers dialled from the cordless 
handset are stored in the redial list.

1.

{R}

2.

Press 

{^}

 or 

{V}

 to select the desired number.

3.

{C}

 or 

{s}

To erase numbers in the redial list

1.

{R}

2.

Press 

{^}

 or 

{V}

 repeatedly to select the desired 

number. 

i


{

>

}

3. “

Erase


i


{

>

}

4. “

Yes


i


{

>

}


i


{ih}

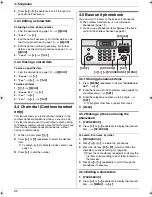
4.1.2 With the base unit

1

{

SP-PHONE

}

2

Dial the telephone number.

3

When finished talking, press 

{

SP-PHONE

}

.

Note:

L

To switch to the cordless handset while using the 
base unit speakerphone:

If on the base unit, just lift up.

To redial the last number dialled from the base unit

Press 

{

SP-PHONE

}

i


{

REDIAL

}

L

If the line is busy, the unit will automatically redial the 
number 2 or more times. While the base unit is 
redialling, mute is automatically turned ON. 

To mute your conversation

When the call is muted, you will be able to hear the other 
party but the other party will not be able to hear you.

Press 

{

MUTE

}

.

L

To release the mute, press 

{

MUTE

}

.

{^}{V}{

>

}

{C}

{s}

{ih}

{R}

{

C/

T

}

{

REDIAL

}

{

SP-PHONE

}

{

MUTE

}

FC966FX-PFQX2677ZA-en.book  Page 18  Tuesday, November 14, 2006  9:03 AM

Summary of Contents for KX-FC966FX

Page 1: ...e using the unit and save for future reference This unit is compatible with Caller ID To use this feature you must subscribe to the appropriate service of your service provider Thermal FAX with DECT Operating Instructions Model No KX FC966FX Charge the battery for about 7 hours before initial use ...

Page 2: ...1 Caller ID 4 7 Caller ID service 22 4 8 Viewing and calling back 23 4 9 Editing a caller s telephone number before calling back 23 4 10 Erasing caller information 24 4 11 Storing caller information into the phonebook one touch dial 24 5 Fax Sending Faxes 5 1 Sending a fax manually 25 5 2 Documents you can send 25 5 3 Sending a fax using the base unit phonebook one touch dial 26 5 4 Broadcast tran...

Page 3: ...rk check here 57 12 Maintenance Jams 12 1 Recording paper jams 63 12 2 Document jams sending 63 Cleaning 12 3 Document feeder scanner glass cleaning 64 12 4 Thermal head cleaning 64 13 General Information Printed Reports 13 1 Reference lists and reports Base unit only 65 Specifications 13 2 Specifications 66 User record 13 3 User record 68 14 Index 14 1 Index 69 ...

Page 4: ... roll with 25 mm core Rechargeable batteries 2 Model No Part No P03P 2 rechargeable nickel metal hydride Ni MH batteries AAA R03 size Additional digital cordless handset Model No Part No KX TGA711FX Belt clip Model No Part No KX TCA718EX DECT repeater Model No Part No KX A272 1 Use only the included or specified recording paper Using other recording paper may affect print quality and or cause exce...

Page 5: ...ndset cover Connections and Setup 1 4 Connections Important L The unit will not function when there is a power failure To make calls in emergency situations you should connect a telephone that can function during a power failure to the telephone line 1 4 1 Base unit Caution L When you operate this product the power outlet should be near the product and easily accessible L Be sure to use the teleph...

Page 6: ...ry performance is reached after a few complete cycles of charge discharge use L Actual battery performance depends on a combination of how often the cordless handset is in use and how often it is not in use standby L Battery operating time may be shortened over time depending on usage conditions and ambient temperature L Even after the cordless handset is fully charged the cordless handset can be ...

Page 7: ...r roll E Close the top cover securely by pushing down on both sides F Press FAX START to cut the paper Correct Incorrect 1 1 Note L If the paper is secured with glue or tape cut approximately 15 cm from the beginning of the roll before installing it L When the power cord is connected a message is printed each time the top cover is opened then closed If the recording paper is installed upside down ...

Page 8: ...e a copy Press COPY L For further details to send a fax see page 25 For further details to make a copy see page 34 1 9 Fax receiving A Lift the cordless handset and press C or press SP PHONE on the base unit to answer the call B To receive a fax document press FAX START L For further details see page 30 L You can select how you want the unit to receive calls according to your needs page 28 1 COPY ...

Page 9: ...o stop recording press STOP L For further details see page 35 1 10 2 Listening to recorded messages The display will show the total number of recorded messages When the AUTO ANSWER indicator flashes Press PLAYBACK New messages will be played When the AUTO ANSWER indicator is ON Press PLAYBACK All messages will be played L For further details see page 36 SET MIC STOP RECORD PLAYBACK AUTO ANSWER ...

Page 10: ...n authorised service centre E If the unit has been dropped or physically damaged F If the unit exhibits a distinct change in performance 14 During thunderstorms avoid using telephones except cordless types There may be a remote risk of an electric shock from lightning 15 Do not use this unit to report a gas leak when in the vicinity of the leak CAUTION Installation L Never install telephone wiring...

Page 11: ... European Union If you wish to discard this product please contact your local authorities or dealer and ask for the correct method of disposal 2 3 For best performance Location and noise The base unit and cordless handset use radio waves to communicate with each other For maximum distance and noise free operation we recommend the following L Placing the unit away from electrical appliances such as...

Page 12: ...auto answer setting ON OFF page 30 31 J Station keys L To use one touch dial feature page 21 K FAX START L To start sending or receiving a fax L COPY L To copy a document page 34 M MIC Microphone L The built in microphone N TONE L To change from pulse to tone temporarily during dialling when your line has rotary pulse services You can also use tone dial service by changing feature 13 on page 41 O ...

Page 13: ...n or programming I C T Clear Mute L To mute your voice during a conversation Press again to resume the conversation L To erase a character number page 52 Press and hold to erase all characters numbers J INT Intercom L To page or locate the base unit or another cordless handset page 49 3 3 Display descriptions of the cordless handset Display icons E F D C I J H B A G Display icon Meaning w Within r...

Page 14: ...cker L The paper stacker may not be shown in all illustrations in these operating instructions 4 Document feeder tray 5 Antenna 6 Top cover 7 Microphone 8 Document exit 9 Document entrance j Top cover release button 9 j 1 2 4 3 5 7 8 6 1 Charge indicator Ringer indicator Message indicator 2 Receiver 3 Microphone 4 Speaker 1 2 3 4 ...

Page 15: ... volume While using the receiver press or V Speaker volume While using the speakerphone press or V 3 6 Adjusting base unit volume Ringer volume While the unit is idle press A or B L If any documents are in the document entrance you cannot adjust the volume Confirm that there are no documents in the entrance To turn the ringer OFF Press B repeatedly to display RINGER OFF OK i SET L When a call is r...

Page 16: ...te Time i 4 Enter the current date month year hour minute by selecting 2 digits for each Example 10 August 2006 10 15 PM 12 hour clock format 1 Press 1 0 0 8 0 6 1 0 1 5 2 Press repeatedly to select PM 5 j OK 6 Press ih to exit To correct a mistake Press or to move the cursor to the incorrect number and make the correction 3 7 2 With the base unit 1 MENU i 0 1 i SET D 01 M 01 Y 06 TIME 00 00 2 Ent...

Page 17: ... the incorrect character and make the correction L To erase all of the characters press and hold STOP 3 9 Your fax number Your fax number will be printed on the top of each page sent from your unit 1 MENU i 0 3 i SET NO 2 Enter your fax number up to 20 digits L To enter a press L To enter a space press L To enter a hyphen press R L To erase a number press STOP 3 SET 4 Press MENU to exit To correct...

Page 18: ... 10 phone numbers dialled from the cordless handset are stored in the redial list 1 R 2 Press or V to select the desired number 3 C or s To erase numbers in the redial list 1 R 2 Press or V repeatedly to select the desired number i 3 Erase i 4 Yes i i ih 4 1 2 With the base unit 1 SP PHONE 2 Dial the telephone number 3 When finished talking press SP PHONE Note L To switch to the cordless handset w...

Page 19: ...e unit has its own individual phonebook page 20 L You can copy phonebook items between the base unit and the cordless handset or between 2 cordless handsets page 51 4 3 1 Storing phonebook items 1 k i j OK 2 New Entry i 3 Enter the name up to 16 characters see page 52 for character entry i j OK 4 Enter the telephone number up to 24 digits i j OK 5 Save i L To program other items repeat steps 3 to ...

Page 20: ...rch by first character index search see page 19 3 Press to dial the number 4 5 Base unit phonebook You can store 100 items to the base unit phonebook L The cordless handset has its own individual phonebook page 19 L You can copy phonebook items between the base unit and the cordless handset page 50 4 5 1 Storing phonebook items 1 Press MENU repeatedly to display PHONEBOOK SET i 2 Enter the name up...

Page 21: ...to select DIAL MODE i SET For stations 2 5 Press one of the station keys For stations 6 10 Press LOWER then press one of the station keys 3 Enter the name up to 16 characters see page 52 for character entry i SET 4 Enter the telephone number up to 24 digits i SET L To program other items repeat steps 2 to 4 5 STOP 4 6 2 Making phone calls using the one touch dial 1 SP PHONE 2 Select the desired st...

Page 22: ...ny 4 7 1 How Caller ID is displayed The calling party s name or telephone number will be displayed You have the option of whether or not to answer the call The unit will automatically store caller information name telephone number date and time of the call of the 50 most recent callers Caller information is stored by the most recent to the oldest call Caller information can be viewed on the displa...

Page 23: ... 20 Jul 11 20 L A Q on the display means the item has already been viewed or answered even if it was viewed or answered using a cordless handset Display while viewing L When the unit could not receive a name the display will show NO NAME RCVD L When no calls have been received the display will show MEMORY EMPTY To stop viewing Press ih on the cordless handset or STOP on the base unit 4 9 Editing a...

Page 24: ... 4 11 1 Into the cordless handset 1 j OK i Caller List i 2 Press or V repeatedly to display the desired item i j OK 3 Add Phonebook i 4 If a name is required enter the name up to 16 characters see page 52 for character entry i j OK 5 Enter the telephone number up to 24 digits i j OK 6 Save i i ih 4 11 2 Into the base unit 1 CALLER ID 2 Press A or B repeatedly to display the desired item 3 MENU i L...

Page 25: ...d during feeding it will be effective from the next page To redial the last number REDIAL i FAX START L If the line is busy the unit will automatically redial the number 2 or more times L To cancel redialling press STOP To send more than 10 pages at a time Insert the first 10 pages of the document Add the other pages up to 10 at a time on top of the previously inserted pages before the last page f...

Page 26: ...ne numbers into the base unit phonebook page 20 or one touch dial page 21 1 Open the document feeder tray 1 then adjust the width of the document guides 2 to fit the actual size of the document 2 Insert the document up to 10 pages FACE DOWN until a single beep is heard and the unit grasps the document L If the document guides are not adjusted to fit the document re adjust them 3 If necessary press...

Page 27: ...AST i MENU i 3 Press A or B repeatedly to display the desired item you want to erase L To cancel erasing press STOP 4 SET i SET i STOP 5 4 4 Sending the same document to pre programmed parties 1 Insert the document FACE DOWN 2 If necessary press A or B repeatedly to select the desired resolution page 25 i BROADCAST i FAX START L After transmission the unit will automatically print a report Broadca...

Page 28: ...x automatically 5 5 2 Use only as a fax FAX ONLY mode Your situation You have a separate telephone line just for faxes Setup Set the fax machine to FAX ONLY mode page 32 by pressing AUTO ANSWER repeatedly L The AUTO ANSWER indicator on the base unit turns ON and r appears on the cordless handset display Note L Make sure feature 77 is set to FAX ONLY beforehand page 44 How faxes are received All in...

Page 29: ... 73 is set to TEL FAX beforehand page 44 How phone calls and faxes are received If the call is a phone call the fax machine will ring If a fax calling tone is detected the fax machine will receive the fax automatically without ringing ...

Page 30: ...press i L You can also press FAX START on the base unit 4 Press ih or place the cordless handset on the base unit How to receive faxes with an extension telephone 1 When the extension telephone rings lift the handset of the extension telephone 2 When document reception is required a fax calling tone slow beep is heard or no sound is heard press 9 default fax activation code firmly 3 Replace the ha...

Page 31: ...me fax machines do not generate fax calling tones when sending faxes therefore the unit will try to receive a fax even if no fax calling tone is detected Note L The auto disconnection code can be changed in feature 49 on page 43 L Even when you answer a call with the extension telephone and press the auto disconnection code the fax machine may activate the fax function depending on the type of an ...

Page 32: ... without being charged for the call 5 7 2 Activating FAX ONLY mode 1 Make sure feature 77 is set to FAX ONLY page 44 beforehand 2 Press AUTO ANSWER repeatedly to display FAX ONLY MODE L The AUTO ANSWER indicator on the base unit turns ON and r appears on the cordless handset display Activating FAX ONLY mode with the cordless handset 1 j OK i Answer System i 2 Answer On i i ih Note L Make sure feat...

Page 33: ...epeatedly to display the item you wish to prevent the fax reception from i SET 4 Press STOP to exit the program To display the junk fax prohibitor list 1 Press MENU repeatedly to display JUNK FAX PROH 2 Press repeatedly to display JUNK LIST DISP i SET 3 Press A or B to display the item 4 Press MENU to exit the program To print the junk fax prohibitor list 1 Press MENU repeatedly to display JUNK FA...

Page 34: ... will be done using FINE mode 4 COPY L The unit will start copying Note L When you copy a multiple page document which is longer than A4 size paper approx 300 mm we recommend you insert one page at a time L Any document which can be sent as a fax can also be copied page 25 L The copied recording paper comes out somewhat longer than the document size To select the resolution Select the desired reso...

Page 35: ...greeting message to press 9 before starting the fax transmission If you change the setting from 60 seconds to 16 seconds your current greeting message will be deleted The pre recorded greeting message will be played when a call is received L If you change the maximum recording time of incoming messages to GREETING ONLY page 38 feature 10 on page 41 the unit will answer a call with your current gre...

Page 36: ... the next message Voice time day stamp During playback the unit will announce the day of the week and time that each message was recorded If you subscribe to Caller ID service During playback you can call back the displayed name or number using the base unit 1 Press MENU during playback L The base unit stops playback L If you do not need to edit the telephone number skip to step 3 2 Edit the telep...

Page 37: ...e played To skip a message Press to play the next message To stop playback Press 9 If you subscribe to Caller ID service During playback you can call back the displayed name or number using the cordless handset 1 Press j OK during playback 2 Call Back i Note To edit the number before calling back 1 Press j OK during playback 2 Edit and Call i 3 Edit the number i C or s 7 4 3 Erasing recorded messa...

Page 38: ... screen the incoming call To hear an incoming call from the speaker when the answering machine is recording the message 1 j OK i Answer System i 2 Settings i 3 Call Screening i 4 On or Off i i ih Note L You can also program this feature with the base unit feature 67 on page 43 7 5 Operating from a remote location Important L Program the remote operation ID beforehand page 38 or feature 11 on page ...

Page 39: ...Enter the remote operation ID page 38 feature 11 on page 41 within 10 seconds L The receiving mode will be set to TAM FAX or FAX ONLY mode depending on the setting of feature 77 page 44 3 Hang up the handset Note L You cannot turn ON the auto answer setting when the unit is set to TEL FAX mode Key Remote command 1 Repeats a message during playback 1 2 Skips a message during playback 4 Plays new me...

Page 40: ...age 17 for details Setting your fax number 0 3 Enter your fax number using the dial keypad See page 17 for details Printing a sending report 0 4 0 OFF Sending reports will not be printed 1 ON A sending report will be printed after every fax transmission 2 ERROR default A sending report will be printed only when a fax transmission fails Changing the ring count in FAX ONLY mode 0 6 1 1 2 2 default 3...

Page 41: ...is changed using the base unit the setting for the cordless handset will also be changed and vice versa 2 This setting can be changed individually for the base unit and the cordless handset To set the cordless handset ringtone for outside calls see page 46 Feature Code Selection Setting the journal report to print automatically 2 2 0 OFF The unit will not print a journal report but will keep a rec...

Page 42: ...ion for the last 50 callers 1 ON The Caller ID list will be printed automatically each time the base unit logs 50 callers page 22 Receiving oversized documents 3 6 To slightly reduce the received fax image when printing so that the received document will be approximately the same length as the original document 0 OFF Deactivates this feature The received fax image will be printed at the same size ...

Page 43: ... 4 9 2 Press 1 to select ON i SET 3 Enter your code from 2 to 4 digits using 0 9 and L The default code is 0 4 SET i MENU Changing the greeting message time for TAM FAX 5 4 1 16s default Maximum greeting message time is 16 seconds 2 60s Maximum greeting message time is 60 seconds See page 35 for details Setting the print contrast 5 7 To adjust the darkness of received or copied documents 1 NORMAL ...

Page 44: ...faxes this feature allows you to hear connecting tones fax tone ring back tone and busy tone You can use those tones to confirm the status of the other party s machine 0 OFF Deactivates this feature 1 ON default You will hear connecting tones Note L If the ring back tone continues the other party s machine may not be a fax machine or may have run out of paper Check with the other party L The conne...

Page 45: ...ENU i 8 0 2 Press 1 to select YES i SET i SET 1 When this setting is changed using the base unit the setting for the cordless handset will also be changed and vice versa 2 This setting can be changed individually for the base unit and the cordless handset To set the cordless handset LCD display contrast see page 46 Feature Code Selection ...

Page 46: ...cordless handset the setting for the base unit will also be changed and vice versa 2 This setting can be changed individually for the base unit and the cordless handset To set the base unit ringer volume see page 15 To set the base unit ringtone for outside calls see feature 17 on page 41 To set the base unit LCD display contrast see feature 39 on page 42 3 If you select one of the melody ringtone...

Page 47: ...nstruction in the rightmost column of the chart L To exit the operation press ih 1 If you change the PIN please make note of your new PIN The unit will not reveal the PIN to you 2 If you forget your PIN consult your nearest Panasonic service centre Base unit settings menu Sub menu Feature default setting Call Options Call Restrict page 48 Other Options Base Unit PIN Change base unit PIN 0000 1 Ent...

Page 48: ...lling certain numbers You can assign up to 6 phone numbers to be restricted and select which cordless handsets base unit will be restricted Storing area codes here will prevent the restricted cordless handsets base unit from dialling any phone number in that area code 1 j OK i Base Unit Setup i 2 Call Options i 3 Call Restrict i 4 Enter 0000 default base unit PIN L If you forget your PIN contact o...

Page 49: ...rdless handset for about 7 hours before initial use 9 2 1 Cancelling a cordless handset A maximum of 6 cordless handsets can be registered to a base unit A cordless handset can cancel its own registration or the registration of another cordless handset that is stored in the base unit This will allow the base unit to forget the cordless handset 1 j OK i Base Unit Setup i 2 Enter 335 3 Cancel Handse...

Page 50: ...dset To page the base unit press 0 To page another cordless handset press the desired cordless handset number 3 Base unit Press SP PHONE to answer the page Another cordless handset Press C or s to answer the page 4 Cordless handset To complete the transfer press ih To establish a conference call press 3 Transferring a call without speaking to the base unit user other cordless handset user After st...

Page 51: ...j OK 2 Copy All i 3 To copy to the base unit press 0 To copy to another cordless handset press the desired cordless handset number you wish to send the cordless handset phonebook item to L When all items have been copied Completed is displayed 4 ih 9 5 2 To the cordless handset using the base unit Copying one phonebook item 1 MENU i 5 9 2 Press 1 to display 1 ITEM i SET 3 Enter the cordless handse...

Page 52: ...s or numbers Press to switch between uppercase and lowercase To enter another character located on the same dial key press to move the cursor to the next space then press the appropriate dial key 10 1 1 Character entry modes Several character entry modes can be used when entering text The characters that can be entered depend on the entry mode 10 1 2 Characters available in each character entry mo...

Page 53: ...10 Useful Information 53 Extended 2 character table O L The following are used for both uppercase and lowercase Cyrillic character table P 0 1 2 3 4 6 7 8 9 5 0 1 2 3 4 6 7 8 9 5 ...

Page 54: ...problem with the other party s fax machine Check with the other party JUNK FAX PROH REJECT L The junk fax prohibitor feature of this unit rejected fax reception MEMORY FULL L The memory is full of received documents due to a lack of recording paper or a recording paper jam Install paper page 7 or remove the jammed paper page 63 NO DOCUMENT L The document was not fed into the unit properly Re inser...

Page 55: ... is full of received documents due to a lack of recording paper or a recording paper jam Install paper page 7 or remove the jammed paper page 63 You will lose all faxes in memory if the power is removed Check with power connected L When performing memory transmission the document being stored exceeded the memory capacity of the unit Send the entire document manually MEMORY FULL L The base unit s p...

Page 56: ...ecessary messages page 36 37 Error L Recording was too short Try again Failed L Phonebook copy failed Confirm the destination unit is in standby mode and try again Incomplete L The destination unit s phonebook memory is full Erase the unnecessary phonebook items from the destination unit and try again Memory Full L The cordless handset s phonebook memory is full Erase unnecessary items page 20 You...

Page 57: ...OFF Adjust it page 15 I cannot make calls L You dialled a call restricted number Remove the number from the call restricted list page 48 L The dialling mode setting may be wrong Change the setting feature 13 on page 41 Problem Cause Solution The other party complains they only hear a fax tone and cannot talk L FAX ONLY mode is set Tell the other party the number is only used for faxes L Change the...

Page 58: ... ON page 6 L Check that the power cord is connected properly L The cordless handset has not been registered to the base unit Register the cordless handset page 49 The cordless handset display is blank L The cordless handset is not turned ON Turn the power ON page 6 The cordless handset will not turn ON L Make sure that the batteries are installed correctly page 5 L Fully charge the batteries page ...

Page 59: ...ations from the base unit page 49 L You entered the wrong PIN If you forget your PIN consult your nearest Panasonic service centre L Place the cordless handset and the base unit away from other electrical appliances Problem Cause Solution I cannot send documents L The other party s fax machine is busy or has run out of recording paper Try again L The other party s machine is not a fax machine Chec...

Page 60: ...there may be something wrong with the other party s machine Ask them to send a clearer copy of the document or to check their fax machine Recording paper frequently misfeeds L Clean the document feeder rollers recording paper feeder and rubber flap page 64 Letters on the received document are distorted L If your line has special telephone services such as call waiting the service may have been act...

Page 61: ...rrection fluid etc Clean them page 64 Please do not insert a document before correction fluid has dried completely The copied document is blank L The recording paper is not installed correctly Make sure that the shiny side of the paper is facing down and re install the paper page 7 The copied image is distorted L Adjust the width of the document guides to fit the actual size of the document The pr...

Page 62: ...11 Help 62 L The date and time setting may be lost If the correct date and time is not displayed after the power has been restored set the date and time again page 16 ...

Page 63: ...4 Install the recording paper and close the top cover securely by pushing down on both sides see page 7 for details 12 2 Document jams sending 1 Open the top cover by pressing the top cover release button 1 and remove the jammed document carefully 2 2 Close the top cover securely by pushing down on both sides Note L Do not pull out the jammed paper forcibly before opening top cover 1 2 1 ...

Page 64: ...and the telephone line cord 5 Close the top cover securely by pushing down on both sides 12 4 Thermal head cleaning If smudges or black white lines appear on a copied received document check whether there is dust on the thermal head Clean it to remove the dust 1 Disconnect the power cord and the telephone line cord 2 Open the top cover by pressing the top cover release button 1 and remove the reco...

Page 65: ...UP LIST TEL NO LIST JOURNAL REPORT PRINTER TEST If the test print has smudges or blurred points or lines clean the thermal head page 64 BROADCAST LIST CALLER ID LIST 1 Press MENU repeatedly to display PRINT REPORT 2 Press or repeatedly to display the desired item 3 SET L If you select to print out a list or a report printing will start To stop printing press STOP 4 MENU STOP MENU SET ...

Page 66: ...3 Approx 25 pages of memory transmission Approx 28 pages of memory transmission reception Based on the ITU T No 1 Test Chart in standard resolution with original mode Voice memory capacity 4 Approx 15 minutes of recording time 1 Transmission speed depends upon the contents of the pages resolution telephone line conditions and capability of the other party s machine 2 Transmission speed is based up...

Page 67: ...13 General Information 67 Operating environment 5 C 40 C 20 80 RH Relative Humidity Dimensions Approx height 155 mm width 48 mm depth 34 mm Mass Weight Approx 140 g ...

Page 68: ...Information 68 User record 13 3 User record For your future reference Attach your sales receipt here Date of purchase Serial number found on the rear of the unit Dealer s name and address Dealer s telephone number ...

Page 69: ...1 Making a phone call 20 Sending faxes 26 Storing 20 Basic features 40 Battery Charge 6 Installation 5 Performance 6 Replacement 5 BROADCAST LIST 65 Broadcast transmission 27 Button description Base unit 12 Cordless handset 13 C Caller ID Calling back 23 Storing 24 CALLER ID LIST 22 42 65 Caller s recording time 41 Call restriction 48 Call screening 38 43 Chain dial 20 Character entry 52 Cleaning ...

Page 70: ...er 7 Recording time Incoming message 38 41 TAM FAX greeting 43 Redialling Base unit 18 25 26 Cordless handset 18 Redial list 18 Registration 49 Remote operation 38 Remote operation ID 38 41 Repeater 49 Reports Broadcast programming 65 Broadcast sending 27 Caller ID list 22 42 65 Journal 25 65 Power down 61 Printer test 65 Sending 25 Setup 65 Telephone number 65 Reset Base unit 45 Resolution 25 34 ...

Page 71: ...71 Notes ...
Page 72: ...es Europe a Division of Panasonic Marketing Europe GmbH Panasonic Testing Centre Winsbergring 15 22525 Hamburg Germany Manufacturer Panasonic Communications Malaysia Sdn Bhd PLO No 1 Kawasan Perindustrian Senai KB No 104 81400 Senai Negeri Johor Darul Ta zim Malaysia Global web site http panasonic net Copyright L This material is copyrighted by Panasonic Communications Co Ltd and may be reproduced...

Reviews: